Level Toilet on Tile
Level Toilet on Tile | It’s very important to level a toilet bowl whether it’s on tile, wood or concrete. Photo Credit: Tim Carter
Leveling a Toilet on a Tile Floor
DEAR TIM: I’m about to step outside my comfort zone. This weekend I’ve decided to delve into the depths of toilets. My current toilet is horribly stained and nothing I’ve tried seems to help. Besides, I want one of the newer toilets where the seat is higher up off the floor. That will be a blessing for my older parent who I’m caring for. I’ve never installed a toilet and it appears complex and scary. My home is only thirty years old, so it’s not ancient plumbing. There is a second toilet in the house in case I run into problems. What tips can you share so I succeed? Elizabeth W., Vancouver, BC Canada
DEAR ELIZABETH: Yoda, one of the principal characters in the Star Wars movie series, would be proud of you. His “Do or do not. There is no try.” quote resonates with me when it comes to attempting a project around the home. Most jobs are not that hard and often it’s just a matter of having the needed tools to guarantee a victory.
In your case, you often just need a few simple tools to replace a toilet. My guess is you have an adjustable wrench, a putty knife, a 2-foot level, a screwdriver and a hacksaw. This is often all you need to replace a toilet.
Turn Off The Water
The first step is to turn off the water supply to the toilet. You should have a small valve under the toilet that controls the flow of water. If not, you may have to turn off the water supply to the entire house. Check that the water is off by flushing the toilet one final time. If the water is off, no water should be entering the toilet tank.
Pour four gallons of fresh water into the toilet bowl as fast as possible to get as much water out of the toilet bowl as possible. Use the putty knife to remove the decorative caps that hide the bolts that secure the toilet bowl to the hidden toilet flange under the toilet. Disconnect the flexible water supply line from the base of the toilet tank. Remove the nuts from the toilet bolts.
You’re now ready to lift the toilet up off the floor. The odds are you may have to rock the toilet side to side to break the bond between any tile grout or caulk that should be between the toilet and the flooring. Once you have the toilet up and in the air, carry it outside with a helper. Don’t set it down on any good carpet or other finished flooring because nasty wax from the toilet seal could permanently stain whatever it touches.
Clean the Existing Toilet Flange
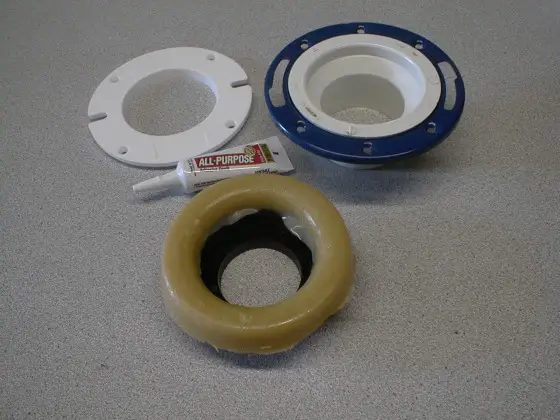
The next step is to clean up the existing toilet flange. If a wax gasket was used before to seal the toilet to the flange, then you should scrape off any excess wax and otherwise clean it up. Set aside about a tablespoon of the best wax. You’ll need it in a few minutes. I’d wear disposable gloves for this part of the job.
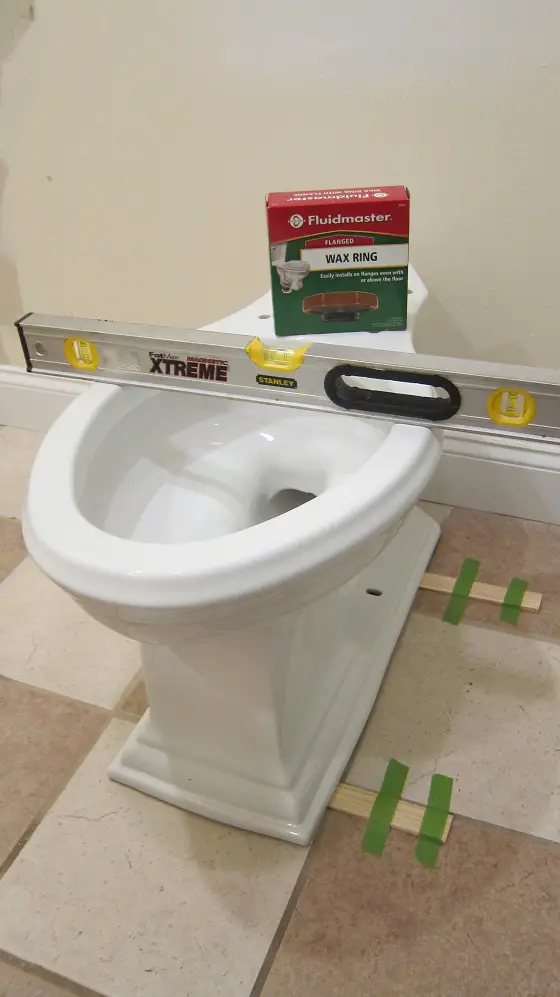
Only one change to set the toilet down on the flange!
The next steps are mission critical for a professional installation. You get but one chance to set the toilet down on the flange. You can’t, or shouldn’t move the toilet once you press it down into the fresh wax gasket. If you do monkey with the toilet trying to make adjustments, you risk breaking the all-important seal.
This means you need to dry fit the toilet bowl to the floor without the new wax gasket in place. Put the toilet on the flange and level the bowl both left and right and front to back. Place wood shims as required to get the toilet level. Tape these shims tightly to the finished floor so they don’t move when you lift the toilet back up.
Place the wax gasket on the toilet flange. I prefer to use gaskets that come with a small plastic horn that forces the toilet water and waste down into the piping below the toilet flange. Install new toilet bolts and use some old wax from the previous flange to help hold them vertical in the toilet flange slots.
Straddle the toilet flange and with the assistance of a helper have them guide you so you lower the toilet bowl slowly so the toilet bolts line up with the holes in the base of the toilet bowl. Remember, you only get to set the toilet down one time. Be sure the toilet bowl is square to the wall so you don’t have to twist it excessively. A helper at this stage of the install is invaluable since you’re a rookie.
Be sure the toilet bowl is tight against the wood shims. Install all the new parts for the decorative toilet bowl caps and tighten the nuts. Resist the urge to apply vast amounts of force to tighten the nuts to the bolts. While the china is strong, some people have cracked the bottom of the bowl by using too much force.
Install the tank to the bowl according to the instructions and install a new water supply line. You can now test the toilet to see how well it works. Turn on the water supply valve and the toilet tank should fill with water. Flush it and see how it all works.
Finish with Grout - Not Caulk
If all is well, it’s now time to grout the toilet bowl to the floor. Do not use caulk for this. The connection between the toilet bowl and the floor needs to be a solid material like grout that will not flex when it’s dry. You want the toilet to be rock solid to the floor so it never rocks back and forth. Rocking will eventually break the seal between the toilet and the toilet flange.
Don’t let the grout touch the wood shims. After about 15 minutes, gently remove the wood shims and use the mixed grout to fill in the voids created by the missing shims. Don’t sit on the toilet for at least 8 hours so the grout has a chance to harden.
Column 1148
Once again invaluable advice: , shims, grout rather than silicon. I have removed and replaced countless throwns but never thought of the benefit of using some wax to keep those brass bolts at attention.
Hut
I use plastic drinking straws on the ends of the bolts to easily start them into the holes as I lift and set the bowl. I also have found a dense rubber toilet ring that I cannot remember the name of, to use instead of that gooey wax ring. Real easy for us women to maneuver a toilet with these two things!
Fernco makes a rubber flange that attaches to the toilet horn with silicone.
Perhaps that is what you're thinking of.
Good tip on the wax to hold bolts up. I grab a few soda straws on the way home with the new toilet to help set it. Leave one straw full length and cut the other in half, place over the bolts,while lowering the toilet into place put the longer straw through one of the toilet holes, lower slowly to put the second straw through the other hole and now slowly continue setting the toilet. Helps a lot in tight spots and with short bolts.
I advocate using the remains of the old wax ring to seal the toilet flange to the finish flooring, using a putty knife or your fingers, That way, if the new wax ring leaks, the water won't get to the underlayment and subflooring and cause rot.
I like the idea of using grout to support the toilet on an uneven floor- Durham's Rock Hard Water Putty is one good choice. I'm not sure that it's completely water-proof when hardened, but that's OK- if you have a leak under your toilet, you want to know about it.
One other point- apparently it's actually code that you caulk the toilet to the floor, "for health reasons..." which I think is really stupid- again, if you have a leak, you want to know about it. However, caulking does improve appearance somewhat, especially if you have wide gaps. BUT, if you do caulk, I advise leaving the back section uncaulked.
Do you have a preferred brand of toilet based on feedback on performance? I have heard some work well while others require several "courtesy flushes" in order to prevent clogging.
My plumber, who's given great service to many of my friends, refuses to install any brand besides Kohler.
I thought you were supposed to use caulk around the base of the toilet- and most importantly leave a small gap in the caulk at the front of the toilet - the thought being that if a leak developed, the water would be visible that here was a problem, instead of perhaps leaking hidden into the floor itself, and perhaps destroying critical floor supports and other expensive damage -
I believe it is a code requirement to caulk the toilet to the floor.
Do not agree that toilets MUST be exactly level. If the level is a little off, there is no problem (I have not seen a ship mounted toilet fail due to not being level when used !!). This way, you may not need grout (if grout wasn't there before, and the toilet worked, why would you need to change things !)
Thanks for this!
I think one of the most important steps is installing a NEW supply line.
I have seen numerous disasters caused by the tile guys reusing an old supply line....also disasters cause by the tile guys not resetting a toilet properly after they added tile, and increased the height of the toilet from the flange.
I like the Twist"Click"Seal supply lines by Fulidmaster.... they cannot be overtightened at the bowl. Have any experience with them?
Also, what if the toilet is level on the floor, and shims are not needed?
would you then apply a small amt of caulk just for beauty?
I use the old nuts and washers to hold the bolts to the flange when installing the toilet to the flange. That will keep the bolts from moving or tipping
Something else to consider using is a $5 metal ring that fits over the flange and allows you to tighten the toilet bolts without fear of distorting the plastic flange where the bolts provide mounting pressure between the flange and the toilet. Even before a toilet bolt is overtightened and cracks the procelein, there is the risk the plastic flange will break of distort.
What about using plastic seals instead of wax. Also extend the bolts by attaching straws to them. Selecting a toilet is harder now with all the different flush mechanisms hot dogs vs golf balls if you follow the tv commercials you know what I mean.
I installed a toilet on a job years ago that had a horrible uneven floor towards the front of the bowl, it caused the previous toilet bowl to crack at both bolt hole openings. I used steel putty to keep the new bowl at the correct height.
I recently remodeled the single bathroom at our house at the lake. With only one toilet, I had to anticipate removing and replacing the toilet multiple times to have it out of the way for the work (it's a small bathroom), but to have it useable at the end of the day. I paid 3 times as much as for wax to buy a foam rubber "ring". Every time I pulled off the fixture, it returned to full thickness before I could turn around! I probably reused it at least six times. The project is finished, and there is no sign of leakage when checked from the basement underneath.
tim
I have always been told by flooring people that you not seal the bottom of the toilet to the floor but to just break the shims off so that you can not see them and their reasoning is if you seal the bottom of the flush to the floor with anything, if and when your wax ring fails, you will never know because the water will stay under the flush and rot the floor. I have never seen that happen if you have a good wax ring. your take on this?
I remove ALL the bowl water before removing the bowl.
What is used to remove a "horrible stain"?
I've experienced a rotten floor where the toilet stands.
Sometimes the nuts are not removable.
Wall mounted bowls are more elegant.
Thank you for 'The right way to do it'. Every other site said 'Use caulk' which didn't sound like a good idea, for the reasons you've mentioned. I had a feeling grout was used but needed confirmation.
Chris