DIY Staircase

diy staircase open risers mortised stringers

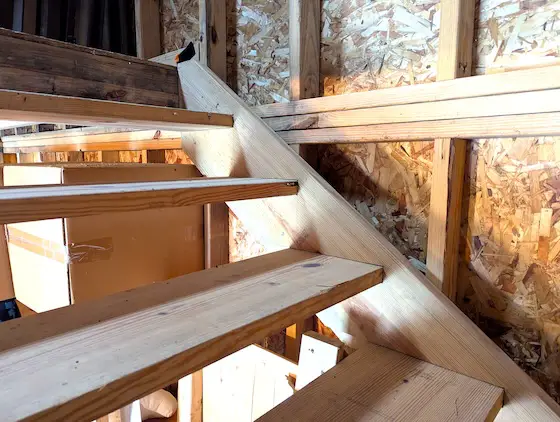
DIY Staircase - The flat stair treads are mortised into the angled 2x12. That angled board is called a stair stringer. It serves the same purpose as the floor joists in your home. Copyright 2026 Tim Carter

DIY Staircase - Use My Ebook

You may be like most folks. I’m guessing you give very little thought to the stairs you go up and down on a regular basis. They might be constructed from wood, steel, or concrete. The vast majority of stairs in residential homes are made from wood.

One of the first books I wrote was how to build a DIY staircase. CLICK HERE to get it.

Loretto Chapel Gaslighting

Wood is very easy to work with, and it can create very strong stairs. I stood just ten feet away from a marvelous circular staircase made from wood. It was in the Loretto Chapel in Santa Fe, New Mexico. This staircase has no center support column. Many feel that’s a miracle, but the truth is no central support column is required. The two twisted helical stair stringers that support the treads are the structural beams that support the stairs and anyone going up and down them.

loretto staircase

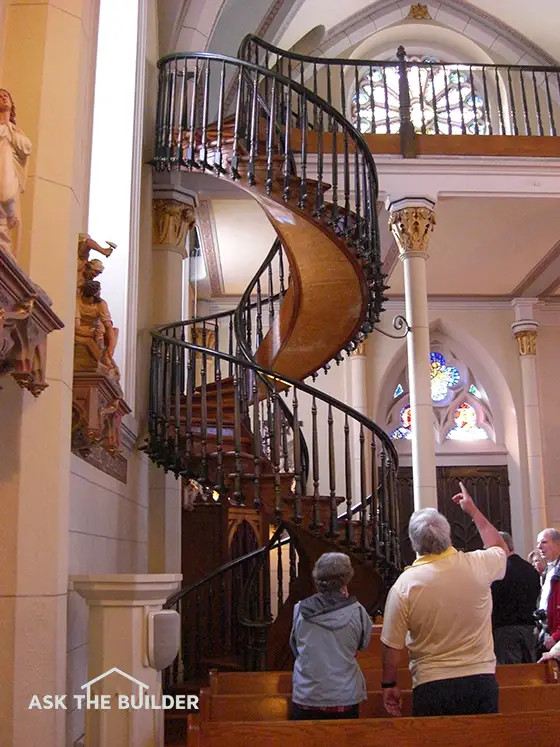
The owners of this staircase want you to believe it’s a miracle that it doesn’t collapse because of a lack of visible support. Any carpenter worth his salt knows what’s holding it in place. ©2026 Tim Carter

I feel it’s important for you to understand the structure of a set of stairs before you get out your saw and framing square. This basic knowledge will allow you to construct a strong set of stairs. These stairs will support you, your buddy, and that 300-pound refrigerator. Think about the concentrated load of two corn-fed boys/men plus a heavy appliance! Weak stairs have collapsed under similar circumstances.

Simple stairs have just two components. The flat part your foot steps on is called a tread. The treads connect to side stringers and sometimes one that is in the middle of the stairs. The stringers are no different than wood floor joists, steel I-beams, or steel-reinforced concrete beams that support many tons of weight.

Stringers and Runners are Angled Floor Joists

I’m sure you can relate to wood floor joists. The building code permits the use of 2x8s in houses. They must meet certain specifications. These 2x8 floor joists can create a floor that resembles a trampoline, and still be code-compliant. It’s unnerving to walk across a floor that bounces up and down, in my opinion.

You can choose to use 2x12s or even giant floor trusses to create a wood floor system that has no springiness. The floor resembles walking across bedrock with absolutely no give whatsoever.

Now think about a set of stairs. A narrow set usually has only two stringers, one at each end of the treads. These stringers are not level. They are angled up or down in an opening so they connect one floor to another.

Imagine if you lifted the lower ends of the stringers and made them parallel with the upper floor joists. Then imagine the treads were rotated to sit on top of the stringers. Your stairs are nothing more than a narrow, tilted floor, much like a child’s slide at a playground.

I see stairs all the time that have stringers that have the strength of weak 2x6s! Perhaps you have a set of these leading from your deck down to the ground. I’m talking about stairs where a solid 2x12 was used for a stringer. However, you or the carpenter proceeded to notch the wood, creating the flat spots to attach the treads. These notches resemble the teeth on a saw blade. They transform a strong 2x12 to a much weaker 2x?, depending on the width of the lumber leftover from the notching process.

Create Mortises for the Treads

I avoid this issue, and you can too, by creating shallow 1/2-inch-deep mortises in the 2x12s. The treads fit into the mortises and are attached to the stringers by driving nails or screws through the outer face of the stringers into the ends of the treads.

The mortise method preserves all the strength of the 2x12. It’s a bit more work to create the mortises, but it’s worth it in the long run. You need a framing square, a circular saw, a router, and a wood chisel to make perfect mortises.

For the sake of discussion, let’s say you’re building a simple set of stairs for a deck, basement access, or up to an attic. You’ll just be using 2x12s for both the stringers and the treads. This lumber will make a very strong set of stairs.

The framing square is used to lay out on the face of the stringers where the mortises will be. The front nose of each tread must be the exact same distance from the edge of the stringer. I prefer to create stairs that have a 7.5-inch riser and a 10-inch tread. Using a 2x12 as the tread provides the code-compliant 1-inch overhang for foot safety.

A normal 2x12 is 1.5 inches thick. I create a mortise that’s just under 1 and 5/8-inch wide. I do this because the 2x12s are often not flat. They may have a hump or dip in the center. The larger mortise allows you to insert the tread into the stringer with minimal effort.

I set my circular saw blade depth to 1/2 inch. I then start to make parallel saw cuts within the 1 and 5/8ths

inch lines. Each cut leaves a thin wafer of wood that’s about 1/8-inch, or less, wide. These wafers snap off when tapped with a hammer.

The router is used to create a smooth face inside the mortise where the wafers used to be. The wood chisel is used to square up the two inside corners of the mortise. I have to tell you creating these mortises is therapeutic for me. The process creates an enormous feeling of satisfaction when you see the treads fit into the mortises like a hand fits into a glove.

I wrote a short ebook filled with photos showing the step-by-step process of marking out and creating the mortises for a set of simple stairs. You can get a copy for just $7 by visiting this link:

Column 1645

Exterior Painting Tips and Tricks

exterior window with peeling paint

Exterior Painting Tips and Tricks: There’s a great chance the paint on this window would have lasted 30 years without peeling if the homeowner had followed my advice. Copyright 2025 Tim Carter

Exterior Painting Tips and Tricks - Think Clean

Exterior painting tips and tricks can be discovered in the strangest places. I had the distinct pleasure of touring a huge paint factory in Southern California several years ago. I was allowed to peer down into this massive vat as the solid components of the paint were added. Thousands of gallons of paint were about to be blended to perfection. I was stunned at the sophistication of the operation. Computers, sensors, and engineers in white lab coats controlled every aspect of the mixing process.

I believe I was the only member of the press on that tour who had a deep appreciation of what we were seeing. It turns out no other editor or media talent on the tour had applied thousands of gallons of paint over a period of thirty years as I had. Little did I know how complex it was to make a durable exterior paint.

Paint is Colored Glue

You might not realize it, but paint is nothing more than colored glue. The chemical formula of many basic paints is almost identical to that of strong yellow carpenter’s glue. My first business partner, John, shared this with me while we ate lunch one day on a job site. John and I painted houses in the summer. We used the money to help pay our college tuition. John went on to get his physical chemistry Ph.D and ended up working for the largest paint manufacturer in the USA.

The adhesive component of paint is often called the resin. Many different adhesives can be used to make paint. Vinyl acetate is one. Acrylic is another. My personal favorite is urethane. Have you ever noticed how clear urethane sticks to wood floors and furniture like the strongest Velcro®️ strips you’ve ever tried to peel apart?

I painted my Cincinnati, Ohio, house with an exterior urethane-resin paint in the late 1990s. Drive by the house today, and it looks as good as the day I applied it. It’s not peeling, and it has not faded. I used the same paint to coat my current house in central New Hampshire fifteen years ago. It looks like the paint was applied last week. You should buy paint with the best resin if you want it to last.

Please Read the Label

The first step, and I feel many ignore it, is to take five minutes and read the instructions on the paint can label. Be sure to follow them to the letter. You’ll almost always see this sentence: “Apply to a clean, dry, dust-free surface.” Let’s talk about clean and what it really means.

Think about cleaning your body. When you shower, I doubt you just stand under the stream of warm water and twirl around. Instead, you take your hands and rub your skin with soap. You may even use a washcloth or microfiber towel. This motion, or agitation, is what gets you clean. The soap helps remove dirt and oil from your skin.

I maintain that pressure washing your house is the same thing as just standing under your shower head. I can prove it. Take your dirty car to a carwash equipped with a pressure-washing wand. Clean and rinse your car with the tool. Drive out of the bay and park your car. Let it air dry for a few moments. Wherever the dirt was the worst, pull a moist finger across it. I guarantee you’ll get dirt on your finger. Dirt the pressure washing left behind!

Pressure Washing Leaves Dirt Behind

I prefer to wash the exterior of a house like I wash my car. I use a wonderful brush that RV owners use to clean the large flat surfaces of their motorhomes. I pre-treat my siding with a mixture of oxygen bleach and liquid dish soap. I always clean in the shade, not direct sunlight. Once finished, my siding and trim are squeaky clean.

Cracks that allow water to sneak behind siding or along windows and doors must be caulked. It pays to purchase the most expensive water-based caulk. These products have better ingredients, in my opinion.

I allow the caulk to cure for 24 hours before painting over it.

Some modern paints don’t require primers. Some do. Pay very close attention to the label instructions for the primers. You may see they dry to touch in as little as an hour, and can be recoated soon after that. This is a very important point that most overlook.

Coat Primer Within Hours

Applying the finish paint as soon as the primer says it can be recoated is the best practice. This ensures the primer doesn’t get dirty, and you often get a physical and chemical bond whereby the primer and finish paint interlock as if they were one paint. You only want to prime as much surface area as you can finish coat on the same day.

The paint label may also say to work in the shade. Many years ago, I discovered the hard way how important it is to do this. I was painting the detached garage of my second home. The trim color was flat black. I was painting in the middle of the afternoon on a hot, cloud-free day. The sunlight was hitting the garage trim like a spotlight on a fleeing prisoner.

Within an hour of applying the paint, blisters appeared on the trim. The hot sunlight boiled the water in the paint, creating water vapor under the fresh paint skin. It was a huge mess.

High-quality brushes make all the difference. The paint will flow better, and you’ll get a better appearance. Get the brush wet before you dip it into the paint. This will help prevent hardened paint from building up on the metal ferrule. Be sure to watch my video demonstrating the secret and proper way to clean paint brushes. I have brushes that are thirty years old that look almost brand new!

Column 1644

Garage Design Ideas

garage design ideas

Garage Design Ideas - The architect, builder, or designer got one thing right with this new detached garage. But there are many things wrong. Copyright 2025 Tim Carter

Garage Design Ideas - Always Go Bigger

Eighteen months ago, I recorded a thirty-second video that went viral on YouTube. It’s received hundreds of thousands of views and thousands of comments. Well over ninety-eight percent of the comments said I had no idea what I was talking about. I never expected this negative outpouring of opinion. I thought many would agree with me.

small garage foundation

This is the garage foundation in my video. Copyright 2026 Tim Carter

You can view the video here. 

I surveyed my 20,000 newsletter subscribers a year ago, once the short video went viral. The response was exactly as I thought would happen. Many of my subscribers have lived in multiple houses over their lives. They were frustrated with the narrow and shallow standard-sized garages that are more prolific than dandelion seeds floating in the air on a breezy late-spring day.

Garages are Too Narrow

The inspiration for the video came to me as I drove past a new home under construction near my house. The foundation had just been poured and backfilled. It was obvious the house had an attached garage based on the 16-foot-wide notch in the foundation for the garage door. The property had a ‘For Sale’ sign posted. This allowed me to inspect the property and foundation without trespassing.

The foundation size and shape communicated two glaring errors to me. I mention this in light of the insatiable appetite of many homeowners, including myself, to accumulate possessions, adult toys, gardening tools, etc. I knew from decades of parking in similar garages that the side walls of the garage were too close to the edge of the garage door. Adding insult to injury, the garage depth would barely allow a common pickup truck to fit with the garage door closed.

You might have hot buttons in your life about any number of things. Perhaps you’re bothered by the design of kitchen tools. Your blood pressure might spike when your life partner once again annoys you with a pesky habit. For me, it’s garage design. Millions of garages, in my opinion, are far too small. The sad thing is that unfinished garage space is one of the least expensive parts of a house to construct.

Educate Architects & Builders

I’m trying to do my part to educate young and old architects, builders, designers, and homeowners about the secondary effects of having a garage that’s too small. My goal is to challenge them to do the math, comparing the cost of building a slightly larger garage versus paying decades of ever-increasing fees for on-site and off-site storage. I’m asking them to ponder the size of cars, trucks, lawn mowers, wheelbarrows, garbage cans, etc. These are common things many homeowners store in a garage.

Days ago, I passed a detached garage being constructed near my home. Once again, I saw the narrow 2-foot-wide concrete walls on either side of the garage door opening. The 2-foot-on-center spacing of the thirteen steep roof trusses told me the outside depth of the garage was 24 feet. Subtract the depth of the 2x6 walls, and the inside of this garage is but 23 feet. The best-selling pickup truck in the USA, with the popular 4-door cab configuration, is just over 20 feet long bumper to bumper. Imagine trying to walk around the truck with the garage door closed!

It’s possible this garage was as big as the local zoning laws would permit. I served on the zoning and planning board of my small village in Ohio for six years. I know a thing or two about zoning and variances. It’s also possible the homeowner didn’t think it through as to what he or she plans to put in the garage.

The detached garage I passed days ago had at least one thing going for it. The architect, builder, or homeowner requested a very steep roof. This allowed for a giant room above the garage to store things. The factory-built trusses had a large rectangular space created within the webbing. The extra price for each truss is about the same as what the homeowner would pay each month locally to rent a tiny 5x5x8-foot storage space!

Stairs Steal Space

Lurking in the shadows of this detached garage is another specter. Without looking at the plans or walking onto the property, I have no idea how the homeowner will gain access to this large space above the parked vehicles. Traditional stairs against the rear wall will shorten one of the two parking slots. A narrow and steep fold-down staircase may be the solution. These can be extremely dangerous if you’re going up or down with a medium to large box in your hands.

Do Storage Math

I priced a few 16x24-foot pre-built outdoor sheds in October of 2025. Each one was more than $10,000.00. These sheds require ongoing maintenance just as your home would. Local zoning laws often stipulate where these can be on your lot. These sheds often have substandard floors that can rot out. The price doesn’t include a strong, level, and square foundation.

You should think about all of these things if you’re building a new home. Do you rent a storage pod for your current possessions, or do you rent an off-site storage space? What are you paying each year for this? How much will the rent go up in the next five or ten years? Based on the prices I see around my home in 2025, I can assure you that people near me will be spending about $40,000 in the next ten years for an off-site storage space that’s less than 200 square feet.

I helped my daughter design a very spacious garage for her home. The garage is 26 feet deep. It has attic trusses above it, creating a huge room. The face of the interior side walls of the garage is 3 feet away from the edge of the 10-foot-wide garage doors. The space between the two garage doors is 3 feet. She can open the doors of her large SUV and not hit the car in the other slot or the shelves along the walls. All of this extra space only cost her $6,000 at the time the house was built.

We did the math before she built. You, your builder, and your architect should do the same. I’m confident you’ll discover it makes much greater financial sense to build a larger garage, assuming your lot will accommodate it.

Column 1643

Trex® RainEscape® Class Action Lawsuit

Trex® RainEscape® Class Action Lawsuit

My Trex® RainEscape® has developed cracks and is leaking.

I recorded this short video showing a few of the cracks.

trex rainescape crack leak

This is but one of the many cracks in my Trex RainEscape system. That sliver of blue is the sky above my deck! Copyright 2026 Tim Carter

Other Trex® RainEscape® owners might have the same issue.

At least one person who has the same problem has left a comment on my video.

I predict, at some point, that Trex® RainEscape® may be named in a class-action lawsuit about this defect.

Plumbing Repair Cost

dirty kitchen sink with food waste

An inexpensive stainless steel kitchen strainer is in place to capture all of this food waste. Failure to do this can create clogs in kitchen drain pipes. Copyright 2026 Tim Carter

Plumbing Repair Cost - How to Avoid Them

You may think I don’t suffer as you might. I don’t know of a living person who looks forward to an expensive service call. Your AC may quit on the hottest day, your kitchen sink may get clogged with egg shells three hours before your Thanksgiving guests arrive, and/or your furnace or boiler decides to take the night off during a wicked cold spell. I’m going to share a few tips in this column that should save you many hundreds of dollars.

A Birch Tree Leaf Stops a Boiler

I’m not immune to service calls. Just last year, my wife called me on a frigid December morning while I was at my son’s house. She awoke to a very cold house. I had stayed the night before at my son’s house, seventy miles south. I was doing back-to-back days of work, helping him finish his basement.

Our relatively new modulating boiler had stopped working. I rushed home and immediately saw the error code on the digital readout. I tried to restart the boiler. It would light and start to fire up, but then it would shut down. I switched out the ignitor, think of an automobile spark plug, but that did no good. I was out of options. It was time to call in a boiler pro.

My wife has many expensive orchids, and we couldn’t allow them to perish with the dropping temperatures. I called a local company that serviced boilers. Two hours later, a tech was here. Before he crossed my threshold, the price was already $300.00 with it being a Saturday.

He spent an hour trying to get the boiler to work and was running into dead ends. Finally, he took off the clamp holding the combustion-air intake pipe to the boiler. The boiler could now get air from the basement mechanical room. Instantly, the boiler started up and ran perfectly.

Ten minutes later, the tech and I had removed the outdoor cover for the intake and exhaust pipe. A flat beech tree leaf had somehow found a way through a narrow 1/2-inch slot. Each time the boiler tried to fire up, the leaf would be pulled against the intake pipe, robbing the boiler of air. A sensor would shut down the boiler as a safety. Ten minutes later, the tech was swiping my credit card for an $800 service call.

I’ve selected three of the top things you can do with ease to prevent service calls or damage to the delicate surfaces of your home. Let’s get started.

How To Minimize Plumbing Clogs

Plumbing clogs might rank in the top three service calls of all time. There are national companies devoted to nothing more than snaking out drain clogs. Many other plumbers specialize in this much-needed service. In almost all cases, you, the homeowner, do very silly things that create the clogs.

Food waste and grease create the most common clogs. The basket strainer in your sink often has four narrow slots that prevent large food waste from getting into the drain pipes. This is not enough. You should be using a very inexpensive strainer that fits inside your existing basket strainer. This secondary strainer is made with a fine-mesh stainless steel screen. The holes are so small that a peppercorn would be caught in the mesh.

mesh sink strainer

This strainer can save you HUNDREDS of dollars on service calls. CLICK HERE to order a set.

Purchase one or two of these and stop all food waste from getting into your pipes. Food waste often doesn’t make it to the primary building drain in your home. It begins to build up and clog the pipe immediately behind your kitchen sink cabinet. Sop up all grease from plates, pots, and pans with used paper towels. Try to minimize grease going down your drains.

Garage door service calls are no doubt high on the list of unnecessary expenses. Many people neglect their garage doors. It’s very important to keep the roller wheels lubricated and the tracks clean.

It’s vital to keep the powerful spring(s) that lifts the door rust-free. A rusty spring can snap without warning. Springs within miles of saltwater corrode much faster than normal.

You can prevent rust by spray painting the spring(s), or you can spray the bare metal with a penetrating oil. Never ever try to adjust this spring. Leave that to a professional. But you can get on a short step ladder and safely spray this spring with a lightweight oil to prevent rust. It’s expensive to replace a broken garage door spring.

The failure to remember some of the basic chemistry knowledge you obtained in high school can also drain money from your checking account. You can ruin painted surfaces in your home with aggressive cleaning practices. My own daughter did this to our entrance hall walls using a magic pad that’s been banned from my house. She burnished the flat wall paint, trying to clean off stains. Now there are random polished spots that will require me to repaint the walls.

Water is the universal solvent. Food stains, mud, dirt, etc., often contain some amount of water. Stains bond very well to walls and furniture once the water evaporates.

All you have to do is rehydrate the stain, and in many cases, it will come off with minimal rubbing. You can rehydrate a stain by getting a small paper towel wet. Squeeze out the excess water. Apply the towel onto the stain and press it against the stain so the wet towel contacts the stain. Wait fifteen minutes and then try to gently rub the stain. You’ll discover, in most cases, the stain disappears with very little effort.

If you’ve not priced out what painters charge these days to paint walls, there’s a good chance it will take your breath away. Washing painted walls using a simple solution of liquid dish soap and water is all you need to make walls look new. I prefer to use an inexpensive grout sponge when washing my painted walls.

Try it on just one wall, and you’ll be amazed. Remember, do the same thing with the sponge as you did with the paper towel. Get the wall wet with the soapy water, let it sit for five minutes, then come back with the sponge and rinse the wall with clear water. The five-minute dwell time is enough to produce professional results.

Column 1642

Laundry Faucet Replacement

laundry faucet replacement

I’m holding a new laundry tray faucet with paddle handles. You can install one yourself in less than 30 minutes with a few inexpensive tools. CLICK HERE or the photo to BUY this exact faucet.

Laundry Faucet Replacement - It's Very Easy

Laundry faucet replacement is easy. You don't need to call an expensive plumber.

You may or may not know that not only am I a home builder, but I’ve also been a master plumber since age 29. I was drawn to the plumbing craft because of its fascinating three-dimensional nature. Your home has but one sewer pipe leaving your house, and often just one vent pipe poking up through your roof. However, in between these two points is a maze of interconnected pipes that all must work together to keep you and your family healthy.

Many aspects of residential plumbing are complex and difficult. Some are not. Most of the plumbing problems you encounter in your home, you can often fix yourself. My guess is you’re afraid to tackle the repair, thinking you’ll cause a leak that floods your home. You can save many hundreds of dollars if you start to do simple plumbing repairs yourself. Your confidence will grow like a dandelion in the warm spring New Hampshire sun!

I want to share with you a simple repair you can do yourself. I’m about to do the same job this week. I’m going to install a new laundry tray faucet. My existing one is about twenty-five years old. It has traditional rubber washers instead of washerless cartridges.

What’s more, my existing faucet all of a sudden started moving around as you operated the valves. The faucet came with a cheap galvanized metal retention nut that eventually rusted out. A high-quality faucet would have had a rust-proof brass nut, but I didn’t install this faucet. I didn’t build this home I live in.

The first step is to shut off the water to the faucet. I have a shutoff valve for the hot and cold water lines under my laundry sink. Rotating the handles clockwise shuts off the water. Test to ensure the water is off by then turning on your laundry faucet. If no water flows, you’re in great shape. If water is flowing, you’ll have to turn off the main water shutoff valve where water enters your home.

You only need three simple tools to replace a laundry tray faucet in almost all cases. I’ll be using a medium-sized adjustable wrench, a medium channel-lock pliers, and the all-important basin wrench.

A basin wrench is a tool that allows you to tighten and loosen the nuts that hold a faucet to a sink, as well as the nuts that connect the water-supply tubes to the bottom of the faucet. This wrench was designed to work in the narrow space between the back of a sink and the rear wall of a cabinet.

Its unique design features curved spring-loaded jaws that resemble the mouth of a fierce dinosaur. These jaws also swivel 180 degrees, allowing you to use the wrench to both loosen and tighten the nuts in the narrow space you’ll find yourself working.

Seasoned plumbers often don’t use a basin wrench when installing a faucet for the first time. They’ll attach the faucet to the sink, when possible, before the sink is installed in the countertop. With the sink out of the countertop, you have easy access to the nuts that must be tightened. An ordinary adjustable wrench is all one needs in this situation. The plumber will often attach the water supply tubes to the bottom of the faucet at the same time.

My laundry sink is a wall-hung design. Gravity holds it on the wall using a clever French cleat hanger. I intend to disconnect my p-trap from the sink using the channel-lock pliers.

CLICK HERE to purchase my durable laundry sink.

I’ll also disconnect the flexible water supply lines from the shutoff valves. I’ll then just lift the entire sink straight up. I’ll then have easy access to the underside of the sink, allowing me to switch out my faucet in just minutes. I’ll install the new faucet and water supply lines to the faucet before rehanging the sink on the wall.

Let’s talk about the water supply tubes. These flexible pipes have come a long way in just forty years. We had to use chrome-plated soft-copper supply tubes when I was an apprentice plumber. You had to cut them to the perfect length and bend them with precision. It was common for these to develop tiny leaks if you didn’t align the tubes perfectly.

Modern water supply lines are idiot-proof. They have internal rubber o-rings at each end. Leaks only happen if you just hand-tighten the nuts. Once you get the nuts hand-tightened, use an adjustable wrench to twist the nut an additional 180 degrees. It’s very simple.

It’s important to use a small amount of plumbers' putty under the body of your new faucet. My guess is your faucet with come with a plastic gasket that fits the bottom of the faucet body. A thin layer of plumbers' putty on the bottom of this gasket ensures water will not leak under the faucet and through the holes in the sink. This water, over time, can cause wood rot, mold, etc.

Excess plumber’s putty will ooze out from under the gasket as you tighten the nuts that hold the faucet to the sink. Be sure these nuts are quite tight so the faucet doesn’t slide around on the top of your sink. Be careful about applying too much pressure, should your sink be vitreous china. Aggressive plumbers have cracked china sinks by over-tightening these nuts.

Do you think you can do this job? I’m sure you can. If you need help over the phone, I’m there to guide you through this repair.

CLICK HERE to set up a plumbing coaching call with me.

You’ll save hundreds of dollars and you’ll feel fantastic once the job is complete and leak-free.

Column 1641

Zip System Leaking

zip system leaking new house wall with cement siding

Zip System Leaking - The siding on this house is being applied directly over the wood sheathing. The sheathing has a plastic covering, and tape is required to prevent water from infiltrating into the wall cavity. Copyright 2025 Tim Carter

Zip System Leaking - The Weak-Link Tape

You prefer hearing stories rather than being subjected to a lecture, don’t you? The most popular person at a holiday party is often telling stories to a small throng of people gathered around her or him. Allow me to take you on a psychic journey over the past fifty years of my construction experience.

This column is about water. You and I need water to survive. Water, however, is the enemy when it comes to your home. Water causes wood rot, mildew, and mold. It’s so powerful that it can split rock and concrete like you might crack an egg in your hand.

I grimace each time I pass a new home construction site here in central New Hampshire. All of the builders have been drawn to a plastic-coated wood sheathing like a moth to a porch light. I predict years from now, many, if not all, of these houses will suffer from water infiltration. The cost to repair the damage will be extreme.

The Evolution of Sheathing

Sheathing comes in 4-foot by 8-foot sheets. It’s 1/2-inch thick. Many years ago, sheathing was tongue-and-groove 1x6s. This lumber was used to create the forms for the cast-concrete foundations. The lumber was salvaged and then recycled by the carpenters for the wall sheathing, subflooring, and the roof sheathing.

They 1x6s were installed diagonally on the exterior wall studs, the floor joists. It was installed perpendicular on the roof rafters The diagonal installation method added strength preventing the walls from racking.

Modern sheathing is a third-generation engineered wood product. Large sheets were developed to cut labor costs.

Version one was plywood. Version two was oriented strand board (OSB). The latest version is OSB, but it’s now coated in plastic to stop water from soaking into the wood. A special tape is required to seal the gaps where one sheet abuts another. This tape, or a similar one, is required to seal window and door nailing fins that sit on top of the wall sheathing. This tape, in my opinion, is the Achilles’ heel of the system.

Water - Resistance is Futile

The builders and carpenters of old knew all about the destructive force of water. Asphalt-saturated felt was used on top of the sheathing to protect the 1x6 sheathing, wall studs, and all the other wood inside the homes. I remodeled many old homes early in my building career that were protected by felt paper. It’s a fantastic product when installed with diligence.

Fifty years ago, felt paper was kicked to the curb by air and water infiltration barriers. These products came in giant rolls. The synthetic fabric stopped liquid water from passing through to the wood, but it allowed water vapor to escape to the atmosphere. That’s a good thing.

The plastic-coated OSB sheathing does allow water vapor transmission. It has a perm range of 12-16 perms, allowing water vapor to escape to the atmosphere.

Do you know why your roof doesn’t leak? Most homes in the USA are protected by asphalt shingles. These install just like the feathers on a bird or the scales on a fish. One overlaps another. This simple system works very well, so long as you have a roof with a decent pitch of 20 degrees or more.

installing shingles staggered offset

This is how normal roof shingles are installed. The overlapping layers shed water.  Copyright 2026 Photo Credit: Tim Carter

Your roof would leak like a sieve if you installed the shingles backwards. Imagine if the top edge of a lower shingle sat above the next shingle higher up on the roof. Water cascading down the roof would flow behind the shingle and get into your home.

The tape used on the modern sheathing is installed this way! The top edge of the sealing tape is not covered by something above it. Water that gets behind the siding or brick can travel down the OSB and get behind the tape should it detach from the plastic coating.

The tape is counting on expert installation. The tape hopes the plastic-coated OSB is clean and dust-free. The tape is counting on the installer to firmly press it against the sheathing. The tape is counting on the temperature to be between 0F and 120F.

black tape window leaking

Look at the bubbles in the tape. The one bubble runs to the TOP of the tape and is an open pipeline for water to infiltrate into the house!

black tape window leaking

Look closely at the tape at the corner of the window! See how it's not adhering to the wall? There are any number of reasons why this happened. The tape requires expert installation techniques. Copyright 2026 Tim Carter

You, the homeowner, are counting on the tape’s adhesive to sustain thousands and thousands of repeated expansion and contraction cycles over decades. Imagine how the tape gets hot and cools down each and every day as the sun rises and sets.

It’s my opinion that this tape has not yet stood the test of time. The residential construction industry is littered with products all thought to be amazing, but over time, they fail. Think of the thousands of homes that suffered catastrophic leaks from plastic plumbing water supply pipes that become brittle and crack when subjected to the chlorine found in most municipal water systems. Think about the class-action lawsuits involving low-quality house siding made from wood dust and glue. I could go on and on and on.

I can hear you. “Tim, if this is how my builder installs sheathing, what am I to do?” I admit this is a major conundrum. I can assure you I’d never rely on this tape to prevent water from entering my home. I’d install traditional OSB and cover it with the synthetic fabric air and water barriers.

This method allows you to overlap the synthetic fabric over the top of the window and door nailing flanges. This fabric can be installed like roof shingles on two-story homes. The first-floor level is covered first. You then overlap the next row of fabric on top of the one below. The manufacturer even makes a special tape to seal this overlap.

You get one chance to get the sheathing protected the right way. Can you imagine what the cost might be years from now to repair a house where the OSB tape has failed?

This is why my Ask the Builder motto is: “Do it Right, Not Over!”

Column 1640

Subway Tile Bathroom

subway tile bathroom vertical install

Subway Tile Bathroom - Subway ceramic tile installations are much like brick installations. The shorter joint lines are staggered. This tiny detail can be very challenging for the rookie tile setter. It's even harder to install subway tile vertical instead of horizontal. Copyright 2025 Tim Carter

Subway Tile Bathroom

I have been installing a stunning green subway tile the past two weekends in my son’s new basement bathroom. Subway tile is rectangular in shape. The grout joints between each tile have the same back-and-forth staggered pattern as mortar joints between bricks in a wall. It’s a fascinating look, and one you should give serious consideration to should a tile job be in your future. The colors, textures, and crackled glazing in some subway tile will take your breath away.

This bath is next to a speakeasy bar. The overall theme of the entire basement remodeling project is Art Deco. Subway tile is most often installed horizontally, just as you see most brick walls. My son likes to test my skill level, so he said, “Dad, I want to install the subway tile vertically on the walls in the bathroom. I think it will be stunning.”

He was right. We have just one more day of setting tile before we grout, and the bathroom is going to garner all sorts of Oooos and Ahhhs from his friends and neighbors. This bathroom, once finished with the sleek wall-hung toilet and vanity with a copper sink, might qualify for a Better Homes & Gardens cover photo.

I’ll never forget my first ceramic tile installation. I was 23 years old and thought, “How hard can this be?” I installed ordinary 4x4 tile above a bathtub. I discovered within minutes that the error tolerance is about 1/16th of an inch. Level and plumb lines created using a high-quality level are a must because each decent tile is perfectly square. One tile out of alignment will throw off all other tiles that abut it.

All that said, I feel you can do a simple subway tile installation. The best part is I offer phone coaching if you need some extra inspiration or help.

Subway tile poses a unique challenge. Each row needs to be in a very straight line. High-quality tile makes this easy because the tile is created with small self-spacing edges. The tile will stay straight as long as the first row is straight, level, or plumb, and you apply the perfect amount of adhesive to the walls. You don’t want adhesive to ooze up in between adjacent tiles. This extra adhesive can alter the alignment.

There are two primary types of adhesive you use to set ceramic tile. One is an organic mastic that resembles cool cake icing. It spreads with relative ease using a notched trowel. Organic mastic is fine for wall installations where heavy objects will not subject the tile to concentrated pressure. The mastic retains a small amount of flexibility once it’s cured.

Ceramic tile is weak in tension. This means that if you press on a tile and it flexes, it will crack. I discovered this decades ago when I used mastic to set tile on a restaurant kitchen floor. The tiles cracked when heavy equipment or table legs pressed down on the tile. I had to remove the broken tiles and replace all of them using thinset mortar. Thinset is nearly identical to brick mortar and hardens like rock with no flexibility.

Thinset mortar, in my opinion, is the best adhesive to use. It’s waterproof. Thinset is a blend of fine silica sand and Portland cement. It can often contain polymers that enhance adhesion. It often contains a chemical retarder that slows down the chemical reaction that causes thinset to transform into rock. This retarder helps to extend the working time of the thinset. You need to press the tile into the wet thinset within several minutes of it being applied to the wall or floor. This ensures you get a great bond between the tile, the thinset, and the substrate the tile is applied to.

Notched trowels are used to spread the mastic or thinset. You match the notch size to the tile size. The tile manufacturer often provides tables to help you get the right trowel. Glide the trowel over the substrate at a 45-degree tilt as you spread the mastic or thinset. This will allow you to apply the perfect amount of adhesive.

You’ll have to cut tile to fit around electrical boxes and water pipes. Straight cuts can be created using an inexpensive tile snapper for most tile. The snapper has a carbide wheel that scratches the glazed surface. Once scored, the tile will snap along this line just like one cuts glass.

Porcelain tile can only be cut with a wet or dry saw. You can’t use a snapper and expect straight lines.

Wet saws or dry tile carbide blades are required to make L-shaped cuts. You can purchase a decent wet saw with a diamond blade for several hundred dollars. I have a professional wet saw that makes perfect cuts. It might make sense for you to purchase a high-quality saw and sell it once you’re done with your job. Pros are always looking for used wet saws in new condition.

You can cut circular holes in subway or other tile, using inexpensive diamond hole saws. They come in many different diameters. The tile needs to be clamped to a solid surface when making the cut. Use a slow drill speed to create the hole in the tile.

You’ll discover it pays off in spades to spend time thinking about the layout of your tile. Subway tile, and most other tile, likes to be centered. You want to minimize, if possible, cutting thin pieces where the tile abuts an adjacent wall. Thin strips of tile must be cut on a wet or dry saw.

Grouting your subway tile is the easiest part of the job. Water is your biggest enemy. It’s best to use wall grout for thin grout lines that are 1/8-inch or less in width. Wall grout doesn’t contain sand. Sanded grout is made for wider grout joints.

The grout should be the consistency of warm cake icing. A stiff rubber float is used to apply it. I spend quite a bit of time explaining why water can ruin all the hard work you invested in your tile job.

I show grouting a floor in the video series. It's the same process for wall tile.

CLICK HERE to see all the tools and things you should have on hand when grouting.


Column 1639

Architect Fee for Renovation

unfinished room in basement renovation

Architect Fee for Renovation - The owner of this house knew the cost per square foot of this basement remodeling job before plans were drawn. It’s easy to do. Copyright 2025 Tim Carter

Architect Fee for Renovation - How to Pay the Minimum

I was on the phone for an hour a few days ago with a young man who lives about 15 miles north of downtown Chicago. He’s used my affordable phone coaching service in the past to solve a complex heating and air conditioning problem with his old home. This call was about a new ambitious whole-house remodeling project he and his wife want to do.

This young man thought he had taken all the right steps before he asked for my advice. As you’re about to discover, I was the first person he should have talked to after he and his wife decided to embark on this remodeling adventure. Instead, I was the last person, and it cost him well over $10,000.00.

Months ago, he hired an architect to draw preliminary plans of what the house would look like after all the work was complete. This remodeling work involved both the first and second floors. I can tell you from doing jobs like this myself that this couple was thinking about a massive undertaking. I knew it would be very expensive.

The homeowner wanted me to be the devil’s advocate and share my feelings about the new floor plans. I’m honest to a fault in these situations, and I rarely sugarcoat my responses. Twenty minutes into the conversation, the homeowner said, “I’m starting to think I’ve wasted all of the money I’ve spent so far on these plans. I'm amazed at all the flaws you’re pointing out in such a short time.”

What is the Current Cost Per Square Foot Price?

The conversation then shifted to money. The young man never mentioned what his budget is, and to be honest, it’s none of my business. He could be very successful at a young age, like my son-in-law. He could have inherited vast sums of money so the cost of the job is immaterial. His wife may earn scads of money. Perhaps they hit the lottery.

I have a simple workaround to the budget issue. I’m astonished this is not employed by each and every architect. I can tell you for a fact, none of the Cincinnati, Ohio, architects who drew plans for the projects I built years ago did this. All too often, I sat at a couple’s dining room table only to see their faces turn ghostly white when I showed them my estimate. Many wasted thousands of dollars on architect fees.

You may be in the exact same position as this young Chicago couple. Here’s how easy it is to discover if you have enough money to move forward on creating plans for your upcoming project, be it a bathroom, kitchen, or large room addition. This same method works for building a new home, too.

Step 1: Gather Photos

The first thing I would have told the young man to do is scour the Internet for stunning photographs of exactly what he wants the inside of the house to look like. I’m talking about great kitchen and bath photos, vaulted ceilings, floor and wall finishes, etc. Pictures, as you know, are worth thousands of words.

Step two is to meet with several contractors who would be interested in getting the job. You ask them to come over and meet for just an hour. As you’re setting up the meeting, you let him know you’re trying to discover the cost per square foot to do what you want done. It’s not a bad idea to offer to compensate them for this time.

Your meeting goal is to determine the current cost per square foot for the type of job you want to do. The photos you’ve collected from the Internet will communicate to the contractors the level of finish they need to know.

Every decent contractor knows exactly what each of his finished jobs costs. Be sure to ask the contractor to bring sets of plans with him. Let him know on the phone call what you have in mind to do at your home, so he can bring plans of similar jobs he’s completed in the past 18 months or so. Tell him you don’t need to know the name or address of these jobs. That’s sensitive information.

Looking at the plans, it doesn’t take much time to determine how many square feet of space was remodeled. Using the finished price for each job, it’s simple math to determine the cost per square foot.

Not one of the architects I ever worked for bothered to track this invaluable information. Once they finished the plans, they all divorced themselves from the job. I’m sure some architects out there do track this information, and these are the ones you want to talk with once you start your planning process. They can verify the numbers you’re hearing from the contractors you talk with.

Let’s say my young couple in Chicago had a budget of $400,000. Imagine if they discover the current cost to do whole-house remodeling in Chicago is $300 per square foot, including a new kitchen and a bathroom or two. This means their planned job can’t exceed 1,300 square feet.

Knowing this, they can use a simple tape measure and calculate the number of square feet of space they intend to remodel. If it’s 1,300 square feet or less, they can now proceed to draw up plans. Nothing about this is hard; it’s just a matter of doing as much homework as you can before you commit to hiring an architect to draw plans for a project that may not be within your budget.

The last portion of the phone consult with the young man touched on critical flaws in his floor plan. I shared with him how to mark up simple plans showing the invisible interior hallways within rooms. These are the pathways you walk to get around in rooms. The minimum width of an invisible hallway in a room, in my opinion, is 24 inches. More often than not, they’re 30 inches wide.

It’s mission-critical that you draw these out and even shade them in with a color on plans. Furniture or built-in cabinets are not allowed to encroach on these spaces. The next step is to create scale cutouts of your furniture to see if it will fit in the remaining space in each room.

You can shortcut this exercise by looking at the existing rooms in your home. What rooms are too small? What rooms might have too much space? Look at each room in your home and write down the tiny things that aggravate you about it.

Lastly, each adult who lives in your house needs to provide input. Make a list of the top three things each person wants to see in the final project. It might be a spacious walk-in pantry. It might be a simple window seat. No matter what it is, try to see if it can’t be incorporated into the final product so everyone is happy!

Column 1638

Self Storage Savings

two-story outdoor shed

Self-storage savings: My two-story shed is now thirteen years old. It’s already saved me over $50,000 in off-site storage fees. You can BUY THE PLANS HERE. Copyright 2025 Tim Carter

Self Storage Savings - Build a Shed

Are you surrounded by off-site storage businesses like I am? Within a fifteen-mile radius of my rural home in central New Hampshire, there are thousands of storage spaces in metal buildings one can rent for a king’s ransom.

Self-storage is the key to saving huge money. There are a few ways to do this.

Within the past few months, an enormous multi-million dollar national-brand three-story storage business opened up. It’s got three loading docks renters can use to store or retrieve their belongings. Just 1,000 feet away, a more traditional single-story metal building with 50-plus units came online in the past month. Times must be really good for people to have so many possessions that they have to store them at one of these places.

The most shocking thing is the cost to rent a space. Are you sitting down? A tiny 5-foot by 5-foot by 8-foot tall cubicle costs $90 per month. That’s $3.60 per square foot per month. A 10-foot by 15-foot by 8-foot tall space is $194.95 per month, or $2,339.00 per year.

The good news is you might have quite a few options to avoid these breathtaking monthly fees. The best solution depends on the size of your lot and your local zoning laws. Your existing garage, should you have one, may be a storage goldmine you’ve overlooked.

I found myself in a storage crisis fifteen years ago. I moved from Cincinnati, Ohio, to central New Hampshire. My wife and I had thirty-five years of accumulated possessions, plastic bins full of cherished toys used by our three children, and lots of furniture. We moved from a larger house to a smaller one.

I had to rent a very large off-site storage space the day the movers arrived. We packed it full of all sorts of stuff. It cost me about $200 a month back in 2010. That same space today is now close to $350 a month.

My lot was large enough that I could build a large 16-foot by 24-foot free-standing two-story shed. I built this shed thirteen years ago in my spare time. It only took about two months to complete it. You can purchase the detailed plans of my shed. Click the blueprint below. The seventeen pages were drawn by an architect friend. Go here to get the amazing plans.

SamplePlan Shed Plans Tim's

The materials for my shed cost just over $10,000.00. It’s a deluxe shed that matches my house. It’s got a handy 6-foot-wide overhead door, a man door, skylights, and two windows. I could have spent less, but I wanted the shed to look like it had been built at the same time as my home. I moved my possessions into the shed in 2012, and since that day, I’ve saved over $50,000 in off-site storage fees. You can save big money, too!

You may want to purchase a pre-built shed. These are built to minimum standards in my opinion, but one might suffice for you. I priced out a 12x10x7-foot shed that has a window and a large door. The cost is only $3,299.00. This shed, if maintained, might last for decades.

You can purchase larger pre-built sheds that can be delivered to your lot. Just be sure you check your local zoning laws before you sign a contract. It’s also important to anchor these sheds to the ground so they don’t blow away in a severe windstorm.

Your existing garage may have a tall ceiling. The garage at my son’s new home has a ceiling that’s almost 14 feet tall. This winter, he and I are going to build a loft with just enough headroom that he doesn’t have to duck up on the loft or underneath it down below.

I built a similar, smaller loft that was 4 feet deep in my last home. I made the bottom of the loft just 6 inches higher than the height of the hood of my wife’s car. She could pull forward and park the front of the car under the handy loft.

This small loft created 640 cubic feet of storage space from what was previously just empty air. Compare that to the tiny 200 cubic feet of space you’ll get with the 5x5 off-site storage locker for $90 per month! My loft only cost several hundred dollars to build.

Do an online search and you’ll discover all sorts of unique storage solutions for garages with taller-than-average ceilings. There’s one system I’d not recommend for my friends or family. This system requires you to install metal tracks on the ceiling. Large plastic bins slide into the tracks.

You need to be on a ladder to slide the bins into the tracks. That’s a very dangerous maneuver, in my opinion. You can lose your balance and fall off the ladder while lifting a heavy bin over your head.

Should you decide to build your own shed or buy a pre-built one, I urge you to watch a video I recorded years ago. The biggest mistake most make is buying or building a shed that’s too small. Empty sheds look spacious, but as soon as you start to put things in them, they shrink in size like a deflated balloon.

I show in my video how to place the things you want in the shed on your lawn or driveway apron. Boxes and bins are easy as they can stack. But lawn mowers, wheelbarrows, snowblowers, bicycles, etc., can take up vast amounts of floor space. https://www.askthebuilder.com/how-to-plan-a-shed/

Once you have all the items placed on the ground, stretch a string around them, creating a rectangle or square. This is the minimum size your shed needs to be to hold all you have now. You’ll need a bigger shed if you add more to your clutter collection.

You can also de-clutter. I’m in the midst of doing that now. I take clutter to my town dump each time I go there with my garbage. My town has a wonderful “free room” in the recycling building. You can take just about any item there and place it on the shelves. Clothes, appliances, books, trinkets, games, you name it, can all be found in the free room.

Some residents retrieve items from the free room and sell them online. You can do that too if you have the time and energy. It’s easy to sell online, and you can turn your clutter into cash with minimal effort.

Column 1637