Workbench

DEAR TIM: I need a workbench at my house. After reviewing many workbench plans, I am a little confused. Is there a difference between a garage workbench and a workbench stand? Is there an advantage to making a metal workbench instead of one made from wood? What would you use for the workbench legs? What is the most affordable way to build a workbench? Laura C., Glendale, CA

DEAR LAURA: A workbench is a subject near and dear to my heart as you might imagine. I have spent countless hours standing at mine engrossed in a project of my own or often something I am doing with one of my children. A garage workbench or one in a basement can be the center of the vortex of enormous pleasure and sometimes great frustration; all in the same project!

There is an enormous difference between a workbench and a workbench stand. You may discover that once your workbench is finished you may need a small stand on the workbench to support different things you are adjusting or finishing. A workbench stand is often a small tripod device that adjusts to different heights. They can come in very handy on any number of projects.

This sturdy and attractive workbench was made entirely from scrap material.  PHOTO CREDIT: Tim Carter

This sturdy and attractive workbench was made entirely from scrap material. PHOTO CREDIT: Tim Carter

There are indeed pros and cons to both metal and wood workbenches. A metal workbench can have enormous strength, but fabricating one can be a challenge. Those who have great welding skills and the needed equipment can quickly use common angle iron to make the legs, shelf supports and the horizontal brackets needed to secure the top to the undercarriage. If you can't weld metal, you can substitute sturdy angle iron that has holes punched in it at regular intervals. Nuts, bolts and washers take the place of welds when connecting the pieces of metal together.

Wood is often the material of choice because it is affordable and many people have both the skills and the tools to work with it. What's more, with a little preplanning you might be able to build your workbench for nothing. I did just that with some dandy scrap lumber I had accumulated. Much of the lumber was solid oak that was salvaged at the loading dock at a supply house I frequent on a regular basis. If you or a friend work at a place that has a shipping and receiving dock, you might be surprised at the rich supply of wonderful wood that could be yours for the asking.

I was able to procure some rough-cut oak that measured 3 by 3 inches. These made wonderful legs for my most recent workbench. I used parts of shipping pallets for the frame of the actual workbench. The top of my basement workbench is made from a salvaged piece of plywood that I then covered with some leftover squares of oak parquet flooring. Try to use oak or some other durable hardwood for the workbench top as these woods can take the years of abuse typically levied on workbenches.

Pay attention to the depth of your workbench top. If you plan on having either metal or wood pegboard on the wall above the workbench, then only make the workbench top 24 inches deep. Resist the temptation to make the top a generous 30 or 32 inches deep. If you do, you will discover it is hard to reach things hanging from the pegboard. But if you plan to have 12-inch-deep wall cabinets over the top, then make the top 32 inches deep for sure.

Be sure to brace the workbench so it does not sway side to side. You can do this quickly with a scrap piece of plywood that is screwed to the back legs of the workbench. The taller the piece of plywood, the stronger the workbench will be.

The height of the finished workbench depends on how tall you are. To get the height right, experiment with your breakfast table. Place a clean drop cloth on the table and place objects on the table that you might work on. Stand at the table and see if the height seems right. If you are tall, try this at a regular kitchen countertop.

If you are looking for scrap or remnant oak flooring for a workbench top, you can also use regular oak strip flooring. I did that years ago on several workbenches I built for customers. There was a bundle or two of leftover flooring that made a superb top.

Be sure your workbench top has an overhang of at least 4 inches on the front and the sides. You will discover this will come in very handy if you need to use larger adjustable clamps to hold something in a steady position while you glue, drill or sand the object.

To keep your workbench top looking like new, always keep a few scraps of three-quarter-inch-thick pieces of plywood nearby. Place these under things as you drill so the drill bit does not puncture the surface of the actual top.

Column 705

Home Heating

DEAR TIM: My home heating bills are going up faster than a jet at an air show. Settle a debate among my fellow employees. Some say it is better just to leave the thermostat at the same temperature all the time as it costs so much to bring a cold house up to temperature. Others say to use a programmable thermostat. Still others feel you should set the thermostat down to 50F at night and while at work. What is the best way to save money on home heating? Marylyn O., Victoria, British Columbia CA

DEAR MARYLYN: Home heating oil prices as well as many other heating fuel costs are going up with little relief in sight. The smart person like you is starting to think about how they can save as it is insanity to waste money on home heating when it is so easy to save.

The first thing you need to realize is that this is a very complex issue. There is no magic silver bullet or one-size-fits-all spandex solution that will allow you to save lots of money and keep everyone within your home comfortable. I am reminded of a neighbor who wanted to save money. She kept her thermostat so low, I nearly turned blue when my wife and I would visit for dinner.

A programmable thermostat, when used correctly, can save impressive amounts of money on your home heating bills.  PHOTO CREDIT: Tim Carter

A programmable thermostat, when used correctly, can save impressive amounts of money on your home heating bills. PHOTO CREDIT: Tim Carter

If you want to save a really significant amount on your heating bills, then set back the thermostat to 60F for the entire heating season while you are awake and then set it to 50F when you are asleep. Go out and buy some long underwear, a hooded sweatshirt and maybe some light gloves. This is a drastic change in your at-home lifestyle, but the savings will be amazing.

Here is the science behind this complicated situation. Most homes are very different from one another. Each one losses heat at a different rate, the well-insulated homes being a better bargain. But each home can have a drastically different source of heat and the rate and amount of heat produced can vary significantly. Keep in mind that furnaces, boilers, heat pumps, etc. are like shoes; they come in all different sizes.

To make things even worse, the heat produced at the point where you and I can first feel it, the floor or wall register or radiant source, can be as cool as 98F with a heat pump or as high as 125-130F with an oil furnace. Natural gas heat can also produce high plenum or register temperatures.

So imagine letting a drafty house heated with a marginally-sized heat pump drop down to 55F and the outdoor temperature is at 0F or below. It might take hours and hours for the house to get comfortable with the heat pump running at full throttle. Compare that to what might happen to a super-insulated house that has a slightly oversized oil furnace. The oil furnace might get the house toasty warm in just 15 minutes!

Far and away the best solution to save money and remain comfortable while you are awake and at home are high-quality programmable thermostats. The best ones are outfitted with mini-computers that can figure out how quickly your furnace or boiler can bring your house up to the desired temperature so as to use the minimal amount of fuel but keep peace among those who want the house to be warm.

The trouble is, many people who have programmable thermostats do not extract the full amount of savings from them. You need to set them up to match your schedule and that of your family. The best thermostats have settings for each of the days of the week, vacation settings and temporary override settings. The people who save the most on their home-heating costs are those who make the furnace go up and down in temperature at least four times a day.

Keep in mind when programming the thermostat when you jump in bed each night. Since it takes the average house a while to cool off, you might set the thermostat to setback an hour before you slide under the sheets. There is no need to keep the heat on a higher setting up till the moment you fall asleep.

Do not underestimate how long it can take a heat pump to bring a cool or cold house up to temperature. Many people who have heat pumps complain how they produce a cold or cool heat. That may seem like an oxymoron, but you may agree when and if you place your hand over a heat-pump register as it is working at its best.

Also keep in mind that if you want to save on home heating, take the time to identify any and all air leaks. Air infiltration is a very significant source of heat loss. Caulk exterior cracks that allow cold air to enter your home. Think as if your home was a boat and the air was water. Stop all air leaks so you do not sink from a heating bill that needs a tsunami of cash to pay for it.

Column 704

How To Install A Prehung Door

Tapered wood shims

Install prehung door: You need adjustable shims and the correct rough opening. Copyright 2018 Tim Carter

"Before the door is installed, make sure the top and bottom of the door are painted. This seals the wood so the door doesn't warp over time."

Install Prehung Door Checklist

  • Rough opening must be correct
  • Trim side jambs so top jamb is level
  • Put shims behind each hinge
  • Install 2.5-inch screw under top hinge

DEAR TIM: I need to know how to install an interior prehung door. This door is a regular interior door, not an exterior door. Is this job as easy as the salesman made it out to be?

I'm suspicious, as it seems that you need some good skills to install a prehung door. What can you share so that I might have a fighting chance as I wrestle with this door? Bill F., Greeneville, NC

Related Links

Dual French Door Installation - DO NOT SHARE! SECRET!

Install a New Front Door in Hours - DO NOT SHARE!

Is It Difficult To Install a Prehung Door?

DEAR BILL: Installing an interior prehung door is not a job I would entrust to a rookie carpenter. The job is fraught with all sorts of little challenges that are solved with tricks that come with lots of experience.

To end up with a door that fits perfectly without rubbing, you need to know some of these tricks. In other words, the salesman either thought you were a seasoned carpenter or he needed to make a sale. No worries though, as I will try to give you as many tips as possible to help you survive this job.

Free & Fast Bids

CLICK HERE to get FREE & FAST BIDS from local finish carpenters who can install your door.

What Does Door Handing Mean?

Door handing refers to the side of the door that the knob and hinges are on when the door is closed. It is a very common mistake to purchase a prehung door that swings the wrong way.

How Do You Determine Door Handing?

To determine proper handing, always imagine looking at the door and be on the side where the door swings towards you. If the doorknob is on the left side of the door, it is a left-handed door. If the knob is on the right, it would be a right-handed door.

Why are the Jambs Long on Prehung Doors?

Prehung doors often come from the factory with the jambs a little long. This is done on purpose so you can install the door in places where there will be carpet and not have to cut off the bottom of the new door.

How Much Space Should Be Under the Door?

The goal is to have about one-half-inch of airspace between the bottom of the door and the top of the carpet or any finished flooring material. The door jambs don't have to touch the subfloor in carpeted situations, but they must be in contact with hardwood flooring, ceramic tile, cork or other finished floors that are typically smooth.

Should the Top and Bottom of the Door Be Painted?

Before the door is installed, make sure the top and bottom of the door are painted. This seals the wood so the door doesn't warp over time. You can just lay the door flat on the ground and open it to check to see if this was done at the factory. It is important to have the top and bottom of doors sealed to prevent warping.

CLICK HERE to get FREE & FAST BIDS from local finish carpenters who can install your door.

How Much Gap Should There Be Between the Door and the Jamb?

Prehung doors typically come from the factory with a one-eighth-inch gap between the edges of the door and the door jamb. The doors are almost always perfectly square, so the challenge is to square up the jamb within the rough opening so the gap between the door and the jamb stays consistent.

The biggest challenge is cutting the lengths of the jambs correctly so the gap at the top of the door is correct. If one leg of the jamb is too long, you will end up with the door rubbing against the top jamb or a horribly large gap between the door and the jamb just above the doorknob.

Should the Side Jambs be Plumb?

It's really important for the door jambs to be installed plumb. Use a four-foot level to see how plumb the rough opening is that is common to the hinge-side of the door. Use wood shims with the level and tack the shims against the jamb until the level is perfectly plumb. It is best to install shims at the same height as the door hinges.

Install Prehung Door Steps:

  1. Position the prehung door into the rough opening, slide it up against the shims, and see how things look. You know you're in great shape if the gap along the hinge side of the door and the top of the door are the consistent one-eighth inch. Don't worry for now about the gap alongside the doorknob side of the door. This is the least important jamb.
  2. Use 10-penny finish nails to attach the hinge jamb of the door to the rough jamb. Carefully nail through the jamb and into the shims. Do not drive the nails completely into place. Leave at least one-half inch of the nails exposed in case you need to make adjustments to the length of the door jambs or you have to move the jambs slightly in and out so the door fits perfectly. Once all adjustments are made, all shims are in place and the door fits well, then you can drive the nails home recessing the nail heads with a nail-setting tool.
  3. To really add a professional touch to your installation once complete, you will want to temporarily remove the top hinge from just the door jamb. Doors are heavy and over time the weight of the door can actually pull the jamb away from the finish nails. This will cause the door to rub and not fit well.
  4. If you take a three-inch-long screw and drive it through the jamb into the rough jamb at this upper hinge, the door should stay put for many years. It is important to predrill the hole so you do not split the jamb and create a countersink hole so the head of the screw does not touch the back side of the hinge once the hinge is reinstalled.
  5. Some carpenters just remove one of the regular short hinge screws and replace it with a longer one that will penetrate into the rough jamb. This method will also work.
  6. When shimming the jambs, place the shims at about two-foot intervals and always nail through the jamb at a location where you have installed shims.
  7. CLICK HERE to get FREE & FAST BIDS from local finish carpenters who can install your door.

Column 703

Crown Molding eBook

Crown Molding eBook:

Satisfaction Guaranteed! Save time, material and cost in minutes!

Download Your Copy Now

Take this quick quiz to see how you score on the

Crown Molding Installation Quiz

  1. Are there 20 or more scrap pieces of crown molding scattered around your miter saw?
    Yes
    No

  2. Is your spouse still talking to you?
    Are You Kidding Me?
    Does Growling Count?

  3. Are the joints between your miters big enough for a 747 to taxi through?
    Yes
    No

  4. Do you want your friends and neighbors to be impressed with your carpentry skills?
    Yes
    No

  5. Do you want to know how to cut perfect miters each time so your spouse or significant other will see you for who you really are? You know, the DIY Superhero with the flashy flannel costume under those tattered clothes?
    Yes
    No
If you answered Yes or Are You Kidding Me? in two or more of the questions above, you need my Instant Download Crown Molding eBook!

     
The only resource you need for cutting and installing perfect Crown Molding.

  • Contains 6 instructional videos that make the hardest parts EASY
  • Become a Crown Molding expert in less than 30 minutes
  • Over 25 large color photos showing every key aspect of your project
  • Easy to follow, step-by-step instructions from beginning to end
  • Recommendations for tools needed and safety tips
  • Invaluable master carpenter tips are highlighted in color
  • NO instructions for using a coping saw nor a compound miter saw are included. WHY? Because you don't need either tool! Master carpenters for hundreds of years never had those tools. You don't need them either.
  • 100% no-hassle money-back guarantee
  • Download your copy immediately - only $17.00


Download Your Copy Now 


Quote

Tim, I purchased two of your eBooks ...... Your directions to download them were easy to follow! ..... the eBooks were EXCELLENT references on HOW to do it right! This was the best money I've ever spent!!! Your eBooks are fabulous, full of details, with great pictures to visualize every step. You took all the MYSTERY out of my projects!

- Patrick M., Baltimore, MD

Quote
Quote

I was fretting about doing the crown molding job I had, as I could not figure out how to use the compond miter saw to cut crown molding.  I went to the compound miter saw sites and found their tables of settings jiberish (especially the day before the job).  I found your site and coughed up the 20 bucks and I followed your suggestions about making the test strips and voila! Within a couple of hours, I literally couldn't believe I was making almost perfect crown moldings!  Not only that, for each crown molding I layed, I tested the corners to be molded first, as you suggested, then took the correct test strip from each corner e.g, outer corner, left side, 45 degrees (plus the other side of the molding) inner corner, 43 degrees, right side with me to the saw. Then I replicated the strips (only using the correct length).  Thank you. Best 20 bucks I have spent!

- Allan H., Centreville, VA

Quote


"I had a trim job that included crown molding coming up real soon. So, having never dealt with crown before, I prepared myself by reading whatever articles I could on the subject. I found your eBook the night before I was scheduled to do the crown portion of the job. I read it front to back several times and then printed out a "cheat sheet" which I kept right there next to the saw. I made no mistakes, wasted no material and the crown looks great!  Thanks for the informative book!"

- John Kennedy


"I just reviewed the eBook – great idea setting up inside and outside corners of varying angles! This step alone will save me the cost of your eBook (in trashed molding material).

Thanks again!"

- Patrick Giacobbe


Discover The Secrets to Cutting and Installing Perfect Crown Molding:

Just seconds from now you can discover my secret tips for cutting and installing crown molding and the final steps of finely-crafted finishing details. In minutes, you will be making professional-looking miter cuts. This one-of-a-kind eBook will teach you everything you need to know for perfect crown molding installation! The cost for this invaluable tool is only $17.00.

This eBook contains many gorgeous step-by-step color photos and covers the following topics:

Here is a sample page to give you an idea of
how colorful, crisp and helpful this eBook is:

Sample eBook Page
This eBook is loaded with step-by-step color photos!
  • Required Tools and Safety
  • Positioning and Cutting Crown Molding
  • Inside Corners
  • Outside Corners
  • Ending Crown Molding on a Wall
  • Nailing Tips
  • Crown Molding On Top of Cabinets
  • Crown in 45 and 60 Degree Bay Windows
  • Crown Molding in Stairwells
  • Cathedral and Vaulted Ceilings
  • No Tedious Coping Required! Why? To create the cut line you follow with the coping saw, you have to cut the molding in the miter saw the way I show you in the eBook. Why waste time coping when you already have a perfect fit? No other publication I know of shows this trick to perfect fits in corners using just a miter saw!
  • Six Crown Molding videos covering: Miter cuts, installation tips, cabinet crown, fancy crown molding corner cuts, inside and outside corners, and more!

Quote

"I have downloaded numerous free articles on installing crown molding. I also bought two books on finish carpentry. Your Crown Molding eBook is by far the best I have ever read. Simple, easy to understand and insights no one else mentions." - Don Yoshikawa

----------------------------------------------------------------------------------- 

"Your Crown Molding eBook was very helpful. I spent a day trying to cope the inside corners using Home Depot's $20 1-2-3 series with no success, but switched after reading your material. Thanks again!" - Scott Peterson

----------------------------------------------------------------------------------

"I ordered your Crown Molding eBook a month ago. The BEST money I've ever spent. The molding in my spare bedroom looks incredible." - Scott Weedman

----------------------------------------------------------------------------------

"I tried your on-line manual on crown molding installation for upper wall mount cabinets.  Awesome! It worked just like you said it would. I ended up with a beautiful finishing touch to some rather drab looking upper cabinets. Thanks, again!"  - Ian Cameron / Zamboni Construction /  Sedona, AZ

Quote
Quote Quote
 

Download Your Copy Now

Satisfaction Guaranteed

This eBook is an instant download the moment your credit is approved. It comes to you in PDF format, that can be viewed with free Adobe Acrobat Reader software.

Final Note:

"Having the right knowledge is as important as having the right tools for any project. My Crown Molding eBook is an opportunity to discover the invaluable tips that determine the success of your Crown project. We are so confident that you will enjoy and benefit from this eBook that we guarantee your satisfaction, with our no-hassle, no questions asked return policy. You have nothing to lose and everything to gain."

Enjoy,

Tim Carter
President, Founder
AsktheBuilder.com

Drywall Repair

DEAR TIM: My testosterone-filled son was practicing some self-defense punches, and now I am left with a pesky drywall repair. Should I go look at the drywall repair kits, or is there a better way? I can't afford to hire any of the drywall repair services. Can you teach me how to repair drywall? Cindy R., Racine, WI

DEAR CINDY: Drywall patching and repair is not a difficult job. In my opinion, this is what I would have an apprentice drywall finisher do for the first week if I were in charge of training. The steps required to repair drywall are few and not too challenging.

If I had a dollar for every drywall repair kit I have seen at the various conventions I attend, I would be a very rich man. Many of these drywall repair kits are wonderful, and a few border on genius. I have always liked the one that was a thin perforated piece of aluminum. It had adhesive on one side. You peeled off a layer of protective paper, stuck the metal over the gaping hole making sure the edges of the metal lapped over solid drywall at least one-half inch and you were 80% finished!

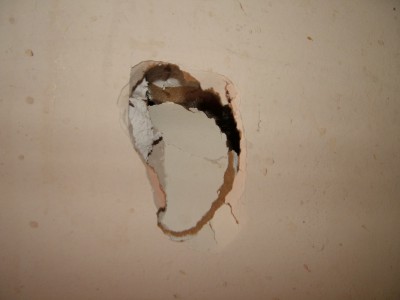
This nasty-looking hole in the drywall can be completely repaired in three hours or less with the right products.  PHOTO CREDIT: Tim Carter

This nasty-looking hole in the drywall can be completely repaired in three hours or less with the right products. PHOTO CREDIT: Tim Carter

All that was left to do was cover the metal with two coats of drywall topping compound. The first coat would ooze through the holes and once dry would make the flimsy metal patch quite stiff.

But as much as I am smitten with many of the drywall repair kits, I usually prefer to do drywall repair using a small piece of drywall. This ensures there is a solid piece of drywall where there was moments before a hole. Be aware that there are many ways to do drywall repair using a small piece of drywall, but the method I am about to describe has never failed me.

Start the job by trying to rip out the dangling piece or pieces of drywall from the hole. Then carefully insert your finger into the hole trying to probe and feel if there are any pipes or wires behind the drywall.

Assuming there are no wires and pipes in the way, you now need to use a pointed drywall saw that resembles the spear on a sailfish. Create a square or rectangular hole using this saw. The hole should be at least 3 inches wide and at least 3 inches tall.

Column 702

Tim’s Cool Stuff

Below are some of my favorite tools, accessories and toys, that I use. I like them because...

CCRadio Plus

CCRadio Plus

CCRadio Plus - I like this radio because it delivers a high quality sound and pulls in the stations, even in my basement office. The built-in NOAA Weather Radio allows me to check on the current forecast and on any severe storm warnings. Other features I like are the 5-memory preset buttons so I can switch between my favorite AM, FM, Weather and TV Audio channels, the clock alarm and sleep timer. Best of all is the great sound.


Atomic Clock Radio

Atomic Clock Radio

I like this clock radio, especially with just changing my other clocks for Daylight Saving Time. This Sangean RCR-2 Digital Clock Radio is atomic. I don't have to reset the spring forward or fall back; it does it for me. Even after a power failure, this clock radio resets itself to the correct time. Gets me up and going on time every morning.


Wireless Weather Station

Wireless Weather Station

Here's how I figure out how to dress for the day. I use the La Crosse Technology Wireless Weather Forecast Station. The on-board barometric pressure gauge and pressure history bar graph lets me know if a storm is building. The clock is atomic, so no resetting to the proper time after Daylight Saving Time. The outdoor remote transmits for 200 feet. After hanging the outside remote sensor in the shade, I am ready to forecast the daily weather.


PowerMonkey Power Source

PowerMonkey Power Source

Okay, raise your hand if you have forgotten to recharge your cell phone or digital camera! Yes, I have forgotten and the device beeps that the battery is low and is shutting down. Just when I need to make that important call or take that once-in-a-lifetime picture. Well, I like the PowerMonkey. This small device is a portable, backup power source that can help keep my panic level down when the device is shutting down. With a variety of adapters, I can plug this in and power up the device. Fits in the palm of my hand even when connected to the cell phone.


Granite Tile

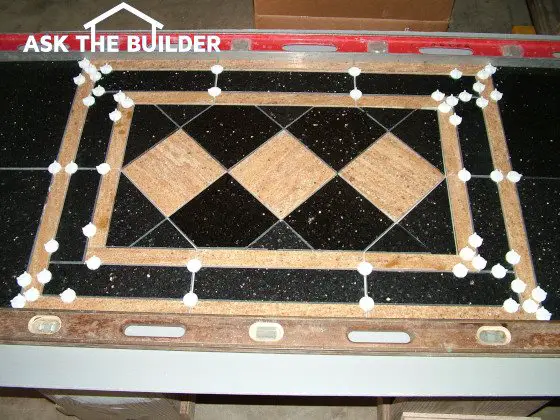
granite tile geometric design

This stunning geometric design was made by cutting up a few pieces of standard granite tile. PHOTO CREDIT: Tim Carter

DEAR TIM: Granite tile looks like it would be excellent flooring or a wall treatment. Is granite flooring a good choice or will it scratch easily? I am thinking of installing granite tile in several places, but wonder if I can do it successfully. Can you make different designs with granite tile, and if so, how? How hard is it to install granite tile on floors or walls? Karen S., Mount Laurel, NJ

DEAR KAREN: I'll go on the record right now. You are going to love the granite tile you will be installing. Granted (no pun intended), I am not as objective as I should be since I am a college-trained geologist and granite happens to be my favorite rock. You should be forewarned now. When you visit a real stone supplier that has a full assortment of granite tiles, you will be mesmerized by the colors, patterns, different-sized mineral grains and beauty of the granite.

The stone suppliers I visit stock granite flooring in 12-inch by 12-inch tiles. The tiles are about 3/8 inch in thickness and precision cut so the sizing among different tiles is very uniform. This is an important thing to consider as the finished grout lines will readily call out granite tiles that are too large or too small.

One thing you will notice quickly is that granite tile is very heavy. After all, it is solid rock. You need to take this into consideration if you are installing the granite on walls or some other vertical surface. Gravity will be constantly tugging at the granite tile and if it is not attached securely, it will fall off the wall. In fact, the substrate like cement board or waterproof gypsum board must be expertly attached to the wall studs or the granite can pull it from the wall as well. You can't use too many screws to attach these products to the wall studs.

Granite is a very hard rock. A geologist will tell you that it is an igneous or metamorphic rock that is highly saturated with silica. Silica when combined with oxygen makes the mineral quartz, and it has a hardness of 7 on the Mohs scale. Suffice it to say there are not too many things that will easily scratch granite tile.

I can't think of one place where I wouldn't install granite tile. It can withstand just about all the abuse you can throw at it. It is ideal for exterior applications as many of the early roads in the USA were made from granite cobblestones. I have granite stones in my own driveway and they are unaffected by heavy trucks or freezing weather.

You can successfully install granite. When granite tile is installed on floors, one of the most important things to keep in mind is that the subflooring beneath the granite must be solid with no flex in it. Granite tiles are strong, but as with any stone product, it can crack if it is put under tension. A hollow spot beneath a granite tile or a flexing subfloor can cause the granite flooring to bend and crack. Be sure the floor beneath the granite tile has all low spots filled and any high spots ground down. You want the subfloor to be in the same plane.

I prefer to install granite tile using cement-based thinset mortar. This product is very sticky and will bond very well to the granite and the wall or floor surface. Consider using a crack-isolation fabric between the granite tiles and any flooring to prevent cracks in the finished granite. The lines between each granite tile can be grouted with unsanded wall grout if the joints are 1/8 inch or less in width. Joints wider than that should be grouted with sanded grout.

Use a diamond wet saw to cut the granite tile. In fact, that is just about the only tool you can use unless you want to spend days sawing the granite tile by hand. If you get a powerful diamond wet saw, you can cut the granite tile into any shape you desire. I made an interesting geometric design for my daughter's shower wall using standard granite tile. It takes a while to layout and make the precision cuts, but it is absolutely worth it. These designs look stunning when you use different colored granites to complete the design.

Granite tile does not come with self-spacing lugs on the edges of the tile. This means you have to space the tile by using your eye or incorporating plastic spacers as part of the installation. The spacers are easily removed once the thinset mortar has cured.

Thinset mortar comes in two common colors: gray and white. I urge you to use white thinset for lighter-colored granites. Be sure to ask the stone supplier for the exact product to use to secure the granite tile to the floors or wall. Avoid the organic mastic products that look like cake icing. Often these do not have the strength needed to hold granite in place permanently.

When installing granite tile on walls, it must be supported well until the thinset cures. The granite is so heavy, it will slide down the wall. This is especially true as you start to stack pieces on top of one another and the combined weight is hundreds of pounds. If the granite moves as the thinset is curing, it weakens the bond between the wall and the granite significantly.

Column 699

SWF Test Page

..

Home Remodeling

25 Things You Must Know If You're Remodeling

Remodeling is as different from building a new home as night from day. When you visit your new home construction site, you can look around and then go home. You don't have to deal with the workers and the mess.

Remodeling is the exact opposite. Your normal routine is rocked to its core. Strangers, whom you have never seen, invade your home. The excitement of the job starting soon wears off and becomes a dull headache.

If the remodeling job is a major one, such as kitchen remodeling, or bathroom remodeling or even a room addition, the impact on your life will be significant. Many people are not prepared for the disruption, dust, and missed deadlines.

To make a remodel job go smoothly, it require enormous amounts of planning. Be sure to convey your bathroom remodeling ideas or basement remodeling concerns or what ever room you are doing to your contractor at the beginning of the remodeling projects. The remodeling contractor is responsible for this, but you must make sure he or she has covered all of the bases. In my opinion, you can only do this if you have a clear understanding of all of the things that can go wrong during the remodeling process. With this knowledge, you can already have a strategy in place to eliminate problems before they happen.

Asbestos and Lead

Harmful basic chemical elements lurk like hidden time bombs in many existing homes. Two of the most prominent are asbestos and lead. Asbestos was commonly used in insulation pads that sat on top of furnaces and was used in wrapping materials around forced-air heating and cooling ducts.

Asbestos was also used in floor tiles, roofing, piping, adhesives, etc. In other words, it can be found just about everywhere. You need to make sure you identify potential trouble areas in your home and make sure your contractor deals with the danger in an approved manner during the asbestos removal.

Lead is a very serious hazard that can be found in many homes built prior to 1978. If your remodeling job involves scraping, sanding or removing anything that might contain lead paint, you better make sure all precautions are taken so your home does not become listed as a Superfund site. Lead poisoning is a possibility if not handled properly.

Bid Breakdowns

When you are soliciting bids from different contractors for your upcoming remodeling project, it is imperative that they submit detailed itemized bids. You need to know how much money is allocated for the labor and material for each part of the job.

This information will be used by you to why the low bidder is low and why the high bidder is high. If there is an enormous amount of disparity between contractors when you compare the cost of the same task, this is an area that needs further discussion. For example, if you are getting a new roof put on and painting done and you have specified the exact shingle you want, then the actual itemized number for the shingles should be within $50 or so of one another as both contractors should have calculated the same number of shingles.

The breakdown will also be an invaluable tool when you need to make payments. When a payment is requested, it becomes your job to view the work that is complete and ensure it is satisfactory. Refer to the initial bid breakdown and make sure to only pay for that amount of work along with a pro rata portion of contractor overhead and profit.

Customizing Touches

One of the most fulfilling things, I experienced as a remodeling contractor, was doing extra special things for customers. Creating special nooks or crannies, delightful custom window seats, maybe it was a special set of steps leading from a deck to a patio.

If you start to gather photographs from magazines and even the Internet that depict things you especially like, an experienced carpenter, painter or other trades person might be able to create it for you with very little extra work.

But you need to communicate these wants and desires in the planning stages. Photographs are an ideal tool for communicating what you want. My wife did this exact thing with me as she saw a gorgeous wood picket fence in a magazine. Without any plans and just working from the photo, I created a nearly exact copy. It doesn't cost one dime to ask for a price or express an idea.

Debris Removal

It is surprising to many people how much debris and garbage are created during a moderate to large remodeling job. The problem on a remodeling job is that you don't want it scattered or piled in the yard or left inside if at all possible. Any trash that is combustible represents a serious fire hazard as it is commonly stacked so there is lots of air around it. A spark from a plumber's torch, a carelessly discard cigarette, etc. can create an inferno that can cause serious damage.

To make matters worse, when debris is being created, often the structure is being altered. Some structures can lose much of it's fire stop characteristics, especially if drywall and plaster have been removed. Open walls and ceilings provide a pathway for rapid fire spread.

Include in your contract that all debris will be cleaned up each day and placed in a metal container that is placed safely away from your home. Request that the work area be broom clean each day and vacuumed at the end of each work week.

Duration of Job

The last thing you want is your house torn up for an extended period of time. If you have seen your friends', relatives', co-workers' and neighbors' homes go through a remodeling job of any size, you know it can take a while. Anything that delays the job causes the pain threshold to rise exponentially.

Using your past experience and observations of other people's projects, you might be able to get a feel for the length of time a job should take. If a contractor says they can do a small room addition from start to finish in 10 days, ask him what magician will show up. You may be surprised as he may have the addition pre-built at a modular home factory!

It is possible to compress time schedules, but your job during the bidding process, is to request a detailed time line of what tasks are going to happen each day or each week. Compare the schedules that each contractor provides to see if each one has accounted for each task. If a contractor refuses to produce a schedule, it might be a sign of disorganization.

Dust Control

Even small remodeling jobs create dust. Large-scale demolition can create dust storms within homes. When you are interviewing contractors, during the bidding process, have detailed discussions about dust.

Take notes during these discussions. If the contractor says something that doesn't sound right, ask for clarification. When you talk with past customers of each contractor, ask specific questions about how well dust was controlled.

Some dust is inevitable, unless the contractor sets up a negative pressurization environment where the work is taking place. This setup costs extra money and is widely used by the mold abatement companies if you or someone in your family is sensitive to dust.

Keep in mind that homes equipped with recirculating forced air systems must be turned off during periods of dust creation. The return air aspect of the system can inadvertently pull dust into the system and broadcast it throughout the home.

Extra Telephone

It seems as if everyone has a cellular telephone today. But it is entirely possible for a battery to die or a cell phone to be forgotten at home or become damaged at the jobsite.

The last thing you want is a contractor or one of his subcontractors using your phone. One or two phone calls is not bad, but day-after-day use of your home phone can become very annoying.

It gets worse, some contractors give out your telephone number because they might expect a return call. You then become an unpaid secretary or a receptionist for the branch office of your contractor.

The solution is simple. Place language that your contractor must install a temporary land telephone line or at the very least buy a temporary cell phone that is kept at the jobsite for all subcontractors and employees to use. We have more options now than ever with respect to communication.

Fumes

Many parts of the remodeling process can and do create fumes. The assembly of PVC plumbing pipes creates very noticeable fumes. Soldering copper tubing creates fumes as well, Drying paint liberates vapors into the air that contain a brew of different chemicals.

Urethanes, adhesives, etc. all create fumes that can invade your home during time periods where windows must be closed. These accumulated fumes can cause discomfort and actually sickness to people who might be acutely sensitive to some of these very peculiar chemical vapors.

Temporary space heaters used for all sorts of heating and drying purposes can create deadly carbon monoxide. Fumes can enter your home quite by accident and cause a problem. A heater placed innocently next to an air intake might cause massive amounts of carbon monoxide to be inject into your interior air. It is extremely important to discuss fumes with the bidding contractors and what they plan to do to minimize them in your home as they work.

HVAC Sizing

If your remodeling project involves adding additional space, there is a strong possibility you will have to upgrade or modify your existing heating and cooling system. Your existing furnace and air conditioner might be at the limit now with respect to the amount of heating and cooling BTUs they can handle.

It is extremely important that you discuss this possibility with the remodeling contractors during the bidding process. Talk with them about heat gain and heat loss calculations. If the contractor or sales person squints or tilts their head when you mention those words, you might be talking with the wrong person.

Once you have awarded the job to a contractor, it is imperative that the heating and cooling contractor come out and gather the necessary data to perform the needed calculations. These tell them whether or not your existing heating and cooling equipment will work.

Insurance Certificates

Unfortunately, we live in a society that seems to be over-populated with attorneys. These people need to feed their families and some of them seem to love to work on accident claim cases. You need to make sure you are never named as a party to one of these lawsuits.

You can do this by taking about insurance certificates with the bidding contractors. It is not always enough for a remodeling contractor to show you he has coverage for his employees. What is important is that each and every person who shows up to work at your home is indeed covered.

Although it is a lot of work, you must insist upon doing it. You must make it very clear to the bidding contractors that they must supply you with current workman's compensation and general liability insurance certificates for all subcontractors who plan to work on your job. These documents need to be produced the day the contract is signed.

Matching Materials

Clothing, automotive, etc. styles change on a constant basis. The same is true for products used to build your home. Your existing home may have very unusual interior and exterior woodwork or plaster. If your remodeling contractor is a professional, he or she will know how to get exact matches on many of the materials used in your job.

There are many woodworking mills that can easily create identical profiles for door and window casing as well as crown molding and baseboards. It will cost more than buying stock trim, but the long-term value you add to your home by doing this will be well worth it.

With lots of extra effort, it is sometimes possible to get very close matches on brick and even ceramic tile. If you are trying to match brick, always go for the color match first and then the texture match. From the street, you rarely can detect texture but readily notice differences in color.

Pavement Problems

Do you have a gorgeous driveways, sidewalks and patios right now? If so, it would behoove you to take very good photographs to prove it. Remodeling activity almost always causes damage to existing paving materials around a house.

Dumpster deliveries, concrete trucks, lumber trucks, etc. can not only crack and break apart paving, but they can spill seas of motor or hydraulic oil on pristine concrete or blacktop.

It is imperative that you and the bidding contractors talk about how your paved surfaces will be impacted by the remodel job. Document what each contractor says and decide who has the best plan to protect your current investment. The last thing you need is an argument that a crack or an oil stain was already there. This is the reason for the photos you took prior to the remodeling project.

Be aware that large loaded delivery trucks can weigh as much as 20 times what your car weighs. It is no wonder thin concrete slabs crack and blacktop driveways crumble when a truck backs up onto it. Read the delivery tickets that are signed by the workers and most have damage waivers that relieve the truck companies of responsibility if a person allows them to drive onto your paved surfaces.

Payment Schedules

This is one of the most important parts of your remodeling job. The money you possess is the only leverage you have to ensure your job gets completed and done to a level of quality you have agreed upon in your contract.

All too often, people advance large sums of money to the contractor when the contract is signed. The only time this is necessary is when your job requires special order materials to be ordered before the job starts. Examples of this might be semi-custom or custom cabinets, a custom front door, custom garage doors, etc. Any materials that are commodity items that can be purchased at supply house do not qualify.

Keep in mind that your contractor should have open accounts at all suppliers. If he does, why would he need advance money? He doesn't pay workers in advance, nor does he pay for supplies in advance.

You must always retain a sufficient amount of money to complete the project no matter what stage it is in. When you do pay for completed work, the contractor must supply you with notarized affidavits from all who have work on the job as well as all companies that have supplied material. Never issue a payment without having these documents. Get your payment calculator out and be sure the total amount you pay each time needs to match the amounts on all of the affidavits.

Plans - Triple Check Accuracy

As with new construction, the plans, blueprints, and written specifications are the primary tool that communicates to the remodeling contractor, suppliers and all subcontractors what is going to happen at your home. The ideal set of house plans would be ones that are so complete and so detailed that no one ever has to ask you a question. It is possible to do this as I have been blessed to work on such a job.

But this goal is very hard to reach. It requires you to think through the simplest things, such as the exact place where a toilet paper holder might go. You need to make all product selections, even paint and stain, before the job is even bid.

Is there a value to all of this? Absolutely, yes. If your plans are this complete, the bids you receive should be highly competitive. Dishonest contractors can't play the famous bait and switch game with absurdly low allowances for things when plans and specifications are complete and accurate.

Plumbing Disruptions

Many remodeling jobs involve plumbing. What may seem to be a very simple task of just turning off your main water valve and turning it back on can wreak havoc in an older home. When water lines refill from the rapidly incoming water, it can dislodge pieces of sediment from the sides of the older pipes. This sediment can clog faucet aerators, toilet fill valves and faucet valve cartridges.

It is very important that you discuss all plumbing jobs with your contractor before work begins. If water needs to be shut off to solder pipes, what happens if a small fire starts? If drain lines need to be cut into to install a new branch drain line, how long will the toilets in the house be inoperative? These simple questions need solid answers.

Avoid major plumbing changes on Fridays. If leaks develop after workers go home, will you be able to get instant repair service over the weekend? If you must have work done on a Friday, have a contingency plan in place. Make arrangements such that you can easily contact the plumber or the remodeling contractor in the event of plumbing problems.

Porta-Potty

Bathrooms are private places. The last thing you need is a bunch of strangers with dirty clothes and muddy boots walking onto the clean throw rugs in your bathrooms or powder rooms.

Major remodeling jobs that will see many people at your home for weeks on end need a temporary toilet facility. Many of these are quite discreet and they allow you to maintain control of a very important part of your home. This is an important issue and you should not budge on it.

Make it very clear to the bidding contractors that a temporary toilet must be on the jobsite and that it must be serviced once or twice a week.

Pre-Order Materials

Any type of delay on a remodeling job creates havoc and stress. You can minimize delays by making sure the exact materials you need are at the jobsite long before they are needed.

This concept may seem simplistic, but it is often overlooked. If you have a safe and secure place to store products that are not readily available, why not buy them in advance and have them on hand?

Examples of this would be specialty faucets, hardware, light fixtures, ceramic tile, special-order windows and doors, and any other material that is not ordinarily in stock. It is also very important to inspect these items to make sure there are no defects and that they are exactly what you ordered. It is not uncommon for the wrong product to be shipped.

Protecting Finishes

Imagine how many trips up and down your stairs a remodeling contractor and his subcontractors might make as they remodel a second-floor bathroom. Without protection, the stairs, carpeting, handrails, walls, etc. can easily be damage or scuffed.

I suggest having a very frank and open discussion with your contractor about what steps will be taken to protect all existing surfaces both inside and outside of your home. Take very good notes and write down in the contract any promises the contractor makes with respect to what he or she intends to do.

The marketplace is crammed with many surface-protection products that help contractors keep dirt and dust away from things that are important to you.

But keep in mind it doesn't stop with existing materials. Many a new tub has been scratched by a drywall or ceramic tile subcontractor. Finish carpenters can scratch new hardwood floors with tools when they come back to install toe stripping. Discuss all of these issues with your contractor so things that are in excellent shape stay that way.

Scheduling

One of the top complaints of homeowners who have gone through a major remodeling job are delays caused by scheduling snafues. Large construction projects employ special people who are experts at coordinating the arrival of both materials and workers so that the job continues from start to finish with no disruption.

Small remodeling contractors can create simple charts that do the same thing. The trick is to correctly identify the realistic amount of time it takes to do a particular task and then place it in the right position on the schedule.

The next task is to determine which jobs can occur on the job at the same time. It is often possible for a plumber to be working inside a room addition while a bricklayer or siding contractor is applying the outer skin to the job.

Request a written schedule from your contractor in the bidding phase. See if any of the contractors you are talking with can produce one they are currently using on an existing job. If they can't, you better talk with past customers to see if the jobs they did progressed with little or no interruptions.

Selecting the Real Professional

I often think this is the Holy Grail of both new home building and remodeling. Every homeowner wants the best contractor, who is both professional and honest. These people do exist. They can often be found in just about every city and county in the nation.

If you hope you have the right contractor for the job, you may already be in trouble. You can't ever base decisions on hope. You start the process of finding the professional by conducting a thorough and in-depth interview. This may seem unusual, but it is a common practice in the business world.

You can ask very interesting questions and get some fascinating information. For example, ask a contractor the names of the last three books he has read. Ask if he attends remodeling conventions. If not, ask why. Ask them if they volunteer time. If so, where? Do they coach children's teams? When asked to produce an ID, does the contractor show you a driver's license or some other card? Never forget that it is your home and it represents an enormous investment. You must be sure you and your contractor are a close, if not perfect, fit.

Temporary Kitchens and Baths

If you have never kneeled down to wash dishes in a bathtub, you are not missing a thing. It is miserable and it is humiliating. It is also unnecessary.

If your kitchen is going to be torn up for several weeks, ask the bidding contractors how they intend to provide you and your family with temporary sinks, cooking appliances and refrigeration. Creative and professional remodeling contractors can often throw together a temporary kitchen that can roll into and out of the kitchen in progress each day.

Bathrooms are even more critical. It is not uncommon for a professional remodeling contractor to build a temporary shower in some location while the primary bathroom is being remodeled. Sinks and toilets are a must. There must always be functioning sanitary plumbing fixtures for you at all times. Excuses are reasons for failure. Do not tolerate them.

Trees and Landscaping

The landscaping around your home may be priceless. How many years has it taken a particular tree to reach its current height? You may have tens of thousands of dollars invested in expensive flower, bushes, shade plants, etc. The last thing you need is permanent and irreversible damage to your trees and vegetation caused by an unknowledgeable contractor, subcontractor, excavator or delivery truck driver.

The best way to ensure you preserve all of your plants is to arrange a consult with a certified arborist long before your project begins. Get written instructions from this person as to what needs to be done to make sure all trees and plants will survive the remodeling ordeal.

Make these written instructions part of the bidding documents and part of your contract. Be sure the contractor you choose has sufficient general liability insurance to cover damages and that the policy specifically covers damage to trees and landscaping.

Valuables

This is an uncomfortable subject, but one that must be discussed. There is no doubt in my mind that your home contains valuables. They may be cash, jewelry, guns, art or stamp collections or even musical instruments.

Remember that your remodeling job will bring with it people you have never met, and employees who work for those people who may have never been properly screened. Never tempt these people by leaving valuable objects in plain view.

If you have things of great monetary or sentimental value in your home, it may behoove you to move them to another safe location during the remodeling process. Accidents can happen. Fires can start. Worse yet, loose talk at a drinking establishment might tip off criminals who learn about all of the wonderful and tantalizing things within the confines of your four walls. Eliminate this problem from the start by eliminating the source of temptation.

Weather Protection

Many remodeling jobs involve opening up your house to the weather. Extreme jobs could actually involve tearing off your entire roof or a part of it to add a second story or a large dormer. The job might be as small as adding a skylight. But Mother Nature might spoil the fun with a pop up thunderstorm or five days of non-stop rain. A snowstorm may even be thrown in for good luck.

The point is simple. You must know how your remodeling contractor is going to protect your home against all forms of weather while your home's outer defenses have been compromised by work-in-progress. You need to understand that giant tarps can blow away in moderate winds. Wind pressure can be enormous over large expanses of plastic or fiberglass.

Not only can rain and wind-driven rain be a problem, but extremes of heat and cold can create enormous amounts of discomfort. Discuss with your contractor, before the job starts, how air leaks will be stopped until such time as enough work is in place to minimize any loss of conditioned air from your home.

Work Days

Within a week or two, you will grow tired of the flow of people who come to your home to perform the remodeling work. It is important for your sanity and peace of mind for the workers to maintain a strict work schedule. When you get home from work, the last thing you need is noise, dust and activity at your home. Yes, that may be part of your families ordinary activities, but you don't need additional input for the remodeling contractor.

When you are bidding the job, ask each contractor to state the normal times workers will arrive and leave each day. Ask about weekend work. If you do not want workers to be around on weekends, make it clear for the beginning.

Applying Stucco

Applying Stuffo Pillar

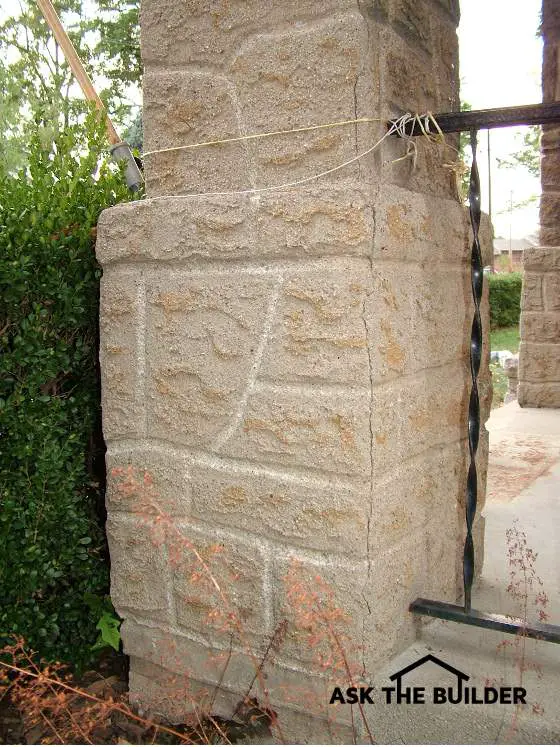
This pillar looks like stone, but it is stucco. The master craftsman who made it took the time to shape the stucco to make it look like rock with mortar joints. PHOTO CREDIT: Tim Carter

DEAR TIM: Can you apply stucco to the exterior of a brick home? I have a small one-story ranch home. A friend of mine says this is not possible, but I am determined to learn how to stucco my own home. Is applying stucco a difficult task? Are there certain stucco textures I should avoid? What tips can you share to ensure the stucco does not peel off the house? Gaynell M., Austin, TX

DEAR GAYNELL: Good news! You can have stucco applied to your brick home. What I can't answer is whether or not you possess the skills to apply exterior stucco. Not only do you need hand-eye coordination, you will need certain tools and equipment. These challenges are not insurmountable, but they can create issues. You can rent the needed scaffolding and a powered mixer that will be required for this job.

Brick, concrete block walls and even poured concrete walls are excellent surfaces to stucco. It is a common practice to stucco exposed poured-concrete foundations to mask the irregularities created by the wood or metal forms. Stucco also does a splendid job of hiding mortar joints in concrete-block walls.

The first thing to do is to inspect your existing brick. It must be in good condition, clean, and free of all dust. Now is the time to correct any water-infiltration issues. If flashings above or below windows and doors are inferior, you want to correct these issues now. There are many wonderful stucco manuals and guides that show how to install flashings around windows and doors.

Applying stucco is almost always a two-step process. You typically apply a base or scratch coat that is approximately 3/8-inch thick. The stucco mixture is a combination of clean sand, masonry cement and Portland cement. Masonry cement is often a mixture of Portland cement and hydrated lime. You will discover that if you mix one part Portland cement plus one part masonry cement with eight parts of clean, damp medium sand, you will get a splendid base stucco mix. The same proportions can be used for the finish coat of stucco.

Before you start to apply the stucco to your home, I suggest you practice first. You can do this by building an 8-foot wide by 8-foot wide wall from 2x4's. Cover the studs with 1/2"-inch-thick cement board. It is important that you get comfortable with the tools and techniques of applying the stucco.

Be sure this temporary wall is secured well so it does not tip over or is blown over by the wind. Once you feel proficient, then consider starting outdoors on the walls of the house you rarely see or can't be seen from the street. You want the most-visible walls surfaces to be stuccoed last after you have discovered how to do a great job. Don't worry about perfection when working with the base coat, since it will be covered with the finish coat. You want the base coat to be somewhat rough so the finish coat bites into it.

Prior to applying the base coat of stucco, be sure to get the brick wall damp by misting it with a hose. The brick you cover with stucco should always be damp just before it is coated. Try to avoid working on hot, dry windy days. The best conditions to apply stucco are on overcast days with the temperature in the 50-60 F range. Since you can control when the stucco is applied, do not apply any stucco if the temperature will drop below 32 F within days of applying either the base or finish coat of stucco.

stucco textures

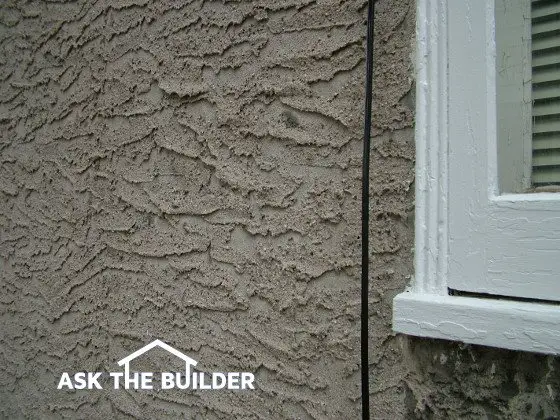
Stucco textures are as varied as plants in a forest. This texture looks like it did the day it was installed in 1916. PHOTO CREDIT: Tim Carter

One of the best aspects of stucco are the infinite types of textures you can create. I don't know that there are any I would avoid, although I would try to do a texture that is a simple two-step process. When you apply the finish coat of stucco, try applying it in a random fashion and then overlap the different strokes slightly. The finish coat of stucco should not exceed 1/4-inch in thickness.

Experiment with different textures on the temporary wall where you learned how to apply the base-coat stucco. Stand back from the wall about 30 - 50 feet to see what it will look like from the street. All too often stucco rookies think a texture looks great as they apply it, but the relief and texture disappears when you stand back from the wall surface. Look at the texture at different times of day, especially if you want a rough texture that creates shadows.

The biggest challenges one faces in a do-it-yourself stucco job is mixing the stucco and getting it to the work location. To get professional results, the person applying the stucco needs to be fresh and concentrating on applying the material, not worn out from mixing and wheelbarrowing stucco mix around a jobsite. If at all possible, try to arrange for a helper.

To ensure both color and texture match, all materials for the job should be purchased at the same time. Sand purchased from two different suppliers can be very different in both color and particle size. If you run out of sand part way through the job, you may not be able to get matching sand. This is not too critical with the base coat, but it is imperative you use the same sand on the finish coat.

Portland cement and masonry cement can also be slightly different colors. Buy enough material for the entire job and keep the cement in a garage where there is no risk of getting wet from the rain.

Column 696