Specifications – Important Details

DEAR TIM: I've heard a lot about specifications. What are they and is there really a value in having them for my project? N. W.

DEAR N.W.: Specifications are detailed written descriptions of the articles to be used in a project as well as the manner in which they are to be installed. They can be one of the most valuable things in guaranteeing a successful project.

Specifications become the guidelines which your contractor must follow to satisfy you. They usually clearly state what items are to be installed in your project. In the event of an error by your contractor, specifications will be an invaluable aid in identifying the error.

The specifications should be attached to the plans for your project.

They should also be clearly mentioned in the contract between you and your contractor. He must realize their importance.


How would you like me to build your new home? It's probably impossible for me to fit your job into my schedule, but I will gladly share hundreds of my tricks and building secrets with you and your builder. Check out my New House Specifications.


How to Square Something

How to Square Something

DEAR TIM: I often hear my builder talk about the importance of things being square. When is something square and is there a simple way that I can tell if something is square? R. J.

DEAR R. J.: Something is considered square when two intersecting lines on the same surface create a 90 degree angle. It is vitally important for all aspects of your project to be square, especially the foundation. Square foundations allow a builder or remodeler to work at the highest level of productivity. All aspects of rough carpentry become a breeze instead of a hassle.

It is easier to install materials and fixtures when framing members and walls are square. There are fewer irregular cuts in most instances. Possibilities for mistakes are minimized.

There is a very simple way to check if something is square. This method has been in use for thousands of years. Starting at the intersection point of the two lines, measure down one line 3 feet and make a mark. Measure down the other line 4 feet and make a mark. Measure accurately in a straight line between your two marks. The distance between the two marks will be exactly 5 feet if the two lines are square. This third line makes a triangle. It is often referred to as the diagonal.

Any multiple of these numbers works as well. For example, a triangle with legs of 6 feet and 8 feet with a diagonal of 10 feet will produce a square corner. The combination of 12 feet, 16 feet, and 20 feet will also produce a 90 degree angle.

You can purchase handy calculators that will give you the diagonal for any combination of two lines. For example, let's say you want to build a deck that will be 20 long and project 12 feet out from the house. Using the fancy calculator, it would tell you in a matter of seconds that the diagonal would be 23 feet and 3 and 7/8 inches.

Footing/Foundation Importance

DEAR TIM: I have a concrete patio slab which is in excellent condition. I would like to construct a screened-in porch on this slab. The screening materials as well as the other building materials are lightweight. Do you think the slab will be able to handle the weight of the structure? G. Y.

DEAR G. Y.: The slab will probably handle the weight, however I feel that you have a more serious problem. Based upon your information and sketch, your slab has no foundation beneath it. It simply is not a good idea to build a structure on such a slab.

The reasons for this are numerous. Some of the primary reasons structures require foundations are as follows. The foundation of a building is designed to withstand the loads placed upon it. Without a foundation, a wall or column supporting a concentrated load could actually crack the slab and sink into the soil. Believe me, that could really ruin your day.

Foundations also protect structures from frost heaving. I have seen certain clay soils heave a slab 2-3". Frost is a powerful force in certain climates and must be respected. Foundations and the footers that support foundations should be poured below the frost line. Frost lines can range from inches below the surface to several feet. Check with your local building officials to determine the frost line in your locality.

If you build your screened porch on the slab several things could happen. Frost action could lift the slab and pull part of the porch away from your house. The frost action could also crack the slab and cause differential movement by lifting one part of the slab higher than the other.

My advice is simple. I suggest that you remove the slab and install a properly designed foundation system. Reinstall a new insulated slab so that you have the potential of using this room on a 365 day-a-year basis should your space requirements change in the future.

Causes of Ice Dams

DEAR TIM: This past fall we had a new roof installed. It has rained many times and never leaked. However, after some recent heavy snowfall and very cold weather, water began leaking into my house in many locations. What did the roofer do wrong? Why would it leak now, but not during a heavy rainfall? N. C.

DEAR N. C.: You should let your roofer off the hook. The leaks in your house were caused by ice dams. These "dams" form under the conditions you described, as well as during periods of heavy freezing rain. To understand why ice dams would cause leaks, you have to understand how a vast majority of roofs work.

Roofs depend almost exclusively on gravity to keep water from entering your house. I'll bet that you would never have guessed that physics and roofing were related! Here is how it works.

For the most part, shingles, slate, tile, etc. are installed in a similar fashion. They are individual pieces which overlap so as to shed water. Generally, roofers begin installing these materials at the bottom of your roof near your overhangs. They continue up the roof putting the next piece of roofing material on top of the one below. The steeper your roof, the better this system works.

However, if water flows backwards up your roof and gets underneath and behind the individual roofing pieces, you will have leaks. Ice dams cause this to happen. They generally form under the conditions you described. Heat from the sun or heat leaking from your house causes the snow to begin to melt. This melt water travels beneath the snow to the gutter. The temperature of the gutter is below freezing. The water hits the cold metal and instantly freezes.

CLICK HERE to get FREE & FAST BIDS from local Roofers who can install Ice Dam Membrane.

Within a short period of time, the gutter is solid ice and the ice is beginning to grow up the roof. Eventually, the water hits this ice dam and before it can freeze, it flows underneath the pieces of roofing and leaks into your house.

WATCH ICE DAM VIDEOS


You cannot easily stop ice dams from forming. However, you can do several things to minimize the possibility of leaking. Consider building large roof overhangs if you are building a new home. Have your framing carpenter or builder use trusses or roof rafters with high heel cuts. This allows insulation to be placed at full depth where the roof passes over exterior walls. Standard trusses or framing can reduce ceiling insulation in these areas to as little as three inches.

If you have an existing home, consider installing specialized roofing products designed specifically to combat water buildup from ice dams. These products are manufactured using modified asphalt. They are applied directly to the wood sheathing just above your gutter line. Your regular roofing material is then applied directly over these products.

Grace Ice Water Shield

I covered the ENTIRE roof of my New Hampshire house with Grace Ice and Water Shield. I never have to worry about a roof leak - EVER. (C) Copyright 2017 Tim Carter

These specialized roof membranes form a barrier which resists water infiltration. The modified asphalt contains rubber which seals around the nails which hold the roofing material to the wood sheathing. If this material is used at the edges of roofs, in valleys, at roof slope changes, skylights, chimneys, etc., your roof should resist all but the worst ice dam.

CLICK HERE to get FREE & FAST BIDS from local Roofers who can install Ice Dam Membrane.

Column 011

Heating Ductwork

hvac round duct damper control

The lever you see on the side of the round metal duct is a damper control. It is connected to a round metal disk inside the duct pipe. If I rotated the lever so that it was straight up and down, the disk would block 90 percent of the air flow in the duct.

Heating Ductwork

DEAR TIM: Very little air comes out of the heating duct in the bedroom at the far end of my house. However, a tremendous amount of air comes out of the same size duct in the dining room, which is located in the center of my house. It doesn't appear that there is anything blocking the pipe. What could be wrong? P. J.

DEAR P. J.: There are several things that could be causing your problem. They are somewhat easy to check. However, if the first two ideas don't help your situation, your problem is much more serious.

First, check to see if the vent cover in each room is adjustable and in the wide open position. Next, go to the basement and locate the supply pipes that feed each room. There should be a damper control lever on each pipe that goes to each room. If you find such a lever, it could possibly be in the closed position. You can check for this by noting the direction in which the lever is pointing. The damper will be wide open when the lever is pointing in same direction as the air is flowing in the pipe.

If your system does not have damper controls, or when wide open your problem still persists, you possibly have a major duct work design problem. Several things are necessary for the air flow to be equal in each room of your house. Equalized static pressure in your duct system is one of them. This is generally achieved by downsizing the main supply duct as room supply pipes are branched off from the system.

The duct system in your house acts similar to the blood vessels in your body. The size of the artery in you ankle is much smaller than the size of the artery leaving your heart. However, even though your blood vessels are different sizes and there are no obstructions, the blood pressure is nearly the same throughout your entire body. This is accomplished by the downsizing of the main arteries as they travel farther away from your heart.

Each room in your house requires a certain amount of air to enter it per minute to properly heat or cool it. The amount of air required is dependent upon many factors. Some of these factors are room size, type and square footage of window glass, presence and thickness of exterior wall insulation, etc. This quantity of air can only enter each room if the duct work supplying each room is sized properly and the static pressure is equalized throughout the entire system.

If your duct work is visible, you can inspect it to see if it was designed properly. Measure the width and height of the main supply duct after it leaves the top of your furnace. Check to see if this main supply duct becomes slightly smaller in width after a few room supply pipes have branched off this main line. As more room supply branch pipes branch off, the main duct should become smaller and smaller.

If your main supply duct is the same size from one end to the other, you will experience significant static pressure readings at different locations within your system. These differences in static pressure will make it very difficult, if not impossible, to comfortably heat and cool your home.

Exterior Peeling Paint

DEAR TIM: The exterior of my 50 year old house was repainted just one year ago. I have many spots that are peeling. I am convinced that I do not have a moisture problem. The painter scraped the house very thoroughly before he started to paint. What went wrong? L. D.

DEAR L. D.: Your description of the 'prep' work which was performed prior to painting left out one of the most important steps. Read the paragraph labeled "Surface Preparation" on the side of your paint can. Generally, the first sentence will state that you should remove all dirt from the surface. Your painter forgot to wash your house prior to applying the paint.

Failure to properly wash the surface is probably one of the most common causes of premature paint failure. Frequently, people think they clean the surface, when in fact they merely rinse it off. Rinsing and cleaning are not the same thing.

Most manufacturers recommend the use of a 'powdered commercial cleanser.' There are many acceptable soaps which meet this specification. The point is, you must use soap AND water to properly clean the surface. The cleaning process removes more than dirt. It also removes chalk, airborne oils, tree sap, and bacteria produced oils.

Oxygen Bleach

Stain Solver is MADE in the USA with USA ingredients that are food-grade quality. CLICK THE IMAGE to order some NOW.

The best organic cleaner to use outdoors on your paint is Stain Solver.

Stain solver is a certified organic product made in the USA with US ingredients. You just mix the pure powder with hot tap water, stir, and put the solution into a garden hand-pump sprayer. 

Spray the painted surfaces with the solution allow to sit for 15 minutes and scrub with a brush used to clean RVs.

CLICK HERE to get FREE & FAST BIDS from local Painters who can clean and prepare your house exterior.

Chalk is produced by the natural breakdown of paint. Rub your finger across some paint which has been exposed to sunlight and the weather. Generally, your finger will pick up this 'chalk' from the painted surface. This chalk will be the same color as the paint. If you understand how paint is made, you will better understand why it chalks.


Is the exterior of your house looking drab? Find the professional painters by using my Exterior Painting & Staining Checklist. I offer a 100% Money Back Guarantee.


Paint is usually made from three primary groups of materials: resin, pigments, and vehicle. The resin is the product which enables paint to stick to things and it also holds the pigment together. The pigment is the part that gives paint its color. The vehicle is the part that makes paint a liquid. When paint dries, the greater part of the vehicle evaporates into the air.

Ultraviolet light from the sun and natural weather processes break down the resin. This breakdown then releases pigment at the surface. These pigment particles are just barely hanging on at this point. Rain water can easily remove them. You generally see the end result on stained brickwork or masonry foundations immediately below painted surfaces. Some paints chalk more readily than others.

The use of soap in the cleaning process also is beneficial in another way. A large majority of latex exterior house paints are alkaline. Most soaps are also alkaline. When you wash a surface and rinse it off, often the surface that you washed remains slightly alkaline. This enables the paint to stick or bond much more readily to the surface.

Do not underestimate the value of properly cleaning your house before painting it. A properly cleaned surface can add years to an exterior paint job. This translates to dollars which you can either save or spend on some other home improvement. Insist on the use of soap, water, a soft bristle scrub brush, and elbow grease the next time you hire a painter. If you follow the instructions on the paint can label, your efforts will usually be rewarded with a long lasting paint job.

CLICK HERE to get FREE & FAST BIDS from local Painters who can clean and prepare your house exterior.

Column 013

Exterior Foundation Wall Waterproofing

foundation waterproofing

The black goo is foundation waterproofing. The red arrow points to the thick coating where it's sagged. Dampproofing is much thinner like a simple coat of paint. Copyright 2021 Tim Carter

DEAR TIM: I'm about to begin the construction of a very large room addition. This room addition will have a finished basement. I've seen a black compound sprayed on new house foundations. Is this the product I should use to 'waterproof' my new room addition? Is there anything else I should do to make sure that my basement will not develop a leak? H. H.

DEAR H. H.: Both of your questions are excellent. I hope I don't run out of room! Let's start with the first one.

The product that you described to me in your letter was an unmodified asphalt-based "dampproofing" product. It is commonly mistaken for "waterproofing." Many, many consumers think they have waterproofed basements, when in fact they simply have been dampproofed. Dampproofing is a low-cost method of retarding water infiltration. It is by no means a true waterproofing membrane.

Dampproofing products are generally asphalt or tar-based compounds. They are sprayed onto foundations prior to backfilling. Because concrete and other masonry products will easily transmit water vapor, these products are designed to block water vapor transmission. This, basically, is the extent of their capabilities.

CLICK HERE to get FREE & FAST BIDS from local builders who can waterproof your new basement or foundation.

Dampproofing compounds generally become brittle after they dry. They also do not have the ability to bridge cracks which may develop at a later time. Groundwater can actually dissolve them over a period of time.

Water-proofing compounds, on the other hand, are much different. There are a wide variety of products on the market. Some are urethanes, modified asphalts, clay-based, or rubber-based. These products can either be spray applied or are available in sheets.

Water-proofing membranes have several distinct characteristics. Groundwater has little or no long-term effects on most of the products. They can bridge small foundation cracks. Usually, these products retain their elasticity and some actually have self-sealing properties.

If you’re interested in learning more about estimates for foundation waterproofing I have an article here.

Waterproofing compounds are able to resist a hydrostatic head. A hydrostatic head develops when water builds up against the side of your foundation. The pressure can be enormous. I have personally witnessed a stream of water squirt two feet out onto a basement floor.

Now, let's talk about your second question. There are many things that you can do to help insure that your basement stays dry. First, be sure that your foundation is constructed to be as strong as possible.

Install as much reinforcing steel as practical to insure that in the event a crack occurs, it will not widen or displace. Consider increasing the thickness of your foundation walls. Remember, no waterproofing compound can bridge a major structural crack. Your first line of defense is a strong crack-free foundation.


Prevent a wet basement by using this Basement Waterproofing Checklist to hire a great professional. I offer a 100% Money Back Guarantee.


Install an excellent foundation drainage system. Use plenty (three feet minimum cover) of large washed gravel over the drain tile. Make sure that you cover the gravel with 4" of straw or tar paper before backfilling! This is a commonly overlooked step.

These materials prevent silt from the 'fluffed' backfill dirt from clogging the gravel and the drain tile system. Be sure that the ground slopes away from all points of the foundation at least 1/2" per foot for a distance of 10 feet minimum. Pipe downspouts and sump discharge pipes away from the house.

Do not let this water collect or discharge at the base of the foundation. If you follow all of these steps you probably will have a dry and enjoyable basement for many years to come.

CLICK HERE to get FREE & FAST BIDS from local builders who can waterproof your new basement or foundation.

Column 015

Sizing Decks or Patio

deck over water

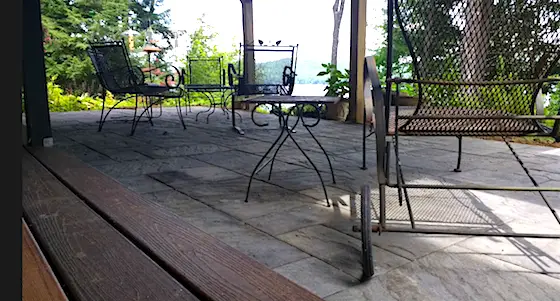
Sizing Decks & Patios | You can see there's plenty of room around that table for six. How big is that lower deck? It's 24 feet wide and 16 feet out from the upper deck. Copyright 2017 Tim Carter

DEAR TIM: My husband and I are getting ready to add a patio onto our house. We can't seem to agree on its size. We intend to have a table and chair set and 4 - 6 other chairs for additional seating. He says that a 10 foot x 16 foot patio will be large enough. I disagree. Will you settle this argument so that we can begin construction? L. A.

DEAR L. A.: As you can imagine, I hate being put in the middle. Call the concrete company and order more materials. You are going to need them! Your husband, in my opinion, is dead wrong. Fortunately, you caught the mistake before it happened. Many, many homeowners have discovered, after it was too late, that the patio or deck they constructed was inadequate for their needs. I have seen hundreds of decks and patios that are too small.

It is actually quite simple to plan a deck or patio. Most homeowners don't realize that they already have the plan. It is three dimensions right inside their own home. Step into your dining room and living room and look at what you see. The first thing you should realize is that a deck or patio in nothing more than a room without walls or a ceiling.

Here's my finished paver patio. It's going to last decades so long as no one pressure washes it. Pressure washing removes the colored cement paste that's coating the sand and gravel in the concrete. Copyright 2017 Tim Carter

Since you told me that you were going to have a table and chair set, let's start in the dining room. Patio and deck furniture is very similar in size to regular interior furniture. Many dining room tables are approximately 4 feet wide by 6 feet long.

CLICK HERE to get FREE & FAST BIDS from local contractors to install your patio.

Most chairs are basically 2 feet square. In order to sit at the table, you generally have to pull the chair away from the table approximately 1 foot. To walk around a chair that is pulled away from the table you need a minimum of 2 feet. So, the minimum width of this portion of the patio or deck would be the following calculation: 2+2+1+4+1+2+2 = 14 feet. Since the length of the table was 6 feet, the minimum length of the patio or deck would be: 2+2+1+6+1+2+2= 16 feet. Try this in your own dining room.

The area required for the additional 4-6 chairs is a little harder to calculate. This is due, in part, to the numerous combinations of seating arrangements. However, a simple way to solve it is to go into your living room. Frequently, people have a couch, coffee table, and side chairs in their living room.

Take a few minutes and rearrange these elements into a realistic and comfortable grouping. Allow plenty of room to get in and out of the furniture. Make sure that you include the coffee table or side tables. You will probably need these on your deck or patio to place food, drinks, books, etc.

After you are happy with the arrangement, measure the width and length of the arrangement. Be sure to include the extra 2 feet' behind the furniture pieces. More often than not, your measurements will probably be in the range of 16 feet x 18 feet.

Often you will find that you need a space bigger than your existing rooms. The reason for this is quite simple. Most people push couches and chairs up against a wall in a living room. This works fine in a room with walls, because you can't walk through a wall.

However, it generally is not a good idea to place furniture at the edge of a patio or deck. If you do, you will find yourself walking in the grass or landscaping to get around the furniture.

These planning principles can also be performed with simple 1/4 inch graph paper available at most office supply stores. Make simple scale colored cutouts of the furniture you intend to use.

Remember, 1/4 inch equals 1 foot. Place these pieces on a piece of the 1/4 inch graph paper making sure that the proper space is allowed for between each piece. Don't place furniture in the pathways between the doors to the house and the lawn.

Now, draw lines around your layout. Presto! You have a plan. Check and recheck your measurements, get out the shovels, and get to work!

CLICK HERE to get FREE & FAST BIDS from local contractors to install your patio.

Column 016

Homeowner Sweat Equity Jobs

DEAR TIM: I'm quite resourceful and handy. I have the ability to install the electric and plumbing in my room addition project. I feel that this will help me save money and allow me to invest some 'sweat equity' into my project. However, the contractors who I have contacted are not interested in working with me. Why am I encountering so much resistance? V. N.

DEAR V. N.: If you put yourself in the shoes of the contractor, you will quickly realize why. The contractors are afraid that you possibly will not complete your work on schedule, and / or will not pass the required inspections. Either of these situations will cause delays in the project.

Professional contractors tightly schedule their project. Projects that run smoothly are beneficial for many reasons. They allow the contractor to maximize his profit. Projects without delays allow the contractor to show up on time for the next job. Remember, you are probably only interested in your job. I doubt that you have much interest in the contractors' other commitments.

The business of contracting is very difficult. There are many, many variables that are beyond the direct control of the contractor. Delays can be catastrophic. They have a ripple effect, much like throwing a rock in a pond. A delay that you cause by not meeting a deadline will not cost you a thing. However, the delay will cost your contractor money.

Delays have a dramatic effect on the pocketbook of a contractor. Most contractors and homeowners fail to realize this. Contractors basically have only one commodity that they can sell. That commodity is time. Contracting is a service industry based upon time.

CLICK HERE to get FREE & FAST BIDS from local contractors who can build your new addition or remodeling projects.

Employees are paid by the hour, even sub-contractors calculate their payroll by the hour. Because of this axiom, a contractor can realistically only work so many hours in his or her lifetime. Delays cause future work to be pushed farther into the future. This means less income over a lifetime.

Delays often hurt the credibility of a contractor. Try to realize that builders and contractors are constantly negotiating for the job that starts after the current one is complete. The next customer is anxious to know when his or her job will start. Everyone is generally excited about the beginning of a remodeling or building project.

Surely you have heard stories of builders or remodelers who did not start a job on time. Few homeowners are sympathetic. They don't care to hear about someone else's problems. Any delay that you cause will make the next customer upset with your contractor. No contractor that I know of wants to start a job with an unhappy customer.

There possibly is a compromise to this problem. Consider investing your 'sweat equity' at the beginning or end of the project. This allows the contractor to control his or her destiny.

In fact, most contractors will negotiate for you to perform tasks at the end of a project. That way they can start the job, run it as smoothly as possible, and then turn it over to you to complete. The contractor can then go on to the next job, while you finish the job at your own pace.

However, keep in mind several things before you attempt this. Be sure to allow enough time to adequately complete tasks. Homeowners often vastly underestimate the amount of time it takes to perform finishing tasks.

Also, be sure that you have accurately estimated the cost of what you need to purchase. Frequently, homeowners run out of money at the end of a project. Beware, those last few weeks of work can often stretch into months or years.

A great book that is loaded with sweat equity jobs that the average to serious do-it-yourselfer can handle is Adding Value To Your Home. In this book you'll learn do-it-yourself projects that add value to your house and yard while saving you money.


Adding Value To Your Home

This book gives a clear idea about what type of home - improvement projects will give the highest yield on investments. CLICK THE IMAGE to order the book now. 

It is also written for those homeowners who need the basic skills instruction, clearly explaining step-by-step what to do as well as how to do it. The illustrations and photos in this book are just fabulous. 

CLICK HERE to get FREE & FAST BIDS from local contractors who can build your new addition or remodeling projects.

Column 017

Change Orders – What’s Fair / What’s Not

DEAR TIM: My builder has presented me with a "change order." He wants to charge me additional money to cover the cost of enlarging the opening for the medicine cabinet I selected. Plumbing pipes and wires also have to be relocated. I picked out this cabinet at the beginning of the project. Do you think it is fair for me to have to pay? How could this have been avoided? R. P.

DEAR R. P. : Based upon your detailed description of the circumstances, I feel that you should not have to pay for this mistake. Because you selected the cabinet prior to the start of construction and made your builder aware of this selection, you are not responsible for the mistake.

Change orders are a very sensitive issue in construction. Frequently, relationships between owners and builders deteriorate because of change orders. It is not uncommon for both parties to be at fault for this dilemma. Many homeowners feel that they are often overcharged for changes in a project.

Most professional builders try to avoid change orders. They are disruptive to scheduling. Also, it is very difficult to charge the homeowner for the true cost of initiating the change order. A simple change order can devour 4 - 6 hours of time.

The builder has to meet with you concerning the change, calculate the cost of the change, obtain your approval, prepare the paper work for the change order, and then administer the change order. This all should happen before any work begins!

CLICK HERE to get FREE & FAST BIDS from local builders who can finish your addition and remodeling projects.

One of the most common causes of change orders is poor planning. During the planning stage of a project, all options should be discussed. This pertains to virtually every aspect of the project.


How would you like me to build your new home? It's probably impossible for me to fit your job into my schedule, but I will gladly share hundreds of my tricks and building secrets with you and your builder. Check out my New House Specifications.


Architects, builders, and contractors often forget that some homeowners have a tough time visualizing the finished project. This inability to visualize, on the part of the homeowner, can become a builder's worst nightmare.

Change orders that result from a homeowner who modifies the plan during the course of construction cannot be blamed on the builder. It is not uncommon for people to change their mind. However, individuals who do this should be prepared to pay for this process.

Remember, the builder and his subs based their original prices on specific tasks and materials. Any extra work resulting in a change should be paid for by the homeowner. Changes in work that delete work or materials should result in a credit for the homeowner.

There are various things that you can do to minimize or eliminate change orders in a project. Many of them are very simple to do. Try to think through all aspects of your project. If you are unsure of how something will look, ask the architect or builder to draw a quick sketch of the area in question.

When selecting fixtures or other items, spend as much time as possible at the showrooms. Ask as many questions as possible. Look at as many brochures as you can. Study the photographs in the brochures and try to imagine a particular item in your house.

Your specific problem could have been avoided very easily. After you make specific selections regarding the fixtures you intend to use, suggest to your builder that he obtain copies of all technical literature pertaining to each product. This literature provides very important dimensions and mechanical specifications that your builder needs.

Various subcontractors need this information as well. Since you notified your builder as to the exact model of medicine cabinet, he should have obtained the exact dimensions of the cabinet before the carpenters framed the opening. Kindly tell your builder to open his checkbook to pay the plumber, electrician, carpenter, and plasterer for the mistake.

CLICK HERE to get FREE & FAST BIDS from local builders who can finish your addition and remodeling projects.

Column 018