DEAR TIM:While cleaning the tile above my bathtub yesterday, several tiles in the bottom row appeared loose. After investigating further, they actually fell off the wall. Behind them was what appeared to be drywall or plasterboard with a green paper. What puzzles me is that none of the grout was cracked or missing. After talking to some of my neighbors, I come to find out that this problem is widespread in my subdivision. What can I do to get my ceramic tile to adhere as in my parent's 65 year old house? F. R.
DEAR F. R.: You are not the first person to suffer this fate. Nor will you be the last. The root of your problem, as you have probably already determined is water. Water simply got behind the tile and was absorbed by the paper covering the drywall. After a period of time, the gypsum core softened. This caused the bond between the paper and the gypsum to fail. You can clearly see in your photographs that pieces of the green paper are still attached to the back of the tile.
Your parent's house has what is often referred to as a mud and metal lath system. This was a very popular method used to attach ceramic tile to vertical wall surfaces. This system involved nailing metal lath identical to that used by plasterers to the wall studs. The tile setter would first apply a thin coat of cement mortar to stiffen the wire. On the second day, he would return to apply a second coat of cement mortar. This coat was approximately three-quarters of an inch thick. After this layer of mud had set up, a thin cement paste was then used to set the individual pieces of ceramic tile. Water that gets behind this tile will not dissolve the cement paste or mortar. The bond between the tile and mortar bed is very permanent.
The problem with this system, however, is that it is extremely labor intensive. While there are tile setters who can still install tile in this manner, very few people can afford the cost. This is where your green paper drywall and some other products enter the picture.
If you're putting ceramic tile in your home, check out my Ceramic Tile Installation Checklist to learn exactly what you should know about the process. Avoid making costly mistakes with the help of this document. I offer a 100% Money Back Guarantee.
The green paper drywall is a product manufactured by gypsum manufacturers. It is marketed as a moisture resistant drywall. The gypsum core is treated with special chemicals that make it moisture resistant. The green paper simply tells installers that it is different from ordinary drywall. Note that there is a big difference between moisture resistant and waterproof.
There are two other types of products that are available as well. One of them has a gypsum core that has been treated with silicone. This gypsum core is then surrounded by an inorganic glass mat. The mat, on one side is then surfaced with a co-polymer coating which is both water and vapor retardant.
The other product is referred to as cementitious board. These products use the same cement mortar as described above. However, it is sandwiched between thin layers of fiberglass mat.
All three of these products can be installed in a fraction of the time of the old fashioned method. The key to successful tile adhesion lies in installing them properly. These products must not be allowed to come into contact with the top ledge of the bathtub. Water sitting on the top ledge of the tub may come in contact with these products. This water can be easily absorbed by some of the products such as your green drywall. This water can cause numerous problems such as the one you experienced.
The Tile Council of North America recommends that you should leave a gap between the bottom edge of these products and the tub. This gap should then be caulked with an elastomeric caulk such as mildew resistant silicone. If you should use green drywall, be sure not to cut off or trim the factory paper-bound edge. After the tile installation is complete, the gap between the tile and the tub should also be caulked. Do not install grout in this horizontal gap!
Restore the "clean" to your grout. Just go to STAIN-SOLVER to see the beautiful, quick results.
Grout can also be very misleading. Many people think that grout is water retardant. In fact, it is the opposite. Untreated grout can and does absorb water. Always treat your finished grout job with grout sealers.
DEAR TIM:My husband and I are planning a bathroom remodel. We can't agree on which type of tub / shower stall to install. My husband says there is no substitute for cast iron. Because of the wide variety of shapes and sizes, the fiberglass and acrylic products appeal to me. My husband says these units won't stand the test of time and scratch easily. I mentioned that cast iron products can chip. Without your help, we may be headed for divorce court! A. G.
DEAR A. G.: I hope both of you have good attorneys. I think you might need them as both of you have raised some valid points. I'm very confident that there is a product or two available that will satisfy both of your desires.
Your husband's comments concerning cast iron are very accurate. Cast iron plumbing fixtures are extremely durable. Cast iron will not flex. The thick enamel coating is actually fused to the cast iron in high temperature ovens where the temperatures exceed 1,700 F. Through this process, the enamel achieves a hardness very near that of ordinary glass. However, enamel can be scratched and it does chip. If you don't believe me, come and look at my kitchen sink.
As you have already discovered, there are many manufacturers, styles, and materials used in fiberglass type tub and shower stall units. While the finish on these units is not as hard as enameled cast iron, they can easily retain their glossy appearance with a little care and maintenance. The simple rule is to use the same care and cleaning products that you might use when you wash your new car.
There are three primary types of "plastic" tub and shower units: gel-coated fiberglass, acrylic reinforced with fiberglass, and acrylic backed with a structural composite. Side by side, these products look very similar, however there are important differences.
The gel-coat products, when constructed with high quality ingredients, can be very hard and durable. The manufacturing process is critical, as the liquid gel-coat must be applied evenly on the molds at the correct temperature. Gel-coated products if damaged or scratched can be repaired with great success. Repairs performed correctly are permanent and virtually invisible.
Acrylic units are usually constructed using large sheets of solid colored acrylic plastic. These sheets are heated so that they soften. The softened sheets are then stretched over a mold to achieve the desired shape of the shower or tub unit. This stretching process, however, sometimes causes the acrylic to be very thin as it stretches around corners. Those units with the highest percent of acrylic tend to offer higher performance levels. Repairs to these units are not always successful.
Should you and you husband eventually agree on using a "plastic" unit, be sure to carefully follow the installation instructions. Many homeowners in the past were dissatisfied with the fact that the floors of these units flexed like oil cans. Some of the acrylic units backed with composites have addressed this problem. The other units often need to be set in wet plaster or mortar to provide a solid base. Be sure that you or your contractor carefully follows the installation instructions.
The care of either cast iron units or the alternatives is important. Never use cleansers that contain abrasives, as these can scratch both cast iron and plastic fixtures. If you simply make a practice of cleaning the tub or shower area every two weeks, you will avoid the heavy soap buildup that often necessitates heavy scrubbing. Virtually every manufacturer has a recommended cleaner that they strongly suggest you use. Follow these instructions and you will have a beautiful tub and shower area for many years.
Finally, if you do select one of the "plastic" units, you can keep it looking new with a little known trick. Once a month, take just fifteen minutes and apply a high quality spray automotive wax to the wall surfaces only. Never apply wax to the floor of the unit. Buff this wax out and it will be as shiny as new!
DEAR TIM:I have an unusual problem. My house is covered with redwood beveled siding coated with a light solid colored stain. A few weeks ago dark brown streaks began to stain the siding. These stains appear to originate from behind the siding. I am also beginning to notice blue-black stains at each nailing location. Do you have a clue as to what is happening? What can be done to prevent this staining? I. L.
DEAR I. L.: I'm afraid I have some bad news for you. You appear to be the victim of a phenomena called extractive bleeding. It can happen with just about any wood siding, but it is especially noticeable with redwood and cedar sidings.
Redwood and cedar are forest products which contain naturally occurring chemical extractives. Woods such as redwood and cedar derive their durability and weather resistant characteristics from these chemicals. However, these chemicals can dissolve quite easily in water.
In your situation, water from several possible sources got behind the siding. This water could have been water vapor that condensed on the back of the siding after it traveled through the walls of your house. It could also have resulted from a leak in your roof. There are other possibilities as well.
The water then possibly traveled down the back of the siding and dissolved some of the extractive chemicals. When the water finally broke through a seam in the siding it ran down the siding, evaporated, and left the brown chemicals behind. This same thing can happen if water enters redwood from the surface. Water soaks into the wood, dissolves the chemicals and then is drawn back to the surface by wind action or sunlight. In any event, the result is the same.
The stains at each nail head are being caused by a chemical reaction between the extractive chemicals and the iron in the nails. Had the nails been hot dipped galvanized or stainless steel, you would not have had this problem. It may be in your best interest to replace the nails to prevent further staining. However, you can try to countersink the nails, swab the holes with a high quality water repellant, and when dry, fill the holes with an exterior wood filler.
The stains caused by the extractive chemicals and the nails can often be successfully removed. Mix one cup of trisodium phosphate, one cup of bleach and one gallon of water and wash the siding with this solution. Follow this with a solution of four ounces of oxalic acid crystals dissolved in one gallon of warm water. Be sure to use a plastic bucket to mix this solution. Wash the wood with this solution and let dry. When the solution dries, rinse with fresh water. Be careful! Oxalic acid is poisonous and can burn your skin and eyes. Wear rubber gloves and use goggles. Keep away from plants as well.
There is a way to virtually eliminate extractive bleeding stains. The trick is to seal completely each piece of exterior wood before it is installed. Just make sure the wood is completely dry before beginning the sealing process. In fact, the California Redwood Association recommends that this practice be followed with any exterior finishing system.
Should you decide to paint redwood in lieu of staining, this sealing process or back-priming is absolutely essential. The reason this sealing process is necessary is quite simple. By sealing the entire piece of wood, it becomes virtually impossible for water to enter the wood and dissolve the extractive chemicals. In the case of painted wood siding, the sealing process also prevents blistering of the paint. Blisters can only form if water has soaked into the wood. Be sure to seal the cut ends of each piece of wood as well. The carpenters may charge a little extra for this service, but it is well worth it. Remember, the end grain of a piece of wood is where water can most easily enter.
DEAR TIM:Enclosed is a set of my new home blueprints and some photographs. As you can see, I was supposed to have a ranch style home built with a walk out basement. Well, I do have a ranch house with a walk out basement, but the house is sitting two and one-half feet out of the ground. Now I need steps or steeply sloping sidewalks to get into and out of the house. The developer sold me the lot assuring me that it was a walk out lot. What went wrong? Why wasn't this mistake caught early in the job? What can be done? P. E.
DEAR P.E.: I've seen mistakes made before concerning foundation depths, however never have I seen a mistake as severe as yours. In fact, more often than not, house foundations are installed too deeply in the ground. Your house looks as if it has floated out of the ground.
Because I was not privy to your conversations with the lot salesperson, your architect and your builder, I am at a slight disadvantage. It is possible that all three individuals are partially responsible. However, the largest portion of the blame should be directed towards your architect and builder.
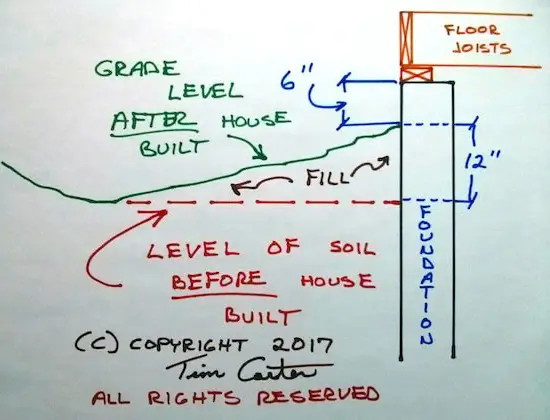
Walk out basements require a minimum change in topography in order to work. This calculation is really quite easy to do. Your plans clearly show that the height of your foundation was to be 7 feet 10 inches above the top of the footer. If you notice on the cross section portion of your blueprints, the architect has indicated that your basement floor is four inches thick and it rests upon the footer. Also note on the cross section where the soil at the highest part of your lot contacts the foundation. Using the scale on the drawings, it appears that only six inches of foundation was supposed to be visible above the ground at this point.
If you do the mathematics, you will see that you need a 7 foot change in elevation between where you walk out of the basement and the highest point of the lot where it comes into contact with the foundation. In your instance it appears that you only had a 5 foot change in elevation.
I noticed that your blueprints did not show a simple topographic map of the existing grade and proposed grade changes necessitated by construction activities. This, I feel, is the root of your problem. Quite possibly your architect failed to take a transit to your lot in order to determine just how much the lot sloped. Without this critical grade information, I don't see how it is possible to draw accurate plans.
Your builder also needs to answer some questions. Often, builders need to determine whether or not construction activities will create excess dirt. Sometimes this dirt can be distributed on the lot and sometimes it needs to be trucked away. This determination can usually only be accomplished by using a transit to determine the change of grade on the lot. Had your builder performed this exercise, the mistake might have been caught in the bidding phase.
Finally, prior to excavating, the house is accurately staked out by surveyors. The corners of the foundation can be easily determined. The excavator and the builder working together should have noticed the problem immediately. Even after digging the hole, the problem would have been evident, as the hole for the foundation would have only been approximately 5 - 6 feet deep. The fact that the foundation was subsequently poured indicates to me a lack of adequate job supervision. Had your builder been following the plans, he could have contacted the architect prior to pouring the foundation. At this point, you could have filled in the hole and sold the lot to someone who didn't want a walk out basement.
There is no easy solution to your problem. In order to achieve the look that is indicated on the plans, you need hundreds of cubic yards of extra dirt brought to your lot. Several retaining walls need to be constructed as well. None of this was indicated on the plans. This problem is a result of negligence or compounded mathematical errors on the part of the architect and builder. The extra cost to correct the problems should not be your responsibility.
DEAR TIM:I am in the planning stages of an upcoming building project that requires stone work. After obtaining quotations for this work, I am over budget. A friend suggested that I look into the artificial stone products. After visiting a local supplier of these products I was amazed. The samples looked like real stone. What can you tell me about these products? Are they affordable? Would you install it on one of your projects? N. I.
DEAR N. I.: Have you had your vision checked lately? Just kidding! I couldn't agree more with you. Artificial stone products are extremely realistic. In fact, I was a geology major in college and many of these products look exactly like the rocks that I used to study and crack with my rock hammer. I am very impressed with these materials.
Many artificial stone products are both lightweight and durable. These two qualities are achieved by manufacturing the stones in a controlled environment. Just about every artificial stone is made by mixing small, lightweight pieces of aggregate, Portland cement, and different iron oxide pigments. This mixture is poured into hundreds of different flexible molds which vibrate. This vibratory motion is the key to producing realistic textures and color variations in each individual stone. Because these stones are very similar to concrete and are manufactured under controlled conditions, they will probably outlast both you and I combined.
The fact that these products are lightweight gives them a unique advantage over natural stone products. Artificial stone products do not require foundations beneath them for support. They are attached to buildings in a manner very similar to applying stucco. If your house is wood framed, a wire lath is applied directly to the wood studs or over the exterior wall sheathing after a weather resistant barrier has been applied. This barrier can be either standard asphalt felt paper or one of the many waterproof air infiltration barriers. Once the metal lath has been securely fastened to the wall framing members, the installer simply applies a one-half to three-quarters inch thick layer of mortar onto the lath. The stones are set directly into this fresh mortar. Many manufactures recommend using specific colored mortars depending upon the color of the stone being used.
If your structure is masonry to begin with, you simply apply the coat of mortar directly onto the concrete block, brick, or poured concrete. It is a fairly simple procedure.
Anyway, there is no limit as to where these products can be used. You can use them for any exterior wall surface, free standing exterior perimeter or garden walls, coverings for exterior metal or masonry chimneys, interior fireplace fronts, columns, wainscoting, etc. You can even do the interior of your office if you desire to simulate a room in a castle. Some manufactures even make artificial cobblestones for driveways and walkways. Artificial brick is available as well.
Some people in the past have expressed concerns about the color fastness of artificial stone products. For the record, many people don't realize that natural stone will both fade and discolor as a result of oxidation and exposure to weather. The artificial stone products are manufactured in such a way that the color is integral throughout each piece. Some manufacturers have developed an additional process which imparts shade variations directly from the face of the molds. This makes the stone products virtually indistinguishable from their natural stone counterparts.
Artificial stone products should also help you with your budget problem. Frequently the cost of a complete installation is 50 - 60 percent that of a similar natural stone installation. The current retail cost of many of the artificial stone products is about $4 per square foot. Labor, mortar, and other costs may add an additional $4 - 8 per square foot depending upon your locality. (Prices shown are from the time the article was written in 1995.)
I wouldn't hesitate to use the artificial stone products on one of my projects. In fact, I wish that I would have used it to face the foundation of my existing house. I built a country Victorian house 9-years-ago and the exposed parts of my foundation would have looked magnificent had I used one of these products. Oh well, I'll do it right on my next house!
Do your own DIY install of a Linear French Drain with Tim Carter's time-tested methods and materials! CLICK IMAGE TO ORDER NOW!
Linear French Drains - They Work Well - Read the Testimonials
The Testimonials are in Author's Notes below!
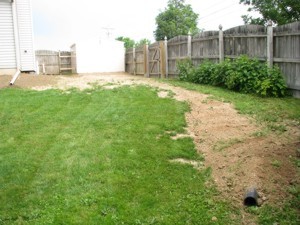
DEAR TIM:We've lived in our home for twenty-two years. Our basement has always been dry. However, this winter water began to enter our basement along our front wall. There are no cracks in the foundation wall and the water company indicates that our water line is not leaking. What has happened? Is there a way to either stop or control the water? By the way, what do you think of the new raised bed landscaping in the photos? C.H.
DEAR C. H.: Your landscaping looks great, for now. I suggest you go out and enjoy it before your landscaper comes back out and temporarily removes it. The landscaping activity is the root of your problem. Several things may have happened.
Does Raised Landscaping Cause Wet Basements?
Yes, raised landscaping beds cause wet basements because the water flows towards the house instead of away from it. Water is supposed to drain away from a house. The soil around a foundation should slope down 6 inches in the first 10 feet of horizontal distance away from the foundation. Look at the green line below in my illustration.
The photos you sent me clearly indicate a problem which your landscaper created. The extra soil which was brought to your home to create the raised beds has created a negative slope situation on the front of your home. Prior to the landscaping, the ground sloped away from the front of your home. Now the ground slopes back towards your house. This condition is often referred to as a negative slope or pitch.
Remember, the holes in the perforated pipe point down. If they point up, they get clogged by pieces of gravel.
What Causes Most Basement or Crawlspace Drainage Problems?
Negative slope and roof water dumping next to a foundation cause a majority of basement or crawlspace drainage problems. It can also cause problems for houses built on slabs. Houses built on hillsides often are victims of negative slopes, as the ground uphill from the house directs surface and groundwater directly at the structure.
Can Broken Buried Drain Lines Cause Wet Basements?
Yes, a cracked or leaking buried drain line can cause water to leak into the soil next to a basement wall.
Two other things could have happened as well. The landscaper could have accidentally broken an underground downspout line while digging. Every time it rains water could be saturating the soil against your foundation. Landscapers sometimes till the soil before they plant. This tilling activity fluffs the soil which makes it soak up water more readily.
How Do You Correct Negative Soil Slope?
In those areas where the landscaper has created a negative slope, remove whatever dirt is necessary to create a positive slope away from your house. If your foundation is high enough out of the ground, you can actually add dirt to create the same effect. However, always try to leave a minimum of 6 inches of foundation exposed. Study the illustration above.
Will a Linear French Drain Stop Basement Leaks?
A linear french drain in the soil will stop basement leaks. My college degree is in geology with a focus on groundwater. I've solved thousands of wet basement problems just like yours with a simple 30-minute phone call.
What is a Linear French Drain?
A linear french drain is a hidden piping and drainage system that captures subsurface water before it enters your house. It works just like a gutter on a roof. Water flowing down a roof falls into a gutter and this water is then diverted into a pipe. The pipe is extended away from your house so the rainwater can flow naturally down to the ocean the way it did before your home got in the way.
Do Linear French Drains Really Work?
Yes, they work exceptionally well. I installed this system on my own property with great success. Water moves sideways through the soil. It moves through the air spaces in the topsoil. Most subsoils are dense clay and the water flowing through the soil moves across the top of the subsoil.
A linear french drain takes advantage of this dynamic. The moving water encounters the gravel in the trench and flows down to the perforated pipe instead of continuing its journey through the soil until such time as it bubbles into a small creek near your home.
Can You Call Me on the Phone to Help Me?
Yes, I can call you on the phone to help you solve your wet basement problem. I've done hundreds of calls with homeowners like you and solved each problem. The calls always are 30 minutes or a little less. I record the call and send you the MP3 file so you don't have to take notes during the call. You send me photos of your yard or a short video, and then I draw a picture for you showing how to install the linear french drain. Read Jim's testimonial below to see how I helped him.
Most recent customers to order a phone consult: Manu, Alexandria, VA | Patti, Ft. Worth, TX | Warren, Hamilton, OH | Sandra, Bend, OR | Brandon, Rapid City, SD | Alice, Plant City, FL | Loreli, Worcester, MA
My neighbor's property sits higher than mine. In the spring, the soil is so saturated that an underground river of water flows through the soil towards my house.
I controlled the water by digging a 6-inch-wide trench 24 inches deep along the entire length of the problem area. I installed 1 or 2 inches of washed 1-inch gravel in the bottom of the trench. Then I installed a 4-inch perforated drain pipe in the trench. I prefer to use a white plastic pipe that has two or three rows of holes drilled in the pipe at 8-inch centers. Be sure to install the pipe with the holes pointing DOWN. If they point up, small pieces of gravel can close off the holes and water can't get into the pipe.
How High Should the Gravel be in the Linear French Drain?
I prefer to fill the trench to the top with gravel. If you don't like the look of the gravel in your yard, then stop about 1.5 inches from the top and put in a piece of sod.
Should I Line the Trench with Filter Fabric?
Never use filter fabric in a linear french drain. Any silt flowing through the soil, and this rarely happens by the way, can clog the filter fabric and water then can't enter the linear french drain.
Filter fabric products are designed to stop the movement of the silt. If the fabric gets clogged with silt, then water can't find its way into the trench or the pipe.
Because my lot slopes front to back, I constructed the trench so that it sloped at a shallower angle than my lot. The drainpipe actually comes out of the ground at the rear of my property. All of the water which used to come towards my house hits this linear French drain. Because water usually takes the path of least resistance, it drops through the gravel and then takes a white water ride through the pipe to the rear of my yard. Most yards have enough slope to make this system work very effectively.
Author's Notes:
October 1999
Do you wonder if linear French drains really work? Read an e-mail I received from Pat Jones in Vienna, Virginia:
A year ago last spring, I called your radio show from my home in Vienna, VA. I described my problem with water in my basement. It was very predictable, every time it rained 2" or more in 24 hours I would get water in my basement. Anyway, you advised me that a French drain would solve my problem.
So I rented the ditch witch and got a bunch of friends, following your on-line tips we installed the drain. Your tip about the plywood to have the dirt flow onto was a great labor saver. We did have a lot of trouble with rocks and tree roots stalling the machine but in the end it was a job well done.
Of course, our work and your advice caused the drought in the Washington, DC area. We waited almost a year and a half before we got to really test the French drain. However when hurricane Floyd came through and gave us 4" in less than a day and the basement was high and dry I figured it was worth the drought. Now the neighbors are asking my advice, and I point them to your web page.
When we talked you said to let you know how it worked out. It worked out great!!
Thank you very much,
Patrick Jones
November 2003
Some wonder if you need to add a straw layer on top of the gravel. It's not necessary if you fill the entire trench with gravel to within one inch of the top. The reason is simple: Silt does not pass sideways through the topsoil. The silt that turns stormwater runoff brown is eroded soil particles that are running in overland flow.
Silt particles get trapped and filtered in the upper layers of topsoil. The vast amount of water captured by a linear French drain is water traveling sideways through the soil. It's generally clear and free of silt. To prove this point, spring water and water taken from underground wells is almost always crystal clear. The silt was left behind at the surface as the water was entering the ground.
You may wonder if my advice is worth anything. Well, read the long summary of what Jim Sanders wrote to me when he was at the end of his rope. My advice in the above column saved him:
"Hi, I just wanted to write to give you the results of my "Trench Drain".
I've had a wet crawlspace for 15 years. Water would fill the crawlspace at times, so we actually had to drill weep holes at the base so that it would enter the basement and eventually, the sump pump.
I have tried everything. Several contractors said that the only thing we could do was to bring the water into the house via drainage tile and let it enter the sump pump. That would work, but because I live on a 6' elevation, there is no reason that I should have water problems. It became like clockwork...when it rained, we would rush home from the lake or wherever we were vacationing so that we could be prepared to start the backup generator, in case the power failed. We even had our alarm company put a sump alarm on our system, so they could notify us if we had a power failure. Battery backup was not an option, because sometimes we lose power for days, and during any rain, our sump would run every 7 minutes...just like clockwork.
I found your site and read your above article on the trench or French drain. At first, it sounded a bit like "holistic healing" to me. I failed to understand why a 2 ft. deep trench, 4 ft. away from the house would do any good. How could this simple thing correct an extreme water problem that has plagued me for years, cracked my foundation, settled my garage floor, and ruined almost every vacation?
The Linear French Drain trench running from the house. PHOTO CREDIT: Jim Sanders
I decided "what the heck". I had to dig by hand using a trenching spade and a pick-ax because the builder back-filled our property with brick and blacktop. It took quite a bit of time. Because the ground level varies so much on that side of the house, I was not able to achieve exactly 2 ft. deep. It varied from 18" to 30" in spots, but the slope was downhill. The trench is about 80 ft. long. At times, I thought about filling it all in, because I just didn’t believe that it would work.
I stoned it, put tile in, and filled it with #1 round stone. I socked the pipe just for safety measure, and I also used geo-textile fabric on top, so I could cover with dirt and grass. I also ordered some clay and pitched from the house to the drain. (Tim Carter Note: Do NOT put a sock on the pipe and DO NOT USE a geotextile fabric as Jim did!)
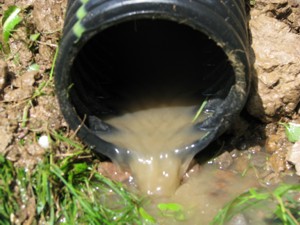
After a short rain, water is running away from the house. PHOTO CREDIT: Jim Sanders
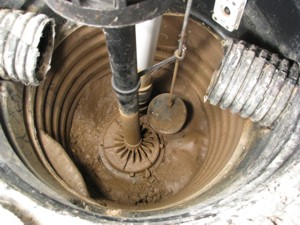
Result? For the last month, we have had seven or eight torrential rains, the worst of which was last night. It rained so hard, that our lawn washed out in spots because of the high clay content. Our sump pump, which normally ran every 7 minutes during and after rain, has not turned on for 4 weeks. The silt at the bottom of the sump well is now dry and cracking. Our crawlspace has not shown a trace of water or even moisture.
Since I couldn’t see correcting the foundation cracks or the garage floor settling and tilting until I corrected the problem's source, I waited to see if the trench drain worked first.
This week, I had a company come in and perform sort of a "mud-jacking" technique on the garage floor, which worked perfectly. Also, during the past few weeks, I parged the cracks in the foundation.
A dry sump pump. PHOTO CREDIT: Jim Sanders
I just wanted you to know how this worked. I stressed for many years over this issue and the solution was nowhere near as difficult as I thought it would be.
As a side note, I went to the end of the drain tile during a hard rain to see what was happening. Water was running out of the drain tile in about the same exact volume that it previously ran out of the weep holes in my crawlspace. This winter will be interesting, because last year, the ground next to the house was so saturated that during a thaw, my sump would run constantly. I'm guessing that the ground between the trench and the house will probably be drier now going into this winter."
DEAR TIM:My hubby and I just got back from the brickyard and I don't mean the one in Indianapolis. Anyway, there were many different types, colors, and styles of brick. I was astonished at the price spread between some of the different types. Aren't all bricks basically the same? Is there a vast difference in quality between bricks? Is there anything I can do to modify the appearance of the brick as it is installed? T.E.
DEAR T. E.: Brick is a fascinating building material. It also happens to be one of the oldest manufactured building materials. Brick is manufactured primarily of clay, which happens to be one of the most abundant materials found in most soils. My guess is that a group of individuals had a particularly intense bonfire one night. The next morning, they were astonished to see that the ground below the fire had become very hard indeed.
Manufacturing processes today are more refined than those methods used 5,000 years ago. Bricks can be manufactured from either clay or shale. Shale is simply a soft rock which started out as clay. Not all bricks are the same for the simple reason that not all clays or shales are the same. These two materials often have a high content of silica and alumina, two of the most abundant elements on earth. In addition, clays and shales contain metallic elements such as iron, magnesium, and potassium in varying amounts. These elements help add strength to the clays as they are heated to form bricks.
There are 4 primary factors that affect the cost of brick: raw material cost, energy, labor, and freight. Certain clays or shales may be easy to mine. The raw materials may be close to the brick plant. The cost of fuel for the firing kilns may differ in different parts of the country. Some bricks can be made and packaged entirely by machines. Other bricks use manual labor to blend and grade the bricks. Because bricks are heavy, the cost to ship them any distance can add significantly to their final cost.
Bricks can vary significantly in quality for several reasons. First, the clay or shale used to make the brick must possess certain qualities. Top quality bricks are made using clay or shale which has excellent plasticity and fusibility. Hang in there, I'll explain these terms.
A clay or shale is considered to have excellent plasticity if, after mixing with a small amount of water, it can be shaped or molded into a certain shape. It must be able to maintain this shape during the drying process.
Fusibility relates to a bricks durability. After bricks are formed and dried, they begin to enter a kiln. A kiln is nothing more than a giant oven. The temperatures in brick kilns can reach as high as 2400 degrees F. As the clay and shale particles are heated they begin to soften and fuse together. The more particles that fuse together, the harder and more durable the brick.
You can modify the appearance of your brick job very easily by paying attention to the mortar which is used between the bricks. Most people fail to realize that the mortar joints on a typical brick job make up approximately 15 to 17 percent of the surface area of a wall. Two things can be done to enhance the beauty of mortar: color and texture.
Many mortar manufacturers offer different colored mortars, not unlike colored grout for ceramic tile. The use of colored mortar can actually enhance the appearance of a colored brick. There are nine different textures or shapes that you can use when finishing the mortar joints. Some of these can make a brick job look old fashioned while others may make it look contemporary. Using a little creativity with mortar can make your brick home the most attractive in the subdivision.
DEAR TIM:My brother lives in a condominium complex. His unit is virtually soundproof. Rarely can you hear any exterior noise or sounds from other units. My current home is not soundproof. Can I do anything to lower sound transmission in my home? What could have been done during construction to make my house more soundproof? N.L.
DEAR N. L.: Excuse me, did you say something? I couldn't hear you. Just kidding! Soundproofing is an often misunderstood and neglected aspect of residential construction. I'm glad you asked the question. Perhaps it's best to start by understanding sound.
How is Noise or Sound Created?
Sound is created when something vibrates. Think about hitting a tuning fork against a hard surface. How about a rock-and-roll drummer hitting a cymbal or any of the drums?
These vibrations create sound waves that travel through the air. The sound waves then can either bounce off objects and/or cause them to begin vibrating.
What is Sympathetic Sound?
This additional vibration then creates sound waves on the other side of the object. This is how our ears work. Sound waves produced by a vibrating object travel through the air into our inner ear. These waves cause our eardrum to vibrate. Our brains then compute whether the vibrations are noise (unwanted sound) or pleasurable sounds such as conversation or music. I fully realize that some conversation and music can be noise depending on who's vocal cords are vibrating.
One way to minimize sympathetic sound is to make sure a wall assembly is not balanced. This is one reason a soundproof radio studio has window glass panes that are not parallel.
You can also add a 5/8-inch thick layer of drywall to one side of a wall that already has 1/2-inch drywall on both sides. If new construction, consider putting 1/2-inch drywall on one side of a wall and 5/8-inch on the other side to prevent sympathetic resonant vibration.
Dense or Thick Things Need More Energy
When sound is produced it has a certain amount of energy. The amount of energy is in direct proportion to the volume of the sound. So the louder a sound the greater its ability to vibrate objects such as walls, floors, and ceilings. If an object is lightweight or has a small density, it doesn't take much energy to get it to vibrate. Heavy, dense items require much greater amounts of energy to get them to vibrate. This is why older homes are more soundproof than newer homes. They tend to have thicker walls, ceilings, and floors.
What About Blocking Air?
Unfortunately, since your home is already built, the only sound that you can control is that sound which is still airborne. You need to block all pathways of air that are leaking air into the room.
Think of the room as an aquarium and begin plugging these leaks. For example, caulk all cracks in the room, especially where walls contact floors. Caulk holes inside of electrical boxes and around the edges of these boxes where they contact the drywall, plaster, or paneling. Install tight weatherstripping around doors and windows.
Soundproofing New Construction
If you are getting ready to build, you have many opportunities to soundproof. Remember, we need to stop airborne sound waves and those sound waves which travel by vibration through the structure.
Airborne sound waves can be stopped by using wall and floor materials that tend to absorb sound rather than reflect it. You can also have your builder caulk underneath all wall plates so that sound can't travel under a wall. Make sure that electrical outlet boxes from two back to back rooms are not in the same stud cavity. Install fiberglass sound batts in walls to block airborne sound waves that get into a wall cavity. Consider using insulated ductwork for your heating and cooling system.
Isolated Things That Vibrate
Vibrations caused by things in the house must be isolated. Do not allow plumbing pipes to touch framing members. Isolate them with pieces of rubber or caulk where they pass through floor joists and wall plates. Isolate any vibrating thing (furnaces, washing machines, dryers, fans, etc.) from direct contact with framing members. Without isolation, the vibrations will eventually create airborne sound waves which you will then hear.
Separate Wall Studs
Construct critical wall assemblies using two rows of studs which do not touch one another. The wall finish material for each room is applied on a separate row of studs. This stops the vibrations from one room from vibrating the drywall on the other side. If you can't afford two rows of studs, consider applying a metal resilient furring strip horizontally across the studs on each side of the wall. Then attach the drywall (two layers, if possible) to these strips. Apply 6 mil plastic to the studs before you apply the furring strips to the studs. This helps to isolate vibrations between the two objects.
Remember, stop the vibrations and you will stop the noise.
DEAR TIM: I'm thinking of adding a skylight to my kitchen area. I would really like to tackle the project myself even though my skills are limited. Many skylight manufacturers talk about flaring the shaft so that more light gets into the room. I only have three days to complete the project. My wife has started a neighborhood betting pool. The smart money says I can't finish the job in time. Can you share any tips or suggest an alternative method to get sunlight into my kitchen? G.Y.
DEAR G. Y.: I can help you, but first, what are the current odds? I might want some of that action. You better get plenty of rest, because if you choose to install a skylight, you are going to be busy!
I am installing blocking in between the ceiling joists.
I have installed hundreds of skylights. Some installations are more difficult than others, especially the flashing details between the skylight and the roofing materials. If you don't pick a skylight that has a pre-engineered flashing system, you might spend three days up on the roof. Pre-engineered flashing systems make quick work up on the roof.
Flaring skylight shafts is a very good idea. If you happen to own a flashlight that has an adjustable beam you already know why. Flaring the shaft of a skylight tunnel allows more light to enter the room. However, flaring a skylight tunnel also adds slightly more time and material to the installation.
Flaring the skylight shaft may not even be an option in your case if your roof is constructed of pre-engineered roof trusses. Trusses should not be cut. Only a structural engineer can make this determination.
If you are determined to try this project, here is what you will need to do. By the end of the first day, you must have the skylight properly installed. This means that if you had to cut any roof rafters, you have properly strengthened adjacent rafters to carry the additional load that used to be supported by the cut rafter(s). It also means that all flashing work is complete on the roof.
By lunch time of the second day you had better have the skylight shaft framing complete. Take a short break for lunch and get busy installing your insulation on the side walls of the shaft. When finished, apply your drywall. Just before going to bed make sure you have taped the drywall and put a first coat of fast setting joint compound on all the nails, screws, and cornerbead.
This particular product required face screws through the plastic outer dome to secure it to the roof.
On the third day, use fast setting joint compound for your second and final coats. If all goes well, you can sand the compound after lunch and complete your painting by supper time. Before you decide to jump into the project, only on two occasions have I been able to meet such a deadline.
As an alternative, why not consider installing one or more of the new tubular skylights. These are nifty devices that actually pipe sunlight directly into just about any space you choose. What's more, if everything goes right, you can have one of these completely installed in about 4 hours.
These devices are comprised of a flush or domed diffuser which is cut into your ceiling, a highly polished steel or aluminum pipe, and a clear acrylic dome on the roof which lets the light into the pipe. If your kitchen roof faces south, you will be pleasantly surprised as to how much light one of these sun tubes will let into your kitchen.
There are three distinct advantages that these tubes have over conventional skylights: no framing, plastering, or painting is necessary. The use of the highly polished pipe or tube eliminates all of this work. You simply need to cut a hole in your ceiling for the diffuser, install the flashing on the roof, insert the pipe and the dome and BINGO you're done. Just think, if you play your cards right you'll have 2 plus days to golf!
DEAR TIM:I went shopping for vinyl windows this weekend and was quickly overwhelmed. While they all appear basically the same, there seem to be differences. For example, why are some windows certified and others not? Does it make a difference how the windows and frames are connected? Finally, all the windows appear to be white, but when samples are held side by side, some are a blue-white color. What I thought was going to be an easy purchase has turned into a nightmare. Wake me up! D.E.
DEAR D. E.: You are awake, but you have crossed over into the vinyl window dimension. The only experience I can compare it with is a trip through a house of mirrors at a county fair. You must proceed cautiously and slowly through this difficult maze.
Let's start with your certification concern. The American National Standards Institute, Inc.(ANSI) and the American Architectural Manufacturers Association(AAMA) joined together to produce voluntary specifications for vinyl window construction. These specifications are very technical and deal with issues concerning durability and safety.
The certification program is very tough. Windows must be constructed using certified components, such as high quality vinyl, glass, and weatherstripping. Windows are tested randomly and periodically for a manufacturer to maintain certification status. Make sure the windows you purchase are constructed using the most recent guidelines, ANSI/AAMA 101-93. A sticker on the window frame should contain language indicating that the windows are approved.
Construction of vinyl windows is very important. There are two basic methods: mechanical connections and fully welded construction. Both types of construction can pass the rigid testing as outlined by the ANSI/ AAMA specifications. Mechanically connected windows are assembled by using screws, brackets, and caulk at the corners of the windows and frames. Connections can loosen or fail during the trip from the factory to your home. Fully welded construction takes advantage of the chemistry of vinyl. After the sections of the frame and window are cut, the mitered corners are heated. Once assembled and cooled, the two pieces of vinyl actually become one.
Heat (from direct sunlight), however, can cause big problems with some vinyl windows. Very close to 160 degrees F, most vinyls begin to loose some of their rigidity. Stress can cause frames to sag and distort. If you live in the South or Southwest, windows that face west can take a beating in the late afternoon. It is absolutely essential that you purchase high quality vinyl if you feel your windows will be exposed to this type of sunlight.
Quality windows are often constructed using frames which have many separate chambers. The cooler chambers which are away from direct sunlight help to hold the heated portions of the vinyl in shape. Steel inserts can also be used in larger windows. However, be sure the steel is encased in an inner chamber that is then welded shut. If not, your vinyl windows may actually start to rust!
The large number of chambers also provides another benefit. When mitered for assembly, the cut edge of a frame exposes the edges of the chambers. These are the parts which are heated and welded together. The more edges you have, the stronger the weld will be. In fact, manufacturers can tell you the square inch area of welded vinyl at each corner. Purchase a window with the highest square inch area.
The color differences you noticed are real. Some vinyls used in windows will change color when exposed to sunlight. Almost all vinyls will eventually begin to yellow. However, some will yellow much quicker than others. Some, not all, manufacturers tint their vinyl blue to delay this process. There are high quality blue vinyl windows, however. If you want these for your house, be sure to look for the ANSI/AAMA label.
Quality vinyl windows contain high amounts of titanium dioxide. Windows which have high amounts of this pigmenting chemical are almost always pure white. High quality vinyl also contains an organic form of the metal tin which also helps to stop the yellowing process. If the people in the window showroom act surprised about these things, keep shopping!
Expert Advice For Your Home
Subscribe to the FREE Ask the Builder newsletter to receive professional advice for your home. Complete the form below and each week you'll get:
DIY Tips
Tool Reviews
Project Guides
Product Discounts, Giveaways & more.
Unsubscribe at any time. We respect your email privacy.