Copper Water Pipe Corrosion – Aggressive Water

DEAR TIM: I'm getting ready to build a new home. I am deeply concerned about my drinking water lines. I have heard from some friends in different parts of the country that copper water lines can corrode from aggressive water. Is this possible? What is aggressive water? My parents had copper water lines that never were a problem. Is there an alternative pipe I can use? A.N.

DEAR A. N.: Aggressive water is drinking water that can cause corrosion. It is a real and growing problem in many parts of the country. Leaks are developing in new homes that are less than 2 years old in some cases. These leaks can cause high water bills and structural damage. Homeowners or municipal water systems that obtain their water from wells are susceptible. Rarely, does surface water (that obtained from rivers, lakes, etc.) become aggressive.

The causes and mechanisms that are responsible for the corrosion are not always the same. Water that is slightly acidic is sometimes to blame. High levels of dissolved minerals and carbon dioxide also can cause problems. High levels of chloride or sulfate can be serious.

copper pipe corrosion

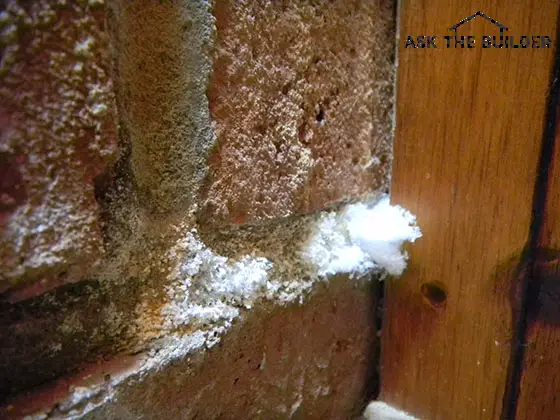
Poor workmanship can lead to corrosion. Plumbers who use excessive amounts of flux when soldering and/or leave excess flux on copper pipe and fittings are to blame as well. Flux is an acid that is brushed on copper pipes and fittings that allows solder to bond more easily to copper. Municipal waters works usually have chemists who regularly test the quality of the water being drawn from wells, rivers, lakes, and aquifers. These chemists are responsible for maintaining water quality. Not only do these individuals treat water to make it safe to drink, they sometimes alter the water chemistry to make it less aggressive. Some municipal water works add corrosion inhibitors to the water.

Believe it or not, these chemists try to adjust the acidity and hardness of the water so that it actually coats the inside of your pipes with a thin scale of calcium carbonate. This scale can protect copper pipes from corrosion by insulating' the copper from the aggressive water. This may be the reason why the pipes in your parents house are not suffering from corrosion. New copper is very susceptible to corrosion, as the protective scale has yet to form.

Water chemistry can change. Those parts of the country that are experiencing growth may find out that their municipal water works are either drilling new wells, or sinking existing wells deeper. In either case, aggressive water may be mixed or injected into a previously non-corrosive water system.

For this reason, you may wish to consider plumbing piping which is not affected by aggressive water. CPVC plastic piping is a good choice. This piping has been used by the plumbing industry for over 40 years. It is regularly tested by the National Sanitation Foundation to make sure that it can deliver water which meets all U.S. EPA standards. However, CPVC piping should be used carefully in outdoor underground installations. There have been instances where solvents in polluted ground have actually migrated into the piping. Choose your piping materials carefully.

Read in my September 10, 2009 Newsletter about Jenee's question about PEX vs Copper tubing.


Author's Notes:

July 6, 2001

I just received an email from Gold Pipe and Fittings and they have information that says solvents in polluted ground areas do not migrate into the piping. Stay tuned to the website to get the facts.

Termite Elimination

termite elminationtermite elmination
DEAR TIM: This past spring my neighbor's house was invaded with termites. I am concerned that my house might be next. Even though my neighbor's house was treated with chemicals, is it possible for the termites to come over to my house? Also, being very environmental, I am concerned about the chemicals that are injected into the ground to kill termites. Is there another way? T.E.

DEAR T. E.: You bet it's possible! In fact, there is a strong possibility that your house may be already infested. Being quite the social insect, they are constantly expanding and attempting to start new colonies. The termites that your neighbor saw may actually have originated from your house.

Remodeling contractors love termites, as they do over $1 billion worth of damage a year to structures in the United States. They like to live in warm, moist soil near wood food sources, such as fallen trees, wood piles, and houses. In the forest, termites help make top soil by munching on dead trees. In houses, they simply add to our shrinking landfills by creating construction debris.

There are over 40 species of termites found in the USA. The termites live in colonies that have highly developed social systems dominated by a king and a queen. Special termites care for the queen who can live for up to 50 years and lay thousands of eggs each year. Other residents of the colony include worker termites, soldiers, and reproductives.

The worker termites are the ones that eat wood. They supply food for the entire colony. The king, queen, soldiers, and reproductives all stick around the nest doing their jobs. The worker termites are the ones that leave the nest to pick up the carry out meals from your home.

The worker termites work 24 hours a day, seven days a week. It is possible for them to travel through a crack in concrete or steel as small as 1/64th of an inch in their constant search for new food sources. Once a worker termite gets his fill from your floor joist or wall stud, he heads back to the nest where he shares the food and gets a drink. Termites are quite thirsty, as they must revisit the soil or nest every 24 hours or so.

Chemicals used in the past, and still in use today, simply provide a barrier around your house. They do nothing to actually wipe out the entire colony. In fact, some of these chemicals can actually harm other wildlife. A new system has been developed which has the capability of killing the entire colony. Small plastic monitoring stations are inserted into the soil around your house.


Termite infestation? Pick the best exterminator using my Termite and Carpenter Ant Checklist. I offer a 100% Money Back Guarantee.


A professional checks these periodically for termites. Once detected, a growth regulator, which is toxic to termites, is installed into the monitoring stations. The worker termites eat the tasty toxic food and share its location with the other workers. Soon, many workers die. This is a major problem for the termites who hang out back in the colony, as they depend upon the workers to bring them food. This system can wipe out a colony completely within six months.


Author's Notes:

September - 1999

I recently received a letter from the public relations firm that represents the Bayer Corporation. One of the head scientists at this company was kind enough to review all of my past information on termites and offered some suggestions in order to keep my content as accurate as possible.

This individual, Dr. Byron Reid, said that up until his company developed a new product called Premise, my statements about liquid chemicals not killing termite colonies was accurate. The Bayer Corporation folks maintain that their product will kill foraging worker termites immediately but does not harm pets or humans. I would ask about this system when you speak with professional exterminators. Remember, a barrier chemical treatment system is only as good as the person who is injecting the chemicals into the ground. TC

Stair Railing Assembly


Farmcrest stars lower flight wide

I installed this handrail system in my Cincinnati Queen Anne Victorian home. Look closely and you'll see three different styles of balusters under the stained-oak handrail. It required intense concentration and special skills to install all you see in this photo. Do NOT underestimate the painstaking work you see here. Copyright 2023 Tim Carter

Stair Railing Assembly

DEAR TIM: I'm in the midst of renovating my first old house and need help with the stair railing. The staircase leading to the second floor has an oak handrail with spindles and a curlicue thing on top of the post at the bottom of the stairs. The handrail and large, decorative posts are loose. Do I just renail all the spindles to tighten it back up? Is there something else I should / can do? Or, is it best just to start over with a new handrail system? M.I.

DEAR M. I.: Did you slip on some sawdust and bump your head? Do the words volute (your curlicue thing), newel, gooseneck, or turnout sound familiar? I didn't think so.

We're about to go on an anxiety-filled journey. You're about to enter a dimension of space and time filled with infinitely small measurements and angles and finish carpentry that only a select few can navigate successfully.

Your next stop.

The twilight zone of carpentry.

Staircase handrail systems are, in my opinion, the most difficult aspect of finish carpentry. A typical installation may take an experienced carpenter, with a helper, 4 - 5 days to install!

Probably less than 1 percent of the finish carpenters in the trade can correctly install handrails and balusters.

Your handrail was installed by a carpenter who is in the 99 percent group. Handrails and balusters installed correctly simply won't come loose unless large children use them as indoor playground equipment or a piano-moving company bashes into a railing or newel post while you're not looking.

Handrail systems derive their strength and stability from the larger, often decorative, newel posts that are found at the bottoms, tops, and landings of staircases. If the newel posts are not securely fastened, the entire handrail system will shake. The thin balusters that extend from the handrail down to each stair tread offer little strength. Their purpose is to form the barrier so you and your children do not fall off the stairs. Toenailing your spindles will do little to help the loose handrail or posts.

Newel Posts - The Foundation

Newel posts at the top, bottom, and balconies of a staircase often have long, thick dowel pins at the bottom of each post. These dowels fit into precisely drilled holes of the same size. Drill the hole too big, even by 1/16th inch and your newel post may wiggle. Newel posts installed at landings incorporate long, heavy lag bolts which are attached to hidden rough framing members. Often these posts are notched into the stair tread nosings for additional stability.

Farmcrest Staircase landing newel post

This is a close-up shot of the landing newel post. It had to be notched so it was centered on the two lines of the intersecting balusters. Copyright 2023 Tim Carter

To fix your loose handrail system, you must attack the problem from below. It will not be easy. Newel posts at the bottom and top of the stairs will be the hardest to tighten. Simply put, you now face the task of inserting a 16-inch long one-half-inch diameter lag bolt up into each post from below! This lag bolt must pass through solid blocking attached to your floor joists directly into the center of the dowel pin. The lag bolt should penetrate up into the newel post at least 8 inches.

Thinking of starting over? If so, there are several companies that, build, precut, assemble then knock down the entire handrail system for just about any project. These same companies preassemble the staircases. You, or your builder, simply provide them with a few basic measurements. The manufacturers claim that an average staircase and handrail system can be assembled in 4 hours. This sounds like something that may be of interest to you.

Avoid Over Budget Plans

DEAR TIM: My husband and I engaged the services of an architect for our project. At the beginning of the process we told him how much money we had to spend on the project. The bids for the job are all coming in about 40 percent over our budget. What went wrong? What can be done, if anything, to salvage the project? Can this agony be avoided? C.R.

DEAR C. R.: I am sorry to hear of your misfortune. On more than one occasion, I had to deliver cost estimates to homeowners that exceeded their budgets. I know the anger and frustration you are feeling. The sad thing is, in almost all cases, it can be avoided. In my opinion, you may have a legitimate beef with your architect.

Frequently, problems such as yours happen in the earliest stages of planning. Homeowners communicate their project wish list to the architect. Often, dramatic preliminary drawings of the project are produced. You can become entranced and intoxicated by these sketches. The emotional attachment to the project intensifies. It is difficult, if not impossible, to turn back at this point. Architects who permit this to happen are guilty of a major infraction: failure to maintain an assured, clear distance.

Your cost overruns are severe. There is little you can do to maintain the integrity of the project. Cost cutting measures that maintain project integrity usually only produce savings in the 5 - 7 percent range. To achieve further cost savings, major product substitutions have to be initiated and/ or the size of the project has to be reduced. These are painful procedures.

Architects can avoid problems like this. However, it requires some work on their part. Fortunately, with computer advancements it is not that hard to do. A simple system of tracking job costs, detailed cost breakdowns, project size and style, and difficulty rating is all that is needed.

An architect can quickly calculate the square foot area of recent projects. They know what these jobs cost. From this, they can calculate finished square foot costs. Because they drew the plans, they can assign a difficulty factor.

Imagine what could have happened in your case. Immediately after hearing what you and your husband wanted, the architect could have stopped the conversation. He could have taken your budget number and divided it by the current cost per square foot for similar projects. Within a matter of minutes, he could have told you the maximum square footage of your planned project. Given this number, you and the architect could quickly determine if the size would fit your needs.

This exercise can often take place in as little as 1 hour. You need a disciplined architect who is armed with accurate and up to date square foot cost figures. Ask for the availability of this data when choosing your architect. If you get a puzzled look, continue to interview prospective candidates.


How would you like me to build your new home? It's probably impossible for me to fit your job into my schedule, but I will gladly share hundreds of my tricks and building secrets with you and your builder. Check out my New House Specifications.


Water Softeners – The Basics

Water Softeners

Water Softeners - The Basics

DEAR TIM: I'm thinking about adding a water softener to my plumbing system. Just what is hard water? Are there any real benefits to soft water? Are any piping changes necessary? O. S.

DEAR O. S.: You are making a smart move. Soft water makes it easier to clean just about anything. It prevents the buildup of scale in pipes, water heaters, and boilers. The Soviets figured this out in 1910. They were the first to use soft water in electric power plant boilers.

Water from wells, aquifers, rivers, etc. contains dissolved chemical elements. Two of these, calcium and magnesium, cause water to be hard. The higher the amounts of these elements in a given measure of water, the harder the water. Water hardness is measured in grains per gallon. One grain weighs 1/7000th of a pound. Water containing 7 or more grains of these elements per gallon is considered hard.

Hard water can cause big problems. When water is heated, the calcium and magnesium decide it's time to get up and leave. They exit the water and begin to form a scale on the inside of pipes, boiler tubes, and hot water heaters. This scale buildup in hot water heaters and boilers can slow down the transfer of heat into the water. This slowdown can raise your fuel bills by as much as 30 percent.

A majority of your laundry problems are also caused by hard water. Hard water interferes with the cleaning action of soaps. Your white clothes turn grey because of unremoved dirt. Colors fade for the same reason. Soft water eliminates mineral deposits commonly found in toilet bowls and on ceramic tile and plumbing fixtures.

You soften water by removing the calcium and magnesium. It reminds me of a game I played as a kid: King of the Mountain. Hard water enters your water softener. It begins to pass through a bunch of tiny resin beads (mountains) that contain sodium. The calcium and magnesium jump out of the water and onto the beads. In the process, the sodium is knocked off into the water.

Eventually, the softener begins to fill with calcium and magnesium. These elements are removed from the softener in a regeneration process. A brine solution containing a high concentration of sodium is injected into the softener. This sodium jumps onto the beads and knocks off the calcium and magnesium. The calcium and magnesium are flushed out of the softener. The softener is now ready to work again.

Because you pay to soften water, you don't want to waste' soft water on your lawn, flowers, and shrubs. So, make sure your plumber pipes outside hose bibs with hard water. However, give serious consideration to installing a soft water hose bib in your garage. Cars rinsed with soft water don't experience water spotting.

Attic Ventilation – Ridge and Soffit Vents

DEAR TIM: Yesterday afternoon, I went up into my attic to retrieve an old book. It was so hot that I became dizzy and almost passed out. The 3 square metal vents in my roof were not clogged. The air was stagnant. Should I improve my attic ventilation? Is it necessary? F. B.

DEAR F. B.: You're lucky you made it out of your attic alive. Had you passed out, it's possible you might not be reading this column. Attic temperatures in non or poorly ventilated attics can soar to 160 degree Fahrenheit. This type of heat harms your body, books, and your house.

Attic ventilation awareness is at an all time high. This awareness, I believe, is a result of the energy savings breakthroughs the home building industry has and continues to experience. Your house, when it was built, probably had state of the art ventilation. Times have changed and so must your ventilation.

Ventilating an attic needs to be done on a continual basis. The temperature and dew point of the air inside your attic needs to be as close as possible to the air on the other side of your roof. Wide differences in either of these numbers can cost you money in repairs or higher heating and cooling bills.

Poor attic ventilation in colder climates can cause frost and condensation to form on the underside of your roof. It can rain inside your attic. I have personally witnessed this phenomena. In hot climates, elevated attic air temperatures cause your air conditioner to work longer and harder. Asphalt shingles, roof boards, and insulation can be damaged by elevated temperatures.

Your photos reveal two major problems. First, you have no lower undereave or soffit ventilation. Secondly, based upon this lack of lower ventilation and the size of your attic (1,025 square feet), you need an additional 17 roof vents to satisfy most current minimum code requirements.

You need flow through ventilation for your attic spaces. Outside air enters your attic space at the bottom edge of your roof. It is exhausted near the top of your roof. These ventilating systems use wind and thermal convection to continually exchange the air in your attic with outside air. On breezy days, wind blowing across the top of your roof creates a partial vacuum which sucks air out of your attic. On days with no wind, hot air, which builds up in your attic, simply floats out of hidden vents located at the top of your roof.

Many continuous ventilation systems are available that are virtually invisible. Upper roof ventilation products can hide beneath your cap shingles. Lower roof ventilation can be achieved either behind or above your gutters. If your roof needs to be replaced soon, your roofer can remove your three metal pot vents, repair the holes, and install these newer continuous ventilation materials. When installed properly, most of these ventilating systems meet or exceed minimum building code requirements and recommendations.

Chimney Crown Repairs

mortar fungus - Efflorescence

Efflorescence growing in the mortar of a brick fireplace. PHOTO CREDIT: Michael Hannum

DEAR TIM: My three year old house has a brick chimney. While performing a routine inspection of my roof, I noticed numerous cracks in the mortar cap on the top of the chimney. Furthermore, the face of some bricks are beginning to flake. Is it possible that water is entering my chimney through the cracks and causing the bricks to flake? Is it normal for this amount of deterioration to occur in such a short amount of time? Was my chimney constructed properly? P. E.

DEAR P. E.: The photos of your chimney tell the tale. You were victimized by a non-professional brick mason. Your chimney crown (mortar cap) has numerous defects. Unless you correct these problems, you can expect further, rapid deterioration of your chimney.

Chimneys are basically very small structures. Just as your house needs a roof to keep water from entering, so to your chimney. Chimney crowns are simply chimney roofs. The crown should slope down from the flue liner. The angle of this slope should be a minimum of 3 inches of fall per foot of run. Flat or low slope crowns can allow water to enter the interior of the chimney. This water can cause efflorescence (white salt deposits on brick surface), brick spalling (the flaking you are experiencing), and the deterioration of the mortar between individual bricks.

All too often, brick masons simply use mortar mix to finish off the top of a chimney. Chimney crowns should be constructed using either pre-cast concrete slabs, cast-in-place steel reinforced concrete, solid stone, or metal. Masonry crown materials should not directly contact the chimney flue liner. This gap should be caulked with a flexible cement stable silicone caulk. The cracks in your crown possibly occurred because the flue liner expanded from the heat of the fires below. This expansion popped your weak mortar cap much like a chick hatching from an egg. Also, excessive shrinkage cracks often develop in cast-in-place chimney crowns that lack adequate reinforcing steel and/or are not cured properly.

I also noticed that your chimney crown does not extend beyond the outer surface of your chimney. A chimney crown should extend a minimum of 2 and 1/2 inches beyond the face of the chimney on all sides. This overhang helps to keep water from running down the chimney face. The bottom of the crown should contain a small kerf (drip). Without the kerf, water can roll underneath the crown and flow down the face of the chimney.

Your photos indicate that your brick mason failed to install a flashing underneath the chimney crown. This flashing is the last line of defense in the war against water. This flashing is placed beneath the chimney crown. When installed properly, it prevents water from entering the interior of your chimney. Use copper, galvanized steel, or stainless steel for this purpose. Do not use aluminum as a flashing material in masonry chimneys. The chemicals in mortar and cement will cause it to corrode.

The deterioration you are experiencing is normal for a poorly constructed chimney crown. When you rebuild your chimney crown properly, it should perform flawlessly well into the next century.

Over the years, I've seen many different spellings of efflorescence. Here's my growing list: effervesce, effervescence, effervescent, effleresants, effloreflance, efflorescence, efflorressance, effluorescence, eflorescence, eflorescents, ellforesce and ifflorescence.

How To Protect Trees During Construction

saving trees

The large beech tree in the right of this photo is as sensitive as the skin of a newborn baby. We didn't allow any trucks or equipment within its drip line.

DEAR TIM: We built our home on a wooded lot 4 years ago. Within the past 6 months over 50 percent of the trees on our lot have died. Several other trees appear unhealthy. I seem to remember that the excess dirt from the excavation was spread around the lot. My builder confirmed this and added that this is a common practice. Could this have caused the problem? Is there anything I could have done to save my trees? R.C.

DEAR R. C.: Your builder should be arraigned and charged with involuntary tree slaughter. The spreading of excess dirt could very likely have been the main factor in the death and sickness of your trees. There is a strong possibility that other construction events hurt your trees as well.

The root systems of trees can be severely damaged by construction activities. Soil compaction is one of the biggest problems. Prior to construction, the undisturbed top soil on your lot contained vast amounts of oxygen. The trees use this oxygen when they extract nutrients from the soil. Excavation equipment, concrete trucks, delivery trucks, even light pickup trucks squeeze this oxygen out of the soil. Soil compaction affects soil moisture content. Rain water is more likely to runoff than be absorbed. Soils containing high amounts of clay compact more readily than sandy soils.

In your case, the extra excavation dirt was the kiss of death. There is no doubt that the soil was compacted beneath the trees, as the loader or dump trucks had to drive beneath the trees to dump the dirt. This extra soil then made it virtually impossible for air and water to get to the buried tree roots.

Shallow trenching and excavating activities can cut into root systems. A majority of tree roots are in the top 2 - 3 feet of soil. Tree root systems serve two primary functions. They provide the nutrients and moisture for the tree and also act as an energy storehouse. Root systems are a two way street. Nutrients and water from the soil are transported by the roots, up through the tree, and into the leaves. The leaves are miniature factories. They transform the nutrients and water into energy, some of which is sent back down the tree into the roots. This energy is used each spring to produce leaves and seeds.

Your soil chemistry may have changed as well. It is possible that some of your trees died because the soil pH level became too alkaline. The most common causes of this result from the washout of concrete trucks and bricklayer's mortar mixers. Burying scrap drywall also can change soil chemistry.

If you could go back in time, you should have hired a certified arborist. This individual would most likely have developed a plan to protect all of your trees before the first shovelful of dirt was turned.

Secure fencing would have been placed around all trees that required protection. Financial penalties could have been included in contracts for any workman who violated a fenced area.

A system of aeration and watering pipes could have been placed beneath the soil which was placed over the tree roots. An arborist could have saved your trees. My wife was smart enough to call one years ago, before we built our house. Every tree on our lot is alive and healthy.

Tim's drive with trees

This is my own home. The large trees were on the lot before I started. They are in perfect health because I listened to Kathy my wife. She insisted we call in a certified arborist to tell us what to do.

Plastic Laminate Countertops

DEAR TIM: It's time to remodel my kitchen. I was thinking of using plastic laminate countertops again. However, my neighbor has plastic laminate cabinets that have numerous chips. Is plastic laminate not as durable now as it has been in the past? Also, can I avoid that ugly brown line at the edges? If I decide to purchase it, how can I keep it looking brand new? A.R.

DEAR A. R.: Don't base your purchasing decision entirely on the condition of your neighbor's cabinets. The chips on your neighbor's cabinets may be a result of abuse. If anything, plastic laminate is quite possibly more durable than at any time in its history.

The decorative plastic laminate on your kitchen and bath countertops was born in another industry in the early 1900's. The first plastic laminate was used as an insulator in the electrical industry. It was a replacement for heavy ceramic insulators.

Plastic laminate is basically a sandwich of plastic coated papers. It is made by combining layers of kraft paper, a decorative paper layer, and a clear surface layer under high temperature and pressure. The color and patterns you see are simply the layer of decorative paper. The clear surface layer protects the decorative paper from abrasion and moisture.

Decorative laminates are available in different thicknesses. The thickness of the final product is usually a function of how many slices of kraft paper are in the sandwich. The greater the number of slices of kraft paper, the higher the product's impact resistance and resilience. Your neighbor's cabinets most likely are covered with a thinner laminate designed for vertical surfaces. Choose the thickest laminate you can find for your new countertops.


Author's Note: I have a wonderful step-by-step eBook that shows you how to get professional results when painting cabinets. It is easy to follow and affordable. Plus, you get the eBook instantly!


That ugly brown line you see on your older laminate tops is simply the layers of kraft paper. Newer laminate edge moldings are available that eliminate this unsightly line. Laminate moldings offer a variety of shapes and profiles. These are applied to the front and side edges of your countertops. You can mix and match different colors, textures and patterns to create your own distinctive countertop. Wood edge moldings in red oak and hard maple are also available.

If you desire the real look of wood and the benefits of plastic laminate, consider using laminate veneers. This is a laminate product that substitutes thin wood veneers for the decorative paper in the laminate sandwich. Some of these laminates are available that allow you to stain and finish the surface to your liking. These laminates can be used to make beautiful cabinets.

Caring for your new laminate countertop is a breeze. The trick is to wipe up spills as fast as possible. Always use a mild liquid or powdered detergent to wash the countertops. Be sure to rinse the surface after cleaning. Some detergent residues can cause permanent surface blemishes if they come into contact with water on the bottom of plates, bowls, or glasses. Finally, while these new laminates are durable, they are not cutting surfaces. Get out that seasoned cutting board for cutlery chores.

Related Column: Ceramic Tile on Laminate

Gas Logs – Vented and Ventless

DEAR TIM: I am considering purchasing a set of gas fireplace logs. My shopping trip left me overwhelmed with decisions. Do they really look like a real wood fire? Some log sets need to be vented, while others do not. How can this be? Can the logs be installed safely in an existing wood burning fireplace? Are there any other considerations? D. P.

DEAR D. P.: Three years ago, I installed a high quality set of vented gas logs for a customer. Just before lighting them, I made fun of their appearance. My comments quickly went up in smoke! I was entranced by the realism of the logs, flames, and the glowing embers. Generally speaking, the vented logs appear more realistic than the ventless gas logs.

The vented gas logs require a flue or a chimney to exhaust the toxic carbon monoxide they produce. Many of these log sets burn gas that passes through sand beneath the logs. Often vermiculite and clumps of rock wool are placed over the sand. These elements produce the highly realistic glowing embers. Vented gas logs also are capable of consuming large amounts of gas. Some can ingest up to 90,000 Btus per hour! Unfortunately, 85 - 90 percent of this energy goes up the chimney. Fireplace dampers must be locked or clamped in the open position at all times.

Ventless gas logs are technological marvels. They have special burner elements that burn gas with minimal carbon monoxide production. Vent free gas logs certified by the American Gas Association (AGA) are equipped with oxygen depletion sensors (ODS). These devices sense when oxygen in the room drops to a certain percentage. If this occurs, the sensor shuts off the supply of gas to the logs. Defective sensors fail in the safe mode. They will not allow gas to pass to the logs.

Ventless gas logs burn less gas than their big brothers. They are only permitted to burn a maximum of 40,000 BTU's per hour. However, since your fireplace flue is closed or non existent, all of this energy is released into your house. During a power outage, these appliances can be used as a temporary heat source.

All gas logs have the capability of producing huge amounts of water vapor. 1.5 gallons of water is produced for every 100,000 BTU's of gas burned. This massive amount of water can condense on cold chimney flue walls and drip into your fireplace. In the case of vent free logs, this water vapor can condense on windows and any other cold surfaces. Should you install these in a newer air-tight home, you may create severe moisture problems in your attic and in exterior wall cavities.

Certain states prohibit the sale and/or use of ventless gas logs: Alaska, California, Massachusetts, Minnesota, Montana, New York, Utah, and Colorado (30 counties permit their use). Certain other municipalities in other states may also prohibit their use. Check with your local building department prior to purchasing your set. Have your chimney professionally inspected and cleaned prior to any installation. Look for the AGA seal on all products. Follow manufacturer's instructions to the letter!