DEAR TIM:Every spring for the past several years I have battled carpenter ants in my house. They invade my kitchen. I have purchased every off the shelf product in an attempt to defeat these pests. Are they hurting my house? Is there a way to control these pests? Can I win the war? V. E.
DEAR V. E.: Ah! A comrade in arms. I too have been battling carpenter ants for several years. However, I feel that I have turned the tide in my battle. Our foe is formidable. Carpenter ants of one species or another are located just about everywhere in North America. The greatest concentration of species is in the eastern United States.
Carpenter ants do not eat wood like termites. They are incapable of digesting cellulose. However, they do excavate wood as a nesting site. Outdoor nest sites might include trees, logs, fence posts, wood piles, or other large pieces of wood. Indoor nesting locations can be floor joists, hollow doors, window and door trim, or any other hollow or hidden location.
The excavations into wood can cause serious structural damage. The ants can burrow deeply into wood in a constant effort to create space for a growing colony. The pathways or galleries usually start in soft or moist wood. However, once established, the voracious ants can easily gnaw into perfectly sound, dry wood.
The insurance company needs to be sent a copy of the letter to put them on notice of a possible claim. These letters need to be sent to both companies via certified mail with a return receipt being sent to you. Keep these very valuable receipts.
! ! ! See Author's Notes at Bottom of Column ! ! !
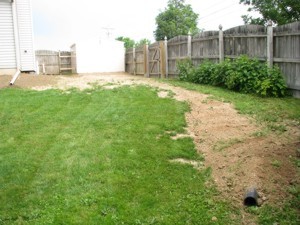
DEAR TIM:Hel! Water is pouring through cracks in my basement walls. It happens every spring and during periods of extended rainfall. Are there ways to successfully patch the cracks? Can I apply an interior waterproofing compound? What do you think is causing the problem in the first place? S. T.
DEAR S. T.: I know how desperate you are. I once owned a house where water would actually squirt up through cracks in the floor. Water also streamed through various wall cracks. I was able to solve my water problem. I'm confident that you will too.
Among other things, soil contains air. Except for sandy well drained soils, the greatest amount of air is in the upper two feet of most soils. As you go deeper they become more compact. Clay rich soils can become extremely dense the deeper you go.
When it rains, water fills the void spaces occupied by the air. This water is pulled by gravity both vertically and horizontally through the soil. In sandy soils, the water may drain deeply into the soil. Most clay soils react differently. The water begins to move sideways towards natural springs and creeks. Basements tend to get in the way of this sideways movement.
To make matters worse, the soil around your foundation might have tremendous amounts of air in it. During the original excavation process and the backfilling process this dirt was fluffed up. That is, it became uncompacted. When it was dumped alongside your foundation as backfill, the air was not removed. It can take years before Mother Nature does it naturally. What's more, you may actually have a bowl shaped depression that has formed at the surface that collects rainwater or irrigation water. This depression may be hidden by mulch or gravel.
Check for these low spots. Fill them with well compacted soil. The ground around your foundation should slope away from your house. A 1 inch fall per foot is desirable. Make it slope away for at least 5 - 6 feet if possible. Do not allow downspouts to drain directly onto your soil as well.
There are numerous ways to repair your cracks and waterproof your foundation. The cracks in your walls can be patched with Hydraulic Cement Compounds. These wonderful cements actually expand as they dry. The cracks can be injected with epoxies or polyurethane grouts. Some of these compounds are actually stronger than the original concrete. Some companies inject special crack filling grouts around the outside of your foundation. These compounds react slowly with soil moisture to fill the cracks from the outside. You can also apply cementitious waterproofing compounds by brush on the inside walls.
Prevent leaks in your basement by using this Basement Waterproofing Checklist to hire a great professional. I offer a 100% Money Back Guarantee.
Installing a curtain or linear French drain around the uphill portion of your home will help. This narrow trench contains a perforated drain tile covered with rounded washed gravel. This simple, yet effective device can capture and divert the water before it even becomes a problem.
You may wonder if my advice is worth anything. Well, read what Jim Sanders wrote to me when he was at the end of his rope:
"Hi, I just wanted to write to give you the results of my "Trench Drain". I have had a wet crawlspace for 15 years. Water would fill the crawlspace at times, so we actually had to drill weep holes at the base so that it would enter the basement and eventually, the sump pump.
I have tried everything. Several contractors said that the only thing we could do was to bring the water into the house via drainage tile and let it enter the sump pump. That would work, but because I live on a 6' elevation, there is no reason that I should have water problems. It became like clockwork...when it rained, we would rush home from the lake or wherever we were vacationing so that we could be prepared to start the backup generator, in case the power failed. We even had our alarm company put a sump alarm on our system, so they could notify us if we had a power failure. Battery backup was not an option, because sometimes we lose power for days and during any rain, our sump would run every 7 minutes...just like clockwork.
I found your site and read the article on the trench or French drain. At first, it sounded a bit like "holistic healing" to me. I failed to understand why a 2 ft. deep trench, 4 ft. away from the house would do any good. How could this simple thing correct an extreme water problem that has plagued me for years, cracked my foundation, settled my garage floor and ruined almost every vacation?
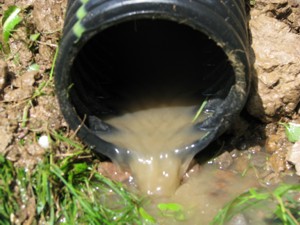
The Linear French Drain trench running from the house. PHOTO CREDIT: Jim Sanders
I decided "what the heck". I had to dig by hand using a trenching spade and a pick-ax, because the builder back-filled our property with brick and blacktop. It took quite a bit of time. Because the ground level varies so much on that side of the house, I was not able to achieve exactly 2 ft. deep. It varied from 18" to 30" in spots, but the slope was downhill. The trench is about 80 ft. long. At times, I thought about filling it all in, because I just didn’t believe that it would work.
I stoned it, put tile in, and filled it with #1 round stone. I socked the pipe just for safety measure and I also used geotextile fabric on top, so I could cover with dirt and grass. I also ordered some clay and pitched from the house to the drain.
After a short rain, water is running away from the house. PHOTO CREDIT: Jim Sanders
Result? For the last month, we have had 7 or 8 torrential rains, the worst of which was last night. It rained so hard, that our lawn washed out in spots because of the high clay content. Our sump pump, that normally ran every 7 minutes during and after rain, has not turned on for 4 weeks. The silt at the bottom of the sump well is now dry and cracking. Our crawlspace has not shown a trace of water or even moisture.
Since I couldn’t see correcting the foundation cracks or the garage floor settling and tilting until I corrected the problem's source, I waited to see if the trench drain worked first.
This week, I had a company come in and perform sort of a "mud-jacking" technique on the garage floor, which worked perfectly. Also, during the past few weeks, I parged the cracks in the foundation.
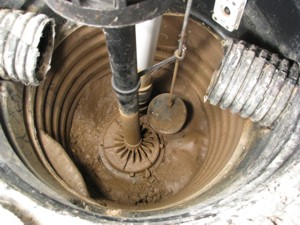
A dry sump pump. PHOTO CREDIT: Jim Sanders
I just wanted you to know how this worked. I stressed for many years over this issue and the solution was nowhere near as difficult as I thought it would be.
As a side note, I went to the end of the drain tile during a hard rain to see what was happening. Water was running out of the drain tile in about the same exact volume that it previously ran out of the weep holes in my crawlspace. This winter will be interesting, because last year, the ground next to the house was so saturated that during a thaw, my sump would run constantly. I'm guessing that the ground between the trench and the house will probably be drier now going into this winter."
DEAR TIM:We have a yellow water saving toilet in our home which is approximately 4 years old. It acts like it has something clogged in it. I often have to flush it twice or three times. A plumber checked it and found no obstruction. What can I do? I sure wish I had my old toilet! M. E.
DEAR M. E.: I understand your frustration. If it is any consolation, there are thousands of people who are suffering with you. You probably have a first generation ultra low flush (ULF) toilet. Regional water conservation acts beginning in the late 1980's brought about the need for these toilets. They use only 1.6 gallons of water per flush. Their use has been mandatory in all non-commercial structures since January 1, 1994.
Prior to these conservation acts, toilets used between 3.5 and 5 gallons of water per flush. The water surface area within toilet bowls was larger and the trap passageway had a larger diameter. Each flush provided enough swirling water to adequately cleanse the bowl and syphon the waste into the plumbing drainage lines.
However, problems arose when these new laws went into effect. The 1.6 gallon standard was chosen before the toilet manufacturers had a chance to complete the necessary hydraulic engineering. They got caught with their pants down, so to speak.
Existing toilet designs were hastily converted to meet the new standards. Water surface area within the bowls was drastically reduced. The internal passageways were made smaller. Because of the reduced amount of water leaving the tank, there was a drastic drop in energy per flush. This caused paper and sometimes waste to be left in the bowl. Repetitive flushing caused the new toilets to actually use more water than the old toilets.
The engineers have been busy. New designs are now available that maximize the energy and cleansing ability of each drop of the 1.6 gallons of water. The water surface area is enlarging. The internal passageways are widening. Sleek designs with smooth sides are available. One flush attempts are more successful.
You may also be interested in another alternative. You can purchase new ULF toilets that have a pressure assist mechanism in the tank. These toilets use the existing pressure from the water supply line to compress air in a bladder mechanism that fits inside the toilet tank. When you activate the flush handle the water rapidly enters the bowl. Rarely, if ever, do you need to flush twice.
The pressure assist toilets offer another advantage. Water and waste is forced down the plumbing drains rapidly. The likelihood of a sewer pipe clog is greatly reduced. The gravity flush ULF toilets have a tough time making this claim. Sewer clogs can happen on a more frequent basis.
You can solve your existing problem easily. Consider trading in that lemon. Get yourself a late model ULF and have your husband install it this weekend. It's a one hour job!
DEAR TIM:Ackkkkk! The wallpaper and/or the adhesive I installed in my new house must be defective. There are several places where the paper has delaminated from the paper backing.
In addition, there are numerous places where the paper pulled completely off the wall exposing the drywall. It also blistered and bubbled during installation. I painted the new drywall before I started. What do you think happened? L. P.
DEAR L. P.: I'll tell you what happened. You very likely made some major mistakes during your installation or you installed the wrong paper in a given location.
Although manufacturing problems do happen, I doubt that your problems can be traced to flaws in either the paper or the adhesive you applied.
Wallpaper hanging is a true craft. Certain wall coverings require specific adhesives. Wall surface preparation prior to the actual hanging of wallpaper is critical.
Successful installations of the many different types of wall coverings require years of experience. Professional wallpaper hangers often have a deep knowledge of paper characteristics, wall preparation techniques, and adhesives.
One of your problems, I believe, is directly related to improper wall surface preparation. In order for wall coverings to stay put for many years everything on the wall must stick to one another.
The drywall paper must stick to the gypsum core, the paint to the drywall paper, the wall covering primer to the paint, the adhesive to the wall covering primer, the paper backing to the adhesive, and so on.
Wall coverings will succumb to the forces of gravity when the weakest adhesion fails. In your case I'll bet that you failed to remove all of the drywall joint compound dust created in the sanding process.
Wallpaper is unforgiving. If you don't get rid of dust, dirt, grease, and stains wallpaper can fall off, show every defect, or cause stains to bleed through the wallpaper.
Very few homeowners know to perform this crucial step. As the adhesive dried behind the paper it created a strong tension force. This literally ripped the paint from the wall. There is a possibility that you will see related failures for up to one year in any room where you failed to remove the dust.
Your paper delamination problems were probably operator error. You may have let the paper relax for too long. When adhesive is applied to wallpaper it causes the paper to swell.
Papers need to expand or relax completely prior to being applied to the wall. This relaxation period changes with different papers. The water in the adhesive soaked deeply into the paper backing (substrate) possibly causing the delamination.
The blisters you experienced are possibly related to this same relaxing requirement. Those sections of paper that bubbled probably didn't relax long enough. The paper continued to swell after it was applied to the wall.
Your paper may also have had an inexpensive pulpy paper backing. These papers perform poorly in areas of high humidity such as bathrooms and kitchen back splashes near cooking or sink areas.
Expanded vinyl papers can also delaminate or pull away from walls in these areas. You must be certain to select wall coverings that are made to perform adequately in high humidity environments.
Just A Few Tools
Let's get started with the tools. Fortunately, you don't need many tools to wallpaper.
Here's a list that will get you going on this job:
retractable razor knife with snap-off blades
4.5 or 6-inch drywall taping knife
smoothing brush or plastic smoother
4-foot level
grout sponge
measuring tape
paint roller & pan
paint brush
Click the Image Below to get all, or some, of the tools now:
UPDATE: New information regarding painting aluminum has been added to this column. Be sure to check the Author's Notes following the article.
DEAR TIM:My husband and I just purchased a 25 year old house covered with aluminum siding. The siding is in excellent shape. It's factory painted finish has faded. In some areas the paint is completely worn down to the aluminum. Can aluminum siding be successfully repainted? I read a book that says to use a latex primer? Is this good advice? What else should I do to insure a professional job? P. A.
DEAR P. A.: The first thing I would do is throw away that book. It may contain some other questionable advice. Many latex primers are not suitable for use with weathered aluminum siding.
Sunshine, rain, and pollution erode all paints. The paint film develops tiny cracks and pinholes. These permit water and air to penetrate the actual siding. Aluminum isn't harmed by water, but air does cause problems. The air oxidizes the aluminum.
Just about every latex paint, including primer, contains ammonia. When ammonia comes into contact with oxidized aluminum it creates a gas. This gas can cause small bubbles to form beneath the paint film. This creates poor adhesion which in turn leads to premature paint failure.
A better alternative is to prime the weathered aluminum siding with a thinned down oil based metal priming paint. Leading manufacturers recommend using one pint of paint thinner to one gallon of high quality oil based primer. This primer creates a barrier between the oxidized aluminum and the finish paint. However, before you even think of mixing up and applying this primer, you need to prepare the surface for paint. If you read the labels on most paints, they will instruct you to apply the product to a clean, dry surface. How do you get yourself clean? Soap, I thought so!
Using any high quality powdered soap product, a heavy sponge, and a scrub brush, wash and rinse down your aluminum siding. You will notice that some of the old paint will wash off in this process. Don't be alarmed. Rinse the siding until no additional paint pigment can be detected in the rinse water. Avoid the use of a power washer for this job. Power washers, when used by a rookie, can direct water behind the aluminum siding. This may cause a leak into your home.
Allow the siding to dry for several days. Apply the thinned metal primer. Consider having the primer tinted to one half strength the color of your finish paint. Your finish coat should consist of a 100 percent acrylic latex exterior house paint. Buy the most expensive paint you can find. It usually contains the highest volume of acrylic paint resin. A higher volume of resin translates into a longer lasting paint job.
You should apply the finish coat of paint within 48 hours of applying the primer. Absolutely do not paint in direct sunlight or on windy days. These conditions reduce the dwell time of the paint. The finish paint needs to dry slowly to achieve the best mechanical and chemical bond. Cool, overcast days are the best for painting aluminum siding.
Author's Notes: The following updated information was received from the Paint Quality Institute. Debbie Zimmer addresses ammonia in latex paints and the resulting bubbling.
"Hi Tim,
Thanks so much for your questions and comments. Regarding ammonia in latex paints, it is so low today that the off gassing (resulting in bubbling) is really not a factor. Here are a few detailed points to consider: 1. Bare Aluminum: forms a strong oxide layer which is easy to stick to and is relatively inert to ammonia. Some folks confuse ammonia with acid. Yes --- acid will generate some hydrogen gas but there should not be a reaction with ammonia. 2. All Aluminum Siding is coated. This again generally results in a surface that is easy to stick to but for all intents and purposes, relatively inert to waterbased paints. Even under poor conditions, incidental exposure to Aluminum should not be a problem because of above (1). Also, on occasion, we do speak about oxygen bleach but typically use the more common (common to homeowners) "bleach" term. Perhaps we should use oxygen bleach more often. We don't use brand names (in any of our materials), such as Clorox. Tim, I'm really glad you asked the questions --- it helps us make our educational information stronger. If you are ever in the Philadelphia, PA area, I would love to take you on a tour of our PQI facilities --- we have over 30,000 paint panels on exposure (a few dating back to the 1950's) and 1000's with the most recent and forward looking technologies. In addition, our "farm" contains over 200 different surfaces and substrates (painted/not painted) on exposure as well. Thanks again," Debbie Zimmer
PQI Director of Communications and Alliances
Dow Coating Materials, North America
The Dow Chemical Company
DEAR TIM:A two foot long by approximately 4 inch thick chunk of concrete detached from one of my outdoor steps. The remainder of the steps are in good condition. Is it possible to restore the broken step? What can I do to insure that the patch will not separate? What are your suggestions as to mixing concrete? Do you feel I can tackle this project? My boyfriend is betting that I will fail miserably. E. R.
DEAR E. R.: Do you have some scrap wood? How about a concrete block or two? Can you rent or borrow a hammer drill? Is there a masonry supply house near your home? Great! Tell your boyfriend, we will take the bet. I'll split the winnings with you!
Repairing a broken concrete step or a cracked corner of a driveway or sidewalk is not a problem. The trick to a successful patch job depends on pinning the new concrete patch to the old concrete.
You need to get the following things: one bag of Portland cement, three 4 inch long pieces and one 20 inch long piece of one half inch steel rebar, a bucket of coarse sand, and a bucket of clean gravel. Pick up the hammer drill from the tool rental shop with a 6 inch long, 1/2 inch bit.
Begin your repair by removing all loose concrete from the broken step area. Use a one half inch cold chisel with a hammer to remove partially loose stones. Wear safety glasses! Drill three holes approximately 2 inches deep into the old step area. These holes should be spaced equally in the area to be patched. Drive the 4 inch long pins into these holes. Take a broom or old paint brush and sweep away all the dust.
Using your scrap lumber, cut and size a board which will act as your vertical form. This form will be held in place with the concrete blocks. You may need to put shims between the board and the concrete block to achieve the correct angle.
Take some pure Portland cement and put it in a bucket. Add water and stir until you achieve the consistency of a thick bodied paint. Slightly dampen the area to be patched with some water. Apply the cement paint to the old concrete and the pins. Mix 3 measures of gravel, 2 of sand, and 1 and a half of Portland cement to make your concrete. Add enough water so the mixture will pour from your mixing basin. Don't add too much water, as it will weaken the concrete.
Pour the concrete into the form. Insert the 20 inch piece of steel into the middle of the fresh concrete. Using a scrap piece of wood, strike off any excess concrete using a back and forth motion as you scrape. At this time take a bricklaying trowel and slide it up and down between the vertical form board and the concrete. This will minimize the presence of stones on the face of the patch.
Within two - three hours, the concrete should begin to stiffen. Gently remove the vertical form. Rub the face of the concrete with a small block of wood to achieve a sandy finish. Do the same with the top of the step. When you are satisfied with the texture, replace the form carefully. Cover the patch with plastic. Don't remove the form or plastic for three days. Also, be sure to get our money!
DEAR TIM:I am thinking of installing a ceramic tile floor in my kitchen. The floor consists of 2 x 10 southern yellow pine floor joists 16 inches on center. The subfloor is 3/4 inch plywood. Is this floor strong enough to prevent cracks in the ceramic tile. If not, what do I need to do before installing the tile? Can I install the tile directly on the plywood? N.G.
DEAR N.G.: The single layer of plywood is insufficient. You will need to add additional underlayment prior to installing the ceramic tile. However, you need to check something else before you proceed. The floor joist span may be too great.
Ceramic tile is a very rigid material. Most ceramic tiles have very little tensile strength. In other words, if you try to bend or stretch a tile it will crack. Some wood floor systems, when designed to minimum standards, have too much bounce. This bounce will crack the tiles.
Floor joists are basically wood I beams. For a given floor joist, as you increase the distance between supports, the joist will deflect a greater amount. Floor joists beneath ceramic tile floors must not deflect more than 1/360 of their span. Assuming your joists are #1 grade and the span is no greater than 16 feet 9 inches, you can proceed.
If you're putting ceramic tile in your home, check out my Ceramic Tile Installation Checklist to learn exactly what you should know about the process. Avoid making costly mistakes with the help of this document. I offer a 100% Money Back Guarantee.
You have two choices of underlayment: 3/8 inch exterior grade plywood or 1/2 inch cementitious board. Both will perform exceptionally as long as you install them carefully. Your existing subfloor should be securely attached to the floor joists. Drywall screws work well. Use ones that have coarse threads.
If you choose to use exterior plywood, the spacing of the sheets is critical. The 3/8 inch plywood edges must be offset from the existing plywood edges at least 2 inches in each direction. You must also be sure to maintain a 1/8 inch spacing around each sheet of plywood.The plywood expands with changes in humidity. If spaced too tightly the plywood will buckle and crack the tile. Attach the plywood with nails or screws that will penetrate the floor joists at least 3/4 inch. Be sure to screw the edges.
Cementitious board makes a great underlayment, however, it requires some additional labor. It is necessary to install the cementitious board in a layer of fresh thinset or dry set mortar. This material acts as a filler for any low spots in the plywood. Without this layer of thinset, the board may flex under foot traffic causing the ceramic tile to crack. The cementitious board is attached to the existing plywood and floor joists with galvanized nails and screws.
If you choose exterior plywood as your underlayment, you must use either an organic adhesive or an epoxy mortar as your bonding agent between the tile and the wood. A latex modified Portland cement mortar will create a long lasting adhesive should you decide to use the cementitious board underlayment. Remember, without a stiff floor your ceramic tile job is doomed to failure.
Restore the "clean" to your grout. Just go to STAIN-SOLVER to see the beautiful, quick results.
Author's Notes:
April, 2002
Tile installed over wood floor systems MUST have a minimum of 1-1/4 inches of solid material beneath it. This means you can have a 3/4 inch wood subfloor covered by 1/2 inch plywood, cement board, or approved gypsum fiber underlayment.
If you want an even stiffer floor, be sure the wood floor system is designed to a 1/480 deflection maximum standard in lieu of the 1/360 standard mentioned above.
DEAR TIM:It is time to replace my 12 year old outdoor air conditioning (A/C) unit. I intend to purchase the highest efficiency unit available. My indoor furnace still has a useful life of approximately 10 years. Does it make economic sense to tear out the good furnace for a new super efficient furnace? Is there anything else to consider in this decision? R. E.
DEAR R.E.: Yikes! You are about to cross over into the most complicated dimension of home construction and maintenance. Heating and cooling equipment and its proper installation is by far the most technical aspect of residential construction. One mistake here and you will be miserable for quite some time. To answer your question, we need to calculate the remaining life cycle cost of your existing furnace. We need your last year's utility bills.
Pick a bill from the spring and the fall of last year when you know your furnace and A/C were not in use. Add these two together, divide by two, and then multiply the result by 14. This total is considered your "base" utility load. I define base load as the sum total of all electric and gas you might use other than that which goes into your furnace or air conditioner. Take all of last year's utility bills and add them together. Subtract the "base" load. The remainder is the annual cost to heat your home. Now, let's project what it is going to cost to heat your home for the next 10 years. Assuming a 2 percent per year increase in fuel costs, multiply your annual heating cost by 11.07. This should give you an accurate cost to heat your home for the next 10 years. We also need to assume that you will not need any major repairs during the next 10 years.
Let's look at the new system. For sake of discussion, assume you will be getting a furnace that is 95 percent efficient. Based upon the age of your existing furnace, I will assume that it is approximately 75 percent efficient. In this case, you should experience a dollar savings of approximately 21 percent per year in fuel savings (95 - 75 =20 20/95=21).
Will this savings over the next 10 years pay for the added cost of the new furnace? What kind of interest income can you get if you invest the money you might spend for the new furnace? Will the annual interest income offset a major portion of the higher annual fuel cost you are now experiencing? All of these things and more need to be considered.
It gets worse. There is a possibility that the new A/C unit will not operate at its rated efficiency if you don't modify your existing indoor equipment. Published efficiency ratings of outdoor cooling equipment can only be achieved when they are installed with specific types of indoor equipment.
If you mix and match equipment, ask the contractor for verification that the new A/C unit will, in fact, operate at the published efficiency. Discuss whether or not indoor modifications are necessary. Investigate warranties as well. See which warranty offers the best protection. Study who backs the warranty. Some companies have a third party involved in long term warranty claims. Read the fine print!
DEAR TIM: My carpenter's level doesn't seem to be working right. The bubbles in the vials don't seem to read the same when you rotate the level. Is there an easy way to test mine? If I buy a new one what should I look for? What kind do you use? G. U.
DEAR G. U.: Your level may be perfectly fine. Do you remember dropping it recently? One of the endcaps may have shifted. You may have created an undetected high spot at one end of the level. Also check to see if the edges of the level are smooth. A piece of dried mud, glue, caulk, etc. may be creating your error.
If you can't find the problem, you can make a copy of an ancient Egyptian level. They made accurate levels by creating a simple A frame using a perfectly straight, horizontal brace or bottom member. A plumb bob was suspended from the apex of the A frame to the bottom brace. The clever builders then marked a point just below the bob while the horizontal brace was parallel with a small stationary body of water. From then on whenever they set this contraption on a surface and the plumb bob lined up with the mark, the surface was level!
However, before you go to that trouble let's do a quick test of your existing level. We need two 1 inch long flat head wood screws, a hammer, and a screwdriver. Find a nearly horizontal rigid piece of wood. This might be a beam, a foundation sill plate, etc. Hammer the screws into the wood about one half inch. I would like the distance between the screws to be 2 inches less than the length of your level.
Place the level on the screws. Adjust one screw until the bubble in the vial is perfectly centered. Rotate the level 180 degrees keeping the same bottom edge on the screws. If the bubble remains centered in the vial, this edge and its vial are OK. If the bubble shifts, the level is off by one half the difference of the bubble's shift. Flip the level over and check the other edge in the same fashion. You can do the exact same procedure using a vertical surface to check the plumb vials.
If your level happens to be a high quality one, the test will be easy. High quality levels have extremely well made and calibrated bubble vials. The edges of the bubble will just kiss the lines on the vial. You will not have to wonder when the bubble is centered. Lesser quality vials often require you to guess. These are the ones where the bubble is smaller or larger than the distance between the two lines. If you decide to purchase a new level, pay attention to the bubble vial's sensitivity. A good level has high sensitivity. Its bubble will move more quickly as the angle of the level is changed.
I happen to own wooden levels. Mahogany levels are usually very stable and have excellent weight distribution characteristics. I look for levels that have glass windows protecting the vials. Glass is more scratch resistant than plastic.
If you want a really nifty level, why not consider an electronic one? Some of these levels combine traditional bubble vials and electronic wizardry to take the guesswork out of making something level or plumb. The electronic window tells you degrees of angle, slope in percent, and even inches per foot. With these tools any DIY'r can easily run with the big dog carpenters!
DEAR TIM: It's time for a new driveway at my house. I really like the look of a gravel road but don't want the dust. Blacktop is simply too plain. I have seen roads constructed using asphalt and small gravel. Can this be done on a residential driveway? Is it practical? What about the cost? L. A.
DEAR L.A.: You bet they are possible. That's the exact type of driveway I have. Locally they are called tar and chip. Some other installers refer to them as seal chip or shoot and chip. No matter what you call them they are a dynamic, beautiful surface. I happened to use two distinctive brown gravels, one from the Meramec River in Missouri and one from an Indiana location. Quite possibly this stone or a similar one is available in your city.
A tar and chip driveway is very similar to standard blacktop in composition. Both types of driveway use asphalt cement as the ingredient which creates adhesion to the aggregate. Blacktop is mixed at a central plant. The asphalt cement completely coats the large, small, and fine pieces of aggregate.
Tar and chip surfaces combine either a special cutback liquid asphalt cement or an emulsified asphalt cement and small similar sized pieces of clean, angular, washed gravel. These ingredients are mixed together at your house.
Tar and chip surfaces are still used in many parts of the USA. This method of paving was standard fare on virtually every highway in the USA prior to 1935. Central mixed blacktop technology was just beginning at this time. Tar and chip surfaces are a wonderful alternative that is, unfortunately, being left by the side of the road.
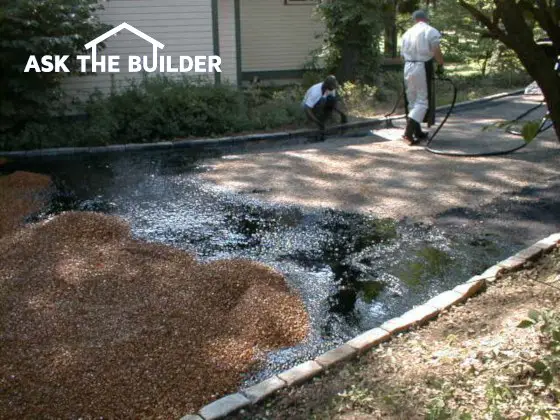
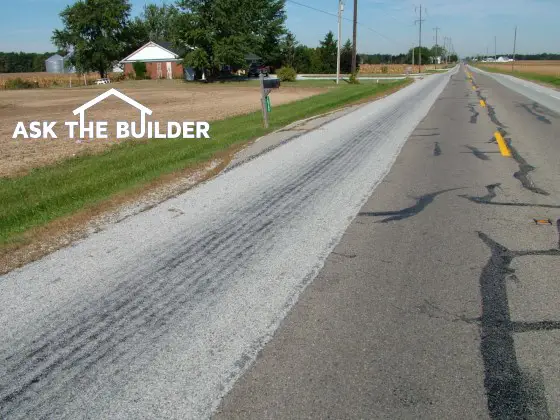
Here is brand new tar and chip resurfacing on a state route in Ohio. Tar and chip are perfect for light to medium-traffic roads. Copyright 2019 Tim Carter
How is Tar and Chip Installed?
The contractor applies the hot, liquid asphalt to a standard gravel base or your existing driveway if it is in good shape. They usually spread one-half gallon of asphalt per square yard.
The small cubic shaped pieces of gravel are then immediately embedded in the liquid asphalt. Often they are applied at a rate of 40 - 50 pounds per square yard. The stones are then rolled and compacted into the asphalt. It is not uncommon for two layers to be installed. That is what I did.
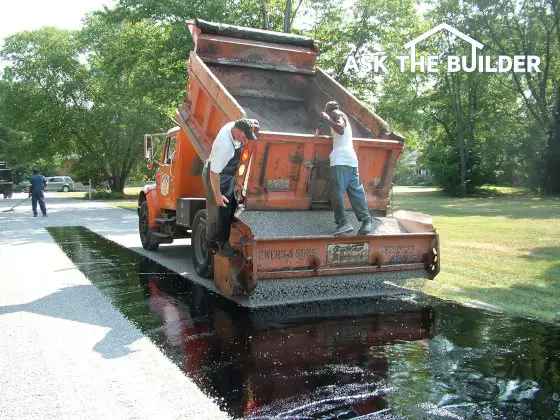
Here are chips being broadcast into the fresh tar. It requires very simple equipment to build a tar and chip road. Copyright 2019 Tim Carter
The completed surface differs as well. The tar and chip surface is almost always rougher. This makes for excellent traction. Not only that, the surface is not black. The color of your driveway is the color of the gravel you choose. If you wish to have a unique country look, you can cover the driveway with a thin (1/2 inch) layer of the colored gravel. This works great on level drives. I don't recommend loose stones on sloped driveways.
What is the Best Weather to Install?
These driveways can only be installed in favorable weather conditions. Hot, dry weather is ideal. If the weather is cool, the asphalt cement may cool and set up to rapidly. The gravel may not achieve a high level of adhesion. Rain can wash away an emulsified asphalt before it cures.
Do Cracks Fill Themselves?
These driveways have a unique feature. They can heal themselves if a small crack develops. In hot weather, the asphalt cement can flow into the crack. The loose stones work in conjunction to disguise this imperfection. As long as the right asphalt cement and the correct chip size is selected, the asphalt does not get on your shoes. We have never had a problem in my house.
Tar and Chip Driveway Cost
These surfaces are inexpensive. Often they cost less than half that of standard blacktop. Unlike blacktop, they never have to be sealed. The service life of a single coat job is often 8 - 10 years.
Would you like to have a gorgeous driveway? How about step-by-step photos and instructions that show you how I had my own tar and chip drive installed? If so, you might want my Instant DownloadTar and Chip eBook.
Author's Notes:
June, 2000
Who Does This Work?
Tar and chip pavement surfaces are nothing new. In fact, there is a strong possibility that you have driven across hundreds of these roads. Many counties use this surface on secondary and rural roads. It is a cost efficient method of repaving and sealing an asphalt roadway.
Businesses and manufacturing plants often pave large parking areas with this material as well.
There is a good chance that a large paving contractor in your city or town does this work. If you are really fortunate, you may find a smaller company that does it as well.
If you have trouble locating a contractor in your town, there is one sure fire way to determine if this paving system is done in your area. If there are blacktop or asphalt driveways in your area, there is an asphalt plant. This is where blacktop is made. This is the same place where the tar and chip people must purchase the tar or asphalt cement. Find out where the plant is and call and speak to the general manager. Ask if he can put you in touch with the contractors who purchase the tar.
Expert Advice For Your Home
Subscribe to the FREE Ask the Builder newsletter to receive professional advice for your home. Complete the form below and each week you'll get:
DIY Tips
Tool Reviews
Project Guides
Product Discounts, Giveaways & more.
Unsubscribe at any time. We respect your email privacy.