Glass and Acrylic Blocks Do Many Things

glass block bar

DEAR TIM: I would like to jazz up a home I am renovating. Glass block has really got my attention. It seems like I can use it in numerous places but I wonder if there are limitations. Do you have some cool suggested uses for glass block other than windows? Is the block as easy to install as the television shows portray? I am skeptical to say the least. Mandy O., Riverside, CA

DEAR MANDY: I must compliment you on your choice of building materials. Glass block is indeed a unique building material that seems to blend with many architectural styles. In addition, it is a rare oxymoron building material. It can provide privacy, yet permit enormous amounts of light to pass from room to room or from outdoors to indoors. Don't feel that glass block is limited to renovation and remodeling as it is an excellent building material for new homes too.

Keep in mind that there are two types of clear building blocks: one is indeed made from glass but the other one is lightweight, crystal clear acrylic. The acrylic block is tough and virtually indestructible. Both types offer you tremendous design opportunities.

Two traditional rooms where you often find the greatest use of glass block are the bathroom and the kitchen. Glass block makes for a very contemporary shower stall. One of the coolest uses is to purchase a special molded shower base that has a wide ledge made especially for the waterproof glass block. One of the walls of the walk-in shower stall has a tight curve that eliminates the need for a shower door. It is similar to the entries into restrooms you often see at airports. Glass block can also be used as the support walls beneath a whirlpool tub and as a low wall around a whirlpool if you want to make a cozy retreat to soak in after a hard day at work.

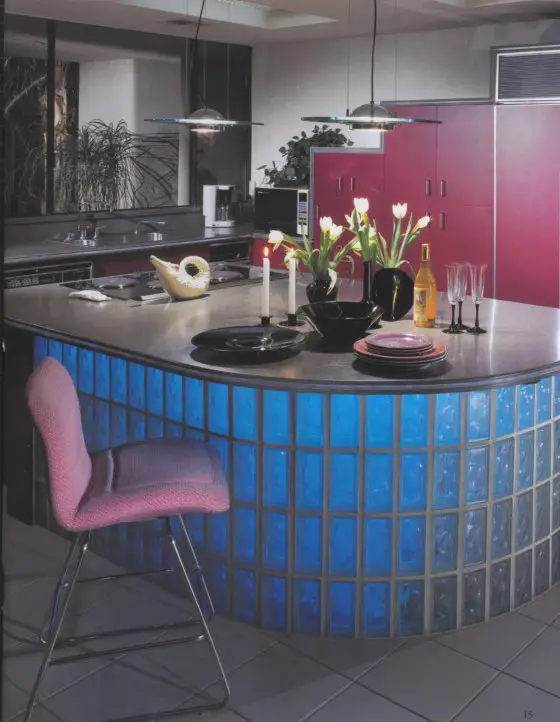
Kitchen islands are a very interesting place to use glass block. You can highlight the block with colored lights to make the glass glow at night. Open shelving can be incorporated into the glass block for a very modern look. If you want, simply install two U-shaped glass block returns at either end of an island for a decorative look. Glass block can support a peninsula bar that is used for chatting or informal eating. If your cabinets are on exterior walls, glass block can be used as the backsplash connector between the countertop and the wall cabinets. They allow sunlight to stream into this otherwise hard to light location.

Combining glass block with a direct vent gas fireplace is another option. You can actually place the fireplace in the middle of a room and use glass block to create bookcases on either side of the fireplace one of which dead ends on an exterior wall. Behind the bookcase that connects to the exterior wall, a chase can be built to hide the necessary intake and exhaust piping for the fireplace.

Consider using glass block to build the guardrail for a balcony. You will need a metal cap to top off the block. This metal cap is securely fastened to the walls to prevent the guardrail from tipping over to the floor below. If you decide to use glass block for this purpose, be sure it is engineered by a professional to insure the highest level of safety.

An interesting use of glass block is at the front door. It is a wonderful material to use as a sidelight(s) adjacent to the front door. The glass permits vast amounts of daylight to enter into the entrance hall. At night, interior light that streams through the block provides a pleasing illuminated frame for your front door.

Use glass block for room partitions, especially if you want to bring exterior light from one room to another. A simple but effective use of glass block is for a basic bookshelf. You can place individual glass blocks apart from one another and lay boards across them. Use different height blocks to accommodate different sized books. If the bookshelf rises above four feet, be sure to use an L bracket or two to connect the shelves to the wall. Tall bookshelves can be unstable and a safety hazard around small children.

Working with glass and acrylic blocks requires a certain level of skill. The manufacturers have developed useful accessories to help lay block level and plumb, but trust me, it is not as easy as it looks on television. If you decide to try it yourself, I suggest you start with a very small project and after you succeed, go to a more difficult one.

Author's Note: We've received other questions with similar problems or questions. Here's one from Lena K. of Rockville, MD, regarding basement replacement windows.

"Our basement windows leak air as well as water when snow melts. The house was built in 1965 and the windows seem to be from that time. They are below the ground level with wells dug out around them. They are set directly into concrete blocks. I looked at different replacement window manufactures and installers, and none of the ones I saw offer specific windows for basements. Do you have any suggestions? (We aren't planning on doing the replacement ourselves). Thank you."

Companion Articles:  Glass Block Installation, Glass Block, Glass Block Manufacturers, Glass Block Greenhouse

Column 395

Little Things Add Up to Save Energy

radiant barrier chips

These chips reflect heat back to its source and help lower my fuel bills in summer and winter.

DEAR TIM: My utility bills are going up and up. I want to save energy in every way possible. There seem to be many differences of opinion as to how to save energy and still be comfortable. What tips give you the biggest bang for your buck? If building a new home, where can I save future energy dollars? What have you done personally to save money on your utility bills? Carol K., Cleveland, OH

DEAR CAROL: I wish the newspaper would give me the entire page for this topic! I will do my best to give you some money saving ideas in the space permitted. Let's get to work.

The first thing to do is look at your actual utility bill(s). Get a feel for what you spend on a daily basis for electricity and any other fuels. Once you do this and consider all of the things in your home that consume energy, you will see that overall energy consumption is actually a bunch of small components that add up each day to a bigger number. When these daily numbers are totaled at the end of a month, it can be a big number. Understanding this will tell you that rarely no one single thing is going to drastically cut your bills. To create a difference you can see in your checkbook, you need to do many things.

Heating and cooling requirements devour large amounts of energy. But beware of falling into the trap of keeping the thermostat turned way down in the winter and suffering while you are home and awake. The time to save considerable money is when you are not at home or are asleep. During the heating season, every degree you go down from 72 F saves three percent over a 24 hour period. A programmable thermostat allows you to automatically achieve this goal and keeps your home comfortable when you are awake and moving about. These affordable devices accomplish the same savings during the cooling season.

How Does the Air Escape? Graphic courtesy of U.S. Department of Energy. From their <em>Energy Savers Tips on Saving Energy & Money at Home</em>.

How Does the Air Escape? Graphic courtesy of U.S. Department of Energy. From their Energy Savers Tips on Saving Energy & Money at Home.

Air leakage around doors and windows can also add up. High performance doors and windows that carry the Energy Star label can save money over time. These products have superb weatherstripping and windows can be purchased with high performance glass that saves even more money. Existing windows and doors that leak air should be repaired to minimize air infiltration.

Older refrigerators, freezers and washing machines can consume vast amounts of energy. Keep refrigerators full of food or fill voids with bottles of water to take up space. Once the bottled water gets cold, it helps keep things cold in the refrigerator each time you open it up and introduce warm air. Use only as much water to wash clothes as necessary. Do full loads of laundry as often as possible.

If building a new home or replacing HVAC equipment, purchase furnaces with the highest energy efficiency rating. Look for air conditioners with a SEEP rating of 12 or higher. Use air infiltration barriers and be sure the seams of this material are taped. Buy professional model water heaters that often have superior foam insulation surrounding the storage tank.

I save money in the following ways: I have programmable thermostats and set back the temperature at least eight degrees when I am gone and sleeping. Many of my traditional incandescent light bulbs are being replaced with new super efficient compact fluorescent bulbs. Last year, a company blew innovative metal foil chips over the insulation in my attic. These chips reflect heat back to its source and help lower my fuel bills in summer and winter. I always buy appliances and electronic equipment that carries the Energy Star label. These devices are designed to save money.

Column 396

Contract Payments

paying contractors

DEAR TIM: You and other people constantly write about how homeowners need to protect themselves from contractors who take their money and perform shoddy work or no work and disappear. What about homeowners who don't pay for work? I have had several customers who nit pick a job to death and withhold tens of thousands of dollars until several small items are completed. I have bills to pay just like everyone else. What is a fair way to solve money problems between homeowners and contractors? Robin S., Kansas City, MO

DEAR ROBIN: Touche! Years ago, I was in a similar situation. I am convinced that hundreds and thousands of homeowners torment contractors for all sorts of reasons. Some of them are legitimate while others are based on past bitter experiences, lack of goodwill, and distrust of contractors as a whole. Unfortunately, there is a small group of very bad homeowners who simply wish to cheat contractors out of money just as there are deceitful contractors who abscond with hard earned homeowner dollars.

When I perform autopsies on these problems, I typically discover a common flaw. The contract between the parties is very vague about the payment terms and conditions. In some instances, wording allows contractors to get too much money in advance. In other instances, homeowners advance money to contractors in a spirit of good faith. Unless these homeowners are working with a contractor who has the highest level of professionalism and honor, the advancement of money before certain things are complete can be a recipe for disaster. The incentive to continue to work at the highest level of efficiency and quality has been removed once the money has been paid.

Contractors routinely present contracts to homeowners that contain loopholes. Imagine language that states, "Payment is due upon completion of work." Well, if I were a homeowner, I could feel justified in holding back the monies if the job were not completely finished. Imagine the nightmare of a job where $100.00 worth of exterior work can't be completed until the spring thaw yet $80,000.00 or more is due upon the total completion of the job. If both parties agree to the terms of a contract, then I maintain that they should abide by what the contract states.

There are countless ways to solve payment problems. Several have worked well for me no matter how large or how small a job might be. One element missing in almost every contract I have seen is a tiebreaker clause. It is wise for the parties to agree up front on an independent inspector who is willing to give a ruling as to the quality and completeness of work. In the event of a dispute between the parties, the inspector issues a written ruling that goes one way or the other.

I have found that it is very effective to state that progress payments are made on given dates for the work that is in place and completed to the satisfaction of the homeowner and/or independent inspector. A job cost breakdown that assigns a fair and real number to each aspect of a job is invaluable for this to happen in a fair way for both parties.

The homeowner has a given amount of time to make the payment after the bill is produced. Since the homeowner knows when monies are due, all inspections would have to be scheduled in advance. This allows the homeowner to feel confident the work is satisfactory as he writes the check to meet the deadline. The contract could contain language allowing the contractor to pull off the job if the money is not paid on time. No contractor really wants to do this for any number of reasons, but it limits the amount of financial exposure to a fixed sum of money. It also gives the contractor some leverage as very few homeowners want their job to be at a standstill.

Set standards in the contract, if possible and reasonable, with respect to work meeting the building code or more importantly set forth manufacturers' specifications. A benchmark of quality must also be established or you may never meet certain homeowner's expectations. The independent inspector may come into play in this event as well.

Column 398

Decorative Wall Shelf in One Hour

DEAR TIM: I have all sorts of interesting knickknacks that I have on standard bookshelves and cases. But I would like to display them on the walls in many rooms of my home. Can you think of a way to make a simple yet elegant shelf that I can use for this purpose? Please keep in mind that some of the shelves need a curb that would stop plates from sliding forward. Oh yes, I am on a tight budget too! Denise H., Kettering, OH

DEAR DENISE: My father in law has a saying that I believe is fitting for this occasion. When the discussion turns to someone who appears to be lucky or successful he often says, "That person happened to be at the bus stop when the bus came by." Well, hop on board and take your seat. I'm driving you to the lumberyard to get some decorative crown molding and a small piece of 1x4 lumber to solve this problem.

french cleat holding shelf

You can't see the cool french cleat that holds this shelf to the wall.

Your problem is multi-faceted. We need to create a ledge approximately two or three inches wide, the face of it needs to be appealing and it needs to have a sturdy and hidden mounting system. Have no fear, I can overcome all of these challenges.

Crown molding works well for this project because it fulfills our first two requirements. The top of most standard crown moldings ends up about two or three inches from the face of a wall when it is installed. The resulting gap is never seen in most instances because the crown molding is tucked tightly against the ceiling in a room. The milled profile of the crown molding creates the decorative relief that will compliment your assortment of knickknacks. If you have different sized knickknacks, you can purchase different sized crown moldings so that the shelf will be in proportion to the articles on display.

Simply cutting a piece of crown molding to length will not work. Each end of the molding needs to be mitered as if it was wrapping around an outside corner in a room. The tiny pieces of crown molding that make the turn and touch the wall at each end are simple triangular pieces of crown molding cut at a 45 degree angle.

To create the necessary flat platform that extends from the top of the crown molding to the wall, you will use the 1x4 lumber. This is actually the most demanding part of the project since the lumber needs to be ripped to a precise width and length and the three edges that contact the back of the crown molding need to be cut at an angle to match the sloped faces of the top rear of the crown molding. Once the shelf is cut and in position, drive small brad nails through the top face of the crown molding into the angled faces of the wood platform.

If you have a table saw or have access to one, you can accomplish this task in a few minutes. The crown molding I prefer to use happens to tilt away from the wall at a 45 degree angle so my cuts on the platform are simple 45 degree matching angles. The angle on the scrap 1x4 doesn't have to be perfect, it simply needs to be enough so that the top of the board is flush with the top of the crown molding. To create the curb for the plate shelves simply cut the shelf a little short in both width and length. As you drop the shelf into position behind the crown molding, the back of the crown molding ends up higher than the shelf.


Click here to watch a video on cutting and working with crown molding.


I hang my crown molding shelves using some extra 1x4 lumber. I cut a piece that is 3/4 inch thick by 3/4 inch high and is about five inches less in length than the overall width of the shelf. I attach the piece of lumber to the wall using screws that penetrate into wall studs. I drop the crown mold shelf assembly onto the wood cleat and then drive small screws through the top of the platform into the 3/4 by 3/4 inch cleat. If you have the proper tools and supplies on hand, you can make one of these shelves in less than an hour.

If you REALLY want to discover how to install Crown Molding, you need my Crown Molding eBook .

Column 399

Paint a Toilet? Sure!

DEAR TIM: Many years ago when I built my home I used pink fixtures in my bathroom. They are in excellent condition and I like the color. But a falling hammer unfortunately shattered the toilet bowl. I can't locate a pink toilet that matches. I have no intention of replacing all of the plumbing fixtures. What are my options? Wayne B., Fairborn, OH

DEAR WAYNE: Perhaps you can buy a used toilet. I guarantee you that there are thousands of those pink thrones still in use in many homes built in the 1950's Pink and gray were the rage back then and I know of several homes that have these fixtures. I hope you saved several pieces of the broken pottery or at the very least the toilet tank lid so that you can get a perfect color match.

You actually have several options. The first one that pops into mind is to call many of your local plumbers and bathroom remodeling companies. Offer a bounty for a pink toilet that matches yours. If you can provide the brand or manufacturer of the toilet, it will surely help narrow the search. Plumbers and remodelers constantly are removing perfectly good, but outdated toilets, and tossing them in a dumpster. Some larger cities have architectural salvage businesses that deal in old building materials. You may find one there.

There are small businesses that advertise a re-glazing service. This is a horrible abuse of a word as the process involves spraying on an epoxy paint. If you want a toilet or other plumbing fixture re-glazed, you need to send it back to the factory for another trip through the high temperature kiln. The epoxy paints I have seen applied to fixtures often lack the hardness of the thin glass surface that is achieved when a piece of china is actually fired in a kiln. The epoxy coatings are also susceptible to peeling.

Perhaps you can do what a relative did for my wife and I twenty years ago. My wife purchased some white china kitchen canisters for flour, sugar, tea and salt storage. The surface has a hard fired clear glaze commonly found on china plumbing fixtures. Using high gloss oil paints this talented individual painted green fern leaves and the different words in jet black on each canister. The paint looks as good today as it did the day they were finished. We clean the canisters on a regular basis and the paint has never worn off nor chipped.

Think of the possibilities with respect to a toilet. A local artist or an art student could paint virtually any design in a matching pink color on the toilet. It could be simple pink pinstripes, or outlines along the toilet tank lid. The front vertical face of a toilet tank is an excellent place to paint anything that comes to your mind. The key is to paint the toilet surfaces that don't get wet. If you paint the tank lid, front and sides of the tank and even accents on the side of the bowl, you will be surprised at how well it will stand up to cleaning with a damp cloth. Never paint the inside of the bowl nor the top edge of the bowl.

If you are fortunate and have access to an affordable artist in your area, I suggest you do what my daughter is about to do for myself and my wife. We recently wallpapered a basement bathroom that has a wonderful white toilet. The bathroom has a splendid tropical theme wallpaper border running around the room. My daughter is going to take several elements from this border and paint them on the front of the tank and the tank lid. I can assure you the look will be stunning once complete.

If you decide to go with this custom look, I highly recommend that you have the artist do a quick scale sample on a piece of brilliant white poster board. Tape the sample to the toilet tank or lid and stand back to see if you like the look. Even if a mistake is made during the painting process or you decide at a later date you want a change, you can easily strip off the paint with common paint strippers.

Column 400

Adding a New Tub or Shower

bath tub pipes

The pipe leaving the tub is the overflow drain. It connects below the slab to the waste piping and the trap. Yes, you can't see it! There is a cutout in the concrete slab that allows you or the plumber to connect all of these pipes to the actual drain. The second pipe leaving the wall plate is the vent for this tub.

DEAR TIM: I would like to add a bathtub in a room that has an existing walk in shower. The floor of this room is a concrete slab poured directly on the ground. There is a floor drain within four feet of where I would like to add the tub. Can I just allow the tub drain to flow over to the floor drain? It seems that would work just fine to me. Or do I have to connect it to the pipes below the slab and add vent piping? I live far out in the country and I doubt an inspector would ever know what happens one way or the other. Brad G., Waldo, AR

DEAR BRAD: Plumbing codes were not enacted to simply create work for people who might otherwise not be able to find work. The interest of public health and welfare are the basis for the plumbing code. Plumbing inspectors help to keep you and your family safe from the spread of disease. Consider him to be a friend, not an obstacle. Don't worry, you can work off some of that steam I just caused swinging a 12 or 16 pound sledge hammer.

To answer your first question, you can set the tub on a small platform and pipe the tub water over to the floor drain. Sure, the waste water from the tub would flow into the floor drain and it would travel from there into the plumbing drainage system. But this solution is not a code approved method. The waste water from the tub is often contaminated and can harbor all sorts of bacteria. Allowing this water to flow freely and splash about over the top of the floor drain is simply a health hazard.

The tub drain water needs to be piped directly from the tub outlet into the plumbing drain system. This fixture requires a connection to the plumbing vent system as would every other fixture. Many people are stumped by tub drain connections. In reality they are no different than any other sink in your home. The primary difference is that the tub is a sink that is at floor level.

To help you visualize what is necessary to properly connect this new tub to the plumbing drainage system, take a peek at the underside of your bathroom vanity sink. You should see a vertical pipe that connects to the bottom of the sink. This pipe then connects to a U shaped pipe that is part of a fitting we plumbers call a P-trap. The P-trap is a transitional fitting and redirects the waste water sideways towards the wall.

Behind the plaster or drywall at the sink is another vertical pipe. The sink drain pipe connects to this vertical pipe with a tee fitting. The waste water from the sink flows into the tee fitting and into the plumbing drainage system on its way to the sewer or your septic tank. But rising out of the tee fitting just behind the wall is usually a vent pipe that works its way up to the roof of your home. This vent pipe along with other vent pipes in the house supply air into the plumbing drain system. Water flowing into drainage pipes displaces air that was residing in the pipes just before you pull the plug in a sink or flush a toilet. Vent pipes prevent vacuums that otherwise would resupply this air by sucking the water out of adjacent P-traps in nearby fixtures. The water that sits in a P-trap acts as a seal and prevents foul sewer gas and vermin from making their way into your home.

To connect your new tub you need to mimic this connection. But don't think for a moment that it is easy to do. The drain pipe sizing is critical and the plumbing vent connections also have to be sized and connected correctly. Furthermore, you just don't tie into a plumbing drain system where it is convenient for you. You may choose the wrong place to connect and cause a drainage problem for a nearby fixture. In other words, adding a new fixture to an existing system is not a recommended do-it-yourself project. What's more, many plumbing codes restrict this work to licensed and trained professionals because of associated health risks.

I suggest that you make a deal with a local plumber. Consult with one that will allow you to do all of the back breaking labor to remove the necessary concrete and dirt beneath the slab that allows the plumber to make the necessary connections. You can also do other interior demolition that will expose existing plumbing vent lines. The plumber will hopefully work with you and show you some tricks that will keep your workload to an absolute minimum.

Column 401

Watch this video to see how Tim SOLVED a problem in minutes!

CLICK here to learn more on how Tim can help solve your problems.

Hanging Gutters Requires Skill

rain gutter

DEAR TIM: I have decided to add aluminum gutters to my home. The lack of them caused cascading rainwater to damage the lower portions of my exterior walls. There is a drip flashing in place that goes under the roofing shingles and extends downward on the face of the fascia board. Does this flashing go behind the gutter or does it drop into the gutter? What is the best way to attach the gutters to the fascia board? Where should the rainwater go? Bob B., New Smyrna Beach, FL

DEAR BOB: You are doing yourself and your home one huge favor. Most people don't have a clue how much water flows off the average house roof in a given year. It is not uncommon for many parts of the United States to have 36 inches or more of rainfall in a year. If your roof area has a footprint of 2,800 square feet and you get 36 inches of rain in a year, the runoff amounts to 62,832 gallons of water. That is enough to fill a gasoline tanker truck nearly nine times!


In need of gutters? Pick out the right ones with my Gutter & Downspout Installation / Repair Checklist. I offer a 100% Money Back Guarantee.


Uncollected rainwater erodes soil and causes excess water to splash up on the side walls of houses. This water can cause painted exterior surfaces to peel, wood framing and siding to rot, masonry walls to effloresce and foundations to settle. Common sense should tell you that the water falling from even a low roof has an enormous amount of energy that allows the water to wreak havoc over a period of time.

Gutters and down spouts collect water and divert it away from the base of the house. Rain water can be used for drinking, cooking and bathing as well as to irrigate gardens and landscaping. People who live in the country routinely use cisterns to capture rainwater for future use. As the population grows in different parts of the nation and puts a stress fresh water supplies, I believe we might see a resurgence of cisterns. At the very least, new homeowners can use rainwater for lawn watering and landscape irrigation.

The flashing that is in place needs to drop down inside the gutter. The bottom edge of this flashing should have a bend in it that directs water towards the center of the gutter. If the flashing does not have this slight bend, capillary attraction can draw water up between the flashing and the back wall of the gutter. This water might actually run down the back of the gutter and rot out the gutter or fascia board.

Traditional long spikes and hollow tube ferrules are old technology. You can purchase very nice aluminum gutters that come with special internal hidden hangers that have long screws that pass through the gutter or fascia board and bite into the ends of the roof truss or rafter tails. Be sure the screws hit solid framing material behind the fascia board if you want the gutters to stay on your home. Gutters can fill to the brim with water because of debris that clogs outlet holes. The weight of the water-filled gutters is in the hundreds of pounds. Keep in mind that the average gutter length may only have three or four fasteners and all of this weight is carried solely by them.

gutter hanger

The drip edge flashing often needs to be trimmed around the hidden screw hangers. You can make two vertical cuts on either side of the hanger and simply bend the flashing tab up and over the top of the gutter hanger.

When hanging your gutters, slant them slightly towards each drain outlet hole. You can't use the plumbing rule of thumb of 1/8th inch of fall for each foot of horizontal run. If you do this, the bottom of the gutter can fall beneath the fascia board on long runs. As long as the gutter is level or has a slight pitch, Mother Nature will direct the water to the outlet hole in the gutter.

If you do not pipe your rain water to a cistern, check with your local building officials with respect to this runoff. Many cities have strict codes that address where this water must be piped. It is almost always against the law to pipe this storm water into sanitary sewers. Storm water that is mixed with sanitary sewage can send too much water to the sewage plant and cause flooding inside houses. Many cities and towns have separate storm water systems and often request that you connect roof drains to these systems.

Column 402

Foundation Choices Are Many

foundation

DEAR TIM: I'll be very brief. My wife and I are building a new home soon and wonder which foundation is the best. Should we do a simple slab on grade, a crawl space or a full foundation with a basement? What are the pros and cons of each? Daniel V., Potsdam, NY

DEAR DANIEL: You are fortunate to have all three choices. Many people, because of local soil and groundwater conditions, often have only one or two options when it comes to house foundations. In certain places, constructing a full basement means blasting through solid rock. In other places, the ground water table may be lurking just a few feet below the surface limiting these folks to a simple slab on grade.

The slab on grade choice is very attractive to builders because of its relatively low cost. Excavation is kept to a minimum and the construction schedule can often be accelerated. The day after the slab is poured, wall framing can often begin.

But slabs come with some baggage. Frequently, plumbing drainage and water supply lines are buried beneath the slab. If something goes wrong or a leak develops, repairs can be costly. Heating or cooling ductwork buried underneath the slab can sometimes fill with water during wet seasons. Should this happen, mold can form and spores might be blasted into the home each time the furnace or air conditioner fires up. Thermal conduction issues are always present. Slabs poured in colder climates can conduct cold back into the house unless special precautions are taken. Homes built on slabs often offer little protection during tornadoes or hurricanes, unless a special masonry or concrete safe room is built within the house. These safe rooms can masquerade as a large walk-in closet.

A foundation system that sports a crawl space is indeed a step or two above a slab foundation. Generally speaking, a footing needs to be poured and short foundation walls are built to support the home. Some crawl spaces are indeed just that offering only 16 to 18 inches of clearance between the bottom of the floor joists and the soil. Other crawl spaces are tall enough to crouch in. Crawl spaces are a slight money saving option. Little time is saved during construction when a crawl space is selected in lieu of a full height foundation.

Crawl space foundations allow you to install plumbing and heating utilities so that they are accessible. The floor system over and the foundation walls inside of the crawl space almost always need to be insulated. A high performance vapor barrier that is sealed to the foundation walls must be placed over the soil in the crawl space. If this vapor barrier is missing, water vapor will readily travel up into the wood floor system and then into the house. This water vapor can cause severe mold problems. Homes built over crawl spaces offer minimal protection in severe weather unless you can install a trapdoor in a closet that allows quick entry into the crawl space.

Ask any homeowner who has a dry full height foundation and they will often tell you they would never be without one. The cost per square foot for this bonus space is often a fraction of what you pay for the living space stacked above it. If you do an actual cost analysis of a full height foundation versus a crawl space, you will find it costs very little to upgrade to the full foundation. Talk to experienced Realtors or appraisers in your area. They will often tell you that full basements make a house more attractive to potential buyers.

A full foundation offers superb protection in the event of severe weather. During the wet season it is not a challenge to keep a basement bone dry. The builder simply needs to apply a real waterproofing material such as synthetic rubber or liquid asphalt that has rubber additives. These materials can bridge small hairline cracks that might otherwise leak water. If you intend to finish off the basement space at a later date, be sure to install a true waterproofing material not the traditional hot asphalt damp-proofing spray.

Finally, if you can afford the extra cost, ask your builder to consider extra height foundation walls that allow you to have a clear ceiling height of eight feet or more beneath any and all beams that support floor joists. Furthermore, increase the height of the actual steel I beams. If you go from a traditional eight inch beam to a twelve inch high beam, the support columns in the basement can often be placed as far apart as 16 to 18 feet.

Column 403

Hunting For A Professional

yellow pages

This is how you used to look up professionals and contractors. The Internet has replaced the Yellow Pages Directory.

DEAR TIM: What's happening with the vast numbers of painters, plumbers and carpet installers masquerading as "professionals" these days? When they show up hours late, it's a blessing because so many don't bother to show up at all! You're waiting around an entire Saturday (or worse, taking a weekday off work) and they don't even call. Haven't these morons ever heard of a telephone, and don't they realize how they're damaging their reputations? Just how does one find a true professional? Colleen A. Cleveland, OH

DEAR COLLEEN: If it is any comfort whatsoever, you are not alone. I hear from hundreds of frustrated homeowners who are at their wits end. It is my opinion that professional tradespeople are an endangered species. Ask anyone who has more than their fair share of gray hair and they will tell you that finding a professional today is harder than Chinese arithmetic. The trick to success is understanding the dynamics of what is really going on in the marketplace.

Imagine for a moment the residential construction business. It is a profession that requires little, if any, formal education or training to be a player. In the modern world of today you almost always need a focused career-oriented education to get hired and then survive as an accountant, advertising executive, dental hygienist, etc. Put a brush in the hand of a person that can fog a mirror and presto, you have a painter. Even if this person is the best painter in your area, that does not automatically make them a great business person. Therein lies the dilemma.

Add to this the steady stream of phone calls that carpenters, painters, roofers, etc. get day in day out from other homeowners. You are just one of many. So what if the carpet installer, handyman, or window contractor doesn't show up at your place? Many don't care as they might have ten other houses to go to and will more than likely have twenty appointments just over the horizon for next week. Are you starting to get the picture?


How would you like me to build your new home? It's probably impossible for me to fit your job into my schedule, but I will gladly share hundreds of my tricks and building secrets with you and your builder. Check out my New House Specifications.


Controlled chaos usually surrounds the average plumber, bricklayer or tile setter. Many of these individuals operate as the craftsperson, the receptionist, the bookkeeper, the delivery person, etc. in their business- often at the same time. Cellular phones have just made the problem worse as they allow the painter, electrician, drywall finisher to multi-task and communicate while doing other things. Very few of these possess mystic powers and have great difficulty being in two places at one time. If there is a problem at some other location when the roofer, concrete mason, or siding installer should be at your home, odds are you will get stood up.

Don't give up hope, though. Just as you need to go deep into the forest to find rare animals, be prepared to do the same to locate professional craftspeople who possess social skills and treat you with respect. To spot a professional, why not go where they go? The first place I would visit is a wholesale supply house that sells the materials the pros use each and every day. For example, look in the Yellow Pages, or search online. Bypass the heading "Plumbing Contractors" and proceed to the one that says "Plumbing Fixtures and Supplies". You will discover some well hidden companies that sell hard-to-get plumbing fittings. The same type of businesses exist for electricians, roofers, carpenters, painters, etc.

Visit these businesses mid-morning after the morning rush. Look for an older counter person or ask to speak with the general manager. Tell them you are looking for an individual who has been buying there for 10- 15 years, has a minimum of 20 years experience, and buys nothing but the best material. Ask this same person to name three customers they would solicit bids from if they needed work performed at their own homes.

If you are lucky enough to have a technical school or a high school that offers technical courses in your city, contact the teacher who is in charge of the Building Technology section. Frequently this teacher knows which students were blessed with the most potential. Ask for names of the top three students in the most recent graduating classes. These students are most likely in the work force and you need to get them in your cross hairs. Keep in mind that many of these formal education settings offer classes in business etiquette in an attempt to train the students to be both great craftspeople and superb business leaders.

Column 404

Fixing a Pocket Door

pocket door track

This is the track of a modern pocket door. The finish jambs have not been installed and I can both adjust the door and actually remove the door from the wheeled trolleys. When I do install the finish jambs, they will be screwed into the rough jambs with decorative screws that are flush with the surface of the wood. This way I can easily remove the finish jambs should I have to work on the door.

DEAR TIM: I have a troublesome pocket door between my master bedroom and the master bath. The door constantly jumps off the single rail track. I am convinced I need to install new hardware to permanently solve the problem. What is the best hardware to use and is there an easy way to complete the repair? Jorge F., Chula Vista, CA

DEAR JORGE: I must tell you that I love pocket doors but only ones that work smoothly. As you might expect, I have had to troubleshoot more than my fair share of minimum quality pocket door rollers and tracks that give homeowners problems on a routine basis. Twisted doors, settlement issues, poor initial installation, etc. can cause pocket doors to become problem doors. The good news is that you should be able to quickly replace several parts or install a new pocket door frame kit. Choose wisely and your door will be trouble free from now on.

Purchasing a new pocket door frame and track is relatively easy. Most traditional lumber yards that sell doors can supply you with a top quality kit. You are looking for a frame that has a one piece box shaped track system that has two J shaped tracks that face each other. This track accepts two tricycle type roller trucks that attach to the top of the door. Once the three wheeled trucks are placed in the track and the door is connected to these truck assemblies, it is impossible for the door to jump from the track. The design is simply brilliant. I have installed many of these and even have one in my own home. The doors glide back and forth as smoothly as I swing in my hammock on a lazy summer afternoon.

Just so you know, getting the parts is the easy part of the job. Performing the surgery to replace the old frame can be tricky. The difficulty of the task depends upon the wall treatment on each side of the pocket door. If the surfaces are wallpapered, then be prepared for misery. If the surfaces are painted drywall, it is entirely possible that the walls and door can be restored to as good as new in as little as 48 hours.

Removal of the trim casing around the door is the first step you must do to remove the pocket door. If you take your time using wide pry bars, you can often salvage this trim. The jamb material that covers the rough framing is the next thing to remove. At this point you have completely exposed half of the track. If you determine that the width and height of the new track match the existing one, you are in fantastic shape. Your challenge now is to gain access to the hidden part of the track.

The metal pocket door track typically is connected to a wooden frame member with screws. Remove the door from the pocket and take it off the track. Use a flashlight and peer up into the pocket cavity. There is a good chance you will see the screws that fasten the track to the frame. It is now time to cut an access hole on one side of the pocket wall. This hole will allow you to get your hand or arm into the pocket so that you can loosen and remove the screws and subsequently the track.

Once the track is removed, you simply cut the new track to the appropriate length and install it in place of the old one. Keep in mind that the track does not touch the rough jamb at the open end of the frame. There has to be sufficient space between the track and the jamb to insert the tricycle roller trucks. Be sure that the new track is level. The new rollers and track are so well engineered that an out of level track can cause the door to open and close on its own.

If your new track does not match the old one in width and height, the job becomes more difficult. You will most likely have to tear out the old frame and install a new one from scratch. This sounds harder than it is. Believe it or not, I have completely removed the drywall from both sides, demolished the old pocket door frame and installed a new pocket door frame including new drywall in as little as two hours. Purchase some dry setting type joint compound that sets in 30 minutes and you can actually be ready to paint the new drywall in as little as four hours.

Column 405