Storage Sheds

storage sheds

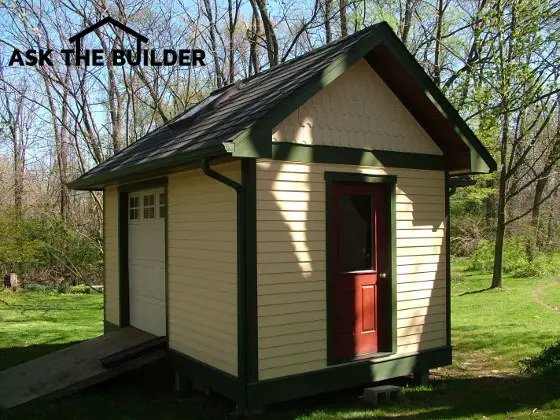
Storage sheds | A shed can get compliments if you invest the time to have it match your home's exterior. This L-shaped shed matches in every detail the Queen Anne Victorian home that's just over the photographer's right shoulder. Copyright 2018 Tim Carter

"Maximize the storage space in your new shed by hanging some salvaged kitchen wall cabinets on one or more walls."

Storage Sheds Checklist

  • Do 10-minute simple plan in your lawn - video below
  • A slab is the best floor | treated joists & treated plywood #2
  • Pre-built sheds are often sub-standard quality
  • Match shed to your home exterior for maximum value

Storage Sheds - Easy to Build and Adds Value

DEAR TIM: I have run out of room in my garage and must build a small storage shed. The ground where it will be built is sloping. Do I need to build a retaining wall first and then level the ground? Is there an ideal shed size? What's the best floor for a shed? I don't want to invest a lot of time and then find out the shed is too small. Todd F., Mason, OH

DEAR TODD: Storage sheds are popular in my neighborhood, so I can understand why you're thinking about building one.

Free & Fast Bids

CLICK HERE to get FREE & FAST BIDS from local shed builders.

Is Sloping Ground a Shed Deal-breaker?

No, most lots have a slope to them.

The sloping ground is present on a vast majority of building lots. Even ground that appears flat typically has 1 or 2 inches of fall across a distance of 10 or 12 feet.

The only place I feel the ground has to be slightly level after the shed is built is just in front of the entrance. A level spot in front of the door will help prevent mishaps as you enter and exit the shed.

What's the Best Shed Floor?

A concrete slab is an ideal floor, but treated lumber joists and treated plywood are a photo-finish second place.

Frequently, I find that people get stuck in a mental rut when it comes to home improvement projects. It sounds as if you might have had a concrete slab in mind as the floor of your new storage shed. There is nothing wrong with concrete, but consider the possibility of your new shed as an outdoor deck that simply has a building on top of it.

Can Wood Storage Sheds Support Lots of Weight?

Many storage sheds have wood-floor systems that support very heavy weight and perform exceptionally well over time. In fact, many large barns have wood floor systems that support very heavy loads.

wood sheds

This treated wood-floor system will last for years. Treated-wood posts, rated for burial, were used as the legs. Copyright 2018 Tim Carter

Do I Need the Approval To Build?

You need to determine if you're allowed to build the storage shed. Local zoning laws and subdivision restrictions may prohibit outdoor sheds or restrict where on your property they can be built.

Often the best location on your lot for a shed is not where you are allowed to build it. You may have to obtain a zoning variance in order to build the shed. A variance is a formal permission from the zoning officials in the event you incur practical difficulty in trying to obey the zoning laws.

What Do I Need To Get the Approval?

Before you travel to the zoning department, be sure to create a simple plan of what you intend to do. It is easy to size a storage shed.

CLICK HERE to get FREE & FAST BIDS from shed builders in your area.

How Do I Plan For the Right Size Shed?

Clear a spot in your lawn or in your driveway. Comfortably arrange all of the things such as your lawnmower, wheelbarrow, bikes, and any other item that will occupy floor space in the shed.

Place the items on the grass in such a way as they are not cramped and you can get to them with little effort. Note the width and the length of the area these items are occupying. My guess is you will quickly determine you need a shed 10 or 12 feet wide by 12 or 14 feet long.

What is a Treated Lumber Shed Floor System?

If you decide to build the shed floor using wood, be sure you use floor joists and plywood that are chemically treated. It's a good idea to use Alkaline Copper Quaternary (ACQ) treated lumber.

This lumber is rot resistant, and wood-destroying insects avoid it like the plague. I prefer using chemically-treated plywood for the floor of the shed as I do not have to worry if I store wet or snow-covered garden equipment. The water that gets on the floor will not harm the wood whatsoever.

Should I Include a Vapor Retarder to Stop Rust?

To prevent rust on equipment stored in the storage shed, you need to block water vapor that tries to migrate from the soil through the floor of the shed. Just before you install the treated plywood subfloor on the joists, place two layers of vapor barrier on top of the joists, and let it overlap the edges around the entire subfloor perimeter.

Stretch it tight and tack it onto the joists. Be careful not to tear the vapor barrier as you place the sheets of plywood onto the joists. This layer of plastic will stop water vapor from seeping up into the storage shed in the winter months. If the floor of the slab is concrete, place this same vapor retarder on the soil just before you pour the concrete slab.

How Can I Get Extra Storage Space?

Maximize the storage space in your new shed by hanging some salvaged kitchen wall cabinets on one or more walls. You might find great cabinets at a garage sale or even a closeout sale at a local kitchen cabinet supply house.

Should the Shed Have Electric in It?

Lighting is also very important. You may want to extend a buried electric cable to the shed. Extending electricity from your home will allow you to install lights and electric receptacles. This power will come in very handy for battery charging, power saws, pumps, and any other tool that requires electricity to operate. Be absolutely certain you follow all National Electric Code requirements with respect to this aspect of the project.

Column 462

A Toilet that Flushes Up!

toilet that flushes up

A Toilet that Flushes Up!

A Toilet that Flushes Up!

DEAR TIM: I would love to add a full bathroom to my slab home but the space does not have any plumbing drain lines nearby. In fact, I would love to add a second bath in the basement room of a vacation home we own, but once again there are no drain lines in the basement. I know there must be a way to do this, but what is the most economical way to add these bathrooms? I would love to know my options before I talk with a plumber. Barb P., Glenview, KY

DEAR BARB: Years ago, you would have had just two options:

  1.  No bathroom for you.
  2. Apply for a home improvement loan to cover the high cost of tearing up concrete and installing all of the necessary gravity plumbing lines that would connect to your existing plumbing drain system.

But once again, technology and a clever idea have come to the rescue.

There are still two ways to accomplish your goal in both residences, even if the floor of a room is below the plumbing drain line as it leaves the house. In fact, it is common for many people to have a lower level that is not served by a gravity plumbing drain line. I have been in many homes where the main plumbing drain line exits a side wall of a foundation as it heads to the city sewer or a septic system. In these homes, storm water or spilled water that enters the lower level flows into a sump pit and this water is pumped from the sump to a location where it flows out onto the ground or into an approved plumbing drainage system.

But you cannot pipe bathroom waste, especially from a toilet, into these standard sump pits. The pits and the standard sump pumps are not built to handle this waste. Your first option, and by far the most expensive, is to install a sealed sump with a special sewage ejection pump. These special plumbing devices capture bathroom waste and pipe it up to the gravity plumbing drain pipes. Connecting the sump discharge line to the plumbing system is a very specialized task. It should only be done by a licensed plumber who is working with a permit.

What is a toilet that flushes up?

Your second option is much more fun. You need a toilet that flushes up! That sounds very odd, but in reality you can actually purchase a toilet that has its own built-in pump. In fact, bathroom sinks, tubs, showers, bidets and even urinals can be connected to this special toilet. The self-contained pump processes and transports all solid waste and waste water from the other bath fixtures into your regular plumbing drains lines. The powerful pump inside this toilet can actually lift the waste water as high as 12 feet and/or pump it 150 feet horizontally to where it connects to the plumbing drain system of your home.

These very cool toilets allow bathrooms to be installed in places on all floors of a home that before were overlooked as impractical. The good news is that virtually every plumbing and building department has approved these toilets for use in residential and light commercial applications. The manufacturers of these wonderful macerating toilets are required to have the fixtures certified to meet or exceed plumbing standards and codes. If you decide to purchase one, be sure your local plumbing department allows them to be used in your home. The plumbing inspectors may have a handy list of approved manufacturers that will save you time as well.

Pay attention to your local plumbing and building codes. Do not be surprised if you still have to hire a plumber for part of the work. Plumbing codes are strict for several reasons, but most importantly for public health and welfare. People can get very sick if plumbing waste is not piped correctly. What's more, public water supplies can be compromised if untrained people make illegal connections that allow water supplies to become contaminated.

If you decide to use one of the reliable macerating toilets, you should have bundles of money left over to spend on other things for your new bathroom. You can save thousands of dollars over the alternate cost of installing underground piping, sealed sumps and special sewage ejection pumps. One of the best features of these toilets is the time savings with respect to finishing the job. You can shave days, if not an entire week, off the schedule by using one of these very cool toilets that seemingly fly in the face of Mother Nature and Sir Isaac Newton.

Column 463

Ceramic Tile on Laminate

DEAR TIM: Our plastic laminate kitchen countertops are in bad shape. They are square edged instead of the common rounded edge tops. I saw a television show where a person simply covered the laminate with ceramic tile. Is this possible? It seems so easy and straightforward. Would you do it this way if it were your home? If not, why? Do you have any tile installation tips? Patty W., Amherst NH

DEAR PATTY: If I had a dollar for every time someone asked me this exact question, I might be in the Virgin Islands. Plastic laminate tops do indeed wear out from heavy use and people often are on a tight budget and are looking for a quick fix. Add to this the typical over-simplification found on many home improvement television shows and you have a recipe for disaster. To answer your question: Yes, it is possible to install ceramic tile on square edged laminate tops. Would it be done at the Tim Carter home? No.

ceramic tile kitchen island

You are looking at ceramic tile on my own kitchen island top. It had been down for over 18 years and still looks as good as the day I grouted it.

Let's assume that we are going to do the tile countertop remodel job for a moment. Here are some things we know we must do: The sink must be removed from the top. The faucet must also be removed. The laminate top must be heavily sanded. Without this abrasion, the mastic or cement-based thinset will very likely fail in a short period of time. Your new tile top can begin to fall apart.

The plastic top does not absorb any moisture whatsoever. If you were to use a water-based adhesive of any type, the only way it would work is that all of the water would have to absorb into the tiles. This may or may not happen. If the tile can't take it all, the adhesive may never fully cure. You can avoid this issue if you use an epoxy, but epoxy adhesives can be a little bit of a hassle to work with for a rookie.

If it were me, instead of taking all of the time to try to sand the top and hope the sanding will work, I would simply remove the old top and replace it with a double layer of exterior grade three quarter inch thick plywood. This material contains special glues that are made to resist repeated wettings in case water somehow gets through the tile. The time spent taking out the old top and installing this new plywood will very likely equal the amount of time spent heavily sanding the laminate. Your only extra expense is the cost of the plywood. Purchasing the plywood also buys enormous peace of mind as the non-epoxy standard tile adhesives will readily adhere to it.

Installing the plywood is somewhat easier than installing the original plastic laminate tops. By yourself, you can screw the first piece of plywood down into the corner blocks of the cabinets. If you are installing a stainless steel sink, you will need to make the cutout hole in the lower piece of plywood two inches larger on all sides than the top piece. The clips that pull the sink tight against the tile are not made to handle the combined thickness of two sheets of plywood and the ceramic tile.

Be sure to grout the new tile with epoxy grout. This grout is surprisingly easy to work with and it is unfazed by the chemicals found in many common foods and juices. These acidic chemicals often cause traditional cement-based grouts to fail within several years.

You might also consider using a wood edge for your new tops. Special bull nose tiles are available that wrap around the front edge of the countertops, but these can be chipped if you are not careful. If you decide to use wood as an edging, be sure you install it after the tile is in place. The best way to insure the tile will be in a straight line as it is installed along the front edge is to install a temporary wood edge that is tightly screwed into the plywood. Remove this stop after the tile is set.

Author's Notes:

I received all sorts of email and calls to my radio show about this column. As you might expect, there are many ways to skin a cat. In this case, many people and contractors have had great luck putting tile on laminate tops. The trouble I sometimes have with my column is the space restrictions imposed by newspapers. I have a very limited amount of room and it is often impossible to discuss all of the options regarding a given topic.

In this instance, there are no less than four or five different ways you can adhere tile to laminate. Sam Vincy of Chicago, IL called me and told me how he had nailed chicken wire to his laminate top and backsplash. He then used cement-based thinset to adhere the tile to the laminate and chicken wire. Since the thinset grabbed onto the wire and the wire was nailed to the top, the tile was solidly attached.

Other folks emailed me and told me how they nailed cement board to the laminate tops. I guess the bottom line is time and money. I feel all of the solutions end up fairly close in time and some cost slightly more than others. My solution outlined in the column above will be more costly as you must buy new plywood to replace the laminate top. But my solution also insures the tile will adhere forever. So long as the nails hold down the wire and cement board in the other situations, you should be bulletproof if you decide to go that route!

Column 465

Little Termites Cause Huge Damage

termite damaged wood

Photo courtesy of Bayer Environmental Science

Termite Damaged Wood

DEAR TIM: I noticed a termite swarm outside my garage door. After careful inspection, the facia board and a portion of the 2x4 frame have suffered considerable damage. Should I replace the boards before I call a pest control company? What is the best product to use to stop termites from eating my garage and possibly my home? Donna Marie C., Franklin, MA

DEAR DONNA: Termites cause more anxiety to homeowners than any other threat to their homes. The reason is simple. These insects are just like vampires and special operation military units. Not only do they prefer to work in complete darkness, but they also infiltrate your home quietly. Furthermore, they do their best to disguise their presence. Typically you only discover termites when you see a swarm or find damage as you have described. Each year termites cause $2.5 billion worth of damage to homes and businesses that is not covered by insurance. That number sure gets my attention.

Termites are amazing insects. They are a very social organism as each colony has a queen whose job it is to lay eggs as often as possible, reproductive termites who become future queens, soldiers who defend the colony and worker termites who supply the entire colony with food. The food the workers supply to the rest of the colony happens to be small bits of cellulose found in firewood, fence posts, paper, tree stumps, your garage, my house, etc.

This caste system is the weak link of the average termite colony. Over the past 10 -15 years, scientists have figured out ways to effectively kill the worker termites or stop them from feeding. Once this happens, you can starve the queen, the reproductives and the soldiers. Kill the egg-laying queen of a colony and you stop future generations of termites.

But it is not always easy to kill the worker termites. They are very smart. The worker termites forage for new food sources constantly and randomly. They are active 24 hours a day 365 days a year. The worker termites can travel as far away as 400 feet from their colony to exploit a food source. What's more, it is common for them to develop multiple food sources for the colony. They may come to your garage on a Monday and then go to your neighbor's log pile the next day. This trait is an excellent survival mechanism.

The first thing I would do, if I were you, would be to call a trained pest management professional (PMP). These technicians know where to look for termite activity in and around your home. You saw them at your garage, but they may be in other locations near your home. It is best to be proactive when dealing with termites. Schedule an annual PMP inspection.


Termite infestation? Pick the best exterminator using my Termite and Carpenter Ant Checklist. I offer a 100% Money Back Guarantee.


There are two distinct methods of dealing with termite infestation. One method that has been used for years is the repellent strategy. A PMP injects chemicals into the soil around your home in an attempt to create a barrier that repels the foraging termites. This method works so long as the barrier is complete. The trouble is, the PMP does not have x-ray vision and can't actually tell if the chemicals have thoroughly saturated all of the soil. What's more, the chemicals used today in the liquid treatments do degrade over time

The newer technology is one that kills the worker termites. Bait stations and stakes are inserted into the ground at certain intervals around your home or garage. The chemicals in these stations do not poison the soil. The worker termites typically find the stations and ingest chemicals that have been cleverly hidden in termite food with the stations and stakes. Over time the worker termites die. So long as these stations are maintained by a PMP, your home and garage have superb protection.

One chemical company makes a system that combines the old technology with the new. It is a liquid that is injected into the soil around your home. This liquid is not a repellent. The termites unknowingly pass through treated soil and suddenly their jaws become paralyzed. They immediately lose their ability to feed which means they immediately stop eating your garage and the houses of millions of the rest of us. This liquid treatment can also degrade over time. If you want permanent protection you must have periodic applications made around your home.

Which system works the best? It is hard to say. If it were me, I would definitely want a system that has the ability to kill the colony. I also would want a system that has been proven to work through independent testing. It is also a good idea to ask very pointed questions about warranties. Ask what is and what is not covered under any warranty. Be sure what the PMP says is in writing.

Column 466

Brick Veneer Siding

brick siding

Ralph tells me he installed the thin bricks on this part of his home. Rest assured if I am ever within 50 miles of his place I am going to stop by to see how good the job looks up close and personal. Read Ralph's story below under Author's Notes.

DEAR TIM: I have planned an ambitious do-it-yourself project for the summer. I want to remove my existing wood siding and install brick veneer on my sea coast home. Brick is durable, waterproof and maintenance free. What do you think of this idea? What are a few of the important aspects of this job? Do you know of any books or articles that would explain how to do this? Chris P., Sea Girt, NJ

DEAR CHRIS: May I have three votes please? Yes, I think brick makes a superb exterior, especially if it is done correctly. But I vote "No" with respect to your belief that a brick veneer exterior is waterproof. I also vote "No" concerning your ability to tackle and complete this job in a satisfactory manner. Your enthusiasm and ambition are to be commended, but I feel you have vastly underestimated the degree of difficulty of this task.

Brick Veneer Siding

Do you really think you can install the brick on a home such as this? Even if the house is simple in shape, there are many fine details you must master to install brick correctly.

Let's talk about the waterproof issue first. Ask any seasoned brick mason or a master at the craft and they will quickly tell you that water can and does penetrate brick buildings. In almost all cases, water in a wind-driven rain event actually passes in between the contact zone between the mortar and the brick. The greatest amount of water often passes into the wall through the vertical head mortar joints.

Bricklayers and builders have known about this for many years. Older solid masonry brick buildings were actually constructed with different types of brick that prevented water from getting to the inside of a structure. The outer facing of brick was typically harder and very weather resistant. But the second and sometimes third layer of brick were softer. These soft brick were able to absorb and release water at a very rapid rate. After the rain stopped, the wind and sun would rapidly draw the water back out of the brick through the lime mortar joints.

My biggest concern is the actual support of the new brick. Typically brick is laid on top of the foundation or a ledge created when the foundation is poured. My guess is that your existing wood-framed floor and wall structure extends to the edge of your existing foundation. If this is the case, you need to create a new foundation or other means of support for the brick. The first person I would call would be a structural engineer. This person can give you several options as to how to permanently support the new brick skin.

Once the old wood siding is removed you need to make sure a superior water membrane is installed over the exterior of the walls. When water leaks through the brick, you do not want a drop of this water to ever touch any wood. This water membrane has to be installed so that it laps over the top of the flashings at each window and door. But this same membrane goes under the sides and bottom of each window and door. You will discover this is not an easy thing to do on an existing home. The all-important base flashing under the first course of brick must be installed perfectly as well.

I realize you can rent scaffolding and all of the equipment needed to mix mortar. You might even be able to hire a temporary hod carrier that will mix the mortar and keep you supplied with brick. If you can't find this person, the thought of one person doing all of the work actually makes my brain hurt. The reality of installing thousands of brick on a home is a monumental task.

Finally there is the simple skill issue. The layout work needed to make sure the brick works out as it passes over the doors and widows properly is not for an amateur. Bricklayers frequently adjust the thickness of the horizontal mortar joints a tad to make sure the brick passes over things with little or no cuts. The skill to actually lay brick is not something you acquire overnight or by watching a home improvement television show or video tape. You need to lay tens of thousands of brick to get good at the craft.

You can get excellent instructional materials for installing brick veneer from the Brick Institute of America. I urge you to do so. After you read all that is required to professionally install brick veneer, you will be able to readily identify a professional brick mason. Once you find this person in your area, take a few weeks of vacation time as he starts to install your brick. If you are lucky, he may even let you install some of the brick yourself. Just wait until you see how hard it is to properly butter the end of a brick and then gently float it to the line!

Author's Notes:

As you might expect, there are numerous ways to skin a cat. I received numerous letters and emails from readers who suggested alternative methods to apply brick to the exterior of an existing home. But be cautious of certain thin-brick products. I'll explain that in a moment, but first read this:

Ralph Dage from Michigan was kind enough to send this photo and description of what he has done to his home. See his photo at the top of this column.

Ralph wrote: "I think you should have told the person to brick his home like I did. I installed 1/2 inch real brick right over the the old wooden siding. It is still weatherproofed and is better insulated. One inch foam board is screwed to the wood, and 1/2 in real brick is glued to the insulating board and then real cement grouting is installed. These bricks and self mounting panels are available at Williams Brick on 8 Mile Rd. They make my 60 year old home look like a real brick house. They have been up for over 10 years with no problems."

With respect to the thin brick systems, be aware that many offer little wiggle room with respect to horizontal alignment. I have seen interlocking systems that offer virtually no horizontal alignment possibilities. In other words, these systems require that you start the first course level and the rest of the brick panels stack on top of this level line. The trouble is, houses are not always level. Windows that are supposed to be in the same line or plane are not always so. If your house is out of level, your brick job may look very poor as you begin to cut wedges of brick to pass under or over things that are not level. Bricklayers who are laying traditional brick can account for these deficiencies by adjusting the thickness of the mortar joints.

You also have to be very careful about applying thin skins of brick with little or no understanding of flashings and water membranes. In other words, treat the thin brick systems as you would any true-thickness masonry product.

Column 468