Hardwood Floor Refinishing
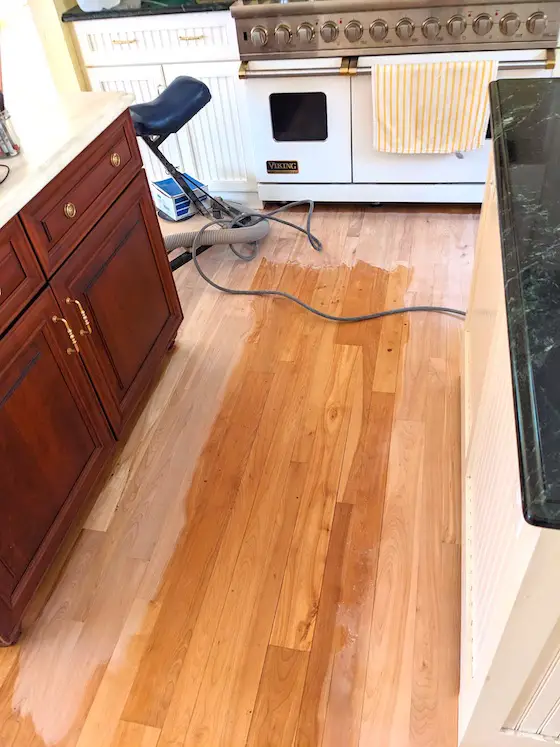
Hardwood Floor Refinishing | The old finish on this hardwood floor has been removed near the cabinets. The mind-numbing work of scraping up against the edges remains to be done. A tremendous amount of skill is required to produce a satin-smooth finish. Copyright 2023 Tim Carter
Hardwood Floor Refinishing is Hard Work - Best Done by a Pro
This past week I, along with my beautiful and patient bride of forty-nine years, had to endure the throbbing and nerve-rattling experience of a massive hardwood floor sander grinding off the finish from the birch hardwood in our home. We were huddled in the basement along with our nervous pets as the workmen busied themselves with restoring our floors.
Just over two months ago a chubby mouse gnawed a tiny hole in a PEX water line leading to a second-floor bathroom. The resulting slow leak happened while we slumbered. The water seeped under the hardwood floor in our master bedroom. Since wood is hygroscopic, it swelled and buckled creating multiple ridges like the ice does on Lake Winnipesaukee in the dead of winter. Even though I shut off the water to the bathroom immediately upon discovering the leak, $35,000 worth of damage was caused by the pesky rodent.
I’m sharing this experience with you in case you’ve been lulled into a false sense of security watching the make-believe cable-TV home improvement show hosts that tell you how easy it is to get professional results when refinishing hardwood floors. They’re bald-faced liars that ride on unicorns.
Allow me to share with you nearly fifty years' worth of building experience with respect to all that’s involved when creating a mirror-like finish on hardwood flooring. If, after digesting what I have to say, you decide to still try to tackle the job yourself, for the love of God do it in a small room that can be sacrificed on the altar of obstinance.
The first step in refinishing an existing hardwood floor or sanding virgin hardwood is to do a rough cut with a massive drum sander. These machines weigh well over 100 pounds. They require a velvet touch when operating so you don’t create shallow dips where the machine changes direction as you go backward and forwards.
This massive machine leaves a border of unsanded wood around the edges of the room. A different smaller hand-held disc sander is used to get right up against the edge of woodwork or other objects that stick up from the floor. If you think operating the huge drum sander is hard, wait until you start carving crescents in your hardwood using an edger. It takes hours of practice to become somewhat proficient using this tool.
Years ago it was back-breaking work using an edger. Fortunately, a floor finisher came up with a brilliant invention called an edger dolly. The young man who edged all my floors sat on this wheeled dolly moving all about the rooms in my house. A chest pad is part of the makeup of the dolly. This design allows you to position yourself comfortably in the dolly. You expend all your strength in controlling the edger instead of trying to maintain your balance while using the sander.
The hardest work of all, in my opinion, is using the hand scrapers. These basic tools work just like a straight razor. A barber pulls a razor across your skin to carefully remove hair. The floor finisher pulls this sharp tool across the wood in corners and other places the edger can’t get to. Once again, a scraper in the hands of a novice will damage the wood in seconds. Watch a hand scraper in use here.
You might think at this point you’re ready to apply three coats of the finish. Think again. It’s time to break out the palm sander and a wonderful rotary floor sander to get the wood satin smooth. The palm sander is used along the edges of the room while the rotary sander is used in the wide-open areas of the floor. Watch a large rotary sander here.
The best rotary sanders, in my opinion, have about six small rotating sanding discs that are part of a larger orbiting sander disc. This sander works just like a floor buffing machine that you might have seen a custodian use to polish vinyl tile or terrazzo. You must keep moving back and forth to produce a professional finish. Applying slight tilting pressure with the handle gets the rotary sander to move left or right. It requires some practice so you don’t crash the sander into a nearby wall.
It’s now time to remove all the dust from the hardwood. There are all sorts of ways to do this. Once the dust is gone, you can apply the first coat of sealer. Be sure to use one that will not raise the grain of the wood. After it’s dried, you screen the floor to buff it, remove the dust and then add a second coat of finish.
Some installers stop at the second coat. I prefer three coats of durable finish. Once again, you must lightly screen the second coat of finish. This screening process is how you create the mirror-like finish that’s satin smooth. It’s imperative you remove all dust before you apply the last coat of finish. Go here to see what fresh finish looks like as it's drying.
Avoid the temptation to move furniture and carpets onto the floor the next day. Almost all floor finishes require a minimum of 72 hours of curing time to attain the hardness required to prevent things from sticking to the finish. If you can wait 96 hours, do so. Are you ready to go rent all the tools? I didn’t think so!
Column 1512
Tim built custom homes and did ultra-custom remodeling for 20+ years before launching his Ask the Builder media presence. He was selected as one of the Big 50 by Remodeling magazine in 1993. This award gave birth to Ask the Builder in October 1993. Tim also operates https://DrawPlumbingPlans.com. His @askthebuilder YouTube channel was the first home improvement channel on YouTube.