Stair Trim Molding
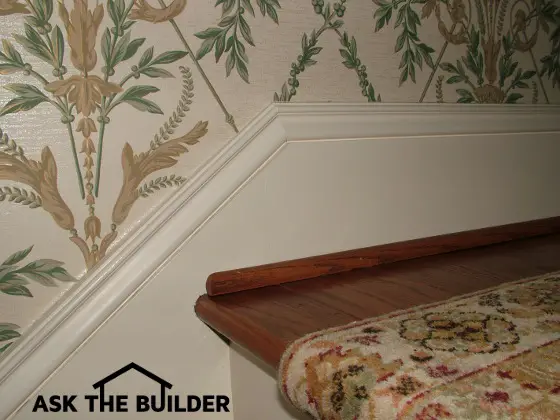
Look at this detail. This is my actual main staircase. The trim molding on the sloping stringer was cut off the top of a piece of baseboard. You can see how the stringer of the staircase appears to just bend over the front edge of the landing and continue as a piece of baseboard on the landing. © 2017 Tim Carter
Stair Trim Molding TIPS
- No geometry required
- Trace top of trim
- Connect points for mitre
- Cut small test pieces and fit
- CLICK HERE to Get Tim's FREE & FUNNY Newsletter!
DEAR TIM: I have wasted about 25 linear feet of solid-wood baseboard trying to get perfect cuts. The problem is not in the rooms, but as I try to extend the trim moldings up the stairs of my house.
No matter how I set my miter saw, the angles I cut do not work. Surely there must be an easy way to determine what the angle must be. How do you do install stair trim moldings? Brian K., Levittown, NY
DEAR BRIAN: With the current cost of solid-wood trim going up instead of down, your failed carpentry experiments are death on a stick. You simply can't afford to make mistakes when using expensive trim moldings.
The sad fact is the answer to your dilemma was staring right at you the entire time. Your first piece of scrap trim molding, a pencil and 15 seconds of time would have produced an exact template of the angles that needed to be cut.
CLICK HERE to get FREE & FAST BIDS from local finish carpenters that can show you how to do this.
No Need For Geometry
Cutting stair trim moldings at precise angles can, and does, bring back memories of failed high school geometry tests to many a homeowner who tackles difficult carpentry tasks on an irregular basis.
Perhaps the most frustrating thing is the mental picture one often has of how the trim looks like in another person's house, but not being able to determine just how those simple angles are duplicated.
If you go back to the stairs and look at the flat landing and the stair stringer along the wall, you'll note that the top edge of the sloping stair stringer and the horizontal floor meet at a point.
The bottom of each of the two pieces of trim will indeed meet at this precise point. But the meeting point of the top of the trim pieces is shrouded in mystery.
Custom Trim Moldings Video
You may not realize it, but you can get molding custom made. If you don't like the trim selections at the lumber yard, and big-box home centers have the WORST selection, then consider having custom trim milled for you home.
WATCH THIS VIDEO:
Trace the Trim
To determine where the tops of the two trim pieces meet up on the wall, you need to use a small piece of the wasted trim you generated. This stair trim molding can be as little as one-foot long to serve as the tool you need.
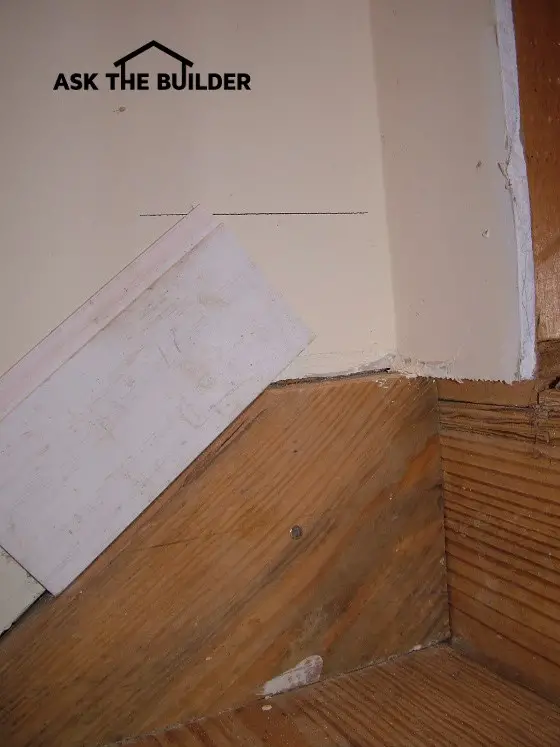
I've already drawn the pencil line that is parallel with the landing using the piece of white sloping baseboard you see as the guide. The white baseboard is now in place on the stringer and you can see how the top crosses the horizontal pencil line. Trace the top edge of the baseboard now so the two pencil marks cross one another. Remove the baseboard and draw a line from the top intersection point of the two lines down to the point on the stair stringer where it transitions from flat to sloped. This line represents the miter joint between the two pieces of finished trim. © 2017 Tim Carter
Place the piece of trim on the flat landing and extend the bottom of the trim 3 inches over the point where the sloping stringer meets the landing. Use a very sharp pencil and trace a line along the top of the entire piece of scrap trim.
Now place the trim on the sloping stringer and slide it up so the bottom of the trim projects up past the flat landing. Do so until the top of the trim intersects the pencil line you just drew on the wall. Use your pencil to trace a second line along the top of the sloped piece of trim.
Draw the Miter
Because the top and bottom of the stair trim are parallel, the two pencil lines you created with the trim will be parallel with the sloping stringer and the flat landing.
Use a straightedge to connect the point where the two pencil lines meet to the point where the top of the sloped stringer meets the flat landing. This angled line represents the cut line you will create on both pieces of trim.
You don't need a fancy angle finder to determine the angle. I prefer to cut test pieces of trim and see how they fit before transferring the angles to long pieces of expensive trim.
Mark & Cut Test Pieces
Take two pieces of the scrap trim and cut each one about one-foot long. Place one piece on the sloped stringer and slide it up the stringer until the tip of the trim just touches the intersection of the two pencil lines.
Hold the trim piece in this position and carefully make a mark on the bottom of this piece of trim where the sloped stringer meets the landing.
Place the piece of trim flat on the floor and use the straightedge to create a line across the face of the trim from the tip of the trim to the mark you just made on the bottom of the trim.
Place the trim in your miter saw so it lays flat and rotate the blade until the blade is parallel with the pencil line. Turn on the saw and make a precise cut along this line.
CLICK HERE to get FREE & FAST BIDS from local finish carpenters that can show you how to do this.
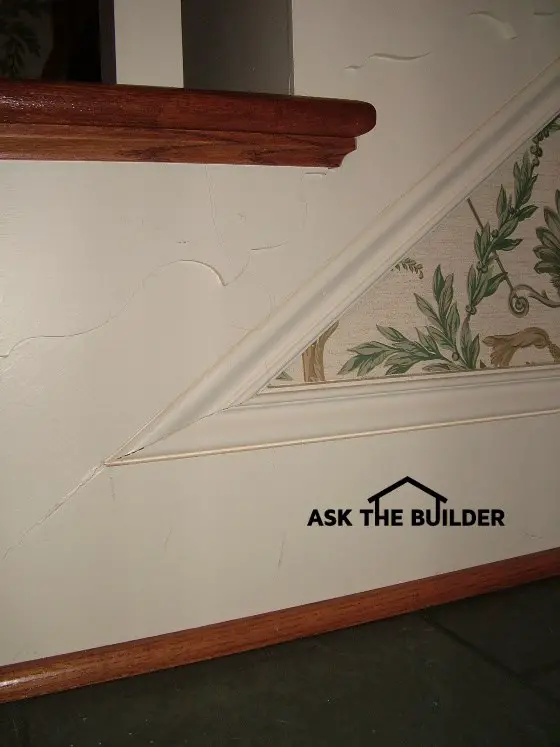
Check out these obtuse angle cuts on the same stair trim molding at the bottom of the staircase where the stairs dive into the first floor. © 2017 Tim Carter
Do this exact same exercise with the other piece of scrap trim as it sits on the landing. Once these two pieces of trim are cut and placed in position, the two angled cuts should meet perfectly and no filler should be needed at the joint. If you do this successfully, consider yourself a journeyman carpenter!
Obtuse Too
This method of bisecting the angle works in just about any situation where two straight lines meet at any given angle. In the case of an ascending set of stairs and a landing, the intersection produces an obtuse angle that creates short cuts across the face of the trim molding.
But the opposite happens on the small triangular wall where the stairs dive into the first floor. In this situation the baseboard trim and the matching trim on the underside of the stringer, not the top, create an acute angle.
The method of determining the cut angle is exactly the same as you attempt to figure out on the wall where the tops of the two moldings intersect.
Long Cuts Work
The cut angle across the face of the trim molding can be very long and one would think the two pieces of trim would never meet precisely. But if the angle is calculated correctly, the cuts are perfect and the resulting cuts produce a tight fit. If you don't believe me, stop by for a visit and look at my entrance hall staircase.
CLICK HERE to get FREE & FAST BIDS from local finish carpenters that can show you how to do this.
Column 557
Tim built custom homes and did ultra-custom remodeling for 20+ years before launching his Ask the Builder media presence. He was selected as one of the Big 50 by Remodeling magazine in 1993. This award gave birth to Ask the Builder in October 1993. Tim also operates https://DrawPlumbingPlans.com. His @askthebuilder YouTube channel was the first home improvement channel on YouTube.
To Whom It May Concern
How do you the get the angle's, to cut shoe molding on top of a stair stringer. I put carpet on the stringers and the staples are show.
I have installed chair rail though out my finished basement . And now I want to bring it up the stairs. I got the return up the stairs from the wall ( I went on line) , BUT now I am perplexed by the other smaller wall .
The molding is 36" high at 42.0 degrees, but I must end it at a vertical wall that opens up to the basement. I want to cut it so it looks finished with and end trim. Thank You
Do you have a video on how to do baseboard molding down a staircase. Im looking for when it meets the lading?
Thank you
I am placing a piece of baseboard on the exposed wall (texturized drywall) on the angle of an ascending staircase (tri level home) under the 1 x 4 (5"?) that supports the spindles. The right end will be open and should have a mitred return. The angle required to have the baseboard line up with the wall at the top of the stair case is approx 39 degrees.(Versus the 90 degree angle normally utilized for "flat" baseboard (or apron) returns.) I am unable to determine what the settings should be for cutting a return to match the angle the baseboard was cut at. Any reference, tutorial or advice/instruction of how to make a return for this piece of base would be appreciated. Thanks.
I assume you extend the piece of trim on the landing past the point by 3" because that it the height of the trim (base) you're using.
Thank you for this article. It has helped tremendously.