How To Install A Prehung Door
Install prehung door: You need adjustable shims and the correct rough opening. Copyright 2018 Tim Carter
"Before the door is installed, make sure the top and bottom of the door are painted. This seals the wood so the door doesn't warp over time."
Install Prehung Door Checklist
- Rough opening must be correct
- Trim side jambs so top jamb is level
- Put shims behind each hinge
- Install 2.5-inch screw under top hinge
DEAR TIM: I need to know how to install an interior prehung door. This door is a regular interior door, not an exterior door. Is this job as easy as the salesman made it out to be?
I'm suspicious, as it seems that you need some good skills to install a prehung door. What can you share so that I might have a fighting chance as I wrestle with this door? Bill F., Greeneville, NC
Related Links
Dual French Door Installation - DO NOT SHARE! SECRET!
Install a New Front Door in Hours - DO NOT SHARE!
Is It Difficult To Install a Prehung Door?
DEAR BILL: Installing an interior prehung door is not a job I would entrust to a rookie carpenter. The job is fraught with all sorts of little challenges that are solved with tricks that come with lots of experience.
To end up with a door that fits perfectly without rubbing, you need to know some of these tricks. In other words, the salesman either thought you were a seasoned carpenter or he needed to make a sale. No worries though, as I will try to give you as many tips as possible to help you survive this job.
Free & Fast Bids
CLICK HERE to get FREE & FAST BIDS from local finish carpenters who can install your door.
What Does Door Handing Mean?
Door handing refers to the side of the door that the knob and hinges are on when the door is closed. It is a very common mistake to purchase a prehung door that swings the wrong way.
How Do You Determine Door Handing?
To determine proper handing, always imagine looking at the door and be on the side where the door swings towards you. If the doorknob is on the left side of the door, it is a left-handed door. If the knob is on the right, it would be a right-handed door.
Why are the Jambs Long on Prehung Doors?
Prehung doors often come from the factory with the jambs a little long. This is done on purpose so you can install the door in places where there will be carpet and not have to cut off the bottom of the new door.
How Much Space Should Be Under the Door?
The goal is to have about one-half-inch of airspace between the bottom of the door and the top of the carpet or any finished flooring material. The door jambs don't have to touch the subfloor in carpeted situations, but they must be in contact with hardwood flooring, ceramic tile, cork or other finished floors that are typically smooth.
Should the Top and Bottom of the Door Be Painted?
Before the door is installed, make sure the top and bottom of the door are painted. This seals the wood so the door doesn't warp over time. You can just lay the door flat on the ground and open it to check to see if this was done at the factory. It is important to have the top and bottom of doors sealed to prevent warping.
CLICK HERE to get FREE & FAST BIDS from local finish carpenters who can install your door.
How Much Gap Should There Be Between the Door and the Jamb?
Prehung doors typically come from the factory with a one-eighth-inch gap between the edges of the door and the door jamb. The doors are almost always perfectly square, so the challenge is to square up the jamb within the rough opening so the gap between the door and the jamb stays consistent.
The biggest challenge is cutting the lengths of the jambs correctly so the gap at the top of the door is correct. If one leg of the jamb is too long, you will end up with the door rubbing against the top jamb or a horribly large gap between the door and the jamb just above the doorknob.
Should the Side Jambs be Plumb?
It's really important for the door jambs to be installed plumb. Use a four-foot level to see how plumb the rough opening is that is common to the hinge-side of the door. Use wood shims with the level and tack the shims against the jamb until the level is perfectly plumb. It is best to install shims at the same height as the door hinges.
Install Prehung Door Steps:
- Position the prehung door into the rough opening, slide it up against the shims, and see how things look. You know you're in great shape if the gap along the hinge side of the door and the top of the door are the consistent one-eighth inch. Don't worry for now about the gap alongside the doorknob side of the door. This is the least important jamb.
- Use 10-penny finish nails to attach the hinge jamb of the door to the rough jamb. Carefully nail through the jamb and into the shims. Do not drive the nails completely into place. Leave at least one-half inch of the nails exposed in case you need to make adjustments to the length of the door jambs or you have to move the jambs slightly in and out so the door fits perfectly. Once all adjustments are made, all shims are in place and the door fits well, then you can drive the nails home recessing the nail heads with a nail-setting tool.
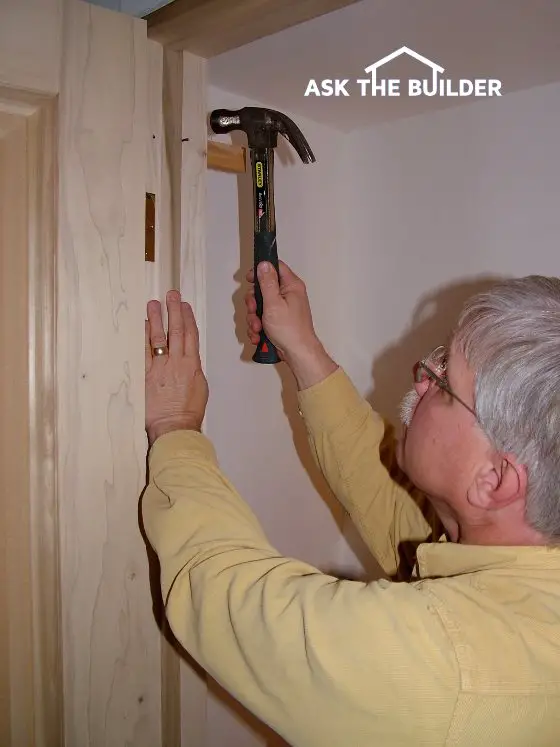
- To really add a professional touch to your installation once complete, you will want to temporarily remove the top hinge from just the door jamb. Doors are heavy and over time the weight of the door can actually pull the jamb away from the finish nails. This will cause the door to rub and not fit well.
- If you take a three-inch-long screw and drive it through the jamb into the rough jamb at this upper hinge, the door should stay put for many years. It is important to predrill the hole so you do not split the jamb and create a countersink hole so the head of the screw does not touch the back side of the hinge once the hinge is reinstalled.
- Some carpenters just remove one of the regular short hinge screws and replace it with a longer one that will penetrate into the rough jamb. This method will also work.
- When shimming the jambs, place the shims at about two-foot intervals and always nail through the jamb at a location where you have installed shims.
- CLICK HERE to get FREE & FAST BIDS from local finish carpenters who can install your door.
Column 703
Tim built custom homes and did ultra-custom remodeling for 20+ years before launching his Ask the Builder media presence. He was selected as one of the Big 50 by Remodeling magazine in 1993. This award gave birth to Ask the Builder in October 1993. Tim also operates https://DrawPlumbingPlans.com. His @askthebuilder YouTube channel was the first home improvement channel on YouTube.

We had new pre-hung interior wood doors hung this week...the sub-contractor cut the bottom of the frame and then hung the doors so that the door is 1/2 from the concrete. The doors are now too low to the ground and return air will be at a minimum...they were suppose to hang the doors and raise the casing and base moulding 1/2" to accommodate the new wood floors...is there any way to fix this?
Sure. A carpenter with a vibrating multi tool can cut the jamb to slide the floor under it. The door can be cut off.
Hi, useful article, however I have searched extensively to find some advice on fitting a pre-hung interior door into a block or brick rough opening and using expanding pu foam as the final fix. Can you help?
Yes, I can help. It's far too much to type. You have this option:
https://shop.askthebuilder.com/products/15-Minute-Phone-Conversation-with-Tim.html
know about the jamb saw...they have only hung 4 of 11 doors...seems a shame to have to trim new doors...Thanks
We just removed all the flooring and old prehung doors. I was wondering should I install the laminate floor first or the new doors first?
Good Post ..I have installed one in my home 🙂
Installing a prehung door is easy and they already have the doorjamb attached with it.It’s an advantage .But you need to take a lot of care to install like a professional. If your measurements aren’t accurate the door would not work well. So a little professional assistance would be a better option :). I got the help of Clera windows here in Canada.
My not-so-handy husband installed all of our interior doors a few years back. Upon inspection, we noticed that he did not get them installed correctly. Most of the door jambs are not level with the walls (meaning on one side of the door, the jamb leaves a huge gap where the trim is supposed to meet the door jamb and on the other side of the door it comes out too far. Is there a way to fix this without removing the entire door? Can one side of the door jamb be loosened and moved where it needs to go?
Hi April, this situation is rough, but not un-fixable. You'll need a hammer and a speed square, and a caulk gun. First, you open the door, and have you husband stand on the other side of the threshold, facing you. Then, you look straight ahead, apologize for chastizing him, and mocking his efforts to improve your home, celebrate his ownership, and save you money with his own hands. Then, hand him the caulk gun and ask him to caulk the gaps, and say 'I guess if we haven't noticed the gaps for so many years, if we caulk them then no one ever will, because no one really looks that closely at that sort of thing and we could probably find better things to do with our time and money than fixing quarter inch gaps around the trim on our doors'. Then put the hammer and speed square back in the new toolbox your bought him for Fathers day, those were just for effect.
Thanks Tim. It never hurts to brush up on a skill like installing a door. Good bonus tip about the top hinge.
what's the best way to cut a hole in a exterior wall to install French doors?