Poplar Bookcase in an Hour
 Bookshelves in an Hour
This is a really fun project. How did I get the idea for it? It was a completely spontaneous thought. About five weeks ago, I was in Ft. Worth, Texas doing a television appearance. The public relations (PR) firm that hired me had scheduled a unique opportunity. A morning TV news show wanted me to be on the air for one and one-half hours doing a project. The plan was to introduce me at the top of the show and then cut back to me every 20 minutes or so to check on my progress. The PR guy thought it would be great if I built a window seat. I roared with laughter! That would take about 12 hours with a helper under perfect conditions!
Poplar Bookshelves Can Be Done in an Hour
This discussion took place while we were waiting at the airport luggage carousel. The TV appearance was to happen in less than 24 hours! After I stopped laughing, Jerry, the PR guy said, "Well, what else can we do?" I said, "Let me think about it as we drive to the hotel." I knew the project had to be simple and it had to pertain to what the viewers in Ft. Worth needed. They have no basements there, so space is at a premium. Bingo! A bookcase popped into my mind.
A Bookshelf Plan
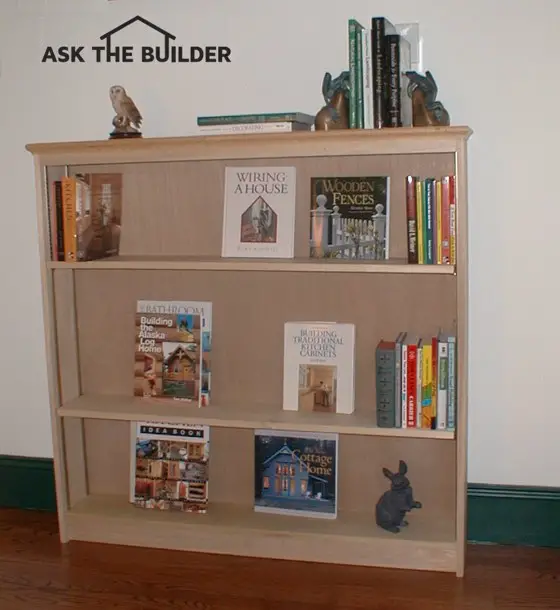
Using a scrap piece of paper, I drew up the plan for the bookcase in about five minutes. Several thoughts drove the concept. I knew that the project had to be simple so that I could complete it in the allotted time while on TV. If I didn't finish it, then it would not be as simple as I said and my credibility would be challenged. The project also needed to be modular. This would save time and make it affordable. You probably can see now why I chose it to be 4 feet wide and 4 feet tall! To make a long story short, I completed it with about 6 minutes to spare and the TV hosts were amazed.
DIY Bookshelves in 90 Minutes
The key to success lies in making sure the pieces are cut square and that they are the exact lengths I prescribe. A 12 inch diameter power miter box is a perfect tool for this project.
Once all of the pieces are cut, start by attaching the top to the side legs. The top overlaps the legs. Use 4 nails at each end for this. Pre-drill the holes with a bit slightly smaller than the diameter of a nail. This will prevent splitting the top of the bookcase. Do not drill into the end grain of the side pieces.
The next step is to install the bottom shelf. It fits in between the two legs. It must be held up from the bottom edges of the legs so the toe kick board can fit below it. The bottom of the toe kick board MUST be flush with the sides. Failure to do this will cause major appearance problems!
Use Plywood to Make it Square
I like to square the bookcase up at this point. The easiest way to do this is by nailing on the plywood backing. Notice that one half inch is cut off the bottom of the plywood. This is done so that the legs support all of the bookcase weight. It also makes the bookcase more stable. Be sure you cut off the bottom of the plywood and not a side! Keep in mind that the backing looks best when the grain of the plywood is oriented up and down, not sideways. Once cut, place a factory edge of the plywood flush with the top of the bookcase. This task is simple if you lay the bookcase down on the floor. Place the best edges of the case facing down. Pay attention to what is at the top. The plywood should be flush with the sides or in just a tad. Sometimes, the plywood comes from the factory a hair over 48 inches. This is why the bookcase is actually 48 1/8 inches wide. Start nailing the top edge. Once this is complete, align one side so that the plywood is even or parallel with that side. Nail this side. I space the brass nails about 8 inches apart on the back. With one side and the top nailed, the bookcase will be squared automatically by the plywood. Nail the remaining edges at this time.
The top apron and toe kick boards are now put in place. Use two nails at each end to secure these boards. You are nearly complete!
The Finishing Touches
Cut the decorative molding to fit. The miter angles are simple 45 degrees. If you have 4d finish nails, use these to attach the molding. The 6d nails are a little too big for this.
The final step is to cut the shelf standards and then attach them. These can be easily cut with a hacksaw. Hold the standards in about 1 inch from the front and back edge. Pay attention when you cut them! Always cut from the same end or they will not work. Pay attention to the numbers on the standards to see what I mean.
This is all it takes, seriously. Once all of the wood is cut, the entire bookcase can be assembled by you in 1 hour or less. Be sure to use a nail set to countersink the nails. Sand it well before finishing it!
If you want the plans to build this wonderful bookcase simply click on Tim's Deluxe Bookcase.
I built this in one hour using simple tools.
Column B337
Tim built custom homes and did ultra-custom remodeling for 20+ years before launching his Ask the Builder media presence. He was selected as one of the Big 50 by Remodeling magazine in 1993. This award gave birth to Ask the Builder in October 1993. Tim also operates https://DrawPlumbingPlans.com. His @askthebuilder YouTube channel was the first home improvement channel on YouTube.
Hey Tim,
Very interesting stuff. I am a great fan of wooden bookcases. Its amazing that you set this up in 1 hour! I just had a look at your plan, its pretty simple and straight forward. I think I should give a brown texture color to the shelf(so that it would fit perfect with the color of my room). Do you have a bigger image of this bookcase?
Thanks for the awesome tutorial