Ten Secret Drywall Finishing Tips
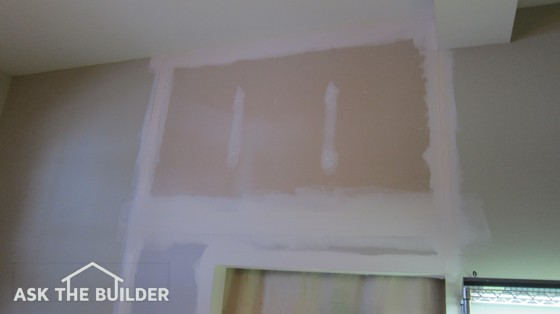
How to finish drywall you ask. Drywall finishing may look easy, but it requires a deft touch. This small section of wall has just about every drywall finish challenge in it: flat and tapered seams, inside and outside corners and an archway! Copyright 2018 Tim Carter
"Drywall finishing requires hand-eye coordination. Some people have it and others simply don't. One of my employees couldn't finish drywall to save his life."
Secret Drywall Finishing TIPS
- The joint compound must be creamy like pudding
- Leave 1/16-inch layer of mud between drywall and paper tape
- Don't try for perfection during second coat
- WATCH my drywall finishing videos below!
- CLICK HERE to Get Tim's FREE & FUNNY Newsletter
How To Finish Drywall?
You finish drywall with great skills. It takes lots of practice to get professional drywall finishing results. Even if you follow my ten drywall finishing tips that follow, you may not get professional results.
Why? Drywall finishing requires hand-eye coordination.
Some people have it and others simply don't. One of my employees couldn't finish drywall to save his life. I tried and tried to get him to hold the broad knife the right way, but he never could get just the right smooth gliding motion with that knife.
Related Links
Drywall Taping Blisters - Second Biggest Rookie Mistake
The Truth About Drywall and Wet Locations
CLICK HERE to get FREE & FAST BIDS from drywall finishing pros in your town.
How Are Drywall Taping and Mudding Skills Acquired?
Drywall taping and mudding skills are acquired by lots of practice. You need to be trained by a professional or watch a few of my videos below.
It's important to realize this is a talent that's acquired. It's much like driving. You get to where you know the feel of a car and a road surface.
Finishing drywall is the same. You get a feel for the flexibility of certain tools and the consistency of the joint compound. I say we give it a try. Here are my Ten Tips:
Does the Drywall Need to be Hung Well?
Great drywall finishes begin with superior hanging jobs. The drywall must be tight against the wall studs or the ceiling joists. All screws need to be countersunk just enough to where they do not tear the paper.
There need to be enough fasteners. I like to see screws every 16 inches on walls and every 12 inches on center on ceilings. Tapered seams should be tight. Corner joints or other joints should have a gap of approximately 1/4 inch. A tight seam is best but a slight gap is acceptable.
How Do You Mix the Mud?
You mix drywall mud by adding a small amount of water and then stir it with a paddle attached to a power drill.

This is my joint compound mixing paddle. It has a long shaft that you insert into a drill. CLICK THE PHOTO NOW to have one delivered to your home. Copyright 2018 Tim Carter
Most people use pre-mixed mud in a bucket or a box. This mud is simply too stiff to use. You need to add a little water and whip the mud up to the consistency of creamy cake icing.
It must be lump free. Be careful not to mix too much air into it. If you do, sometimes you get tiny air bubbles in your seams as you apply and finish the mud. Just try to mix the mud slowly. Do NOT add too much water.
Watch this video to see what the mud should look like:
Paper or Mesh Tape?
I have used both. I prefer to use the paper tape in corners and the self-adhesive mesh tape is superb for tapered seams. I will use paper for both with no hesitation. If you have lots of taping to do, fabricate a belt holder using a coat hanger that holds the roll of tape. Or you can buy a handy holder at a drywall supply house.
What are the Best Drywall Finishing Tools?
The best drywall finishing tools are:
- a stainless-steel mud pan
- a 10-inch stainless-steel broadknife
- a 5-inch wide taping knife

These are my favorite drywall finishing tools. CLICK THE PHOTO to have them delivered to your home. Copyright 2018 Tim Carter
I prefer stainless steel broad knives for finishing. I have 10 and 12-inch knives. For taping, I use a flexible steel blade that is about 5 inches wide. My trusty one that's over 25-years old is not stainless steel, but you can now get them.
It's important to use a file to slightly round off the corners of your taping knife. A brand new knife has very sharp corners and they will tear the paper tape as you glide it down a corner seam.
What are the Drywall Finishing Steps?
Here are the drywall finishing steps:
- tape flat seams
- do inside corners walls and ceilings
- tape corner bead corners (see video below)
- coat corner bead
- second coat
- light sand second coat ridges
- third coat and skim
I do all of my flat seams first and run the tape to within one-half inch of the corners. I then do the inside corners last so that this tape overlaps the flat seam tape. Before you start to tape, all metal and curved corner bead should be nailed in place.
How Do You Tape Drywall by Hand?
On flat seams, I will apply mud to just about four or five linear feet of seam. I do the same in corners.
I press the tape in place and start to scrape the seam to remove excess mud. I stop about six inches from the end of the excess mud. I then apply more mud to the drywall to proceed.
When Do You Apply the Second Coat of Mud?
You can second coat immediately after you have finished taping. The tape does not have to be dry. It will dry out as the second coat dries.
How Do You Second Coat Inside Corners?
You second coat inside corners one side at a time.
You can't apply the second coat of mud on both sides of a corner at the same time. You do one side on one day and then the other side on day two or after the mud is dry.
You can finish three corner surfaces where a ceiling meets the inside corner of two walls at the same time. If I was looking at an inside corner I could do the right side vertical wall seam of the inside corner, the ceiling side of the right wall/ceiling intersection and the top wall side of the left wall/ceiling intersection.
On the following day, you would coat the remaining three corner surfaces. Corner tape should have a 1/16th-inch layer of mud over the tape once complete.
Does the Second Coat Have to be Perfect?
No, the second coat of mud does not have to be perfect. You should have a slight ridge in the center of taped seams. This ridge gets sanded off later.
Everyone tries to get the second coat perfect! Big Mistake!
The feathered edges where the mud stops and the drywall paper begins must be clean with no excess and the mud must build up from there to a high point at the center of wall and ceiling seams. You will see this ridge line and any lift marks where you pull the knife away from the wall.
Once the mud dries you will quickly sand these off before applying the third coat of mud.
Should Drywall be Primed and Sealed?
Yes, finished drywall should be primed and sealed. This paint coating evens out the porosity and texture of the drywall so the finished paint looks superb.
After you have third coated and finally sanded the seams, corners, and nails, you MUST apply a superb sealer/primer to the walls before you paint. USG Corp makes a fantastic inexpensive paint called First Coat®.
It's ideal. It eliminates joint banding and texture problems that happen when the regular paint is applied to freshly finished drywall. The primer sealer is applied like any other paint and looks milky as you roll it.
But somehow an hour later the wall is snow white! Failure to apply a primer/sealer before painting will negate all of your hard work.
Column B387
Tim built custom homes and did ultra-custom remodeling for 20+ years before launching his Ask the Builder media presence. He was selected as one of the Big 50 by Remodeling magazine in 1993. This award gave birth to Ask the Builder in October 1993. Tim also operates https://DrawPlumbingPlans.com. His @askthebuilder YouTube channel was the first home improvement channel on YouTube.

Excellent write up , was most interested in the corners
This is interesting. I'm wondering about #8. "You can't second coat both sides of an inside corner at the same time". I use a corner tool to do both sides at the same time, I don't know why I can't do something that I've always done. Good article.
Agreed Owen. I mud both inside corners with a 6" blade, remove the excess, apply the tape and secure it with the blade. Then apply mud on the tape and use a corner trowel. Done in half the time as doing each corner separately.
Its also like not eveyone can paint. Its an art also.I like using Zinnser 123 primer on new rock or plaster. It helps create a water vapor barrier especially for outside walls.
Thanks for your tips on finishing. I'm doing a complete bathroom remodel and at the rock hung. Now to tackle the mudding!
Also not everyone can paint. Its an art that not everyone one can master. I have never come across a one step one coat coverage paint that looked good. I perfer to use Zinnser 123 primer on rock or plaster. It help create a water vapor barrier.
Thanks for the corner and ceiling line tips. I at the mud stages on a bathroom remodel. It was a total destruction and rebuilt that gave 2 more feet to master bedroom.
I'm a painter by trade and have always struggled with corners!
Any sanding grit or type you perfer for the different stages?
Get the angled 3M sanding sponges. Fantastic. Also, skim coat the walls or edges of all joints BEFORE sanding. Use thinned-down compound.
As you stated not everyone can finish, not everyone can paint. When I prime I like to use Zinnserr 123 primer. It creates a vapor barrier especially good for outside walls.
Thanks for the corner/ceiling tip when muddin. Doing a bathroom remodel and I get to be the lucky one who does the muddin. I'm using the mesh tape and use it for some areas that need small patch. In those ares I cross the tape.
Well better get back to the rock. Thanks again!
Thanks for the tips. I do drywall as a profession and I'm always looking for the best process. A little worried about doing second coat right after tape. I guess any blade marks on inside corners will be covered by 2nd stage of second coat. How about knives? I use a 4" and 6" for most of the process, ( except on butt joints) and they do not have that little flat edge on the side. What do you prefer and why? Also, do you skim coat the whole wall after third coat? Is the Sherwin Williams primer any good? How about Valspar? I water my mud down to set tape because it flows out nicer. Can this back-fire?
Glenn, lots of questions!
I use a 10-inch knife for second and third coat work. I like that it gives me plenty of work room applying and removing mud. I don't skim coat. It's a wasted step if you use the high-quality sealer primers. You can paint far faster than you can skim coat and clean up. Be very careful about thinning mud! You THIN the glue at the same time that holds the tape to the wall!
Benjamin Moore first start latex primer. Its multi purpose. Works great for almost anything. If not everything!
Experience 2 years in the trade...
Sherwin is okay... IF your looking for quality BM
TNX. This sounds like a robust discussion between Ford and Chevy pickup truck owners.
Added tip* prefill you're gaps and tape with the heavy mud. And for the rest of the coats use lightweight.
On third coat, use own judgment but I scrape all the mud off and be sure to cover all edges of second coat.
When spotting screw's, do not take any shortcuts. Make sure they are all countersunk the first time. And any other blemishes or torn paper on the rock, beat or rub in with knife handle lol and fill with mud while spotting. Don't want any surprises on your primer coat.
Smile more.
I'm re-drywalling a bathroom. I've left the ceiling up. Can I make the wall to ceiling joints look good? Little nervous.
Yes you can. Read all my columns and WATCH ALL MY DRYWALL FINISHING videos!
I am an expert drywall repairman and finisher All of my seams are done in only two coats with no sanding in between. First coat is applied using 90 or 45 even 20 minute set powder compounds mixed accordingly with water. After first coat is dry enough you will use a six inch putty knife and scrape down lap marks and trowel ridges ( if you had used a 12 inch knife to start you smooth out edges with little or no ridges by tilting the blade to a sharper angle always use a twelve for seams) second and final coat to be applied using standard box or bucket compound thinned accordingly like you stated Tim apply with twelve inch trowel after surface is completely dry then light sand to perfection. EXPERT DRYWALL REPAIR NC.ON MANTA.
Absolutely! Mark, this is my profession as well totally agree with what you say. I use a 12 in curved trowel for my tapers and butt seems first coat. With 90 45 20 dura bond. Finish coat lightweight compound. Tight skim with 14 inch flat trowel. No paper tape at all. All mesh, butts, seems, and inside coners. I do all my inside coner work with just a six inch knife. A lot of people would never know to round the coners of your new taping knifes or trowels, that's a must!!!!!! as Tim stated. Helps with the breaking in process as well. And always keep your tools clean!
This guy is doing dome drywall work for me and he is using a set 45 mixed with joint compound and he put dawn dish soap in it as well, what negative effect will this habe? Never heard of this I'n my life!
Don't let them mix the mud and the quickset. You will have problems down the road with the mud flaking off. Soap is ok. It is used to keep the pock marks out of the mud on the wall but I have occasionally seen problems with finishers who used too much soap and cause a bad bond with the raw drywall.
Keeps the mud smooth and creamy while eliminating the little bubbles that appear when applying it to the joint
These are some really geeat tips! I wish i had taken the time to see this when I decided to play DIY. You are absolutely right When you say "This is a talent that is acquired".I am just a new home howner that HATES textured walls.I know I definitely bit off more than I can chew when I thought Drywalling was gonna be no big deal, seemed simple enough.....Not! Here I am 4 months later, 4 buckets wasted, and a house full of dust still trying to perfect all the little knicks and crannys, along with trying to sand and not sand to much just to get it just right, UGH, I just want to rip my walls down and throw on all new Sheet rock. I have finally gotten into groove with applying perfecting its just been so long and tiring, i dont want to finish it.
There is so much variance in information you see out there. Everyone has their own special way to do drywall, just as a painter has their own way to paint. The importance is the finished product. Find a way you are comfortable with and go with it. I saw a method when i was a kid, with even caulking seems with just a thin coat of mud and sanded and painted and it lasted for at least 12 years until i moved away with absolutely no cracks and was a perfectly smooth finish.
The key for me is, embedding your tape correctly. It sets the foundation for a good job. You screw up the tape, it'll show in your final work. Mesh tape does not work that well for non-factory edges that are tapered. You have to go very thick and feather out 12 to 14 inches minimum to hide the mesh. Paper is a breeze in 2 coats. There is also a tape gun available that will mud your tape for you as you pull it through, they usually run around 50 bucks and is worth it on a large job.
Practice. And just make sure you sand (or wet sponge) the final coat before painting to a very smooth surface.
Lastly, if you hirea contractor, please DO NOT google it and become google experts overnight and try to tell your contractor how to mix his mud or that he is "doing it wrong". We all hate people like that.
Good luck.
We're doing some remodeling in an old house. Anything we need to do differently if it's plaster on one side and drywall on the side of the corner?
Just set paper tape is damp tape, damp tape is swollen. That means a direct second coat will shrink more as it looses water and the tape looses water. Dry tape on a seam will get filled over then expand, so on contraction its still mostly filped minus only the mud shrinkage.
I think any one who has forgot about a spot before hand texture can tell you.. if you apply too many topping/skimming/touchup coats with out adequate dry time, you WILL see a channel where the tape finally shrunk to dry. Some times its under a beautiful skip-trowel with a flawless pre texture skim. Or a spray... Always a bummer to fix. Dont rush your way into free of charge work later.
This has occured to me in a hotell job on the one private cabin, they friggin moved two light receptacles the morning after I had skimmed all metal and seams for a hand putty-coat. Had to patch/prefill/tape/top/skim and float into other existing seams... Free labor for them to fix it, and they had to repaint.
I like to work quickly so I use 20 or 45min for the 1st coat. Then I use a slightly watered down premixed for a top coat. It makes for a quick 1 day mud 2nd day sand. As far as corners go use the right tools so you can get on to the next job more quickly. Tools are cheap your skills are what pay the bills
I like that you said that we need to have the right tools. If I was getting my house plastered then I would want to know that the professional was going to have the right tools. When you are prepping your home for plaster you might want to take all of the safety precautions that you can.
I am remodeling an older home. I removed interior wall paneling to find that the walls were all 1/2 inch plywood, buttoned as tight as can be with nails every 6 inches or so. I would like to drywall overtop. Is this a problem? I was told that a vapor barrier in between the plywood and drywall will prevent the drywall from wicking moisture. Any feedback is greatly appreciated.
You need a great vapor barrier. Read all my past columns on that topic as well as all my drywall installation columns.
Good luck! If you want the Easy Button approach and all the information in a Vulcan mind-meld, you have this option:
http://shop.askthebuilder.com/products/15-Minute-Phone-Conversation-with-Tim.html