Fence
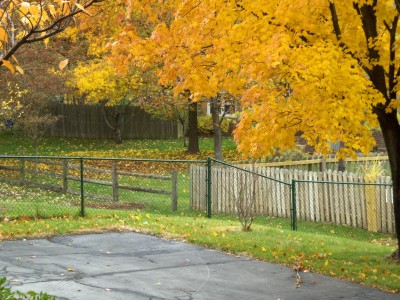
There are four types of fences visible in this picture - chain link, picket, split rail and a privacy fence in the distance. PHOTO CREDIT: Roger Henthorn
There is an old saying that talks about how good fences make good or great neighbors. This is so true as a fence that is placed where it should be clearly defines and outlines the property the fence is surrounding. I have a fence along part of my north property line and believe me, it has come in handy on more than one occasion. Fortunately, my neighbor loves the fence and both she and my wife use this graceful wood fence as a backdrop for plants.
Where do you start when deciding on a fence?
If you decide you want a fence, the first thing you must do is some research. Start with your local zoning officials to see if fences are permitted and if so, what if any requirements there are with respect to height, type, style and position. The zoning restrictions concerning fences in my town and its suburbs are as plentiful as ticket scalpers at a Cubs game. You should also check your deed or other paperwork you received at your closing. You just might find other neighborhood or sub-division restrictions regarding fences.
Once you have been cleared for construction, you now need to verify where your property line is. If you don't have accurate property pins in place from a recent survey, I suggest you invest in a survey. The price of the survey is well worth it, especially if you take great care to mark and preserve the corner pins the surveyor will drive into the ground. These markers can be used to settle property line disputes in the future and they will be very helpful when you go to sell your home.
Once you know what you can legally build and where to place the actual fence, it is time to select a material. There are countless materials and styles. You may want chain link, wrought iron, vinyl or wood fencing. My wife and I settled on a Victorian wood fence style that goes very well with our Queen Anne Victorian home. Cedar and traditional treated lumber were the woods I chose to use. I could just as easily have gone with redwood and even locust as they both contain great built-in preservatives to combat wood rot.
CLICK or TAP HERE to get FREE quotes from local fencing companies that can install your new fence.
How should you prepare treated lumber before installing the fence?
If you are going to use treated lumber for the posts and horizontal rails of your fence as I did and you are going to paint your fence, I suggest you get the lumber months ahead of time and stack it in your garage so it can air dry. Be sure to use small sticks between the layers so that air can circulate around each piece. Store the lumber flat and do not let the sun hit it. Often treated lumber has excessive amounts of moisture in it from the treating process. If this moisture is covered by paint, peeling and blistering of the fresh new paint in a few weeks or months is a real possibility.
Should you paint the fence pieces before installation?
If you really desire your paint job to stand the test of time, you should precut all or many of the actual pieces of wood that will be used to build the fence. I did this when I built my fence. I then pre-painted each piece of wood on all sides, surfaces and edges making sure to use the correct primer for the paint as called for by the top or finish coat paint manufacturer. If I were rebuilding my fence today, I would use an exterior paint that contains both urethane and acrylic resins. This paint has the best holding power and will last possibly 10 - 15 years without failure.
The nails, screws and bolts you use to secure all of the wood to one another is very important. Use only the highest double hot-dipped galvanized or stainless steel fasteners. These will not rust. If you use inferior fasteners, not only can the fence fall apart over time, but your paint job might start to develop unsightly rust spots in short order.
Before you start the actual construction of the fence, be sure you determine if there are any buried wires, pipes, cables, gas lines, etc. where you will be digging. Striking a high-voltage electric line with a sharp post hole digger can be a religious experience, if you know what I mean.
Column NH051
Tim built custom homes and did ultra-custom remodeling for 20+ years before launching his Ask the Builder media presence. He was selected as one of the Big 50 by Remodeling magazine in 1993. This award gave birth to Ask the Builder in October 1993. Tim also operates https://DrawPlumbingPlans.com. His @askthebuilder YouTube channel was the first home improvement channel on YouTube.