Faulty Metal Roof Flashings
"Flashings are the weak link in a roofing system. It's important to realize they should be made from the finest materials that have a life-span that equals or exceeds the life of the roofing materials."
Metal Roof Flashings Checklist
- Flashings are the source of most leaks
- Installation requires skills and experience
- Copper and other metals that can be soldered are best
- Do not rely on caulk - Sun's UV rays damage it
Metal Roof Flashing - Ones that Solder are Best
Homeowners are continually perplexed and frustrated by roof leaks. My years of experience in the field has taught me that 90 percent of roof leaks happen at flashing points. These are simply places where a roof meets up with something that isn't a roof. When I try to explain this to the average homeowner, their eyes tend to glaze over.
It finally clicked in my head one day that the problem lies in the fact that 80 percent or more of homeowners are terrified of heights. They haven't been up on roofs and as such can't easily visualize what a flashing is or how it is incorporated into a roofing system.
Free & Fast Bids
CLICK HERE to get FREE & FAST BIDS from local contractors who will install flashing for you.
How Old Are Metal Roof Flashings?
Metal roof flashings are hundreds of years old. Roofers of old discovered how to keep buildings dry.
I have seen photographs of some of the cathedrals in Europe. Some of the photos clearly show the 600-year-old roofs with their flashing systems in place. Some brilliant roofer many years ago figured out how to lace metal pieces into different layers of shingles to create a barrier against water.
How Simple is Flashing Technology?
The concept is simple. It is also very effective. I suspect that there was a certain degree of trial and error, but before long the roofer saw that you simply had to overlap shingles, slate, and metal flashings.
Are Flashings the Weak Link in a Roof?
Flashings are the weak link in a roofing system. It's important to realize they should be made from the finest materials that have a life-span that equals or exceeds the life of the roofing materials. I have done re-roofing jobs where the tin flashings had been painted periodically.
They were basically as good as when they were installed 70 years ago. Remember, when you purchase flashing materials, the labor to install them is virtually the same. If it costs $100 - 200 to get premium materials such as 40 lb. tin or copper, then by all means upgrade!
Is it Okay to Patch Flashings Using Roofing Cement and Caulk?
Roofing cement and caulk are not long-lasting roofing materials. If you can't repair a flashing correctly, then you can use roofing cement and caulk as a temporary patch. Once the weather breaks, you need to substitute proper metal flashing work.
I've seen an alarming increase in the use of roofing cement and caulk on roofs and flashings. These materials - especially roofing cement - are not acceptable.
First of all, many roofing cements are not ultraviolet light (UV) stable. This means they are intended to be sandwiched between two roofing materials hidden from sunlight. Exposing roofing cement to high energy UV light will cause it to break down rapidly.
Caulk, rarely if ever, will last more than 3 - 5 years in the harsh environment of a roof. There can be wide fluctuations of temperature that create wide swings of expansion and contraction of materials. The caulk can separate from the roofing materials and metal flashings. If this happens, a leak is guaranteed.
What Tools are Required to Install Flashings?
The wide variety of common roof flashings can be installed with some very simple tools. A tin snips, a simple hand brake, and a propane torch will allow you to do many tasks. If you have long lengths of sill flashing to do, it would really help if you rented a metal brake that siding installers use. A brake is a tool that allows you to make crisp creases in metal - just like when you fold a piece of paper.
What is a Step Flashing?
The simplest flashing to install is a step flashing. This flashing is used when a roof butts sideways into a wall, chimney, or other object as the roof rises. As a shingle stops at the wall you can see that water would readily get into the crack, no matter how tight you cut the shingle.
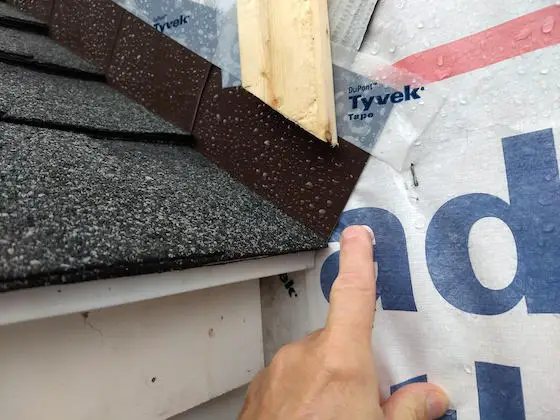
The brown bent aluminum is step flashing. The aluminum extends under the shingle and goes up the roof under the next flashing about 2 to 3 inches. The roofer made a SERIOUS ERROR where my finger is pointing. There should be an additional piece of flashing that's called a kick-out flashing. The lower end is bent and soldered and directs the water out to the front face of the exterior siding or stucco. Copyright 2018 Tim Carter
A step flashing rests on top of the uppermost 7 inches of the shingle This assumes you are using a 12 inch high shingle that requires a 5 inch exposure.
The flashing itself is a 5 by 7 inch piece of flat metal. I like to use 40 lb. tin pieces that come precut to 5 x 7 inches. You can bend these by hand so that the crease goes down the middle of the 7 inch axis. This way 2.5 inches of metal rises up along the wall and the other 2.5 inches covers the end of the shingle. You can also purchase 20 lb. tin, but this has half as much tin coating. Go for the good stuff - 40 lb. tin.
How Are Step Flashings Nailed?
To keep the flashing in place, I always install a nail right at the top of the flashing. I don't like to nail the flashing to the wall as this makes it nearly impossible to remove it years from now when the siding is in place.
CLICK HERE to get FREE & FAST BIDS from local contractors who will install flashing for you.
When you install the next row of shingles, something magical happens. You completely hide the piece of flashing on the row below! This is OK. When you install the next piece of flashing just like the one below, you will readily see that the second step flashing overlaps the one below by 2 inches - even though there is a shingle between the two pieces of metal.
What Prevents Leaks into a Home?
This overlap is what prevents water from entering your house. Remember, shingles and metal flashing rely entirely on gravity to keep your house dry. You can easily create a leak around flashing if you take a hose and squirt water UP the roof under the shingles and flashing.
But in the real world, this doesn't happen except in the fiercest wind driven rain storms. If you have wicked rainstorms in your area, you may want to cut custom flashings that create more than a two inch overlap.
Where Do You Solder Metal Roof Flashings?
Flashings need to be soldered where they turn corners. This happens at the four corners of a skylight, a chimney, or when a dog house dormer projects from a roof. The lower two corners of the dormer will have flashings that run along the front of the dormer and then turn to proceed up the roof.
Professional roofers use a soldering iron that looks like a plumb bob on an iron rod. They heat the plumb bob portion over charcoal or a propane flame. The stored heat in the iron then heats the metal flashing just enough to melt stick solder.
What Metals Will Accept Solder?
Tin, lead, or copper flashing readily accept solder if you wipe the mill oil from them and use liquid red ruby flux. If you don't have a soldering iron, you can use a torch but you must be very careful. Keep a bucket of water handy for fires that you WILL start!

Photo 1: Plumbing Vent
Virtually every house has one of these poking through the roof - a plumbing vent. The flashing actually is a rectangular piece of metal. In this photo #1, 60 percent of the metal is hidden by overlapping shingles. I have seen homeowners and rookie roofers who simply install the entire flashing on top of the shingles!
The reason the flashing works is the fact that at least half of it is hidden. Water flowing down the roof goes over the shingles and then over the flashing. If the top of the flashing was exposed, water would eventually get under it and leak into your home.
Note how you see no tar or caulk in this photo. This flashing has been in place 12 years with not one single leak.
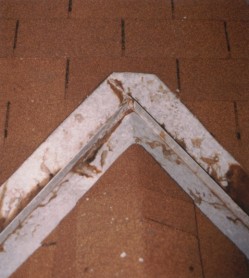
Photo 2: Soldered Valley Flashings
This photo #2 illustrates two soldered valley flashings that intersect. Often roofers will not solder the intersection. They just beat the metal flashing down and overlap the pieces. The ridge cap shingles that are at the bottom of the photo are then extend over the metal to seal the lack of solder.
The stains you see in the photo are not rust. Believe it or not they are stains from oak leaves!
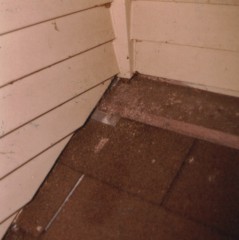
Photo 3: Shed Roof Flashing
This photo #3 illustrates a shed roof that stops at a second story wall. As the roof abuts the wall on the left, there are inter-laced pieces of metal step flashing hidden under the shingles.
You can see a glimpse of one of these flashings in the groove of the second shingle from the top. Note the light line in the photo.
At the second story wall, note the metal flashing that covers the top 3 inches of the shingle. The shingle actually runs up under the flashing to the wall. The metal flashing is installed before the wood siding. It is bent so it extends up 4 inches behind the wood siding. The wood siding actually acts as the counter flashing for this "sill" flashing.
At the inside corner, where the two walls meet, there is a final step flashing that has been cut, bent and soldered. The solder joint runs up the inside corner and is hidden by the thick corner board. Note how the wood siding does not touch the shingles. You should keep the wood off the roof at least 1/2 inch.
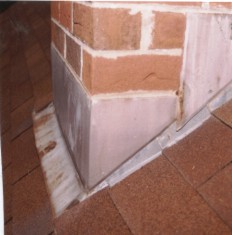
Photo 4: Chimney Flashings
Chimney flashings - a huge source of leaks! This photo #4 shows the side view of a chimney base counter-flashing. You can also clearly see the step flashings that overlap one another under each row of shingles.
Note how water can't get in. It flows over the brick, down the counter flashing over the step flashing and finally onto the shingles. The overlap orientation is the key!
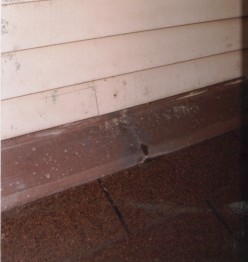
Photo 5: Simple Sill Flashing
This is a simple sill flashing where a shed roof terminates at a second story wall. The center of the photo #5 is actually a soldered joint where two flashings overlap one another.
The shingles extend up under the flashing to the wall. The flashing has a crease in it to keep it flat.
CLICK HERE to get FREE & FAST BIDS from local contractors who will install flashing for you.
Column B25
Tim built custom homes and did ultra-custom remodeling for 20+ years before launching his Ask the Builder media presence. He was selected as one of the Big 50 by Remodeling magazine in 1993. This award gave birth to Ask the Builder in October 1993. Tim also operates https://DrawPlumbingPlans.com. His @askthebuilder YouTube channel was the first home improvement channel on YouTube.

I can no longer find tin flashing, now what?? Have any Idea where I can order it?
Easy. Go to a real roofing materials supply house.
I always appreciate the time that's put into your articles.
And pictures help me so very much!
I only wish that yours could enlarge, if clicked on or hovered over.
Even with my reading glasses, the pics, as in this article, are just too small to show me the details that you discuss.
Thanks & keep us informed.
Appreciated!