Patio Repair
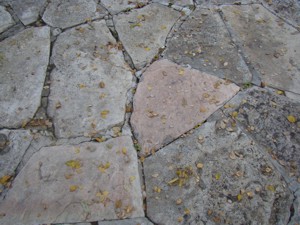
DEAR TIM: I have a patio-repair job at my house. The irregular pieces of limestone are fine, but the mortar joints between them are failing. In some places the stones have lifted up. The patio is about 20-years old, so I think that this patio crack repair is not an indication that I have to start over. Is this patio mortar repair something I can handle? What is a good way to ensure the repair lasts for a long time? Is it possible the stones are set just on sand? Albert Jacob, San Antonio, TX
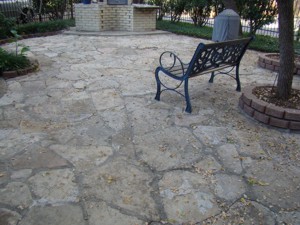
DEAR ALBERT: You have one great patio there! Not too long ago, I played golf in an exhausted limestone quarry in San Antonio, TX. Perhaps the stone from your patio came from that location. In any event, I would not consider taking up the stone. Based upon your photos, I can see that a few days of patio repairs will have that outdoor space looking like new.
It's possible that the stones were laid on a sand base. Since you rarely have extended periods of freezing weather, I see no issues with a sand base. What concerns me more would be movement in the soil beneath the sand caused by expansive clay soils. Parts of Texas have extensive amounts of clay soil that shrink and swell as the moisture content in the clay goes up and down. This movement is enough to crack foundations, so it can easily move your thin patio stones up and down.
I would recommend that you chisel out all of the old mortar between the stones. You can do this by hand, or you can rent a demolition hammer from a tool-rental business. These electric tools are simply miniature jack hammers and will quickly pulverize the mortar. You just have to be careful not to crack the limestone.
As you're removing the mortar, save it in a pile. This will help you estimate how much new sand and cement you need to purchase to do the patio repair. You absolutely want to buy plenty of sand from the same batch and plenty of Portland cement from the same manufacturer. Doing this will ensure that the color of the new mortar joints is the same. If you mix batches of sand or buy different types of cement, the color of the mortar can be quite different. Be sure to purchase coarse sand for this job.
This stone patio has failed mortar joints. The repair is not complicated, but does require working on your hands and knees. PHOTO CREDIT: Albert Jacob
After all the old mortar is removed from the cracks, you need to adjust the height of the stones so they are reasonably flat. If this means lifting them up and taking sand out from some stones or adding sand under others, do so. You can use the old mortar you removed as a base under stones that are low.
To prevent any future movement caused by the soil, I have a little secret you can try. Get some scrap one-half-inch diameter hard-copper tubing from a plumber. Cut it into short lengths that are one-half-inch longer than the thickness of the patio stones. Tap these little pipes somewhat randomly in the spaces between the stones. Try to have at least one pipe section for every six square feet of patio area. The top of the pipe should be flush or slightly lower than the top of the stones.
Carefully install the new mortar. Mix it using three measures of clean sand, one and one-half measures of Portland cement and enough water to make the mixture similar to bricklaying mortar. This means that the mortar will be stiff enough so it can stand up about one and one-half inches on a trowel. Try to work on overcast days or when the patio is in the shade. Cool, damp weather is the best to work in. Sunny, hot and windy days are the worst as the new mortar will dry too rapidly.
The joints between the stones must be dust free before you add the new mortar. Be sure to use a spray bottle filled with clean water to mist the sides of the stone and the sand base just before you add the mortar. This small trick will help the mortar make a good bond between the stones.
Only mix enough mortar as you can install in one hour. Never add additional water to mortar that starts to get hard. Be careful not to put mortar inside the open copper pipes that are sticking up. Once the patio-repair job is complete, these pipes will allow rain water to get under the patio to keep the soil moist. If the weather gets bone-dry, then you want to use your hose or sprinkler to get water into the little pipes so the soil stays moist all year long. By doing this, the soil will not shrink and swell, and your patio repair should last for a very long time.
When installing the new mortar, you can use a large trowel that has a fair amount of mortar on it and use a smaller trowel to slide mortar from the bigger trowel into the joints between the stones. Hold the bigger trowel so its long edge is parallel with the joint keeping the trowel about an inch above the stones.
Try avoiding getting the fresh mortar on the top of the stones. If you do, just scrape it off immediately. Don't worry about the mortar smear on the stone. After one month, you can remove the mortar smears with a solution of muriatic acid and water. Mix one part acid to ten parts water. Get the stones damp with clear water then pour on the acid solution. Allow the acid to bubble for ten minutes then scrub the area with a scrub brush. Wear goggles and rubber gloves. Follow all safety instructions on the acid label.
Column 751
4 Responses to Patio Repair