Plumbing Photos – Vent and Drainage Systems
Color Photos of Plumbing Vents
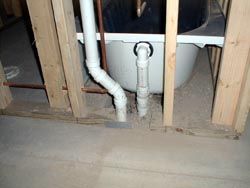
Here is a tub drain pipe and partial vent system. This is what the average bathtub drain and vent system looks like if you could remove the drywall or plaster from your walls. The plastic pipe connected to the tub is the overflow pipe. The chrome fitting up high on the inside of your tub is the overflow. Water enters it and flows down into the pipe. Just before the white pipe enters the gravel, you can see a tee fitting. Attached to it is a pipe that connects to the bottom of the tub drain outlet. The vertical pipe connected to the tub drops into a standard P-trap similar to one under any sink in your home. This trap connects to another tee fitting that is beneath the floor and is attached to the vent pipe that is passing through the notched wood floor plate.
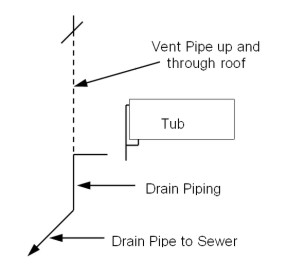
I have drawn an isometric drawing above to illustrate the actual piping connections in this situation. It should make sense to you.
Another Vent Pipe Photograph
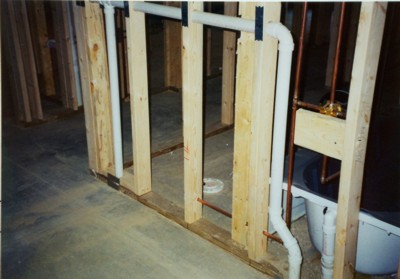
This photo is a continuation of the tub drain from the previous photo. In the isometric diagram above, I showed you - using the dashed line - the vent pipe that extends up straight to the roof. In reality, they rarely do this. Vent pipes can have all sorts of twists and bends in them as they travel from a fixture up to the roof. In fact, they can connect with other fixture vent pipes. This is why you might only see one or two vent pipes on a roof when the house below might have 10 or 15 separate plumbing fixtures.
In this photo, you can see how the vent pipe from the tub travels vertically up about four feet off the floor. It then travels horizontally until it intersects the vent pipe that services the toilet. You can clearly see the toilet flange on the concrete floor inside the bath area. The vents then travel horizontally a short distance and then start to go up once more towards the roof. They have a long way to go as this is a two story house and this bathroom is in the basement.
Whenever a vent pipe travels horizontally it needs to have fall so that condensate or rain water drains down the vent towards the fixture. You never want water to lay in the vent pipe as this water could block air that is trying to get to the fixture each time bath or sink water flows down the drain pipe.
You can also see that the vent pipe is protected from nail or screws with metal protection plates. These are a must as the wood framing is very thin after the holes have been drilled to accept the piping. It is a superb idea to take photos of the walls after all pipes, wires, etc. have been installed. Imagine how helpful photos such as these would be if you were remodeling or getting ready to drive a random nail in a wall. You would know what is behind the drywall!
Column B401
2 Responses to Plumbing Photos – Vent and Drainage Systems