Brick Patio Pavers
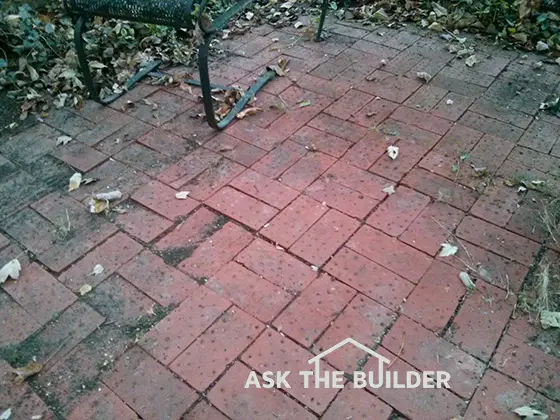
Would you believe it if I told you the brick you see is well over 100 years old, it was salvaged and then installed as a patio 45 years ago? And it still looks to be in great shape! © 2016 Tim Carter Builder
DEAR TIM: My wife is begging me to install a patio. The issue is she hates the interlocking cast concrete brick and they seem to lose their luster and color in a few years. Plus, they look too perfect she says.
She want’s me to create a brick patio that looks like it’s been down for fifty, or more, years. How can you do that? What’s the magic? I’m not very skilled and the method needs to be pretty simple for me to pull this off and be in her good graces.
Help me Obi Wan Tim, you’re my only hope. Zach S. Raleigh, NC
DEAR ZACH: I sensed a slight disturbance in the home improvement force when I read your email. It was a pleasant one that brought back a buried memory of mine. You may enjoy this small tale and take some inspiration from it.
When I was dating my wife back in college during the early 1970’s, I was deeply interested in home improvement, yet I had raw undeveloped skills. Energy and desire were in abundance, but both needed to be tamed so as to not waste them.
One early summer night when I went to pick up Kathy for a date, I saw two pallets of brick in their driveway and asked about them. Kathy told me her mom wanted a small brick patio around the back of her house where she could sit in nice weather and have a cup of coffee. That included 95-degree days as she consumed hot coffee on blistering hot days. I sweated thinking about that.
I can’t remember how it happened, but I volunteered to help put in the patio. Kathy’s dad was a medical doctor and very busy so I knew he’d have limited time. My future mother-in-law saw I was serious and welcomed the offer.
The brick they had bought was solid brick that had been used in some building. Fortunately, it was a harder brick that was strong enough to be exposed to the cold punishing weather that one can have in Cincinnati, Ohio, in the winter. Realize that not all brick has been fired long enough at a high enough temperature in a kiln to have this durability. It’s required for paving brick to be used in a patio or roadway. Brick in contact with the ground needs to be much tougher than brick used in a wall.
The first thing I had to do was chip off all the old mortar. Fortunately the mortar that had been used was primarily made with hydrated lime instead of Portland cement and it came off with little trouble. It took days to get off all the old mortar, but they passed like minutes to me because I was enjoying the work.
The brick had very square edges but every now and then a corner was chipped. I thought this would be an issue, but Kathy’s mom loved the missing corners as she was going for the same look your wife wants. I couldn’t picture it, but I trusted her and after all, it was her patio!
Kathy’s mom had read some article about installing the brick in a bed of coarse sand that had some Portland cement blended with it. This cement would eventually set up once the sand got wet and create a fairly stiff base under the brick.
I dug out enough soil so there would be a 3-inch bed of sand. I blended four measures of sand per measure of Portland cement and mixed it up in a wheelbarrow until the sand was a uniform color.
This sand was then put on the soil. I had created wood forms around the patio so we’d have the sand in the same plane. Kathy’s dad taught me one night after he got home from work the importance of using a string to get the edge of the forms straight so the patio didn’t look like it was being installed by a novice. I thank him to this day for that tip as I was trying to eyeball the wood forms.
I dumped the sand into the wood forms and used another straight 2x6 that ran across the top of the forms to smooth out the sand cement mixture. I did not compact the sand but immediately began to dry fit the brick on top of the sand. I kept the brick about 3 inches away from the edge of the sand. That’s what the instructions in the article said to do. I didn’t understand why at the time, but I do now! That sand edge provided a nice barrier so the brick on the edges would not tip outward if stepped on.
Because the brick were very uniform in size, they went together well in a double basket-weave or stacked bond pattern. Once all the brick were installed and I put dirt around the edges, I used a metal tamper that had a towel wrapped around it to set the brick in the sand. I started at the edges and tamped lightly working my way in to the center of the patio. The final step was to put a lawn sprinkler on to try to activate the Portland cement in the sand so the base stiffened up.
Last week, I was on that patio, possibly for the last time, because we had to send my father-in-law back to Heaven. Seven years ago, we sent back my mother-in-law. I sat in a chair on the patio and marveled at how well it looked after nearly 50 years of wear and tear. The brick weren’t perfectly level, some were up and down, the spacing wasn’t perfect but the patio looked amazing. I think your wife would like one like this.
The only thing I think I’d change if I could do it over would be to blend three measures of sand to one measure of Portland cement. I’d also make the base 4 inches thick instead of 3. Let me know how your patio comes out!
Related Column: Patio Pavers
Column 1171
Tim built custom homes and did ultra-custom remodeling for 20+ years before launching his Ask the Builder media presence. He was selected as one of the Big 50 by Remodeling magazine in 1993. This award gave birth to Ask the Builder in October 1993. Tim also operates https://DrawPlumbingPlans.com. His @askthebuilder YouTube channel was the first home improvement channel on YouTube.