Fence Building Tips
DEAR TIM: I plan to build a privacy wood fence as soon as the weather breaks and want to do all my planning now while the ground is frozen. I've got many questions, not the least of which is how to secure horizontal wood framing members to the vertical fence posts so the weight of the fencing doesn't cause a failure down the road. I was thinking of using some metal joist hangers. What other tips can you share about building privacy fences that will stand the test of time? Dorothy G., Grand Haven, MI
DEAR DOROTHY: Oh gosh, another question where I could write a book instead of a 1,000-word column! I'm going to just hit the high spots here and you may want to visit my AsktheBuilder.com website for many past columns where I dive deep into how to construct wood fences that will last for generations.
The first thing you need to do, believe it or not, is to stop and check to see if you have any troublesome zoning regulations in your town or city. I used to live in a community where fences taller than four feet were not permitted. The community used to be rolling farms prior to development and the founders didn't want a bunch of tall fences ruining the vistas as you looked out across the backyards of your neighbors.
If you do have some zoning regulations that prohibit what you want to build, you may be able to get a zoning variance. However, most variances are only granted if you can prove a hardship. You have to have a solid hardship argument to overcome most members of the planning board.
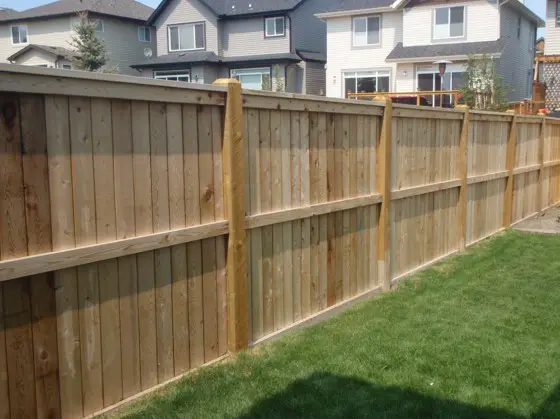
What magic holds the horizontal wood framing to the vertical fence posts? Photo credit: Dorothy Grissom
Let's assume you can build the privacy fence you want. Privacy fences do more than stop peering eyes, the solid nature of these fences makes them great windbreaks. With the westerly winds that howl across Lake Michigan aimed at your fence, you need to be aware that a poorly constructed fence can be blown over.
If you plan to build a 6-foot-tall fence, then I'd sink the fence posts into the ground no less than 30 inches. The fence posts themselves should be at least 4 x 4-inch timbers. It might be a better idea to upgrade to 4 x 6 posts. These could also provide a very nice aesthetic look at the same time.
If it were me, I'd not use any metal framing connectors as I just don't like the look of them. They're fine for the underside of decks that you can't see or inside homes that get covered with drywall, but for a fence that becomes a focal point, I'd just not use them.
I've had great success with using long hot-dipped galvanized spikes that are 3.5 inches long. These are toenailed through the ends of horizontal 2 x 4 framing supports that span between the vertical fence posts. The key to success here is to predrill the holes through the horizontal members to avoid any splitting of the wood.
I start the holes about 1 and 1/2-inch up from the ends of the framing members and angle the drill bit so the hole exits at the middle of the end of the 2 x 4. I put in two spikes on each side of each end for a total of eight spikes per horizontal member. The spikes penetrate into the vertical posts about 2 inches forming an X inside the posts which is incredibly strong.
Many rookie fence builders wonder about setting the posts in concrete. I don't feel it's a great idea, especially if you ever have to replace a fence post. I discovered long ago that crushed angular gravel does as good a job as concrete. You'll also discover that you probably don't need to use anything but compacted soil to hold the posts in place. That's worked well for me for years on many fences.
The advantage to not using concrete or gravel is if a fence post starts to lean in the future, all you have to do to straighten it is to dig out the soil on the side of the post where it's leaning away from. You then tilt the fence post back up so it's plumb and put the soil back on the other side of the post.
If your ground is hilly have the fence follow the contour of the ground. Don't try to make it look like staggered steps marching across your lot. Go look at photographs of fences you see out in the range or on large farms to see what I mean. The top of the fence is always parallel with the surface of the ground.
Be sure that any fence posts that are to be buried in the ground are treated for burial and/or are a lumber species that is very rot resistant. My father-in-law taught me years ago that farmers in Ohio loved to use locust for fence posts as it seemed to hold up very well to wood rod and insect infestation.
Use double dipped hot-dipped galvanized nails for all fasteners. These nails have a thick coating of zinc on the steel so that rust won't stain the wood. If you're using cedar as the fencing, you may want to invest in stainless-steel nails to hold the cedar in place to prevent staining that might happen from a coated steel fastener that reacts with the cedar.
Column 1071
Tim built custom homes and did ultra-custom remodeling for 20+ years before launching his Ask the Builder media presence. He was selected as one of the Big 50 by Remodeling magazine in 1993. This award gave birth to Ask the Builder in October 1993. Tim also operates https://DrawPlumbingPlans.com. His @askthebuilder YouTube channel was the first home improvement channel on YouTube.
I liked what you had to say about building a privacy fence. I've always thought that their primary function is to provide privacy to homeowners. It didn't occur to me that they can also work as great windbreakers until I read your post. I live in a very windy area, so I could use some kind of windbreaker on my property. Thanks for the information!
Your fence is really beautiful. I really like the mid level cross beam. Does that add a whole lot more support for the vertical planks? The fact that your planks are inside of a top and bottom frame makes the fence seem a lot more sturdy.
http://www.sweetmanstimber.com/fencing-timber-cessnock
Thanks for starting this off with zoning regulations. It's a good thing for anyone to check before traipsing off to do some fence work. If you're friendly with the neighbors, I would also ask them about it to see how it would affect them.
That is really good advice about finding out what the city limits are on how high you can build your privacy fence. Privacy fences are becoming really popular and people want them as tall as possible. My neighbor just put up a fence and I really didn't like the style of it, so I put up my own fence right next to his. Would it look weird if my fence was taller than my neighbors?
Wrong you need concrete if you dont your fence will tilt I have been putting up fence for 40 yrs and if you go cheap you end up cheap , if you spend that kind of money and dont use concrete you just wasted your time BOTTOM LINE
Art,
Well, I guess I wasted my time for forty years not using it. But wait! All the fences I installed using crushed rock and just soil have never tilted or fallen over. How do you explain that? Farmers and ranchers don't set all their fence posts in concrete.
hey, Thanks for sharing a good information! I have a question what about the wooden which i should use the best to build a fence and it will be not expensive?
Thanks for answer.