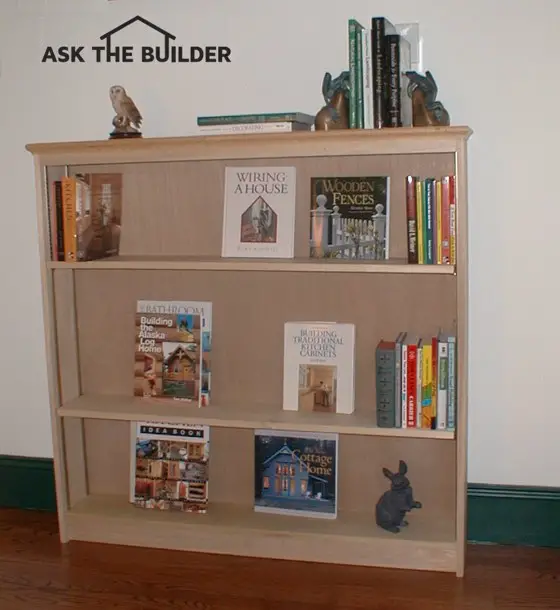
How to Build a Simple Bookcase
Many people still like the feel of a real book or magazine in their hands instead of a tablet that lets you read and view digital content. What's more, you may have a collection of books, trinkets or small gear you'd like to display in a simple bookcase.
You might shy away from a project like this because you feel it's too complex. It's really not if you can measure accurately and if you have a few handy power tools that allow you to cut finish lumber nice and straight.
Degree of Difficulty: 
Step One: Gather the following supplies and tools:
- three 1 x 8 x 8-foot pieces of sanded poplar
- one 1 x 4 x 4-foot piece of sanded poplar
- one 1 x 2 x 4-foot piece of sanded poplar
- one piece of 3/4-inch tall decorative bead molding 8 feet long
- one piece of 1/4-inch luan plywood 4 foot by 4 foot
- four 4-foot metal adjustable shelf standards with clips
- carpenter's glue
- twenty 8d finish nails
- ten 6d finish nails
- small box of brass round head nails 1-inch long
- ten-inch sliding miter saw
- power drill with a 5/64-inch bit
- hammer
- fine nail sets
- measuring tape
- two adjustable clamps
Step Two: It's time to cut the nice pieces of poplar. If there's ever a time to measure twice or thrice and cut once, this is it. You also want to pay attention and cut on the correct side of your pencil mark.
Step Three: From each of the 8-foot pieces of 1 x 8 poplar cut one piece of wood that's exactly 48 and 1/2-inches long. Be sure both ends are square. The miter box saw set at 90 degrees does a great job of this. Two of these pieces will be the sides of the bookcase and the other will be the top.
Step Four: From the outfall pieces of 1 x 8 cut these three pieces: one at 47 inches and two pieces at 46 and 1/4 inches. The 47-inch piece is your fixed bottom shelf and the two other pieces will be the adjustable shelves supported by metal clips that fit into the metal shelf standards.
Step Five: Cut the poplar 1 x 2 and 1 x 4 each at 47 inches. Make sure the piece of plywood is exactly 48 x 48 inches.
Step Six: Take the three pieces of poplar that are 48 and 1/2-inches long and nail them together. The top piece should lay on top of the two side pieces of the bookcase. Use the power drill and bit to drill pilot holes in the top only for the 8d finish nails. The nails should be driven so they're centered in the sides. Drill the pilot holes straight so the nails do not pop out of the side piece of the bookcase. Apply glue to the top edge of each side piece before you set the top down for nailing. The sides of the bookcase should be flush with each end of the top piece.
Step Seven: Nail the 1 x 2 in place directly under the top front edge of the bookcase. Use the 8d nails, some glue along the edges and drill pilot holes. The face of the 1 x 2 should be flush with the outer edges of the top and sides of the bookcase. Use the clamps to hold this piece in place as it's nailed and glued.
Step Eight: Nail the 1 x 4 between the sides of the bookcase at the bottom. Recess the 1 x 4 so it's inset from the front edges of the sides by 3/4 of an inch. This makes for a nice touch visually. Install the fixed bottom shelf that's 47 inches long on top of the 1 x 4 and glue and nail this into place.
Step Nine: Place the partially assembled bookcase on the floor with the front facing down. Put a small bead of glue around the perimeter of the bookcase and lay the plywood on the bookcase frame.
There should be a 1/4 inch reveal all the way around the poplar material. Nail the plywood to the poplar with the small round-head nails spaced about six inches apart. Be sure the reveal is the same around the entire bookcase as the plywood will keep the bookcase square and offer great stability. Cut and miter the corners the decorative molding to fit around the top frond edge and the sides only of the bookcase. Use glue and the small 6d finish nails.
Summary: Paint or stain and finish the bookcase at this time. Once you're satisfied with the look, then carefully cut and install the metal shelf standards two to a side. Hold them in one inch from the front face of the bookcase and one inch from the plywood back. You're finished and you should have a nice sturdy bookcase!
Column HT040
Tim built custom homes and did ultra-custom remodeling for 20+ years before launching his Ask the Builder media presence. He was selected as one of the Big 50 by Remodeling magazine in 1993. This award gave birth to Ask the Builder in October 1993. Tim also operates https://DrawPlumbingPlans.com. His @askthebuilder YouTube channel was the first home improvement channel on YouTube.