How To Polish Marble
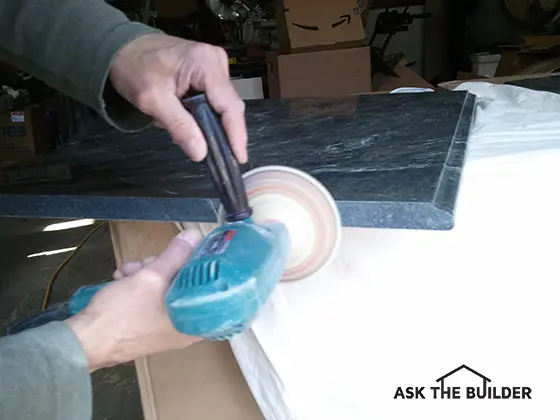
A drill, or orbital polishing tool, outfitted with a flexible pad equipped with special silicone-carbide sandpaper allows you to dry polish marble. © 2017 Tim Carter
How To Polish Marble TIPS
- Dry or wet method works
- Orbital polishing tool is best
- Simple drill will work
- Many grits of sandpaper required
- CLICK HERE to Get Tim's FREE & FUNNY Newsletter!
DEAR TIM: I need to discover how to polish marble. In my house, there is some marble flooring that has seen better days. The scratches aren’t too deep, but they look bad.
I also had to cut a piece of marble and now have an ugly dull stone edge that needs to look like the high-gloss polished finish on the top. What’s the secret? Do I need all sorts of expensive equipment? Do I need to use water? Paul H., Santa Barbara, CA
DEAR PAUL: You’re in luck. The great news is that you’ll be able to get very nearly professional results in short order.
It may take a little practice, but I think you’re going to be amazed at how easy it is to take a dull stone edge and transform it to a highly polished surface that broadcasts the natural beauty of the stone.
No Expensive Tools
Guess what? You don’t need thousands of dollars of expensive equipment to polish marble. It’s quite possible that you have a simple tool in your garage or workshop that will allow you to achieve very good results.
At the bare minimum, you need a regular drill that has a variable-speed motor. All you need is a pad that fits into the drill chuck and the sanding discs attach to the pad. Here's a very inexpensive one that will work.

There are many different sanding disc kits out there like this. You can shop around at Amazon to see which one is best for you. CLICK THE IMAGE TO ORDER THIS ONE OR SEE OTHERS.
If you have access to an orbital stone polisher, that’s all the better.
CLICK HERE to get FREE & FAST BIDS from local marble pros who can polish your marble.
Dry or Wet
Understand there are at least two ways to polish marble and other stones. You can use the dry method or the wet method. It’s hard to believe, but dry polishing works very well.
Dry = Dust
This method creates a fine dust, so you need to work in a place where dust won’t ruin things. When dry polishing, you need to wear both eye and breathing protection.
It’s not a good idea to ingest stone dust into your lungs, especially stone dust that contains silica.
Silicone-Carbide Paper
Using special silicone-carbide sandpaper that’s made for stone polishing, you can cut away successive ultra-fine layers of the stone until you have a high-gloss finish.
Sandpaper can be purchased that attaches with adhesive or hook and loop technology to a flexible round sanding pad. These pads attach to a regular drill or to a special mounting base that connects to a stone grinder.
At Least Five Grits
The polishing process starts with a coarse-grit sandpaper that has a low number like 24 or maybe 60 grit. As the grit number gets larger, the size of the silicone-carbide particles gets smaller and smaller.
Grit sizes march through the double digits, triple digits and beyond. I guarantee you that you’ll be using 120 grit, 220, 400, 500, 600 and over 1,000 grit.
Coarse First
The process starts by using a coarse-grit paper and cutting away a fine layer of the stone to remove the scratches or saw-blade marks. It’s mission critical that you cut away any and all grooves leaving a surface that may be rough, but all in the same plane.
If you leave small grooves, tinier than the thickness of a piece of hair, you’ll see these as you start to achieve a high polish.
High Gloss Cons
The high-gloss finish works to your disadvantage as you polish. The higher the gloss, the more light reflects off at a different angle from imperfections. This is why you now see the scratches in your marble floor as light that hits the scratches bounces away from you at a different angle than the light that reflects off the polished areas that are free of scratches.
CLICK HERE to get FREE & FAST BIDS from local marble pros who can polish your marble.
Orbital Sander Best
When you use the tools, you need to keep them moving. By that I mean that the drill or grinder will be spinning as it’s on, but don’t keep it stationary in one spot. This is why an orbital sander is the best tool. The sandpaper automagically moves around as it should with just simple back-and-forth motions.

This is a superb orbital sander / polisher. You can get the needed pads that hold onto the sandpaper. CLICK THE IMAGE NOW TO BUY THIS TOOL.
If you can't afford an orbital sander and must use a drill with a sanding disc, you need to slide it constantly across the surface of the stone so the sandpaper doesn’t cut a circular groove into the stone. Moderate pressure is all you need. Let the sandpaper do the work for you.
More Grits = Better Job
It’s best to use many different grits of sandpaper as you start to achieve the polish. You may start with 24 grit, then use 60, 120, 220, 320, 400, 500, 600 and then 1,000. If you skip a grit, you may end up with tiny scratch lines that show through the polish.
You can also use dry diamond polishing pads in the same manner. They also come in different grits with some grits that are as high as 3,000.
Polish A Scrap Piece
It’s best to test your skills on a scrap piece of marble first. Try to get a piece that matches your floor marble now so that you can see what it’s like.
Use some regular sand to scratch the scrap piece and then start to see if you can polish these scratches out like a pro. Once you've achieved success with the scrap piece, advance to your floor and to the cut edge.
Wet Sanding
Wet polishing or sanding has some advantages as the water helps keep dust down and it reduces the friction of the abrasive materials allowing them to last longer.
But the downside to wet polishing is the water on the stone causes the color of the stone to naturally deepen tricking you into believing you’ve achieved success. You may feel you have a gorgeous polished surface as you’re working because the color of the edge or surface matches that of the polished top.
Practice Makes Perfect
But when the stone dries, which can take a while depending upon the porosity of the stone, a dull or scratched surface shows up. It takes quite a bit of practice to achieve professional results using wet-polishing methods and tools.
CLICK HERE to get FREE & FAST BIDS from local marble pros who can polish your marble.
Column 879
Tim built custom homes and did ultra-custom remodeling for 20+ years before launching his Ask the Builder media presence. He was selected as one of the Big 50 by Remodeling magazine in 1993. This award gave birth to Ask the Builder in October 1993. Tim also operates https://DrawPlumbingPlans.com. His @askthebuilder YouTube channel was the first home improvement channel on YouTube.
Just what I was looking for. Thank you.
Debra, you should consider investing in a 15-Minute Consult with me. Look at my cart for that. Lot's to discuss. I just do short pithy answers here.
Can this be done effectively with a palm sander and silicon carbide sheets? I want to do edges on a sink cutout and plain counter edge. It doesn't have to be fast.
It's just that I have a palm sander, and don't have the pads and attachments to use my variable speed corded drill as a sander. (and I'm afraid I'd mess it up using something so powerful and harder to handle for sanding).
Thanks, good site.
John
Just get the right sandpaper. Easy
Glad to find this post. I have a marble dinning table (38" * 76") with a transparent polyester coating. The coating is cracked, so I sanded it off. Now the natural stone is exposed, and I need to polish it.
My problem is that I can not find sanding papers for stone anywhere in Ottawa. Can I instead use those for polishing cars?
Given the area the I am going to polish, how long does it usually take?
Thanks for any information.
I have no idea of your skills or tools. Thus it's impossible to answer you.
Having trouble finding drill attachment online. Which one(s) do you recommend?
I want to try this on a marble table that has a really bad rough spot on it (you can feel the coarse stone). However, the rest of the table is very smooth. Would I do the above steps on just the coarse spot, or would I have to do the entire table? Thanks!
Thanks for this. Has taken a considerable time to find a comprehensive and sound explanation. I am making tables using some marble that has a few blemishes (to keep costs down) and need to be able to finish them. Much appreciated. Tony, Bath UK
Hi and thanks for the great article. Quick question. I have a round marble sink I'd like to polish. Can this be done by hand with squares of the Silicon Carbide sandpaper? Would I make circular motions or use some other technique? Any help would be appreciated.
Can the same techniques be used on limestone? I don't want a shine. I just want to get rid of the etched marks, make the surface more uniform before sealing. I like the idea of working wet, but what type of sandpaper will work with water?
when I go to 800 and 1500 grid discs, I get brown stains on edges. no problem with 50 and 200 grids.
what am I doing wrong?
Excellent article. Thank You. What speed should I polish at and is a variable speed orbital polisher a good idea? I have a low end crema marafil marble floor with some tiles with imperfections. I have some acid etching on a couple cause by using the wrong cleaner or spillage. The etching on a couple were let to a couple of small sixteenth inch divots that I put a couple of drops of nail polish in to file in with. The small orbital polisher sounds like a great idea and with it I can probably reduce the lippage a bit in other areas.
Medium speed is fine.
I want to polish an Italian Marble Top Coffee Table that was my mom's.
It is a premium thick cut of marble. Years of kids and grandkids has left it with various spots and circles etched by Pickle Juice (vinegar) probably. I believe your article has answered most of my Questions, just 1 left.
1. Dry Sanding ok
2. any basic orbital sander is fine.
3. (I'm going to order a series of step down to fine sanding pads, Diamond Pads for Marble)
I just have 1 Q:
What type of final Polishing Pad should I get? (Seems like I recall someone using a leather/suede pad)
What do you recommend?
Appreciate your article so much.
I found it via Google Search.
Thanks,
Beth
Tennessee, USA