How to Repair a Chimney
Quick Column Summary:
- Chimney repair for the ages
- Protect your chimney with a crown
- Chimney liners
- Prevent cracks with wire mesh
DEAR TIM: My chimney is constructed with concrete block and has a thin stucco coating. I know the top of the chimney is not right and some of the blocks are falling apart. There are also tiny hairline cracks all over the chimney that don’t seem to be serious. What would you do if this were your chimney and you wanted to make repairs that would last decades? What’s the most important thing to tackle now if I don’t have enough money to repair the entire chimney? John L., Newton, NJ
DEAR JOHN: Your photo is excellent and allows me to give you some solid advice long distance. I can clearly see the deteriorating concrete block at the top of the chimney and know exactly why the damage is happening. The good news is you’ll be able to restore this chimney and extend it’s service life for decades.
Let’s start the discussion with an overview of chimneys and why those built by some masons are doomed from the start. It’s important to think of a chimney as it’s own house or a structure in and of itself.
Water is very destructive to most building products, even strong masonry or solid rock. If you add freezing temperatures to the mix, the damage caused by water happens much faster. You live where winter temperatures do drop below 32 F, so it’s mission critical for your chimney to shed water.
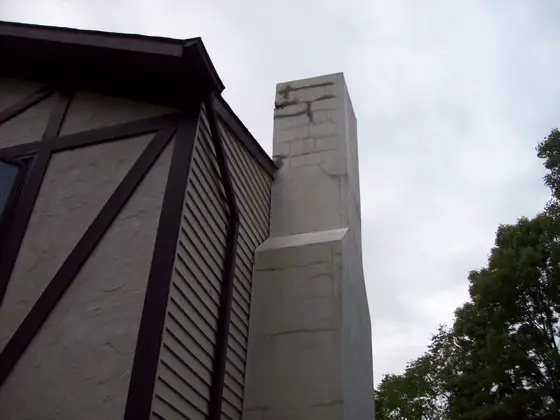
This chimney has some cosmetic cracking and an inferior crown. It can be repaired properly and will last for decades if done right. Photo Credit: John Loughran
Can you imagine how silly it would be to build a house and not have a roof on it? Everything inside the house would get ruined in a hurry. Chimneys are no different. They need roofs on top of them to keep water from soaking into the inside of the masonry. If you only have so much money to spend, put a proper roof on the chimney then save up to do the other repairs.
The roof of a chimney is called a crown. Chimney crowns can be made from solid slabs of stone, they can be poured concrete in place and they can even be metal. No matter what it’s made from, the chimney crown’s sole purpose is to shed water to the outside of the chimney where it can drop down to a lower roof or the ground.
Great chimney crowns have a slope to them so the water does not pond on top of the crown. The best crowns have an overhang and a drip kerf cut into the overhanging edge so all water that falls on top of the crown drips away from the side walls of the chimney.
Most masons don’t know how to construct a proper chimney crown and they rarely place a metal flashing pan under the crown. The metal flashing pan captures and diverts any water that gets past the crown. You never want any water to get into the core of your chimney. Never forget that.
You or the mason you hire needs to tear apart the top of your chimney and remove any rotten or broken block. Once you’re down to solid masonry, start to rebuild. Be aware the chimney liners may have to be extended a little higher to accommodate the new thick crown.
Keep in mind the crown should not touch the clay flue liners. A half-inch gap needs to be maintained between the crown and the liners and this gap needs to be caulked with a special urethane caulk meant for masonry control joints. This product will NOT be found at a home center. You find this special caulk at businesses that sell specialty concrete products to masons.
Be sure the new crown overhangs the sides of the chimney at least 3 inches on all sides. This may seem like a huge overhang, but from the ground it will look perfect. A quarter-inch wide by half-inch deep drip kerf needs to be located about one inch in from the outer edge of the crown on the underside of the crown.
If the crown is made from poured concrete, be sure that reinforcing steel is placed in the concrete both directions. This steel will hold the crown together. Do NOT use plain bricklayers mortar for the crown. I must be concrete or a giant slab of stone that has a pre-built slope to it.
Once the crown is complete, I would attach galvanized wire lath to the existing block and restucco over what you have. You have a rare opportunity to change the entire look of your chimney at this point by covering it with artificial stone. If you decide to do this, keep in mind the stone is much thicker than the stucco and you’ll have to make sure you get the proper 3-inch crown overhang past the outer surface of the artificial stone.
Do not allow masons to talk you into adding stucco on top of the existing stucco. The hairline cracks you see now will telegraph through the new stucco and your chimney will look horrible in no time.
The wire mesh, when attached with the proper fasteners into the solid concrete block, will prevent the existing cracks from coming through the new stucco.
All of this work should be done, if possible, when the outside temperatures range from 40 - 70 F. The best conditions to do all this work are overcast days with no wind. Sunny, hot and windy weather is the worst weather to perform masonry repairs because the water in the mortar, poured concrete and stucco leaves the materials too fast.
Column 1057
 |
 |
The above product links are affiliate links. I get a tiny commission if you purchase these from Amazon.
Tim built custom homes and did ultra-custom remodeling for 20+ years before launching his Ask the Builder media presence. He was selected as one of the Big 50 by Remodeling magazine in 1993. This award gave birth to Ask the Builder in October 1993. Tim also operates https://DrawPlumbingPlans.com. His @askthebuilder YouTube channel was the first home improvement channel on YouTube.
I always heard that the clay liner is a "chimney inside a chimney" and is not cemented to the rest of the chimney except at the bottom. The reason is the heat from the furnace warming the liner will expand the liner which will/should ride freely up and down the chimney, If it is all cemented together, the lining will crack and break loose .
Is this true?
That is not entirely true. The 2015 ICC Mechanical Code is quite clear. Look at 801.18.2 It states, ".... chimney INNER WALL shall be continuous and free of gaps, cracks, and perforations...." Clay liners are subject to thermal cracking because of heat shock so solid fill around the liner will help prevent the spread of fire. The gap you describe creates a chimney within a chimney. Think about that for a while and what the secondary deleterious effects are by creating this gap. A good chimney has solid fill around the liner with no airspace. Now that doesn't mean solid concrete or mortar. It can be a mix of small rubble and some mortar here and there. The point is to have solid masonry around the liner to prevent fires.
Hey Edward, you are correct according to the code book and NFPA 211 The code specifically states that there needs to be a 1" gap between the liner and the rest of the chimney and that it needs to be either air or insulation. The result you state is true, the liner does crack. I have been a certified chimney tech for many years and have trained with the industries best across the united states.
I need chimney work and foundation repairs
Do you have anyone in New Jersey that can come to look and give estimate?