June 19, 2016 AsktheBuilder Newsletter
Summer is in full swing here in New Hampshire. Today the temperature is going to kiss up against 90 F. Fortunately, the humidity is not too bad with the dew points in the mid 50's.
I've been crazy busy here as this week I just started to build a deck that should have been put on my home 15 years ago.
What I'm doing is adding a deck that's 24 feet wide and projects out from my existing deck 16 feet.
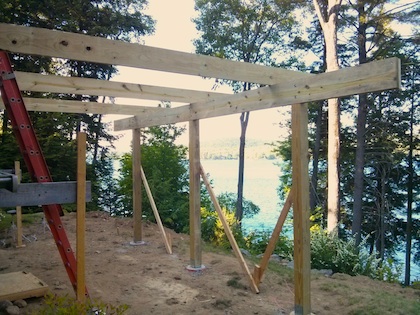
The picture above shows how far I got in just the past four days. The deck will eventually be as wide as the long beam that's mortised into the top of the wood 6 x 6s.
The three joists you see are there to stabilize the beam so it doesn't fall over in the wind.
On Wednesday, I was getting dirty. Look below at the photo of me down in a hole getting one of the Form Footer pier forms set exactly where it needs to be.
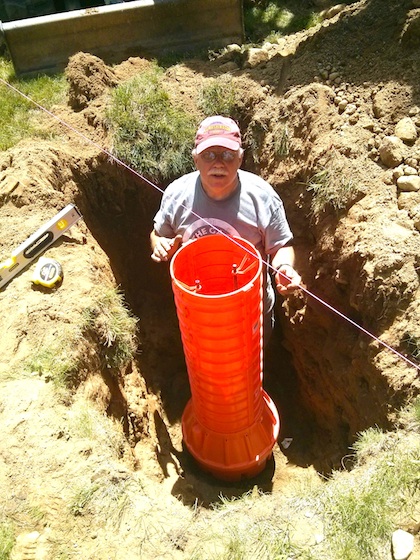
I saw this invention for pouring piers a few years back at one of the shows I attended. It's simply ingenious.
Using this form, which requires NO TOOLS to assemble, you're ready to pour concrete in just minutes after it's set in the hole.
One of the best qualities of this form is it comes with the reinforcing steel already cut to length and bent! But wait, there's more!
The inside of the form has slots and rings that put the steel exactly where it needs to be to provide the most strength. You don't have to try to figure out HOW to suspend the steel so it's surrounded by concrete.
The way I install these forms is to get them exactly where I want them in the hole and then I carefully backfill around them so the dirt supports the form side to side. With the dirt filled all the way to the top of the grade, you can the tip a wheelbarrow right over the top and fill it up with fresh concrete.
CLICK HERE to see a video I taped several years ago when I used the same forms to build my 16 x 24 shed. Boy, I seem to like rectangles that size!
Thursday, I poured the concrete and set the anchor bolts. Friday, I mortised in the ledger board for the new deck into the wood support posts of my existing deck. Yesterday my son helped me put up the three 6 x 6 posts, the beam and the three joists you see in the photo above.
You need to have the new ledger board in place, in my opinion, before you go about calculating the height of the new deck posts and beam.
With the ledger board in place you then simply calculate the distance from the bottom of the ledger board to the top of each pier.
When you add those two dimensions together you get the exact height each 6 x 6 post should be.
The top of the support 6 x 6s is where the top of the new beam will be. If you want the deck level, then the top of the beam needs to be at the same elevation in space as the bottom of the ledger board. Keep in mind the deck joists are supported by the ledger board using metal joist hangers.
I'm using all top-of-the-line Simpson Strong-Tie joist hangers, hot dipped Simpson Strong-Tie nails and structural screws to assemble all the deck components.
This week I'll be retrofitting my deck so it's connected properly to my house. The IDIOT BUILDER - NOT ME - who build my house just nailed my deck ledger board to the house.
Fortunately, Simpson Strong-Tie has come up with ingenious structural screws and a special bracket to connect my existing deck to the house so it doesn't pull away or fail under a massive snow load. I'm strengthening it so it meets the 100 pounds per square foot standard.
I'll be taping a few videos for sure about the ingenious Simpson retrofit screws and brackets. If your deck is lag bolted to your house, you need to do what I'm doing.
Why?
Because you have NO CLUE if the lag bolts were overtightened, if they're the right size and if they even bolt into the RIGHT components of your home!
Stain Solver Sale
We just finished making another TEN TONS of Stain Solver. Watch for a sale announcement on Tuesday.
If you're a new subscriber, Kathy and I own Stain Solver. It's a Certified organic oxygen bleach that cleans just about anything water washable.
CLICK HERE to see a boatload of Before and After photos sent in by customers just like you.
FAIR WARNING: There is a true LIMITED SUPPLY of the bigger sizes. If you want the BEST PRICE per pound, then you want to invest in an 18 or 50-pound size.
Toilet Install SECRET
You may not be aware, but I've been a master plumber for about 35 years. I was licensed in Hamilton County and Cincinnati, OH for years and years.
Since there was no reciprocity between OH and NH, I lost my license when I moved. But they can't take away my knowledge, right?
Here's my question: Do you know the MOST IMPORTANT aspect of installing a toilet so there are no problems in the future?
Lets' see if you do.... CLICK HERE to find out what it is.
That's enough for Fathers Day. BTW, happy belated Mothers Day to all you moms out there!!
I'll be back on Tuesday with your Stain Solver SALE promo code. I'll make it a funny one.
Tim Carter
Founder - www.AsktheBuilder.com
Do It Right, Not Over!
Tim built custom homes and did ultra-custom remodeling for 20+ years before launching his Ask the Builder media presence. He was selected as one of the Big 50 by Remodeling magazine in 1993. This award gave birth to Ask the Builder in October 1993. Tim also operates https://DrawPlumbingPlans.com. His @askthebuilder YouTube channel was the first home improvement channel on YouTube.