LVP Flooring Installation Story
LVP Flooring Installation | This is luxury vinyl plank flooring being installed in my own home. It’s very DIY friendly so long as you can read and follow instructions. Copyright 2023 Tim Carter
LVP Flooring Installation - It's a Remarkable DIY Product
Author's WARNING: Read Judy's email to me below about where NOT to install LVP flooring.
Several months ago a pesky mouse caused a small water leak in a PEX water line that supplied water to a second-floor bathroom in my home. A new hump in our master bedroom hardwood floor foreshadowed what I’d discover hours later at dawn.
By then, the water had leaked to a basement bedroom as well. The water ruined the hardwood floor in the first-floor master bedroom and warped a plywood-based tongue and groove floor in the basement my lovely wife uses as a plant conservatory. Suffice it to say both floors had to be replaced.
My wife asked if there was a waterproof floor that looked like real wood that could be used in the basement room. She didn’t want to worry about spilling water as she watered the countless orchids she grows in the room. I told her that we should give luxury vinyl plank (LVP) a serious look. Technology has advanced to such a degree as the average person can’t tell the difference between real wood and high-quality LVP that mimics wood.
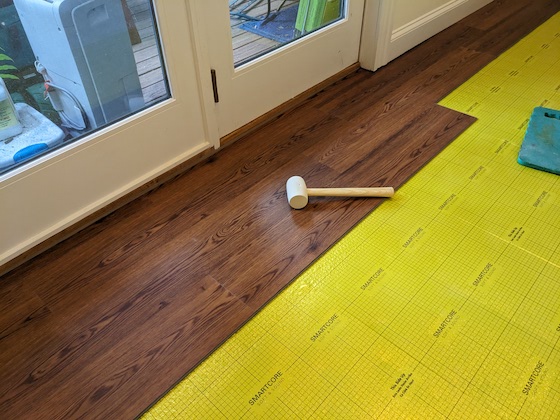
This is the LVP I installed. It was called Honeycomb Oak. The average person would never know it's NOT real wood. Copyright 2023 Tim Carter
Vinyl flooring is now approaching its 100th anniversary. I clearly remember helping my Dad install 12-inch squares of vinyl tile in what used to be the garage of my childhood home in 1961. The 1960s time period was the first golden age of vinyl tile as countless millions of square feet of vinyl composition tile (VCT) were installed in houses and businesses all across the world. I believe we’ve entered the second golden period of vinyl flooring with the dazzling LVP flooring choices.
If you start to research LVP, you’ll quickly discover it’s nothing like the VCT tiles of old. Those tiles were solid in color all the way through the product. Modern LVP is more like a layer cake. There are several layers of materials that create the actual plank or tile.
The product my bride and I decided on was a high-quality one that has a 20-mil-thick wear layer. It’s a medium-brown color that is extremely close to the red oak hardwood floors we had in the last home I built for my family.
The wear layer is the thin top surface you walk on. It’s not uncommon for them to range anywhere from 6 to 40 mils. Thicker wear layers are better. As with anything, you can keep the LVP looking like new by keeping it clean and free from grit.
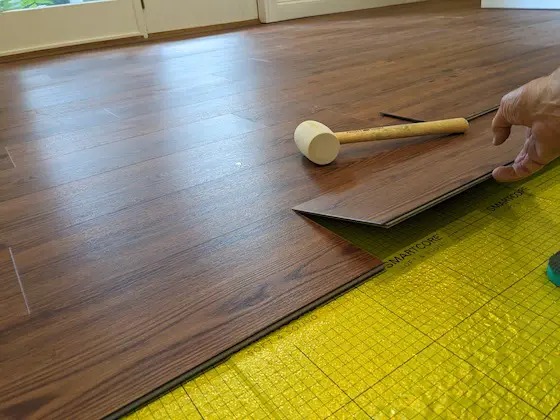
Installing LVP flooring is extremely simple. The one I chose is a floating floor. This means there’s no glue or adhesive required. The planks just lay on the floor and their combined weight and the fact they all interlock prevent them from moving when walked on.
To have a successful long-term installation it’s imperative you read the installation instructions for the LVP you choose to use. I beg you to do this even if you hire a professional to do the job. You want to interview the pro before you sign a contract making sure he will do everything right.
There are several things that must be done when installing LVP. The surface the LVP will lay on needs to be flat. Flat doesn’t mean level. Flat means that the surface is all in the same plane. You can’t have shallow areas or humps. These defects can make it impossible for the pieces to interlock. Hollow spots under the LVP can cause the tongues or grooves to break over time from flexing as you walk on the floor.
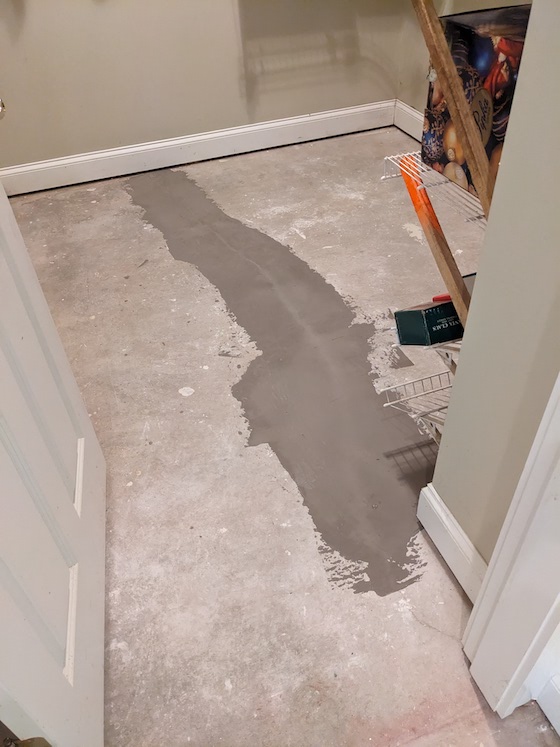
The dark gray area is a cement-based floor leveling compound spread on either side of a crack in the concrete slab. Copyright 2023 Tim Carter ALL RIGHTS RESERVED
You can easily mix and spread floor-leveling compounds to make a floor flat. I used a cement-based product to cure several trouble spots. The product, once mixed with water, resembles cake icing. It’s easy to spread to a feather edge using a drywall broadknife tool.
LVP has a huge expansion/contraction coefficient. This means in gets bigger as it gets warm or hot. As such, you must create a gap around all the edges. Your instructions will tell you how much depending on the size of the room. Do NOT skip this step. If you fail to install the gap, the LVP flooring will buckle when it gets hot.
Your instructions may call for an underlayment. If so, install it. Be sure the subfloor is free of all debris. Vacuum the existing surface to ensure there’s no grit or chips under the new underlayment.
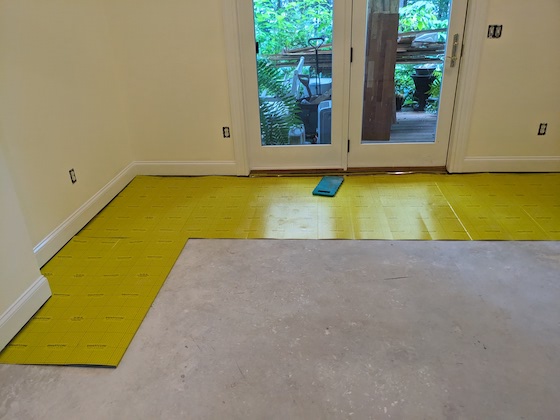
This is the fan-fold foam underlayment I installed. The yellow coating is a vapor barrier. Copyright 2023 Tim Carter
With no experience whatsoever installing LVP, I was able to install the planks in the room and a closet in less than six hours with no help. Simple cuts were made with a sharp razor knife.You score the LVP several times just like drywall. and then snap it. I used a simple rubber mallet to pound the side joints so they interlocked.
My wife was astounded at how the new floor looks like real wood. I’m also impressed. Be sure to look at all the different brands to find the most realistic LVP should you want to fool your friends and neighbors!
Here's an email I received from Judy in Redmond, Washington:
"I installed LVP in my laundry room per directions with the gap all along the walls. I regret it now since my front loader washing machine gyrated opening a gap of nearly 1/4". Aren't these things (LVP) basically plastic and the instructions recycled from floating wood floors? The subfloor is a concrete basement slab."
I replied that vibrating washing machines can absolutely cause LVP panels to UNLOCK. You'd do well to NOT install LVP in your laundry room.
Column 1516
Tim built custom homes and did ultra-custom remodeling for 20+ years before launching his Ask the Builder media presence. He was selected as one of the Big 50 by Remodeling magazine in 1993. This award gave birth to Ask the Builder in October 1993. Tim also operates https://DrawPlumbingPlans.com. His @askthebuilder YouTube channel was the first home improvement channel on YouTube.
Howdy Tim! The wife and I agree with you 100% as to the LVP recommendation-well,and everything else you have written. We wanted real wood floors for the entire downstairs areas,but the sticker price was quite a shock.We opted for the Armstrong Adura Max and couldn't be happier with the end result! It looks amazing,it's very durable,easy to clean and comfortable,as well. Thanx for your outstanding work!
Congrats on your beautiful LVP floor! We just used contractors to cover our horrible original 19 year old linoleum with luxury vinyl tile (commercial grade) in our kitchen/laundry area, and we love it! Although it’s a simple project to someone like you, I’m glad we didn’t attempt it ourselves. 🙂
I cannot tell the difference, it looks like real wood to me. Enjoy the new floor.
When my husband started to become very "clumsy" due to his progressive dementia (spilling food and knocking over glasses of liquids), I replaced carpeting on our upper level with LPV. Boy, was I glad I made this decision. It made life so much easier in caring for him (and my house). Also, it made it easier for him to move around with his walker and, later, his wheel chair. Too bad I didn't know about LPV when I had to replace the carpet in our basement level when toilets and the washing machine backed up shortly after we moved into our split-foyer home in 2007. I would have chosen it in a heartbeat.
The floor looks amazing. I enjoy and appreciate your columns and videos. I think of you often and hope you are doing well.
Great job, Tim!
Thanks for your information regarding this product. I have been considering LVP to replace laminate flooring damaged by ill, senior dogs. Sheet vinyl would be the most functional replacement but I just don't want to use it.
I didn't read the write up since I've looked at these products many times and have seen different "finishing" techniques. Regardless of the "finish" (the layers and thickness of various materials), my concern is the longevity of the "finish". If I keep my home for another 40 years, what will the high traffic areas look like in 5, 10 20 years?
I had LVP installed in a cabin. It looks great and hides the dirt well. In a rustic cabin feet are constantly tracking in mud, etc..
We changed our mind about using it in the bathroom after reading a comment on the mfg. web site that it warped when it got wet.nded "wateproor" but how true is that?
It seems unwise to use anything with a wood backing in an area likely to see standing water: near toilets and showers, washing machines, even dishwashers (should they fail).
Can you weigh in on that?