Your Disaster Plan

Disaster Plan

This column is a departure from my normal question and answer format. You can thank the editor of a large East Coast newspaper for the inspiration. She asked me to write a special column about preparing for storms, but she resisted doing a survey of her readers to see what information would best help them.
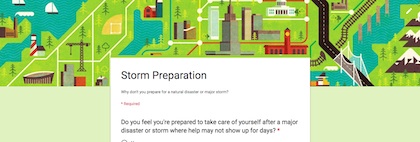
Well, I’ll just do the survey myself. I’ll ask the100,000 subscribers to my free AsktheBuilder.com newsletter to take the survey,” I said to myself a little over 48 hours ago. The results are still pouring in, but so far they’re shocking.

Just over 50 percent of the 1,050 responses said they’re not prepared to take care of themselves for a few days in the event of a major disaster. This is sobering as my survey is a statistically relevant sampling of the homeowner population all across the USA.

When asked why they’re not prepared, 29.8 percent said they don’t know how to do it. That was just below the 32.2 percent who chose “Other” and wrote in a specific reason for not being ready.

Disaster Plan

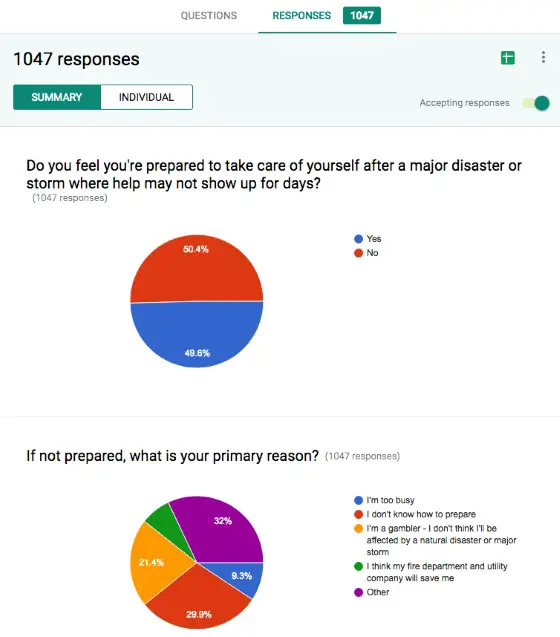
These survey results are not good. Over half the people admit to NOT being prepared. Image credit: Google Inc. (C) 2016

Fast Facts

A big disaster is going to strike where you live. It could be a hurricane, a huge flood, an epic blizzard or a terrorist attack. I don’t know when it will happen. It could be brutally cold or blazing hot when it happens. Think about how many days a year at your home that it’s comfortable to camp in your front yard.

Stop thinking now that the local fire department and police are going to help you in a major disaster. Most people don’t realize they’ll be busy working to get help to larger community assets like hospitals, retirement homes, and any other business that supplies basic needs to the community as a whole. You and your home are at the bottom of their priority list.

Think about how many fire trucks are in your city or town. Then think about how many people or houses are there. That should wake you up like a bucket of ice water to your face. The same is true for utility repair trucks and employees.

What to Do

I feel the best way to get ready to take care of yourself, and your possessions, is to think about going camping. What would you take with you if you were going to do a primitive camping trip where there are no utility hookups?

You’ll need plenty of water. You can get by for days without a shower, but you’d be surprised how much water you need to drink and might need for food preparation and clean up. Some can be stored in bathtubs, but you could need barrels of water to make things comfortable.

Food is easier. Canned foods and dried foods are easy to store. I have a large supply of five-gallon buckets that have gasketed screw-off gamma seal lids. These can be stacked easily and you’d be stunned how much rice, beans, and dried foods can be put into a five-gallon bucket.

Realize that in the event of a huge disaster, our food distribution network is based on just-in-time need. Local grocery stores don’t have enough food in them for all in the neighborhood in case everyone shows up at once.

You’ll probably need a camp stove and fuel to cook. You can buy inflatable solar camp LED light lanterns that will create some light at night. Maybe you’ll be able to have a fire, so do you have access to firewood? You might need a cord or two of dry, split wood. How will you start the fire?

What about shelter? Maybe your home will be habitable and maybe it won’t be. I’ve got a nice shed that could be used as a shelter. If that doesn’t work, I’ve got a small enclosed trailer that could keep me and my family out of the weather. It would be cramped, but we’d stay dry and out of the wind.

Have you thought about your important papers, documents and photos? Much of these can be scanned and put onto hard drives, thumb drives or stored on remote servers. You need to gather all your important papers and digitize them. Wills, insurance policies, treasured secret family recipes, any irreplaceable photos, letters or contracts must be preserved.

Get a small address book and record in writing all important names, phone numbers and email addresses. You have all this now on your computer or cell phone, but what happens if they get destroyed or you can’t power them up?

If you’re thinking of getting a portable generator, you really need to think about fuel. Larger generators can consume lots of gasoline. How can you safely store lots of gasoline? It’s not easy and it may not be legal to do in your city or town. Are you sure your local gas station can dispense gas in a disaster? No one may be there, the in-ground tanks could be empty or there could be no electricity to operate the pumps.

The bottom line is you need to follow the Boy Scout motto and just Be Prepared. There are hundreds of free checklists online for getting ready. Look at many and take from each one what works best in your situation. There’s no spandex list that works for all.

Above all, don’t forget to create a go or bug-out bag. This is a small day pack that has the absolute minimal things you need to survive for even a day or two. There are many go bag checklists online. Get one before you don’t have Internet access!

August 13, 2016 AsktheBuilder Newsletter

It's been a few weeks since I've reached out. There are a couple of reasons.

I discovered that during the summer months you, and other subscribers, tend to get busy. As such, interest in the newsletter wanes.

Because of this, I don't want great information to fall through the cracks. That's why I coast a little during the summer.

And then there's been my deck project. I have to tell you, I bit off just about as much as I can chew with this job! I've been on it now since the beginning of June and I still have weeks of work left.

I taped two videos for you last week and you'll see links to those below.

Here's a photo that should be of great interest to you. Do you have an idea of what's going on in this photo? Look closely.
TIm's deck under construction
What you're looking at is my upper original deck. It projects out from the house 10 feet and is 64 feet long. There's an identical-sized deck 13 feet below it. My house is a walkout on a steep hill.

Oh, it's important for you to know that I didn't build the house I'm living in. I would have NEVER EVER built a deck that's only 10 feet wide!!!!!

Look at the left side of the photo and you can see a glimpse of the new deck I built. It extends out 16 feet from the edge of the existing deck and it's 24-feet wide. It's also 3 feet lower than the upper deck.

But what is the weird shiny stuff covering the top of the joists in the photo?

CLICK HERE to enlighten yourself!!!

Are you Prepared?

It's a very long story, and quite disturbing if you ask me, but suffice it to say that you need to realize certain newspaper editors RESTRICT what you get to see in their papers. I don't know if it's a power trip or ?????

I was asked by an editor of a very large East Coast paper to write a special column about getting prepared for storms. The link to it is just below.

I suggested to the editor that she do a survey of her readers to prove the angle I was using in the story was valid. She refused to do the survey and insisted that I write the column with the slant she wanted.

I decided, "Heck, I'll do it. I'll survey you (my newsletter subscribers)."

The reason for the survey was to drive home the fact that in a major disaster, you'll be all on your own. Your local emergency services will not come to help. They don't have enough equipment or manpower to help everyone at the same time.

The survey is only two questions.

I have it setup so you can see the results as more and more people take the survey.

Be honest when you answer.

CLICK HERE to take the survey then I want you to READ the column I wrote.

CLICK HERE to read the column I wrote for the editor.

Two New Videos

I told you I've got two new videos for you. When you go to the links below, be sure to COMMENT at the bottom of the page if you like the product, have questions, etc.

Become part of the community and COMMENT.

I have to approve comments, so you won't see it appear right away. Be patient.

Here are the two new videos:

Trex Protect Joist Tape

Trex RainEscape

New Columns for You

If you're a new subscriber and want to see all the NEW CONTENT I load to my website, here are two great links for you.

I upload primarily to my Q & A page and my Tool Reviews. Feel free to bookmark those two pages and stop back to see what's there.

Treated Lumber ROTTING

Mulch Against Foundation

Forgotten Technology

I want to remind you of a GREAT DVD made by a brilliant man named Wally. He lives in rural Michigan.

Wally has figured out how ancient people lifted HEAVY HUGE stones with ease.

Wally also re-discovered how these stones were MOVED with ease from one spot to another.

CLICK HERE and ORDER Wally's DVD.

I GUARANTEE you this DVD will blow your mind.

I get NOTHING from this other than the joy of helping keep this technology alive.

That's enough for today. I need to get out and finish the Trex RainEscape system so I can put the Trex Transcend decking on my upper deck!

Tim Carter
Founder - www.AsktheBuilder.com

Do It Right, Not Over!

Major Storm Coming

I was a Boy Scout fifty years ago, and the motto hammered into my head still rings true: Be Prepared. Lessons I discovered in Boy Scouts stuck with me all these years and they’re relevant to you on Long Island as the storm season approaches.

September 21, 2016, marks the grim 77th anniversary of the Great New England Hurricane that made landfall near Bellport, NY. Only a few residents might be old enough to retain vivid memories of the true power Mother Nature can conjure up when she wants.

Here’s all you need to know. Another storm is coming. It could be bigger than the great Long Island Express. When? I can’t tell you.

But I can tell you what you can do to survive the aftermath and protect you and your loved ones and save many, if not all, of your possessions.

Fast Facts

There are many more people on Long Island than professionals who have the tools and training to help you after a major storm hits. What’s more, these professionals are charged with protecting and preserving larger community assets when a disaster strikes. Your home is at the bottom of their priority list.

The Cold Hard Truth

What does all this mean? It means you need to consider taking the Boy Scout motto to heart. You need to do all you can to be prepared to help yourself after a storm hits. Don’t think the fire department or utility company is going to race to your home to help you right away when millions are affected on Long Island from a major storm. It could take weeks or months in extreme situations before you’d ever see help.

The same is true for repair professionals. They will be overwhelmed with requests to do repairs or do a temporary patch to your roof or windows to keep weather out. Realize you’ll be on your own or on a huge waiting list.

What you Must Do

If a major storm strikes, there’s not much you can do ahead of time to make sure your home will come through with little damage. Caulking cracks that might allow wind-driven rain to enter is a good idea. Removing things from your yard that can become air-borne missiles that bang into your home is a great idea.

Take the time now to put all valuables in a place where they can be away from windows and leaking water. Digitize important documents and photos and store them on a small external hard drive that can be put in a purse. Make multiple copies and use flash or thumb drives too. Consider uploading the files to remote storage servers as your backup drives could get lost or damaged.

Know how to turn off your main gas supply in case a storm causes a gas leak inside your home. A simple wrench should be kept next to the gas meter for this purpose. Know how to turn off the main water supply to your home and drain the lines in case a storm causes your heat to be interrupted.

Now is the time to start to stock up on things that will help you survive. Food and water are vital. If a storm hits in the winter, you need to think about heat. Keep in mind that anything that depends on electricity for heat will be of little value unless you have a way to produce your own electricity for days or weeks. Make sure you know where all your warm clothes are and be sure they’re clean and dry.

Dried foods can be stored safely in clean five-gallon buckets that have gasketed screw-off lids. Beans, rice, or any other easy-to-prepare dried food can be stored in these containers. Small propane-powered camp stoves can be used to cook and heat water. These stoves are affordable and you can buy an adapter to refill small propane tanks from the larger 20-pound tanks that you use for your outdoor grill.

What are you going to do for water? You can buy cases of bottled water affordably, but not the day before the storm. It takes lots of gallons of water per day to satisfy the needs of a typical family, so barrels of water are not out of the question in case of a major storm that disrupts utilities for days.

If you live in a low-lying area, you need to be deeply concerned about the devastating storm surge that can raise the level of the ocean by as much as 10 or 15 feet. People who stay in houses battered by the waves in these surge areas often die. The houses can be wiped away or reduced to firewood kindling wood. Think now how you’d move out before the storm and what are the most important valuables you could pack in your car. Do it now, not an hour before the storm when you’re frantic and the roadways off the island are gridlocked with traffic.

Be sure you have hand tools that don’t need electricity to operate. Rope, tarps, sheets of plywood or anything else that could cover a broken window or door could be a great help to minimize wind-driven rain damage.

Try to recall anytime you may have gone camping. What did you need to survive for three days outdoors? That’s the frame of mind you need to be in now and you need to stockpile all the supplies you need because you may not get out for days or even a week. You hear this advice all the time, but this time take it. Act on it. Start to get prepared - now.

Getting ready was discussed way back in my April 18, 2013 AsktheBuilder Newsletter.

Trex RainEscape Overview Video

Tim Carter describes what Trex RainEscape is.

This was what my photo in the August 13, 2016 Newsletter showed. Well, while under construction!

This is not a how-to-install-it video. Go to Trex RainEscape for detailed installation videos. This product protects that area below your deck by channeling water away from that area. LOOK AT PHOTO BELOW to see why snow and ice will not harm it.

Click here for Trex RainEscape Products on Amazon.com

Transcend-and-RainEscape

The Trex Transcend decking is being installed. Just as I say in the video, the Trex RainEscape sits BELOW the decking. Snow and ice don't collect on it, they sit on top of the decking. Photo credit: Tim Carter

Trex RainEscape

You can see the white gutters I used to collect the water from the Trex Rain-Escape funnels. There are two MIRROR-IMAGE gutters and you can see in this photo where the two diagonal under-deck braces meet where the two long sections of gutter meet. Look closely and you'll see how the gutter goes to the end of the deck and there's a short section of gutter about 8 feet long at a 90-degree angle. You can just see the downspout in white at the corner where it cuts into the vertical downspout from the house roof. The brownish-orange troughs are Trex Rain-Escape keeping the lower deck dry each time it rains.© 2017 Tim Carter

Mulch Against Foundation

DEAR TIM: I recently moved into a neglected house. While working on the landscaping in the front yard, I discovered that the top of the foundation was below grade. Two courses of brick on top of the foundation were covered by a mixture of dirt and mulch. What’s your opinion about how much mulch one can put up against a foundation? There are no leaks in the basement at this time, but this just doesn’t see right to me. My lot from the house to the street seems flat to me. What can I do? What should have been done when the house was built? Laura E., Sterling Heights, MI

DEAR LAURA: Your problem is but another example of how hard-earned knowledge accumulated over decades by older builders transforms from history to legend and then finally to myth. This same exact progression was mentioned early in the Lord of the Rings book by J.R.R. Tolkien when he was speaking about how the magic ring came to be forgotten for two and a half-thousand years.

All one has to do is walk through older neighborhoods in just about every major city east of the Mississippi river to see how builders of old knew all about why the top of a foundation should never be near the soil line or grade. Look at houses that were built in the late 1800’s or early 1900‘s.

You’ll quickly notice that the top of the foundations of these homes almost always sat a good 30 inches or more above the grade. The houses had wood basement windows and the bottom of the basement window sill was about 6 inches above the level of the surrounding soil.

You can see the two stained rows of brick that were covered by mulch and soil. Photo credit: Laura Elsee

You can see the two stained rows of brick that were covered by mulch and soil. Photo credit: Laura Elsee

This method of construction allowed light into basements and helped preserve the wood that was used to build the house. The wood framing was far away from splashing water and creeping damp. Creeping damp is simply the phenomenon of water being pulled up through masonry construction against the tug of gravity by water’s capillary attraction.

For some odd reason, builders tend to ignore or forget what the builders before them discovered. Some of this happens because many builders, and people in general, take their knowledge with them to the grave. They don’t take the time to write down what they’ve learned over thirty or forty years. It’s not important to them for whatever reason.

If you look at the building code, realize it’s not only a collection of minimum building standards but it’s a moving target as it’s in a state of near constant change. Codes from not too long ago said that you need at least 6 inches of foundation showing above the grade. What’s more, you need at least 6 inches of fall in the soil in the first 10 feet of horizontal distance away from the house. Remember, this is a minimum standard.

I used to make my foundations, when possible, about 18 inches higher than the surrounding grade. Using the dirt I dug from the basement, I then was able to make a long gentle slope away from the foundation so that the ground around the house appeared level, or nearly so. The builder who built my wife’s childhood home did an excellent job of this. This house sits about 70 feet from the curb of the street and the front yard looks dead level.

Guess what? It has about 24 inches of fall over that distance! I know because I checked it one day using a very accurate builder’s level transit. Your builder should have done the same and it’s possible you have quite a bit of fall now, but your eyes are playing a trick on you. Get access to a laser level or transit and check to see how much fall you really have from the top of your foundation to the city sidewalk or street curb.

If you can’t get your hands on one of these precision instruments, you can use a standard 4-foot level and some wood stakes of increasing length with a flat top. Using these things and a four-pound hammer, you can start to determine how much fall your front yard has from your house to the street.

Place one end of the level on the top of the foundation. Drive a stake in the ground at the other end of the level so that when the level rests on it, the bubble in the level is centered between the two lines on the vial. Now move the end of the level that was on the foundation to the stake. Drive a new slightly longer stake into the ground for the other end of the level to rest on.

Repeat this procedure using longer and longer stakes until you reach the street curb. If you did everything right, the height of the last stake sticking out of the ground closest to the road tells you how much your lot has fallen away from the house as you get closer to the roadway. My guess is you’ll be shocked at how much fall there is.

The other thing to watch for is creating a depressed area between your home and any sidewalk that leads from a driveway to your front door. All too often I see ponds in between these sidewalks and the house because the sidewalk acts as a dam not allowing surface water to drain away.

The best way to prevent all these issues is to keep the top of the foundation at least 18 inches above grade. You can even go up as much as 24 inches. Creative planning then can make it so there are minimal steps to get up into the home.

As for as how much mulch one should put up against a house foundation, I say use the minimal amount. Keep in mind that during dry spells the mulch can be flammable and cause a house fire if it somehow ignites.

Column 1155

July 26, 2016 AsktheBuilder Newsletter

Yes, I'm alive! You may have been one who recently emailed me wondering why I've gone dark. It's been at least a month since I've sent out a newsletter.

If you're a new subscriber, this is not a typical newsletter. So hang in there.

A week ago, I got back from a ten-day trip to Cincinnati, OH. I went there for my 50th grade school reunion. It was an epic time meeting up with some friends I've not seen for decades.

Here's a photo of us standing on the steps of the church in just about the same relative positions as we did back 50 years before.

CLICK HERE to see a larger photo and the original graduation photo of all of us. Everyone is pretty much in the same row, but the spacing is off a little bit.

I'm wearing the bright blue polo shirt that helps make my hair look more blonde than it is. That's my story and I'm sticking to it.

The Journey

I decided to drive to and from the reunion. It's close to 1,000 miles from central New Hampshire to Cincinnati, Ohio.

I love driving long distances as it gives me time to think. What's more, I try to take different roads to see different things. US 30 across southern Pennsylvania is a stunning roadway.

I'm an amateur radio operator and our community is helping the National Park Service celebrate its 100th anniversary with the National Parks on the Air event.

I decided to try to *activate* eight locations in the ten days. Believe it or not, I was successful. CLICK HERE to read a story that explains *activating* a site.

The one that meant the most to me on a personal level was the Flight 93 National Memorial. Ever since 9-11, I've wanted to go pay my respects to the forty patriots who gave the ultimate sacrifice in the ongoing battle we have with the radical Islamic terrorists.

Here's a selfie photo I took the first time I visited this hallowed ground two weeks ago today.

I taped a video while I was there and I hope to have it ready for you in the next issue of the newsletter.

Suffice it to say I was quite emotional when standing on the Memorial Plaza just a few hundred feet from the impact crater now marked by a giant boulder of the native bedrock.

I urge you to go visit this solemn site in some of the most gorgeous rural farmland I've ever seen in my life.

What I Learned

My ten-day trip reinforced things I've known for a long time.

Family is by far the most important thing. If you've got strong family bonds, then you know this to be fact.

Friends are second. I made a special effort to connect with some other close friends while in Cincinnati. It's impossible to see all of my Cincinnati friends each trip back because there are simply too many.

I had a delightful time reconnecting with Nick and Mary Beth Motz. I met Nick about thirty-three years ago when he was in high school at St. Xavier. I was doing my first of many projects for his mom and dad, Matt and Ginny.

I was able to spend a great lunch with my dear friend Tom Yunger. Tom now owns the Clifton Skyline Chili. Tom and I worked many a day and late night together.

The memories we talked about where so thick we had to brush them away from the front of our faces. Remember that great line from the Field of Dreams movie?

Everything else after family and friends is a distant THIRD.

If family and friends are not the focus of what you do each day, I suggest you consider changing what you do. When you make family and friends the center of your life, your personal happiness machine will be running on all eight cylinders.

CLICK HERE to read about two new friends I made while on this trip.

The Deck Project

I'm just about eight hours away from installing the first NEW piece of decking on my massive deck project.

Here's an update photo of what *some* of the three decks looked like this past Sunday.

The new deck you see in the photo is pretty big. It's 24 feet wide and extends out from the existing deck 16 feet. It's 3 feet lower than the upper deck. The upper deck is a whopping 13 feet off the ground below.

When you stand at the end of the new deck, you feel like you can jump right into the lake because you can't really see any ground between you and the water as you look out to the lake.

It's a stunning effect and one that WILL SELL the house when we do decide to move.

I have two existing decks off the back of the house, both are 64 feet wide and extend from the house but 10 feet.

A deck 10-feet wide is pretty much useless. The minimum width for a deck with a table and chairs on it needs to be 12 feet.

The decking you see in the lower right corner is generation one Trex that's in fantastic shape after sixteen years of HARSH New Hampshire sun, snow and ice.

I'm replacing all the existing decking and railings with the magnificent Trex Transcend product line.

Composite decking has come a very long way and it's finally a product that delivers on its promises.

CLICK HERE and poke around at the Trex site to see why Kathy and I went with Trex. We're doing a two-toned deck using Lava Rock as the border and Tiki Torch as the main area of decking boards.

Wait until you see the railing and the post caps with the soft low-voltage lighting at dusk!!!!

Tomorrow I should begin to put on the decking on the new deck you see in the above photo.

I guarantee you that you'll be WOWED.

I wanted to add that I SOLD all my old deck railings and all the older Trex decking on Craigslist. In fact, I could have sold five times the amount of Trex decking had I had it!

New Columns for You

Here are a few new columns you should read:

Blacktop Driveway Sealer Legends and Myths

Brick Weep Holes - IMPORTANT!!!!

Deck Flashing Materials

Deck Screws vs. Nails - Don't Use Nails!!!

Many new videos of what's going on with the deck project are in your future.

I'll be back soon.

Tim Carter
Founder - www.AsktheBuilder.com

Do It Right, Not Over!

Blacktop Driveway Sealing

blacktop sealer

Seal blacktop driveway or not? This is what blacktop looks like just after it's sealed. It looks like glossy black paint. Copyright 2018 Tim Carter

"Years ago, I fell under the spell of what many blacktop sealer manufacturers said about the necessity of sealing blacktop driveways. Much of what they said made some sense, but there was always a nagging thought or two in my head that conflicted with what I was being told."

Seal Blacktop Driveway Checklist

  • Never seal a new blacktop driveway
  • Blacktop roads are never sealed
  • Use the cheapest sealer made if you seal annually
  • Blacktop will last for decades if installed right
  • CLICK HERE to Get Tim's FREE Newsletter!

DEAR TIM: Can you settle a friendly argument? My wife insists that our blacktop driveway gets sealed.

She listens to a local weekend home improvement radio show and tends to think everything the show host says is true. The show host tells callers about how important it is to seal blacktop, but one of his long-time sponsors is a blacktop sealer manufacturer.

The cynic inside me says he says he does this because he’s getting money from the sponsor. What’s your stance on blacktop sealers and what would you do if you had a blacktop driveway? Stuart T., Hamilton, OH

DEAR STUART: I can speak to all your points. For twelve years, I used to do a two-hour call-in home improvement show on a few commercial radio stations. When I negotiated my contract, I reserved the right to edit the wording of commercials I was asked to read.

It didn’t take long for the advertising salespeople to grow frustrated with me because I’d routinely change the wording in the commercial copy.

I did so because the salespeople made unsubstantiated claims about both products and services. Soon they stopped selling ads for my show. My integrity was all I had and I refused to say things that weren’t true.

Are Blacktop Sealers Necessary?

Blacktop sealers may not be necessary if you look around at all the blacktop you see.

Years ago, I fell under the spell of what many blacktop sealer manufacturers said about the necessity of sealing blacktop driveways. Much of what they said made some sense, but there was always a nagging thought or two in my head that conflicted with what I was being told.

Why Aren't Blacktop Roads Sealed?

First and foremost I thought long and hard about blacktop roads in my city. They were never sealed.

The asphalt cement used at the plant that makes blacktop for the city roadways was undoubtedly the same used to make residential driveways. Asphalt cement is the binder, or glue, that holds together the sand and stones that make up a blacktop drive, road or parking lot.

This blacktop driveway is twenty years old and has never been sealed. It’s in very good condition. Photo credit: Tim Carter

This blacktop driveway is twenty years old and has never been sealed. It’s in very good condition. Photo credit: Tim Carter

Some cities and towns apply an asphalt rejuvenator that claims to extend the life of the asphalt. I'm not so sure these products really help significantly extend the life of the pavement based on years of looking at blacktop and asphalt that's not sealed.

The roads in my city got the same rainfall, the same snow and ice, and the same harsh ultraviolet (UV) light as my neighbors’ blacktop driveways. It was not uncommon for secondary side streets in my neighborhood to go twenty, or more, years before being repaved. That’s a very important fact you shouldn’t ignore.

What Is Blacktop?

Blacktop is a flexible pavement made from a combination of small stones or rock, sand and liquid asphalt cement. It pays to look at an asphalt surface that's not been sealed to see all three of these components.

I then started to look very closely at the average blacktop road and driveway. When you study them, you quickly realize that well over ninety percent of the surface is not asphalt.

What you see are small stones and sand. The asphalt cement just shows up as a thin line in between the stones and sand. Remember, sand is just very small pieces of stone. The stones and sand in blacktop are immune to UV damage from the sun.

Does Sunlight Hurt Asphalt?

Sunlight does hurt asphalt. A certain percentage of ultraviolet light from the sun contains active photons.

I did research about asphalt for my Roofing Ripoff book. It turns out that the sun’s UV rays blast apart asphalt molecules making it more susceptible to oxidizing. When asphalt molecules oxidize and cross-link with one another, it becomes more brittle.

As asphalt becomes more brittle, it loses its ability to hold onto things such as the sand and stones in asphalt roads and driveways. Keep in mind that this oxidation only happens at the very top of the asphalt that’s exposed to the sunlight and it can take years and years for larger stones to become dislodged.

What About Your Blacktop Drive, Tim?

My current home has a blacktop driveway. I live in New Hampshire where winters are brutal with abundant snow, ice, and harsh conditions.

My driveway is twenty years old, it’s never been sealed and a vast portion of the driveway is in excellent condition. The only bad portions are where the gravel base was not installed correctly and there are a few small areas that are beginning to deteriorate.

Can Sealing a Drive Create Problems?

Yes, sealing a driveway can cause secondary problems. The drive may look good for a short time, but now you've created a periodic maintenance situation.

If you decide to seal a blacktop driveway you open up a Pandora’s box of problems in my opinion. The sealer is made up almost exclusively of asphalt. The UV rays will attack this thin coating and it will begin to harden and fail. If you don’t take off your shoes when you come into your home, you’ll track the asphalt indoors discoloring vinyl flooring and carpets.

Once the sealer starts to wear off, your driveway starts to look bad. Your neighbors may think less of you because of the appearance of the driveway. You’re forced into an endless cycle of sealing your driveway, even though the driveway itself is in excellent condition.

Do Sealers Fill Blacktop Cracks?

Yes, a sealer will fill tiny cracks in blacktop.

The sealer manufacturers talk about the ability of the sealers to fill small cracks so water doesn’t infiltrate and cause greater damage.

My driveway has only a few cracks after twenty years because the gravel base under the blacktop was put in correctly. I’ve filled the cracks that have appeared using a strong epoxy that comes in a caulk tube. I press small stones and broadcast clean sand into the fresh epoxy so the crack matches the texture and color of my existing blacktop.

Why is New Blacktop Black?

When a blacktop driveway is new, it’s black as a moonless night because the asphalt cement has coated all of the sand and stones in the mix.

Over time, this very thin coating wears off and you start to see the color of the stones and sand. Don’t discount this distinctive look.

So long as the asphalt cement used at the blacktop plant was high quality, your driveway will not fall apart in a few years without sealer. If it does start to crack and crumble, it’s not a lack of sealer, it’s an indication the gravel base was not installed correctly.

Related Column: Asphalt Driveway Sealers

Column 1154

Brick Weep Holes

brick weep holes

Brick weep holes like the round black hole serves a very important purpose and should never be filled. Copyright 2018 Tim Carter

"Brick walls leak water. They’ve always leaked water. Builders and masons from hundreds of years ago knew this and..."

Brick Weep Holes Tips

  • Water gets behind brick walls
  • Weep holes allow water to exit the wall
  • Mortar can clog weep holes
  • Flashings must be installed too

DEAR TIM: I live in a brick townhouse. In the back there is a patio door leading to a concrete deck. The patio door sits on top of some brick work.

We are planning to go from carpet to laminate floors. I'm trying to make sure the patio door is all sealed up keeping out any and all moisture. I've noticed what seem to be round weep holes along the very bottom of the brickwork.

I would like to plug them up with some mortar to keep the moisture level down. Will this do any harm? What purpose do the weep holes serve? Todd J., Newport News, VA

Related Links

Brick Veneer Water Leak Locations

Brick Veneer Sealants - Magic in a Bottle

Never Plug Up Brick Weep Holes!

DEAR TODD: Whatever you do, do not fill those round brick weep holes. They’re an integral part of the drainage system to keep water from building up behind the brick. This water, if allowed to contact any untreated lumber, will cause serious wood rot, mold and eventually structural issues with your home.

Allow me to explain the dynamics of brick walls, brick veneer and rain and you’ll be able to do a fantastic job of protecting that new laminate floor as well as everything else behind the brick.

Do Brick Walls Leak?

Brick walls leak water. They’ve always leaked water. Builders and masons from hundreds of years ago knew this and designed brick buildings using best practices to ensure their buildings did not fall apart.

Sadly, lots of this information for years was handed down by word of mouth. To add insult to injury, not all brick masons of today are not required to learn all the past history about brick construction. If they had a better understanding of what’s going on, they’d be able to do a better job of preventing water infiltration.

Where Does the Water Enter the Brick?

Most water enters brick walls along the interface where the mortar touches the brick. You may not see the ultra-fine line or pathway, but it exists. On row-lock brick like you see under your door threshold the problem is even more severe because the mortar joints are facing the sky. Rainfall has no problems getting into a brick wall at these locations.

Does Wind Force Water Behind Brick Walls?

The pressure of the wind is forcing the water into the brick wall through the cracks like you’d pound a nail into a piece of wood. Each successive rain drop that hits the wall pushes against the water that just hit seconds ago.

This, in combination with the wind pressure, allows water to stream into the wall. This water needs to be captured and redirected so it doesn’t come in contact with any of the wood framing in a brick veneer house.

Why Don't Old Brick Buildings Leak?

Old brick buildings don't leak because they had multiple layers of brick.

Years ago in solid masonry buildings, the masons and builders dealt with this water in a different way. They used harder brick to construct the outer face of the walls but the brick used for the inner second or third course was a softer brick that readily absorbed water.

You can usually spot these brick because they’re an orange color and not a deep earth-tone color.

These soft bricks would absorb the water from the storm and the next day they’d send the water back out to the air via capillary attraction and vapor pressure. As the sun beat on the wall and the breeze blew over it after the storm, the water stored inside the inner brick would come out faster than rats abandoning a sinking ship.

What are Brick Flashings?

A brick flashing is a material that captures water and re-directs it to the exterior of the wall.

In modern brick veneer construction, it’s imperative this water is captured by flashings and waterproof membranes and then redirected to the exterior of the brick wall. One of the components of this system are the round weep holes you see at the bottom of the brick.

There are all sorts of modern products available now that channel the water back to the outside of a brick wall, but it’s impossible to retrofit them into an existing brick veneer wall.

Can Spray Sealants Stop Brick Leaks?

Spray-on sealants can stop some brick leaks. Sealants are not the magic silver bullet, but they may stop much of the water.

Your best bet to protect your home is to apply a clear silane-siloxane water repellent that has enough solids in it to help plug the tiny cracks that allow water to enter at the brick/mortar interface.

What is the Best Way to Apply the Brick Sealer?

The best way to apply a brick sealer is to use a leaf blower.

When spraying these products on a brick wall it really helps to have a helper who’s operating a backpack leaf blower. This person directs the air flow to the area being sprayed with the sealer. The high wind pressure created by the blower forces the water repellent deep into the brick wall to help create a strong barrier against water infiltration.

What are the Best Practices When Building With Brick?

The best practices for building with brick are published by the Brick Industry Association.

If you’re building a new home with brick veneer, then you’ll want to read many of the Technical Notes from the Brick Industry Association. These are easy to understand and have great illustrations. They show all the places where you need very important flashings to collect the water.

Do Flashings Go Under Window and Door Sills?

Flashings must be installed under all window and door sills.

Masons often install brick on edge in these locations and the mortar joints point to the sky. The sad thing is in many of the brick houses I’ve inspected this flashing is missing.

Is it Important to Keep a Water Pathway Open?

It’s also important to make sure the pathway from behind the wall to the front of the weep holes is wide open. All too often mortar falls behind the back of the brick veneer and makes it very hard for water to easily enter the weep holes.

There are products and methods to ensure this doesn’t happen, but many bricklayers and builders don’t use the products and problems happen as the house is subjected to pounding rain. MortarNet® is one product that works to prevent mortar from clogging flashings and weep holes.


Column 1153