Shimming a Door

wood door shim

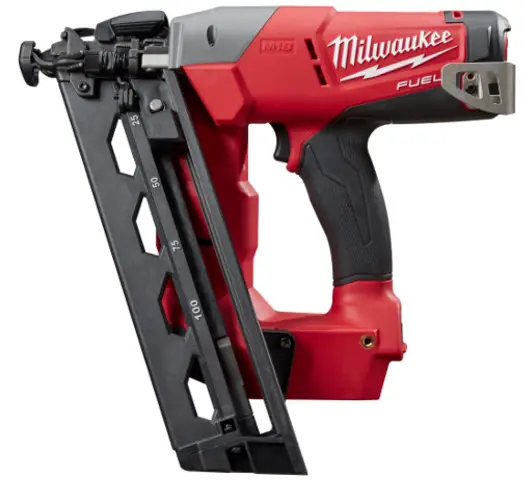
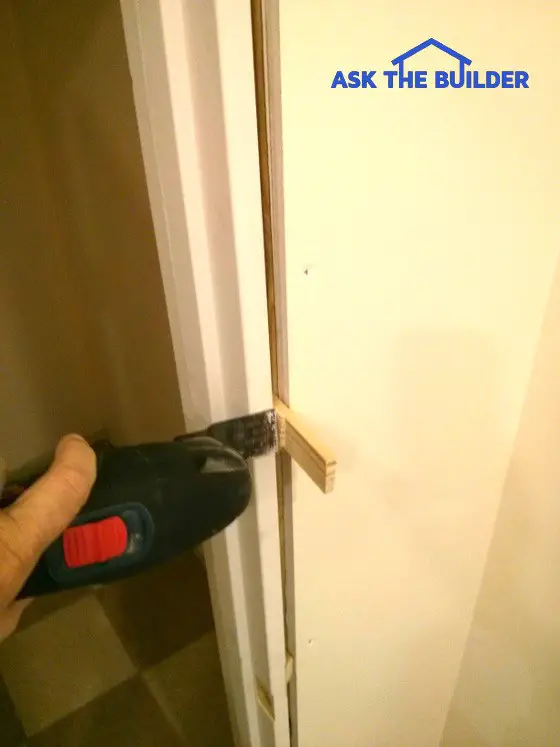
Shimming a Door | A vibrating multi-tool is a fast and safe way to trim wood shims that are used to install a door. Photo Credit: Tim Carter

DEAR TIM: While on vacation I plan to install a few new interior doors around my house. I’m using pre-hung doors. I’ve never hung a door before and could use some of your secret tips. Please share how to avoid common rookie mistakes. I’m lost on what to do when shimming a door. My wife told me she will bake you a cake if your advice gets me through this endeavor. Peter K., Philadelphia, PA

DEAR PETER: I’ll see the chocolate cake and raise you a pint of mocha chip ice cream from my favorite parlor in Cincinnati, OH. While I appreciate your wife’s generous offer, it’s not necessary. I’m going to do my best to guide you on this pathway so you can have all the doors installed in one day or less. That way you and your best friend can go do some fun things instead of slaving away on your vacation.

Measure the Rough Opening Accurately

The first thing to do is to carefully remove the door casing trim from around your existing doors. This allows you to confirm the rough openings. This is vital to ensure you get the right doors. Measure accurately and take these measurements with you when you go to order the doors.

Usually the width of the rough opening between the wall studs is one-half inch wider than the outside overall width of the new door frame. This extra space gives you plenty of room to shim the door. The height of the rough opening is often 84 inches from the rough subfloor, but since you have an existing home that’s hard for you to determine.

Have the Right Door Frame Height

You just want to make sure that from the finished floor to the top of the rough opening you have around 83 inches, especially if the rooms have wall-to-wall carpeting. Be sure to check the width of the door jamb. If you live in a home that has 2 x 4 wall studs and 1/2-inch drywall, you’ll discover the jamb width is most likely 4 and 9/16 inches.

I’d take photos of the doors and show them to the person who takes your order. Stand back from the door so you can see the entire door and part of the wall. It’s important that you get the “handing” of the door correct. The photos will tell the person at the lumber yard what you need.

Modern doors are made pretty much perfectly square. The door frame is supposed to be parallel to the door once it’s installed with the same-sized gap between the door and the frame on all three sides. This means the door frame will also be square once installed.

Check the Opening Stud on the Hinge Jamb side - It needs to be plumb.

I always check to see if the rough opening stud on the hinge jamb is plumb. If it’s not, I add shims to the rough stud to make it plumb. If I have to add shims, I do it at the places I intend to put nails through the door frame when installing the door. More on that in a moment.

When you add tapered shims, you need to use two at a time and overlap them so the thin end of one is on top of the thick end of the other. When you then slide one of the shims across the other shim the thickness of the two shims changes equally across the entire length of both shims.

With the rough jamb plumb, it’s easy to get a head start on an easy install. Place the door into the opening and open the door. Place a few shims under the end of the door so there’s no stress on the door frame. Without this support, the weight of the door will pull the top of the frame away from the rough opening.

What size nails to use?

I prefer to use 10-penny finish nails to start the install process. I nail my first one about one inch above the top of the top door hinge on the door frame. This stabilizes the door and allows you to work with no fear of the door falling out of the opening. Carefully hit the nail making sure you do not miss causing an unsightly blemish on the wood door jamb. You’ll need to use a nail set to drive the head of the nail below the surface of the wood frame.

In my opinion, you need a minimum of six nails on each side of the door frame. These nails should be one inch above each hinge locations and level with these spots on the latch side of the door frame. Put a nail on either side of the center door stop.

When shimming the door, the goal is to make sure that once the frame is nailed the gap between the door and the frame is equal all around the door. Most pre-hung doors come with a 1/8-inch gap between the door and the frame on the hinge side and the top. You’ll discover it’s fairly easy to attain this gap around the entire door.

As you shim, the shims will stick out beyond the wall and the door frame. Do not be concerned about this. You’ll cut these off after the install is complete. You can use a sharp razor knife, but the safer tool is a vibrating multi-tool that resembles what a barber uses to cut your hair.

Installation Tip

To prevent the door from rubbing the frame in the future, I always install two hidden screws that penetrate the door frame and go at least 1.5 inches into the rough framing. I place these screws under the top hinge of the door. This step is only done after you’re completely happy with the gap and all the nails are set below the surface of the door frame.

Be sure you support the door with shims under the open door when you go to unscrew the top hinge plate from the door frame. Drill pilot holes and be sure the screws are as far away from the edge of the door frame as possible so they bite into the rough door jamb.

The screws must penetrate through shims so they don’t stress the door frame. Countersink the screw heads a small amount so they don’t interfere with the hinge when you put it back in place.

These tips were shared in the June 10, 2016 AsktheBuilder Newsletter.

Column 1147

June 5, 2016 AsktheBuilder Newsletter

I just spent the last hour awash in emotions. I'm still in a fog.

I was engrossed with the information at the Flight 93 Historic Site website.

I'll be there in about five weeks. I decided to take a different route from NH to OH that will take me through Gettysburg and Shanksville, PA.

Both places are hallowed ground but for different reasons.

Shanksville's scarred ground is yet another reminder of the war that's being waged on us by radical Islamic terrorists.

We've been locked in battle with these vermin since the late 1700's. Don't believe me? Then go research why the US Marines fight song's first sentence has the words, " .... to the shores of Tripoli."

I can hear your angry voice now. "Tim, I don't want to hear your historical drivel. I signed up for home improvement tips!"

Guess what?

I try to open my newsletter each week with something that's important and today it's about something that's very important to me - my country and it's future.

You want home improvement? Here you go.

The Condo Wall

I received an Ask Tim question yesterday that blew me away.

A woman in California lives in a multi-story condominium. She was seriously thinking of tearing out a wall in the condo without consulting the HOA or anyone else but me.

I shouted at her to STOP and call a structural engineer. Who knows how important that wall could be to the people living ABOVE her!

CLICK HERE to watch a video about simple walls in houses and how you might determine if a wall is a bearing wall or not.

Can You Write in Hebrew?

My daughter Kelly needs your help if you can.

Look at the following image just below. Can you translate it accurately for her?

If so, will you please reply to me ASAP with the translation?

Gloria's Pantry Knob Question

Gloria asked me about where is the best place to put a pull knob on a narrow tall pantry.

You can read the column, her question and MY ANSWER by CLICKING HERE. You'll see Gloria's question at the bottom of the stack of comments below the column. Scroll down.

Broken Grace

I often share the books I'm reading. Well, a week ago I finished a very good mystery by E.C. Diskin - Broken Grace.

Here's all I'm going to tell you.

I blurted out loud as I read the last few pages:

"Touche' "

Yep, E. C. got me. She completely fooled me.

You do know what touche' means, don't you?

You're going to LOVE this mystery.

CLICK HERE to purchase Broken Grace.

LAST CALL for TUMI Bag

I told you on Friday that I'm starting to sell RARE Google schwag that I've accumulated over the years.

One prized item is a TUMI laptop case that was given to the 300, or so, attendees of the 2005 Google Zeitgeist.

I was one.

New TUMI bags start about $300 or $400. Some are as high as $600.

The auction for this ENDS tomorrow night.

If you know someone that wants a Google collector's item, this is it.

CLICK HERE to put in a bid.

Bearing Wall Footing

Do you know what a bearing wall footing looks like?

I didn't think so.

CLICK HERE to see a magnificent photo of one.

That's enough for a Sunday.

I'll be spending the day doing the material takeoff for my Trex Transcend decking.

Oh my it's beautiful stuff!!!! CLICK HERE to see it.

Tim Carter
Founder - www.AsktheBuilder.com

Do It Right, Not Over!

June 3, 2016 AsktheBuilder Newsletter

How are you? I'm doing great, thanks for wondering.

There's so much to share this issue. I've got news about Stain Solver, my upcoming deck project, replacing rotten house trim lumber and a few common sense tips.

I've also started to sell some RARE Google schwag that I've accumulated over the years. I listed a few days ago on eBay a TUMI laptop bag that I got at the 2005 Google Zeitgeist.

Maybe only 300 of these are in existence. They are SUPER RARE. Look below for more information about this.

But first I want to let you know that in about five weeks - yikes! - I'll be driving from New Hampshire to Cincinnati, Ohio.

I'll be attending my 50-year grade school reunion. Would you like to see some dorky photos of me in grade school, including my kindergarten graduation photo? I thought so. CLICK HERE if you want to put a smile on your face.

Oh did we ever have fun in grade school. I was part of the magical baby boomer generation, and we grew up in the late 1950's and early 1960's. It was a magical time.

Think about this. There were no cell phones. It cost LOTS of money to make a long-distance phone call. There was no such thing as email and the Internet. Personal computers were not even a glint in Steve Jobs' or Bill Gates' eyes.

You rode bikes, played hide and seek, and went into the woods and read comic books for fun. You went on hunts to find empty glass soda bottles so you could get 2 cents for each one at the store. That money was then spent on penny candy.

Many stories like that are going to be exchanged at the reunion. I'm looking forward to it.

I'll be taking a circuitous route to and from the reunion so I can stop by as many National Parks and Historic sites on the way. I'm actively participating in this magical fun year-long radio event.

.
CLICK HERE to discover a SECRET method to get your tub and shower tile and grout CLEAN!
.

My Outdoor Deck Project

I didn't build the house I live in. I won't name the builder, but I can tell you that he had some BOZO subcontractors on the job. I'm constantly redoing and rebuilding things around here and ALMOST DONE.

Last year, I had to redo the entire roof. The house now has a roof that will not need to be replaced for at least 80, or more, years.

Here's the laundry list of how bad the builder messed up my deck. It started with the plan.

  • It's 10 x 64 feet
  • It's nailed to the house, not through bolted
  • It's got INFERIOR flashing
  • Composite decking was not spaced properly
  • Railing 4x4 posts had TWO INCHES of material notched out

I could probably list a few other things, but I think you get the point. Here's a photo of my current narrow deck.

Let's start with the plan. If you want a deck that will have a table and chairs that sit more than two people around it, you MUST HAVE at least 12 feet of space.

Most tables for four people are 4 feet in diameter. You then need another 4 feet of space around the entire table to provide comfortable seating space and enough room so that people can WALK AROUND a seated person without forcing that person to get up or SCRUNCH in.

To solve this problem, I'm building a new deck that's going to be 3 feet lower than my existing deck and it will be 24 feet wide and extend out from my current deck 16 feet.

Kathy and I have decided to use the Trex Transcend decking material and the stunning railing system they provide.


The Transcend product is their top-of-the-line decking. It's really an amazing product and if you're considering a new deck or want to abandon wood because it's so much hassle, then be sure to give Transcend a hard look.

CLICK HERE to discover more about Trex Transcend. You'll be blown away by how realistic the deck planks are.

I'm going to tape a series of videos about the deck remodeling process so you'll get to see all that's going on.

I'm also using a few VERY FASCINATING structural connectors and screws to FIX the deck connection problem with my existing deck.

These are made by Simpson Strong-Tie. Hang tight for information on these as I'll have very good video for you showing exactly what they are and how they work.

My guess is you probably should use at least one of these connectors. MANY MANY decks built in the USA are not connected correctly to the house.

These can PULL AWAY and COLLAPSE with NO NOTICE. Watch for my upcoming videos.

Rotten Trim Lumber

Hundreds of thousands of homes around New England, and I feel the entire USA, have been trimmed out with JUNK trim lumber.

My house is one. It's a crappy hybridized lumber that is finger jointed. This means the lumber mills take small short pieces of scrap lumber and mill them so the ends interlock like you doing the same with the fingers on both of your hands.

I have this crap on my home. Much of it around the windows and doors around my deck is rotting out.

I'm about to TEST a new exciting product that should never rot and it's able to be painted a DARK color.

There are a few products out there made from cellular plastic that you can install that will not rot. The issue is you can't paint them dark colors because the expansion contraction coefficient of the plastic is too great and the paint will not adhere.

I'll have MORE about this new material in about a month, so stay tuned!

Stain Solver News

We had a Stain Solver sale a little over a month ago. It was SO SUCCESSFUL that in just ten days we sold about 50% of the ten tons we made.

Yes, TEN TONS.

Usually I send out a last-minute reminder that the sale is about to end.

I didn't send it out!

Why?

Because you would have bought up all the remaining inventory! When I send out the "Sale Ends in HOURS" reminders, you might be one that finally reacts. Those reminders create LOTS of sales.

We're about a week away from making another TEN TONS.

I'll be having another sale, so you'll want to be opening each newsletter for the announcement. But if you've NOT USED Stain Solver before, I have something to tell you.

You can use Stain Solver for all your outdoor cleaning projects:

  • boats
  • docks
  • decks
  • mildewed patios
  • composite decking
  • algae-covered siding
  • pre-painting cleaner
  • teak tables and chairs
  • etc., etc., etc.

If you're a new subscriber, Kathy and I own Stain Solver. It's a Certified organic oxygen bleach that is NON TOXIC. It cleans anything water washable.

You should order NOW a small sample bottle to test it so you can then be READY to buy a LARGER size when the sale happens.

Seriously, order a SMALL SAMPLE SIZE now. It's less than $10 with FREE SHIPPING to any place in the USA including any US Territory!!! Yes, if you live in Guam, you can get one of these bad boys.

CLICK HERE now and order the 0.4-pound size. It's the Perfect Sample Size.

Google Schwag Bag

Are you aware of the TUMI brand of satchels? These are some of the best in the world. I'm serious. Just go read online reviews about TUMI bags.

If you're looking for a SPECIAL GIFT for that someone who LOVES Google and TUMI gear, then you need to look it this.

I received this bag because I was one of about 300 people who were invited to the 2005 Google Zeitgeist.

Who were some invited to Zeitgeist?

Well, the Librarian of Congress sat next to me at lunch. There were a few royal family members from other lands there. Ray Kurzweil was there too. Watch this video BEFORE it's taken DOWN from YouTube!

Barry Diller was there and many huge titans of business.

We all received one of these bags and some other loot.

These are truly RARE. You can get TUMI bags all day long, but not ones that have the Google ZeitGeist embroidery.

I have this bag up on eBay for auction now and the auction ENDS on Sunday night.

CLICK HERE to see more photos and to BID on it.

I'm SERIOUS, this is a very rare bag.

You'll be sorry if you don't get this, especially if you love getting special Google schwag.

Little Cute Gus

About three weeks ago, I received a charming email from a mom. Her name is Terri.

It was about a funny video I taped about eight years ago. Evidently toddlers LOVE watching it because I was being corny and there's a surprising special effect at the open.

Terri's son Gus loved it so much he did an impersonation of me in the video and she shared the video.

She gave me permission to put it on my website and share it with you.

WATCH my video first, then watch Gus below my video. Then share in a comment on that page how well you thought Gus did!

CLICK HERE to watch me and then Gus.

That's PLENTY for a Friday.

GO BID on that TUMI bag now. You'll REGRET not getting it. I guarantee you it will go UP in value.

Tim Carter
Founder - www.AsktheBuilder.com

Do It Right, Not Over!

Bearing Wall Footing

Bearing Wall Footing

Bearing Wall Footing | This massive long block of poured concrete is a bearing wall footing. It will be covered with more concrete that forms the lower level floor. Photo Credit: Tim Carter

Bearing Wall Footing - Or What is that long block of concrete in my Basement?

DEAR TIM: My wife and I are building our new home and we stopped by to see the progress just after the foundation was poured. We saw a massive long block of concrete at least 10 inches thick in the middle of the basement floor. I don’t see how our basement floor will be smooth now with this giant thing in the way. What is it and why would the builder go to this much effort and waste this amount of concrete? Is it too late to remove it? I see pipes passing through the bottom of this concrete. I took lots of photos of this monolith. Stephen B., Dover, DE

DEAR STEPHEN: You’re doing the right thing stopping by your new home construction site. I hope you’re taking hundreds of photos of everything you see. I clearly remember the first time I was around a new home job site smelling the freshly turned earth, the lumber and all the other aromas associated with building. That and all the progress being made my excitement meter needle move.

Take Pictures

With modern digital photography, and massive amounts of memory in smart phones and cameras, it’s a wise thing to take hundreds, if not thousands, of photos of your construction projects. Be sure to take close-up photos too. These photos will become invaluable at a later date as things you see now eventually get covered up with dirt, concrete, insulation and drywall. I also urge you to take videos of what you see talking about what you see and what you’re looking at while you move the camera around.

You want to be able to know where everything is and what was there before it gets covered up. Even though you think the photo you’re taking is of nothing, an expert in the future may be able to see valuable pieces of data in the photo. I urge you to download the photos each day and place them in file folders so you know what the photos are at a future date. Be sure to backup this data so the photos and videos are never lost.

Bearing Wall Footer

I looked at your photo of that massive block of poured concrete. Without looking at your blueprints of the house, I’m quite certain it’s a bearing wall footing. Take a look at your plans and blueprints and my guess is you’ll see a wall that’s going to be in this location in your new home.

The floor joists above this wall will run perpendicular to the wall and this massive block of concrete. The wall below supports these joists. What’s more, there could be another wall upstairs that’s directly over the wall in the lower level. That wall no doubt will have floor joists passing over it at a 90-degree angle too.

Depending on how your roof is going to be framed, there’s a possibility that some of the roof load could transfer down through the center of the home as well. The bearing wall footing you see now in the basement will support all this weight and transfer it over a wider area to the soil beneath the footing.

Will my Basement Floor be Level?

To the untrained eye, you may think this massive concrete block is at the same level, or even higher than what your concrete basement floor will be poured. Mistakes have happened and contractors have poured these footings too high, but it’s rare that this happens.

I think what you’ll probably discover if you stretch a string is that the top of the bearing wall footing is at the same elevation as the top of the footings that your poured foundation walls rest upon. There is no need to remove the bearing wall footing unless it somehow is too high.

It’s a common practice for the basement slab to be poured so it rests directly on top of the footings. The void space between the footings where you see bare soil should be filled with granular clean fill material. I used washed pea gravel for the homes I built.

Some builders use a mix of sand and gravel. If you see piles of material brought in by dump trucks at your site now that have lots of sand in it, this is what’s going to be used. Be sure this material is compacted before any concrete is poured in your basement.

The pipes you see in the bottom of the footing are most likely passageways that allow ground water that might collect under the slab to flow toward the foundation walls. If your builder is doing a great job, you should see a few of these pipes under the footings that are below the outer foundation walls.

These pipes on the outer walls should be located on the side of the house that faces the lowest spot on your lot. Assuming there is fall or slope to your lot, the builder will hopefully dig a trench at some point and place a drain pipe that connects to the drain tile pipe that surrounds your foundation.

This pipe in the trench is the conduit through which groundwater passes so it doesn’t enter your basement. All too often most builders don’t install this very important drainage feature. The pipe will eventually exit at ground level and water will flow from it in periods of wet weather. Make sure it happens on your job.

Column 1146

Milwaukee 16 Gauge Angled Finish Nailer 2742-21CT Review

I've been reviewing Milwaukee tools for about six or more years. I've used them for decades as a master plumber and builder.

If you're not familiar with Milwaukee's pedigree because you're just discovering power tools, they focused on power tools for plumbers and electricians for decades.

Along the way, they've figured out how to make perhaps the best electric motors, the best cordless batteries and the best micro computers inside the tools to protect your investment.

The Milwaukee upper management decided, my guess is four years ago in 2012, they were going to expand past their comfort zone and start to make power tools for the other trades. Carpentry was a natural extension.

This new 16 gauge angled finish nailer of theirs is a debutant. While it's a gorgeous piece of eye candy, it's not the belle of the ball. That's just one man's opinion of course.

Milwaukee angled finish nailer

Decades of Experience

I'm one of the very few members of the media here in 2016 that has decades and decades of experience working with nail guns on real jobs in the homes of real paying customers.

Many of my peers, I hate to say this, are hobby bloggers with other day jobs. Quite a few of them have never in their lives had to make a living using power tools on real jobs. When you read their reviews, you have to wonder how they have the experience to evaluate a tool.

If you stumble across other tool reviews at other websites, be sure you go find their About Us page. Go there and read about the person who's writing the review to see what qualifies them to give you great advice about tools. But I digress.

The Gold Standard

In just about every category of anything, there's the gold standard product. Of course it's often subjective, but there are quite a few objective comparison points you can put side by side.

In the world of carpentry, there are quite a few carpenters that will tell you that Paslode has enjoyed being king of the hill for quite a few years. Their nail guns provide excellent visibility, renowned reliability, and excellent value.

Paslode's 16-gauge angled finish nailer has been one of my go-to tools for years. It's a lean, mean fighting machine that weighs only 4.5 pounds.

Their downside is the power source. You need to purchase propane gas cylinders to provide the energy to drive the nails.

Milwaukee decided to forgo that and just use electrons to drive nails. That's good.

But the new Milwaukee 16-gauge angled nailer weighs an astounding 60 percent more than the Paslode nailer. That's bad - very bad.

The Target

When driving finish nails, you need to see where the nail is going to go. That's not an issue with the Paslode nailer. It's somewhat problematic with this new Milwaukee 16-gauge nailer. The visibility is better than their new 18-gauge brad nailer, but it's not perfect (in my opinion).

Summary

I love Milwaukee as a company. It's my job to tell you the truth about things. It's my obligation to temper initial excitement about new tools with years of using similar tools and what you need to have to get excellent results.

When it comes to nail guns, the two most important things are weight and visibility. If you're going to use a tool all day, you need one that minimizes fatigue. Fatigue leads to mistakes and injuries. Fatigue can cause you to drive a nail wrong in a $100 piece of trim ruining it. Fatigue can cause a tool to drive a nail in flesh and bone.

Visibility is the most important quality of a nail gun. You need to be able to see exactly where the nail will go without the need of a LED light, without having to angle your head, without craning your neck, etc.

Milwaukee, in my opinion, needs to correct these flaws with their 16-gauge angled finish nailer. 

Remember, if you read glowing reviews about this tool on other websites, be sure you go to their About Us page and see how many decades the reviewer spent being a carpenter using nail guns. You need to vet tool reviewers just like you vet any person who's advice you're thinking of following before investing time and money.

Trust a Builder

This is a special column about trust. It was inspired by no less than three emails and one phone call I had with visitors to my AsktheBuilder.com website and this column that appears in your paper.

Lynn, who is building a new home in Santa Fe, New Mexico, is now wringing her hands each day wondering if her new home is going to be her dream home or become a hellish nightmare. The trust she placed in here builder dissolved in a matter of moments on the first day of the job when the excavator dug the hole for her slab too deep.

The builder goofed up and dug too deep. This early mistake dissolved Lynn Adam’s trust in his abilities. Photo Credit: Lynn Adams

The builder goofed up and dug too deep. This early mistake dissolved Lynn Adam’s trust in his abilities. Photo Credit: Lynn Adams

We worked all our lives for this house,” she told me. Can you imagine being in this situation? When you have hundreds of thousands of dollars hanging in the balance and not much time to play catch-up baseball, it has to be exceedingly stressful.

Dorina and her ailing husband love to sit outdoors in the fresh air at their Pennsylvania home. They hired a contractor to install a new septic tank. Once he completed the work, the odor outdoors was unbearable. They no longer could invite friends over to spend time sitting on the patio.

The contractor promised he’d provide valuable paperwork about the new installation so when it came time to sell their home, they could prove the tank was the right size and all work was done correctly. Dorina is still waiting for the paperwork.

Lee just contacted me overnight from Baltimore. He hired a contractor to install a stunning marble floor in a bathroom. The contractor installed a cracked piece of marble and when Lee requested it be replaced, they got into an argument.

The contractor finally relented, took out a hammer and shattered the cracked tile. But in the process he cracked adjacent pieces of marble. I could go on, but I feel you have all you need to know about this situation.

Because of my syndicated column and website, I’m in a unique position. I’m one of the funnels through which many contractor / homeowner horror stories pass through. Unfortunately, I’m observing a disturbing trend of more and more people losing vast sums of money each day because they trusted the job would get done right. The homeowners hoped everything would work out okay.

It’s time for some tough love and I beg that you consider what I’m about to share. As with many things in life, the great things just don’t come to you. You generally have to work for them. You have to put in the time. You have to put in effort to get the reward.

The same is true when it comes to hiring a contractor. I want you to stop trusting that a contractor will do what he says he’ll do. I want you to never hope that your job is going to turn out right. Hope is the emotion of last resort. You hope for things when you can’t control the outcome.

You can control the outcome of your job. Lynn, Dorina and Lee could have all selected contractors that would put a smile on their faces each day when they reviewed the work.

Here’s the CliffsNotes version of how to spot a possible shady or unethical contractor:

  • He waffles about putting things in writing in the contract.
  • He asks for lots of money up front even though he doesn’t pay his workers, suppliers or anyone else in advance.
  • He plays the scarcity card with an offer that’s only good if you sign NOW.

Here’s how to spot an ethical and professional contractor:

  • He gladly puts every aspect of the work in writing because he wants you to know what you’re getting.
  • He only asks for money up front if he needs to order special-order, non-returnable items. He’s got good credit and he has plenty of money in his business account to float your job for weeks at a time.
  • He doesn’t pressure you to sign a contract because he usually has a backlog of work for months.

Remember the time I talked about that you need to invest? Here’s what I was talking about. For starters, you need to create your own description or specifications before you ever invite a contractor over to your home. You need to know what items you’re going to have installed. You then read the written installation instructions so you know exactly how the job needs to be done to preserve the warranty.

You need to write down all the items you want used including the manufacturer and model number. Why? This prevents a contractor coming to you after the job has started with his sob story that he had no idea it was going to take so much time to do something. Too bad, so sad. It was his job to read your simple job description.

Realize that trust needs to be earned. The contractor needs to prove to you that he can be trusted. What’s that old saying? Actions speak louder than words.

Don’t be lulled by any Jedi mind tricks that flow from a slick contractor’s mouth. Be brave instead and do your due diligence before your doorbell rings.

Column 1145

May 22, 2016 AsktheBuilder Newsletter

Next weekend is the unofficial start to summer and while you may be celebrating at a picnic or on a boat, it's more of a subdued bittersweet weekend for my sister and me.

A week from tomorrow is Memorial Day - the day we honor those who gave the ultimate sacrifice - their LIVES - so I can type whatever I want in this email newsletter and so you can say whatever you want outdoors.

My dad is one of those men and women who gave the ultimate sacrifice so you can experience freedom every day, although he didn't give up his life on the battlefield or next to it.

While he did receive a wound in battle from a bullet, his injuries were primarily psychological. They were caused by what he saw as a medic in General Bradley's army and then what happened to him while a POW for 13 months growing potatoes for the German Army in a Polish stalag.

My dad hung on for 29 years before the Grim Reaper finally ripped him from us. The PTSD he suffered was directly responsible for his death.

I'm sharing all this with you but for one reason.

The liberty you have each day - assuming you live here in the USA - is precious and it came at a very high cost.

Take some time out next weekend and visit a cemetery that's got lots of veteran graves. Stroll through it and thank those that gave their lives so you can bask in life, liberty and the pursuit of happiness each day.

If you can't go to a cemetery for any number of reasons, CLICK HERE to watch a travel video that has some decent footage of the US military cemetery at Normandy, France.

.
CLICK HERE to see if you know the BEST way to install foundation drain tile. If you got an A+, reply to me.
.

DR Power Grader Review

On Friday morning, I taped a video showing how to transform your rutted gravel driveway or parking lot into what it looked like the day it was installed. I used this cool tool.

This grader has a wireless remote fob that allows you to raise and lower the carbide cutting teeth!!!! VERY COOL.

CLICK HERE to watch the video. Do you know about black flies and New Hampshire in the spring? At the end of the video, you get to see and hear a few of these wretched creatures.

It was a dream to operate behind Bob's small tractor.

CLICK HERE to see all the specs about this amazing tool that will restore your rutted gravel drive or parking lot.

If you're a NEW SUBSCRIBER, last fall I had the opportunity to meet two of the team members of DR.

They're a Vermont company and they came to demonstrate an AMAZING walk-behind String Trimmer.

I FELL IN LOVE with this easy-to-use string trimmer. It's perfect to cut down beefy weeds and tall grass that's beyond the scope of a lawn mower.

CLICK HERE and you'll be able to use the DR search engine to locate the string trimmer.

If you want the Power Grader, it's on sale now, $300 off, for just the next week.

CLICK HERE to order one now.

Loyd the Inventor Reminder

On Friday I shared a story with you about Loyd who lives in Oslo, Norway.

He's invented a very cool tool you could use. I know I can.

I backed his project on Kickstarter.

You should too. If you can SPREAD the WORD about this project to your friends and neighbors, that would be great.

CLICK HERE to watch a short video about Loyd's DrumRoll invention.

Consider donating one cup of your designer coffee to Loyd in the form of a donation. Yes, you can pledge just $2 to Loyd.

Repair Spalling Concrete

Here's a new column that describes how to fix a spalling concrete surface.

It's not as hard as you might think.

CLICK HERE to discover the magic product to use!!!

STOP WET BASEMENTS!!!!

Do you have a wet basement or crawlspace?

Does your sump pump run and run and run driving you nuts?

I have a DVD that can take all your pain away.

My college degree was in geology with a focus on hydrogeology and geomorphology.

One is the study of ground water and the other is the study of the shape of the Earth - or the ground around your home.

CLICK HERE NOW to get the DVD and soon your basement will be as dry as the Atacama Desert.

READ the testimonial there from Fred who is the owner of the Atwood Inn B&B. He used the information in the DVD to stop water that had been plaguing his basement for over 100 years!!!!

The DVD is on sale now and you can SAVE $8.

BUY it NOW. This is a professionally manufactured DVD and it's an awesome product.

That's enough for a Sunday. I'm off to tape the drywall in the basement bathroom here.

It's also my son's birthday and I'm baking him some delicious orange rolls as part of his special day. Time to turn on the oven and preheat it!

Tim Carter
Founder - www.AsktheBuilder.com

Do It Right, Not Over!

May 20, 2016 AsktheBuilder Newsletter

I'm finally starting to get back in the groove from my ten-day vacation / business trip out to California.

You may have been one who asked me to post a few photos of what I saw with my youngest daughter Kelly. Here's one taken at Barker Dam at Joshua Tree National Park.
Barker Dam at Joshua Tree National Park
Here's one I took at Death Valley, now my favorite national park. I was at Dante's View, thousands of feet above Badwater Basin, the lowest spot in the USA. Somewhere out in that white salt flat, there's a spot that's 282 feet below sea level.
Death Valley

If you've not visited the national parks in the western USA, I urge you to try to make it happen. Your blood pressure will go down and you'll have a new appreciation for what's truly good in life.

Loyd the Inventor

A few days ago, I received an email from Loyd. He's a clever man that lives in Oslo, Norway, and he's got a very simple thing you probably should have in your garage, truck or car. Actually you may need several.

Loyd needs your help and mine to make his invention become reality and it's one I believe really deserves your attention.

He's got his project up on Kickstarter, one of the few crowd-funding websites. If you're a seasoned subscriber to this newsletter, you'll remember I did three successful projects on Kickstarter, the biggest one being my awesome shed.

Loyd has created a fascinating small tool he calls DrumRoll that allows you to roll up the PESKY long pieces of strapping that are part of the fabric ratcheting clamps. I know I have this problem!!!! Do you?

Here's what you need to know about inventors.

I get at least TWO requests a month from Kickstarter people trying to get me to tell you about their products.

I've turned all the others down so far because I just didn't feel they were that great of a product.

Loyd's invention got my attention because I know I struggle with the ratchet straps all the time. I also like how simplistic and useful the invention is.

You should really consider helping out Loyd.

Even if you don't need one and just think he deserves a chance, you can donate just $2 to his cause. If you do that, each person who gets a DrumRoll will see your name on a roll of paper inside the DrumRoll! How cool is that?????

You can get the DrumRoll in two colors. The green color is a LIMITED edition so you need to ACT NOW if you want it in green. CLICK HERE NOW to get the green DrumRoll.

If you don't want your DrumRoll in green, you can get the high-visibility orange like you see in the photo above. That's the one I want because I love that shade of orange.

To see how the DrumRoll works, CLICK HERE and watch Loyd's cool video.

I'm serious - PLEASE consider helping Loyd. This is a very good cause and I'm supporting him. I'm excited about receiving my DrumRoll so I don't have anymore strap messes in my trailer and pickup truck!

Dorina Got RIPPED OFF

Dorina did a phone consult with me yesterday. She had a horrible sewer and septic tank odor problem I solved in less than fifteen minutes.

As she told me her story, it became very evident that she got ripped off by the man that installed her new septic tank.

I won't go into the messy details but here's what you need to do.

STOP BEING SO TRUSTING!

Dorina and her husband TRUSTED the installer that he'd do what he said he would do.

So far he hasn't. The evil installer also pulled a fast one just after he pulled out the old septic tank. He then informed Dorina that he has to dig deeper to install the new tank.

With the old tank out of the ground and NO WAY to flush toilets in the house, Dorina and her husband were in a pickle. The installer pulled the classic SCARCITY card on them. Use of a toilet was scarce and the installer knew it.

Any GOOD INSTALLER would have known before the job started how deep he's got to go. All costs would have been included. There would have been no surprises.

Here's what you need to know about GOOD CONTRACTORS:

  • They have NO PROBLEMS with you putting everything in writing in a contract.
  • They encourage you to do it.
  • They won't offer resistance if you ask to put everything in writing.

CROOKS are the ones who squirm and squeal when you ask to put things in writing.

Stain Solver REMINDER

It's time to clean decks. It's time to clean patios. It's time to clean boats. It's time to clean outdoor siding.

CLICK HERE to see a photo I received yesterday from Pat. She used my Stain Solver certified organic oxygen bleach to SAFELY clean her painted fiber cement siding!

It looks NEW!

CLICK HERE to see a 30-year-old special hand-stitched pillow stored in an attic that had a terrible stain in it. Diana got the stain out with Stain Solver.

CLICK HERE to see John's teak picnic table he cleaned with Stain Solver.

Bottom Line: Stain Solver is NON TOXIC and will clean composite decks, docks, algae from patios, etc. outdoors.

GET YOURS NOW before Memorial Day!

CLICK HERE to order. Kathy and I own Stain Solver. We've been selling it since 1996.

Love it or List It and the Law

Are you addicted to HGTV shows?

A popular one called Love It or List It is making a little news.

CLICK HERE to read about it and thank your lucky stars your home is not ever featured in any of these shows.

Believe me, there are MANY HORROR stories like this out there about homeowners who are victims of shoddy workmanship that are the centerpiece of some home improvement TV show.

I'm here to tell you that the magic of video editing can hide many, many, many defects that you have no idea exist. It's all about glamour.

Many of these shows use the same brain trickery that happens when you watch magic. Your brain is putting things together that really aren't there.

Thanks to Frank Towle for alerting me about this news item.

Happy Weekend

I'm about to go tape a video about a very cool road grader you use to SMOOTH gravel driveways and parking lots.

I've got a half-mile gravel road going up to my property here in New Hampshire and believe me, it needs to be graded after months of winter plowing and abuse.

PLEASE GO help Loyd. If nothing else, donate a measly $2 so his DrumRoll is a huge success. That's less than what you'd spend on a cup of coffee for goodness sakes.

Tim Carter
Founder - www.AsktheBuilder.com

Do It Right, Not Over!

Drain Tile Installation

drain tile installation

The builder is doing just about everything right installing this drain tile. Photo Credit: Tim Carter

DEAR TIM: My last house had a basement that leaked water. I’m building a new home and want my basement as dry as the Atacama Desert. I’m confident that my drain tile was not put in correctly at my last house. What are the best practices when installing drain tile around a foundation? What materials would you use? What are the biggest mistakes you can make when installing foundation drain tile? Beverly H., Falls River, MA

DEAR BEVERLY: You’ve touched on a subject that’s near and dear to my heart. My college degree is in geology with a special interest in two things: geomorphology and hydrogeology. Those are fancy words for the study of the surface of the earth and the study of ground water. Both of those disciplines are in play when it comes to foundation drain tile.

The last home I built for my family had a basement as dry as the Atacama Desert. It wasn’t hard to achieve this and sadly most builders either don’t understand how to do it or they decided to go cheap at this phase of the construction.

Foundation waterproofing is a place you never want to go cheap or cut corners. The reason is simple. It’s extremely expensive and disruptive to have to go back at a later date and correct poor workmanship. Can you imagine digging up around your foundation after a house is built? You could be removing porches, tearing up sidewalks, driveways, expensive landscaping, rupturing buried utilities, etc.

If you want to go cheap and save money, then do it with your bathroom vanity faucet or any other thing in your home that you can replace at a later date with minimal work and effort. There are quite a few things you can do to save money on a home and come back a few years later to upgrade with relative ease as more money becomes available.

When it comes to foundation drain tile, let’s start first with the pipe. I happen to prefer the white 4-inch plastic pipe that comes with two rows of pre-drilled holes. I don’t like the corrugated pipe with the slits in it.

I’ve always installed the pipe with the holes oriented in the down position and lay the pipe on 2 inches of washed gravel that about the size of grapes. In the Midwest you normally find this gravel and its rounded. In other parts of the nation you may get similar sized stone, but it’s angular because they make it by crushing larger stone. No matter what type you use, just be sure that the gravel has no smaller pieces of stone or sand in it. You want all the stones to be the size of a grape or maybe a little larger. Water flows through this stone very fast.

I prefer to lay the drain tile along the side of the foundation footer, not on top of it. I want the level of the ground water to be as low as possible and placing the drain tile pipe on top of the footer usually forces the ground water table up to within a few inches of the top of the basement slab.

It’s vitally important that you apply true foundation waterproofing compound to the foundation walls as part of this system. That’s a subject for another column. Understand that simple hot asphalt spray is not waterproofing. It’s damp-proofing. There are rubberized asphalt-based waterproofing products that do work well.

The next step is to cover the drain tile with plenty of gravel. One of my customers years ago was so concerned about water leakage that he paid the extra money to backfill the foundation wall to within 6 inches of the final grade with the gravel. This was a little expensive, but it’s the best practice.

On most of my jobs I covered the foundation drain tile pipe with 30 inches of the washed gravel. The next step is mission critical. It’s vital that you cover the gravel with some material that captures the fine silt that will be present in the backfill dirt. I tried two things and they both worked well. I would scatter a 1-foot layer of straw on the gravel or I’d lay a piece of 30-pound asphalt-saturated felt paper on top of the gravel.

Realize when you dig up dirt it gets fluffed up. The volume increases usually by about ten percent and you disturb and free up fine silt. When this dirt is put back in a hole it settles. As rain passes through the dirt, it carries fine silt with it as it compacts the soil. This silt will readily clog drain tile pipe and the gravel rendering them ineffective. It’s mandatory that you protect the gravel and the pipe from this wretched silt.

You should also employ Mother Nature to help keep your new basement dry. This is where the geomorphology comes in. In a perfect world, you should build on a lot where the lowest part of your lot is at least three feet lower than the bottom of your foundation.

This allows you to use gravity to drain any water that makes it to your drain tile and is flowing through it. If you have a properly sloped lot, then the drain tile pipe is buried and extends all the way to a low point where it exits on the surface.

Many builders pipe this foundation drain tile to a sump and then it needs to be pumped out of the house. The issue with electric-powered sump pumps is they tend to fail in severe storms when the power goes out. This is when you most need a sump pump!

Column 1144