Trex® RainEscape® Class Action Lawsuit

Trex® RainEscape® Class Action Lawsuit

My Trex® RainEscape® has developed cracks and is leaking.

I recorded this short video showing a few of the cracks.

trex rainescape crack leak

This is but one of the many cracks in my Trex RainEscape system. That sliver of blue is the sky above my deck! Copyright 2026 Tim Carter

Other Trex® RainEscape® owners might have the same issue.

At least one person who has the same problem has left a comment on my video.

I predict, at some point, that Trex® RainEscape® may be named in a class-action lawsuit about this defect.

Plumbing Repair Cost

dirty kitchen sink with food waste

An inexpensive stainless steel kitchen strainer is in place to capture all of this food waste. Failure to do this can create clogs in kitchen drain pipes. Copyright 2026 Tim Carter

Plumbing Repair Cost - How to Avoid Them

You may think I don’t suffer as you might. I don’t know of a living person who looks forward to an expensive service call. Your AC may quit on the hottest day, your kitchen sink may get clogged with egg shells three hours before your Thanksgiving guests arrive, and/or your furnace or boiler decides to take the night off during a wicked cold spell. I’m going to share a few tips in this column that should save you many hundreds of dollars.

A Birch Tree Leaf Stops a Boiler

I’m not immune to service calls. Just last year, my wife called me on a frigid December morning while I was at my son’s house. She awoke to a very cold house. I had stayed the night before at my son’s house, seventy miles south. I was doing back-to-back days of work, helping him finish his basement.

Our relatively new modulating boiler had stopped working. I rushed home and immediately saw the error code on the digital readout. I tried to restart the boiler. It would light and start to fire up, but then it would shut down. I switched out the ignitor, think of an automobile spark plug, but that did no good. I was out of options. It was time to call in a boiler pro.

My wife has many expensive orchids, and we couldn’t allow them to perish with the dropping temperatures. I called a local company that serviced boilers. Two hours later, a tech was here. Before he crossed my threshold, the price was already $300.00 with it being a Saturday.

He spent an hour trying to get the boiler to work and was running into dead ends. Finally, he took off the clamp holding the combustion-air intake pipe to the boiler. The boiler could now get air from the basement mechanical room. Instantly, the boiler started up and ran perfectly.

Ten minutes later, the tech and I had removed the outdoor cover for the intake and exhaust pipe. A flat beech tree leaf had somehow found a way through a narrow 1/2-inch slot. Each time the boiler tried to fire up, the leaf would be pulled against the intake pipe, robbing the boiler of air. A sensor would shut down the boiler as a safety. Ten minutes later, the tech was swiping my credit card for an $800 service call.

I’ve selected three of the top things you can do with ease to prevent service calls or damage to the delicate surfaces of your home. Let’s get started.

How To Minimize Plumbing Clogs

Plumbing clogs might rank in the top three service calls of all time. There are national companies devoted to nothing more than snaking out drain clogs. Many other plumbers specialize in this much-needed service. In almost all cases, you, the homeowner, do very silly things that create the clogs.

Food waste and grease create the most common clogs. The basket strainer in your sink often has four narrow slots that prevent large food waste from getting into the drain pipes. This is not enough. You should be using a very inexpensive strainer that fits inside your existing basket strainer. This secondary strainer is made with a fine-mesh stainless steel screen. The holes are so small that a peppercorn would be caught in the mesh.

mesh sink strainer

This strainer can save you HUNDREDS of dollars on service calls. CLICK HERE to order a set.

Purchase one or two of these and stop all food waste from getting into your pipes. Food waste often doesn’t make it to the primary building drain in your home. It begins to build up and clog the pipe immediately behind your kitchen sink cabinet. Sop up all grease from plates, pots, and pans with used paper towels. Try to minimize grease going down your drains.

Garage door service calls are no doubt high on the list of unnecessary expenses. Many people neglect their garage doors. It’s very important to keep the roller wheels lubricated and the tracks clean.

It’s vital to keep the powerful spring(s) that lifts the door rust-free. A rusty spring can snap without warning. Springs within miles of saltwater corrode much faster than normal.

You can prevent rust by spray painting the spring(s), or you can spray the bare metal with a penetrating oil. Never ever try to adjust this spring. Leave that to a professional. But you can get on a short step ladder and safely spray this spring with a lightweight oil to prevent rust. It’s expensive to replace a broken garage door spring.

The failure to remember some of the basic chemistry knowledge you obtained in high school can also drain money from your checking account. You can ruin painted surfaces in your home with aggressive cleaning practices. My own daughter did this to our entrance hall walls using a magic pad that’s been banned from my house. She burnished the flat wall paint, trying to clean off stains. Now there are random polished spots that will require me to repaint the walls.

Water is the universal solvent. Food stains, mud, dirt, etc., often contain some amount of water. Stains bond very well to walls and furniture once the water evaporates.

All you have to do is rehydrate the stain, and in many cases, it will come off with minimal rubbing. You can rehydrate a stain by getting a small paper towel wet. Squeeze out the excess water. Apply the towel onto the stain and press it against the stain so the wet towel contacts the stain. Wait fifteen minutes and then try to gently rub the stain. You’ll discover, in most cases, the stain disappears with very little effort.

If you’ve not priced out what painters charge these days to paint walls, there’s a good chance it will take your breath away. Washing painted walls using a simple solution of liquid dish soap and water is all you need to make walls look new. I prefer to use an inexpensive grout sponge when washing my painted walls.

Try it on just one wall, and you’ll be amazed. Remember, do the same thing with the sponge as you did with the paper towel. Get the wall wet with the soapy water, let it sit for five minutes, then come back with the sponge and rinse the wall with clear water. The five-minute dwell time is enough to produce professional results.

Column 1642

Laundry Faucet Replacement

laundry faucet replacement

I’m holding a new laundry tray faucet with paddle handles. You can install one yourself in less than 30 minutes with a few inexpensive tools. CLICK HERE or the photo to BUY this exact faucet.

Laundry Faucet Replacement - It's Very Easy

Laundry faucet replacement is easy. You don't need to call an expensive plumber.

You may or may not know that not only am I a home builder, but I’ve also been a master plumber since age 29. I was drawn to the plumbing craft because of its fascinating three-dimensional nature. Your home has but one sewer pipe leaving your house, and often just one vent pipe poking up through your roof. However, in between these two points is a maze of interconnected pipes that all must work together to keep you and your family healthy.

Many aspects of residential plumbing are complex and difficult. Some are not. Most of the plumbing problems you encounter in your home, you can often fix yourself. My guess is you’re afraid to tackle the repair, thinking you’ll cause a leak that floods your home. You can save many hundreds of dollars if you start to do simple plumbing repairs yourself. Your confidence will grow like a dandelion in the warm spring New Hampshire sun!

I want to share with you a simple repair you can do yourself. I’m about to do the same job this week. I’m going to install a new laundry tray faucet. My existing one is about twenty-five years old. It has traditional rubber washers instead of washerless cartridges.

What’s more, my existing faucet all of a sudden started moving around as you operated the valves. The faucet came with a cheap galvanized metal retention nut that eventually rusted out. A high-quality faucet would have had a rust-proof brass nut, but I didn’t install this faucet. I didn’t build this home I live in.

The first step is to shut off the water to the faucet. I have a shutoff valve for the hot and cold water lines under my laundry sink. Rotating the handles clockwise shuts off the water. Test to ensure the water is off by then turning on your laundry faucet. If no water flows, you’re in great shape. If water is flowing, you’ll have to turn off the main water shutoff valve where water enters your home.

You only need three simple tools to replace a laundry tray faucet in almost all cases. I’ll be using a medium-sized adjustable wrench, a medium channel-lock pliers, and the all-important basin wrench.

A basin wrench is a tool that allows you to tighten and loosen the nuts that hold a faucet to a sink, as well as the nuts that connect the water-supply tubes to the bottom of the faucet. This wrench was designed to work in the narrow space between the back of a sink and the rear wall of a cabinet.

Its unique design features curved spring-loaded jaws that resemble the mouth of a fierce dinosaur. These jaws also swivel 180 degrees, allowing you to use the wrench to both loosen and tighten the nuts in the narrow space you’ll find yourself working.

Seasoned plumbers often don’t use a basin wrench when installing a faucet for the first time. They’ll attach the faucet to the sink, when possible, before the sink is installed in the countertop. With the sink out of the countertop, you have easy access to the nuts that must be tightened. An ordinary adjustable wrench is all one needs in this situation. The plumber will often attach the water supply tubes to the bottom of the faucet at the same time.

My laundry sink is a wall-hung design. Gravity holds it on the wall using a clever French cleat hanger. I intend to disconnect my p-trap from the sink using the channel-lock pliers.

CLICK HERE to purchase my durable laundry sink.

I’ll also disconnect the flexible water supply lines from the shutoff valves. I’ll then just lift the entire sink straight up. I’ll then have easy access to the underside of the sink, allowing me to switch out my faucet in just minutes. I’ll install the new faucet and water supply lines to the faucet before rehanging the sink on the wall.

Let’s talk about the water supply tubes. These flexible pipes have come a long way in just forty years. We had to use chrome-plated soft-copper supply tubes when I was an apprentice plumber. You had to cut them to the perfect length and bend them with precision. It was common for these to develop tiny leaks if you didn’t align the tubes perfectly.

Modern water supply lines are idiot-proof. They have internal rubber o-rings at each end. Leaks only happen if you just hand-tighten the nuts. Once you get the nuts hand-tightened, use an adjustable wrench to twist the nut an additional 180 degrees. It’s very simple.

It’s important to use a small amount of plumbers' putty under the body of your new faucet. My guess is your faucet with come with a plastic gasket that fits the bottom of the faucet body. A thin layer of plumbers' putty on the bottom of this gasket ensures water will not leak under the faucet and through the holes in the sink. This water, over time, can cause wood rot, mold, etc.

Excess plumber’s putty will ooze out from under the gasket as you tighten the nuts that hold the faucet to the sink. Be sure these nuts are quite tight so the faucet doesn’t slide around on the top of your sink. Be careful about applying too much pressure, should your sink be vitreous china. Aggressive plumbers have cracked china sinks by over-tightening these nuts.

Do you think you can do this job? I’m sure you can. If you need help over the phone, I’m there to guide you through this repair.

CLICK HERE to set up a plumbing coaching call with me.

You’ll save hundreds of dollars and you’ll feel fantastic once the job is complete and leak-free.

Column 1641

Zip System Leaking

zip system leaking new house wall with cement siding

Zip System Leaking - The siding on this house is being applied directly over the wood sheathing. The sheathing has a plastic covering, and tape is required to prevent water from infiltrating into the wall cavity. Copyright 2025 Tim Carter

Zip System Leaking - The Weak-Link Tape

You prefer hearing stories rather than being subjected to a lecture, don’t you? The most popular person at a holiday party is often telling stories to a small throng of people gathered around her or him. Allow me to take you on a psychic journey over the past fifty years of my construction experience.

This column is about water. You and I need water to survive. Water, however, is the enemy when it comes to your home. Water causes wood rot, mildew, and mold. It’s so powerful that it can split rock and concrete like you might crack an egg in your hand.

I grimace each time I pass a new home construction site here in central New Hampshire. All of the builders have been drawn to a plastic-coated wood sheathing like a moth to a porch light. I predict years from now, many, if not all, of these houses will suffer from water infiltration. The cost to repair the damage will be extreme.

The Evolution of Sheathing

Sheathing comes in 4-foot by 8-foot sheets. It’s 1/2-inch thick. Many years ago, sheathing was tongue-and-groove 1x6s. This lumber was used to create the forms for the cast-concrete foundations. The lumber was salvaged and then recycled by the carpenters for the wall sheathing, subflooring, and the roof sheathing.

They 1x6s were installed diagonally on the exterior wall studs, the floor joists. It was installed perpendicular on the roof rafters The diagonal installation method added strength preventing the walls from racking.

Modern sheathing is a third-generation engineered wood product. Large sheets were developed to cut labor costs.

Version one was plywood. Version two was oriented strand board (OSB). The latest version is OSB, but it’s now coated in plastic to stop water from soaking into the wood. A special tape is required to seal the gaps where one sheet abuts another. This tape, or a similar one, is required to seal window and door nailing fins that sit on top of the wall sheathing. This tape, in my opinion, is the Achilles’ heel of the system.

Water - Resistance is Futile

The builders and carpenters of old knew all about the destructive force of water. Asphalt-saturated felt was used on top of the sheathing to protect the 1x6 sheathing, wall studs, and all the other wood inside the homes. I remodeled many old homes early in my building career that were protected by felt paper. It’s a fantastic product when installed with diligence.

Fifty years ago, felt paper was kicked to the curb by air and water infiltration barriers. These products came in giant rolls. The synthetic fabric stopped liquid water from passing through to the wood, but it allowed water vapor to escape to the atmosphere. That’s a good thing.

The plastic-coated OSB sheathing does allow water vapor transmission. It has a perm range of 12-16 perms, allowing water vapor to escape to the atmosphere.

Do you know why your roof doesn’t leak? Most homes in the USA are protected by asphalt shingles. These install just like the feathers on a bird or the scales on a fish. One overlaps another. This simple system works very well, so long as you have a roof with a decent pitch of 20 degrees or more.

installing shingles staggered offset

This is how normal roof shingles are installed. The overlapping layers shed water.  Copyright 2026 Photo Credit: Tim Carter

Your roof would leak like a sieve if you installed the shingles backwards. Imagine if the top edge of a lower shingle sat above the next shingle higher up on the roof. Water cascading down the roof would flow behind the shingle and get into your home.

The tape used on the modern sheathing is installed this way! The top edge of the sealing tape is not covered by something above it. Water that gets behind the siding or brick can travel down the OSB and get behind the tape should it detach from the plastic coating.

The tape is counting on expert installation. The tape hopes the plastic-coated OSB is clean and dust-free. The tape is counting on the installer to firmly press it against the sheathing. The tape is counting on the temperature to be between 0F and 120F.

black tape window leaking

Look at the bubbles in the tape. The one bubble runs to the TOP of the tape and is an open pipeline for water to infiltrate into the house!

black tape window leaking

Look closely at the tape at the corner of the window! See how it's not adhering to the wall? There are any number of reasons why this happened. The tape requires expert installation techniques. Copyright 2026 Tim Carter

You, the homeowner, are counting on the tape’s adhesive to sustain thousands and thousands of repeated expansion and contraction cycles over decades. Imagine how the tape gets hot and cools down each and every day as the sun rises and sets.

It’s my opinion that this tape has not yet stood the test of time. The residential construction industry is littered with products all thought to be amazing, but over time, they fail. Think of the thousands of homes that suffered catastrophic leaks from plastic plumbing water supply pipes that become brittle and crack when subjected to the chlorine found in most municipal water systems. Think about the class-action lawsuits involving low-quality house siding made from wood dust and glue. I could go on and on and on.

I can hear you. “Tim, if this is how my builder installs sheathing, what am I to do?” I admit this is a major conundrum. I can assure you I’d never rely on this tape to prevent water from entering my home. I’d install traditional OSB and cover it with the synthetic fabric air and water barriers.

This method allows you to overlap the synthetic fabric over the top of the window and door nailing flanges. This fabric can be installed like roof shingles on two-story homes. The first-floor level is covered first. You then overlap the next row of fabric on top of the one below. The manufacturer even makes a special tape to seal this overlap.

You get one chance to get the sheathing protected the right way. Can you imagine what the cost might be years from now to repair a house where the OSB tape has failed?

This is why my Ask the Builder motto is: “Do it Right, Not Over!”

Column 1640

Subway Tile Bathroom

subway tile bathroom vertical install

Subway Tile Bathroom - Subway ceramic tile installations are much like brick installations. The shorter joint lines are staggered. This tiny detail can be very challenging for the rookie tile setter. It's even harder to install subway tile vertical instead of horizontal. Copyright 2025 Tim Carter

Subway Tile Bathroom

I have been installing a stunning green subway tile the past two weekends in my son’s new basement bathroom. Subway tile is rectangular in shape. The grout joints between each tile have the same back-and-forth staggered pattern as mortar joints between bricks in a wall. It’s a fascinating look, and one you should give serious consideration to should a tile job be in your future. The colors, textures, and crackled glazing in some subway tile will take your breath away.

This bath is next to a speakeasy bar. The overall theme of the entire basement remodeling project is Art Deco. Subway tile is most often installed horizontally, just as you see most brick walls. My son likes to test my skill level, so he said, “Dad, I want to install the subway tile vertically on the walls in the bathroom. I think it will be stunning.”

He was right. We have just one more day of setting tile before we grout, and the bathroom is going to garner all sorts of Oooos and Ahhhs from his friends and neighbors. This bathroom, once finished with the sleek wall-hung toilet and vanity with a copper sink, might qualify for a Better Homes & Gardens cover photo.

I’ll never forget my first ceramic tile installation. I was 23 years old and thought, “How hard can this be?” I installed ordinary 4x4 tile above a bathtub. I discovered within minutes that the error tolerance is about 1/16th of an inch. Level and plumb lines created using a high-quality level are a must because each decent tile is perfectly square. One tile out of alignment will throw off all other tiles that abut it.

All that said, I feel you can do a simple subway tile installation. The best part is I offer phone coaching if you need some extra inspiration or help.

Subway tile poses a unique challenge. Each row needs to be in a very straight line. High-quality tile makes this easy because the tile is created with small self-spacing edges. The tile will stay straight as long as the first row is straight, level, or plumb, and you apply the perfect amount of adhesive to the walls. You don’t want adhesive to ooze up in between adjacent tiles. This extra adhesive can alter the alignment.

There are two primary types of adhesive you use to set ceramic tile. One is an organic mastic that resembles cool cake icing. It spreads with relative ease using a notched trowel. Organic mastic is fine for wall installations where heavy objects will not subject the tile to concentrated pressure. The mastic retains a small amount of flexibility once it’s cured.

Ceramic tile is weak in tension. This means that if you press on a tile and it flexes, it will crack. I discovered this decades ago when I used mastic to set tile on a restaurant kitchen floor. The tiles cracked when heavy equipment or table legs pressed down on the tile. I had to remove the broken tiles and replace all of them using thinset mortar. Thinset is nearly identical to brick mortar and hardens like rock with no flexibility.

Thinset mortar, in my opinion, is the best adhesive to use. It’s waterproof. Thinset is a blend of fine silica sand and Portland cement. It can often contain polymers that enhance adhesion. It often contains a chemical retarder that slows down the chemical reaction that causes thinset to transform into rock. This retarder helps to extend the working time of the thinset. You need to press the tile into the wet thinset within several minutes of it being applied to the wall or floor. This ensures you get a great bond between the tile, the thinset, and the substrate the tile is applied to.

Notched trowels are used to spread the mastic or thinset. You match the notch size to the tile size. The tile manufacturer often provides tables to help you get the right trowel. Glide the trowel over the substrate at a 45-degree tilt as you spread the mastic or thinset. This will allow you to apply the perfect amount of adhesive.

You’ll have to cut tile to fit around electrical boxes and water pipes. Straight cuts can be created using an inexpensive tile snapper for most tile. The snapper has a carbide wheel that scratches the glazed surface. Once scored, the tile will snap along this line just like one cuts glass.

Porcelain tile can only be cut with a wet or dry saw. You can’t use a snapper and expect straight lines.

Wet saws or dry tile carbide blades are required to make L-shaped cuts. You can purchase a decent wet saw with a diamond blade for several hundred dollars. I have a professional wet saw that makes perfect cuts. It might make sense for you to purchase a high-quality saw and sell it once you’re done with your job. Pros are always looking for used wet saws in new condition.

You can cut circular holes in subway or other tile, using inexpensive diamond hole saws. They come in many different diameters. The tile needs to be clamped to a solid surface when making the cut. Use a slow drill speed to create the hole in the tile.

You’ll discover it pays off in spades to spend time thinking about the layout of your tile. Subway tile, and most other tile, likes to be centered. You want to minimize, if possible, cutting thin pieces where the tile abuts an adjacent wall. Thin strips of tile must be cut on a wet or dry saw.

Grouting your subway tile is the easiest part of the job. Water is your biggest enemy. It’s best to use wall grout for thin grout lines that are 1/8-inch or less in width. Wall grout doesn’t contain sand. Sanded grout is made for wider grout joints.

The grout should be the consistency of warm cake icing. A stiff rubber float is used to apply it. I spend quite a bit of time explaining why water can ruin all the hard work you invested in your tile job.

I show grouting a floor in the video series. It's the same process for wall tile.

CLICK HERE to see all the tools and things you should have on hand when grouting.


Column 1639

Architect Fee for Renovation

unfinished room in basement renovation

Architect Fee for Renovation - The owner of this house knew the cost per square foot of this basement remodeling job before plans were drawn. It’s easy to do. Copyright 2025 Tim Carter

Architect Fee for Renovation - How to Pay the Minimum

I was on the phone for an hour a few days ago with a young man who lives about 15 miles north of downtown Chicago. He’s used my affordable phone coaching service in the past to solve a complex heating and air conditioning problem with his old home. This call was about a new ambitious whole-house remodeling project he and his wife want to do.

This young man thought he had taken all the right steps before he asked for my advice. As you’re about to discover, I was the first person he should have talked to after he and his wife decided to embark on this remodeling adventure. Instead, I was the last person, and it cost him well over $10,000.00.

Months ago, he hired an architect to draw preliminary plans of what the house would look like after all the work was complete. This remodeling work involved both the first and second floors. I can tell you from doing jobs like this myself that this couple was thinking about a massive undertaking. I knew it would be very expensive.

The homeowner wanted me to be the devil’s advocate and share my feelings about the new floor plans. I’m honest to a fault in these situations, and I rarely sugarcoat my responses. Twenty minutes into the conversation, the homeowner said, “I’m starting to think I’ve wasted all of the money I’ve spent so far on these plans. I'm amazed at all the flaws you’re pointing out in such a short time.”

What is the Current Cost Per Square Foot Price?

The conversation then shifted to money. The young man never mentioned what his budget is, and to be honest, it’s none of my business. He could be very successful at a young age, like my son-in-law. He could have inherited vast sums of money so the cost of the job is immaterial. His wife may earn scads of money. Perhaps they hit the lottery.

I have a simple workaround to the budget issue. I’m astonished this is not employed by each and every architect. I can tell you for a fact, none of the Cincinnati, Ohio, architects who drew plans for the projects I built years ago did this. All too often, I sat at a couple’s dining room table only to see their faces turn ghostly white when I showed them my estimate. Many wasted thousands of dollars on architect fees.

You may be in the exact same position as this young Chicago couple. Here’s how easy it is to discover if you have enough money to move forward on creating plans for your upcoming project, be it a bathroom, kitchen, or large room addition. This same method works for building a new home, too.

Step 1: Gather Photos

The first thing I would have told the young man to do is scour the Internet for stunning photographs of exactly what he wants the inside of the house to look like. I’m talking about great kitchen and bath photos, vaulted ceilings, floor and wall finishes, etc. Pictures, as you know, are worth thousands of words.

Step two is to meet with several contractors who would be interested in getting the job. You ask them to come over and meet for just an hour. As you’re setting up the meeting, you let him know you’re trying to discover the cost per square foot to do what you want done. It’s not a bad idea to offer to compensate them for this time.

Your meeting goal is to determine the current cost per square foot for the type of job you want to do. The photos you’ve collected from the Internet will communicate to the contractors the level of finish they need to know.

Every decent contractor knows exactly what each of his finished jobs costs. Be sure to ask the contractor to bring sets of plans with him. Let him know on the phone call what you have in mind to do at your home, so he can bring plans of similar jobs he’s completed in the past 18 months or so. Tell him you don’t need to know the name or address of these jobs. That’s sensitive information.

Looking at the plans, it doesn’t take much time to determine how many square feet of space was remodeled. Using the finished price for each job, it’s simple math to determine the cost per square foot.

Not one of the architects I ever worked for bothered to track this invaluable information. Once they finished the plans, they all divorced themselves from the job. I’m sure some architects out there do track this information, and these are the ones you want to talk with once you start your planning process. They can verify the numbers you’re hearing from the contractors you talk with.

Let’s say my young couple in Chicago had a budget of $400,000. Imagine if they discover the current cost to do whole-house remodeling in Chicago is $300 per square foot, including a new kitchen and a bathroom or two. This means their planned job can’t exceed 1,300 square feet.

Knowing this, they can use a simple tape measure and calculate the number of square feet of space they intend to remodel. If it’s 1,300 square feet or less, they can now proceed to draw up plans. Nothing about this is hard; it’s just a matter of doing as much homework as you can before you commit to hiring an architect to draw plans for a project that may not be within your budget.

The last portion of the phone consult with the young man touched on critical flaws in his floor plan. I shared with him how to mark up simple plans showing the invisible interior hallways within rooms. These are the pathways you walk to get around in rooms. The minimum width of an invisible hallway in a room, in my opinion, is 24 inches. More often than not, they’re 30 inches wide.

It’s mission-critical that you draw these out and even shade them in with a color on plans. Furniture or built-in cabinets are not allowed to encroach on these spaces. The next step is to create scale cutouts of your furniture to see if it will fit in the remaining space in each room.

You can shortcut this exercise by looking at the existing rooms in your home. What rooms are too small? What rooms might have too much space? Look at each room in your home and write down the tiny things that aggravate you about it.

Lastly, each adult who lives in your house needs to provide input. Make a list of the top three things each person wants to see in the final project. It might be a spacious walk-in pantry. It might be a simple window seat. No matter what it is, try to see if it can’t be incorporated into the final product so everyone is happy!

Column 1638

Self Storage Savings

two-story outdoor shed

Self-storage savings: My two-story shed is now thirteen years old. It’s already saved me over $50,000 in off-site storage fees. You can BUY THE PLANS HERE. Copyright 2025 Tim Carter

Self Storage Savings - Build a Shed

Are you surrounded by off-site storage businesses like I am? Within a fifteen-mile radius of my rural home in central New Hampshire, there are thousands of storage spaces in metal buildings one can rent for a king’s ransom.

Self-storage is the key to saving huge money. There are a few ways to do this.

Within the past few months, an enormous multi-million dollar national-brand three-story storage business opened up. It’s got three loading docks renters can use to store or retrieve their belongings. Just 1,000 feet away, a more traditional single-story metal building with 50-plus units came online in the past month. Times must be really good for people to have so many possessions that they have to store them at one of these places.

The most shocking thing is the cost to rent a space. Are you sitting down? A tiny 5-foot by 5-foot by 8-foot tall cubicle costs $90 per month. That’s $3.60 per square foot per month. A 10-foot by 15-foot by 8-foot tall space is $194.95 per month, or $2,339.00 per year.

The good news is you might have quite a few options to avoid these breathtaking monthly fees. The best solution depends on the size of your lot and your local zoning laws. Your existing garage, should you have one, may be a storage goldmine you’ve overlooked.

I found myself in a storage crisis fifteen years ago. I moved from Cincinnati, Ohio, to central New Hampshire. My wife and I had thirty-five years of accumulated possessions, plastic bins full of cherished toys used by our three children, and lots of furniture. We moved from a larger house to a smaller one.

I had to rent a very large off-site storage space the day the movers arrived. We packed it full of all sorts of stuff. It cost me about $200 a month back in 2010. That same space today is now close to $350 a month.

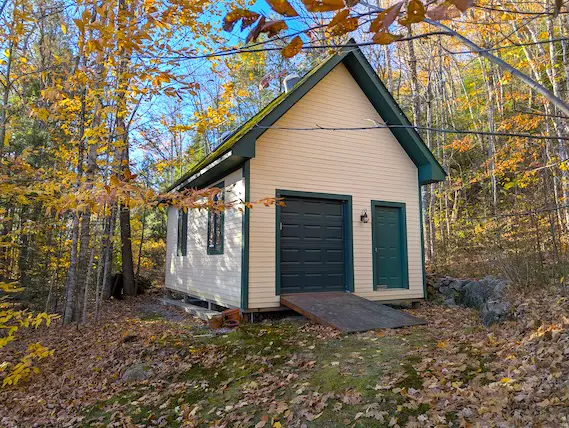
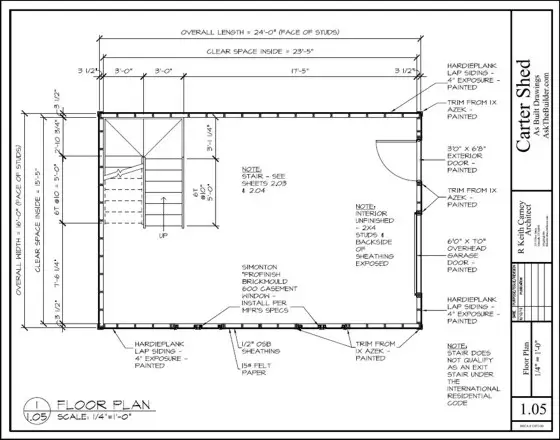
My lot was large enough that I could build a large 16-foot by 24-foot free-standing two-story shed. I built this shed thirteen years ago in my spare time. It only took about two months to complete it. You can purchase the detailed plans of my shed. Click the blueprint below. The seventeen pages were drawn by an architect friend. Go here to get the amazing plans.

SamplePlan Shed Plans Tim's

The materials for my shed cost just over $10,000.00. It’s a deluxe shed that matches my house. It’s got a handy 6-foot-wide overhead door, a man door, skylights, and two windows. I could have spent less, but I wanted the shed to look like it had been built at the same time as my home. I moved my possessions into the shed in 2012, and since that day, I’ve saved over $50,000 in off-site storage fees. You can save big money, too!

You may want to purchase a pre-built shed. These are built to minimum standards in my opinion, but one might suffice for you. I priced out a 12x10x7-foot shed that has a window and a large door. The cost is only $3,299.00. This shed, if maintained, might last for decades.

You can purchase larger pre-built sheds that can be delivered to your lot. Just be sure you check your local zoning laws before you sign a contract. It’s also important to anchor these sheds to the ground so they don’t blow away in a severe windstorm.

Your existing garage may have a tall ceiling. The garage at my son’s new home has a ceiling that’s almost 14 feet tall. This winter, he and I are going to build a loft with just enough headroom that he doesn’t have to duck up on the loft or underneath it down below.

I built a similar, smaller loft that was 4 feet deep in my last home. I made the bottom of the loft just 6 inches higher than the height of the hood of my wife’s car. She could pull forward and park the front of the car under the handy loft.

This small loft created 640 cubic feet of storage space from what was previously just empty air. Compare that to the tiny 200 cubic feet of space you’ll get with the 5x5 off-site storage locker for $90 per month! My loft only cost several hundred dollars to build.

Do an online search and you’ll discover all sorts of unique storage solutions for garages with taller-than-average ceilings. There’s one system I’d not recommend for my friends or family. This system requires you to install metal tracks on the ceiling. Large plastic bins slide into the tracks.

You need to be on a ladder to slide the bins into the tracks. That’s a very dangerous maneuver, in my opinion. You can lose your balance and fall off the ladder while lifting a heavy bin over your head.

Should you decide to build your own shed or buy a pre-built one, I urge you to watch a video I recorded years ago. The biggest mistake most make is buying or building a shed that’s too small. Empty sheds look spacious, but as soon as you start to put things in them, they shrink in size like a deflated balloon.

I show in my video how to place the things you want in the shed on your lawn or driveway apron. Boxes and bins are easy as they can stack. But lawn mowers, wheelbarrows, snowblowers, bicycles, etc., can take up vast amounts of floor space. https://www.askthebuilder.com/how-to-plan-a-shed/

Once you have all the items placed on the ground, stretch a string around them, creating a rectangle or square. This is the minimum size your shed needs to be to hold all you have now. You’ll need a bigger shed if you add more to your clutter collection.

You can also de-clutter. I’m in the midst of doing that now. I take clutter to my town dump each time I go there with my garbage. My town has a wonderful “free room” in the recycling building. You can take just about any item there and place it on the shelves. Clothes, appliances, books, trinkets, games, you name it, can all be found in the free room.

Some residents retrieve items from the free room and sell them online. You can do that too if you have the time and energy. It’s easy to sell online, and you can turn your clutter into cash with minimal effort.

Column 1637

Bathroom Condensation Leads to Mildew

condensation on painted wall

Bathroom condensation happens in your home. That reflection on the wall above the shower is caused by invisible condensation on the flat wall paint. Hot, steamy showers feed mold growth in your bathroom. Copyright 2025 Tim Carter

Bathroom Condensation Causes Mildew

Do you wage a constant war against mold and mildew in your home, especially in your bathroom? You’re not alone. Millions of people fight this scourge, and businesses have tried to develop all sorts of products to slow or stop the growth of this ugly, black organism.

Your chances of slowing mildew and mold growth increase exponentially once you understand the basics of how and why it flourishes inside and outside your home.

Mildew and mold are very similar to fire. Have you given much thought to what you need to have a fire? You need just three things: fuel, oxygen, and a heat source. Take away any one of those three, and you don’t have a fire.

Mildew and mold need just three things to grow: mold spores, food, and water. Eliminate just one of those, and you don’t have mold and mildew. It’s pretty much impossible for you to eliminate mold spores in your home. There are millions and millions of them coating just above every surface in your home. You’d need constant, expensive filtration systems to capture these tiny spores. Only high-tech laboratories can afford this type of filtration.

You have mildew and mold food all over your home. Dust, grease, body oils, soap film, etc., are all excellent food sources for mildew and mold. You can eliminate these by doing a deep clean of every surface in your home. Who has the time for this? I know I don’t. You’d have to be cleaning like crazy each and every day.

That leaves you with water. Eliminate water and you’re golden. This is why folks who live in the desert or a very arid climate have fewer issues with mold and mildew than those of us who get lots of rain.

Let’s talk about hot, steamy showers. I’m talking about the ones where, when you exit the shower, so much condensation has formed on the mirror that droplets of water have run down the glass.

You probably think the condensation just forms on the mirror. You’re wrong. I’m sure you remember your high school physics class about dew points, right? All the surfaces in your bathroom are pretty much the same temperature as the mirror before you turn on the hot water. Exterior bathroom walls in cold climates are very problematic. The surface of the wall could be five or ten degrees lower than the mirror surface!

This means that condensation forms on the walls, ceilings, and all other surfaces in the bathroom in addition to the mirror. You don’t see the condensation because the surfaces are not reflective, but believe me, it’s there.

I know you can’t eliminate water or water vapor in your bathroom. Your challenge is to minimize as much of it as possible to stop or minimize the mold and mildew you so dislike.

You can start with an excellent bathroom exhaust fan. Most homes have ones that do very little to exhaust the water vapor. The best ones will suck hundreds of cubic feet per minute of moist air and expel it to the outdoors. Never allow this humid air to dump into an attic space or out under a roof overhang. Install a roof vent or a wall vent outlet, much like a dryer vent, on vertical walls.

Keep in mind that these powerful fans must be able to pull into the bathroom the same amount of air they’re sending outdoors. This means you may need to crack the door a bit or install a new louvered vent in the bottom of your bathroom door. You can also keep the bathroom door open a bit, but this eliminates complete privacy.

In you live alone or are not overly modest, you might be able to shower with the bathroom door open. This will help send much of the steamy water vapor out into the rest of the home, where it mixes with drier air. I know this will make the bathroom cooler, but you can offset this by installing a radiant heater in the bathroom to keep you toasty warm in your birthday suit.

Here’s the hard part. Mold and mildew will not have a chance so long as you dry off all the surfaces in your shower area. A high-quality squeegee can help. You need to get all, or much of, the liquid water from the glass, tile, or acrylic surfaces into the drain. You can also use old towels to dry off the surfaces. Do this, and I can almost guarantee you that your caulk and grout will never have a mold or mildew issue.

It’s easier said than done. You may still be in a sleep daze, or running late, and can’t take the extra minute it takes to dry off everything. I get it. You may want to install a vertical oscillating fan in your bathroom that you can turn on as soon as you have your robe on.

Do you have a shower curtain? Be sure to wave it back and forth to try to get water off of it. Don’t pull the shower curtain all the way across the shower area to make it look pretty. You need air to get into the shower. Keep glass shower doors open after you leave the bathroom.

Leave the bathroom door wide open after you walk out. Your goal is to have all the surfaces in the bathroom dry as rapidly as possible. Do whatever it takes to get the condensation to evaporate as fast as possible.

Column 1636

Repair Wood Rot

wood rot under a dryer vent.

Rainwater splashing up from the gravel just below this dryer vent outlet is the primary cause of this wood rot. My guess is the painter never coated the bottom edge of the wood block allowing water to soak into the end grain. Copyright 2025 Tim Carter

Repair Wood Rot - There are Different Methods

Do you have wood rot happening at your home? It’s a very common problem. Wood rot, in my opinion, is getting worse each year because new wood is more susceptible to rot, and many tradespeople are not coating the fresh cut ends of wood with paint or preservative. As you might expect, clever alternative products have appeared in the marketplace to take wood rot off your plate. I’ll discuss those in a moment.

Wood rot is a sibling to mold growth. Mold growth requires but three things: a food source, mold spores, and water. Those three things are almost always available in and outside your home.

Wood fibers, and especially the soft light-colored spring wood, is the food source for wood rot. Fungus spores are a simple organism that’s also abundant around your home. Rainfall, moisture in the soil, and even water vapor in humid climates, allows the fungi to start to munch on the wood in and around your home.

Rot is more common with exterior wood than interior simply because water falling from the sky sustains the fungi that’s eating away at the wood. Wood rot happens indoors only when you allow interior wood to get wet and stay wet.

A leaking caulk joint in a shower can cause wood rot. Leaks around a toilet are a common cause of a wood subfloor and the joists below to rot. Roof leaks and dryer or bath-fan exhaust in attics can rot out roof sheathing, rafters, and trusses with ease.

Don’t mistake dry rot as some other issue. Dry rot is just wood rot but the rot stopped because the water supply was cut off. The fungi stop growing once their water source disappears. The active wood rot destroyed the lignin that holds together the wood. This is why dry rot wood crumbles in your hand much like a handful of crisp oyster crackers.

I had a wood rot issue at my own home a few years ago. I didn’t build the house I live in. The builder used cheap exterior wood trim to frame around all my windows and exterior doors. This trim is made from hybridized trees that have been genetically modified to grow fast. This fast growth creates huge amounts of less-dense spring wood. This is the wood that is created when a tree grows in the spring.

Water cascading down from my roof splashed up and onto the vertical trim on each side of my exterior doors on my upper deck. I had several choices how to deal with the problem.

The least expensive method was to remove the destroyed wood and patch it with wood epoxy. This method works well for small areas of rot.You need to have a bit of hand-eye coordination to make an expert repair as you have to apply the sticky epoxy compound much like you’d apply drywall joint compound to a wall. The issue is the wood epoxy has the consistency of peanut butter. It’s also very sticky and difficult to tool!

I decided the easiest thing to do was to cut off the bottom 9 inches of the wood trim. I then put in place new plastic trim that was the identical size of the original wood trim. My new plastic trim will never rot.

I used a vibrating multi-tool to cut out the old trim. I made a jig that has a 45-degree-angle cut to act as a cutting guide. I didn’t want a flat seam where the new trim met the old trim. I wanted a sloped seam so water would not flow back behind the trim. The flat surface of the multi-tool blade resting on the sloped jig made this a very simple task.

I then applied two coats of exterior paint to this angled upwards sloping cut of the wood trim. This paint would help prevent future wood rot by not allowing water to get to the wood fibers. I made an opposite 45-cut on the new plastic trim and slid it into position. You can barely see this thin mitered seam now that it’s finished.

A single mom I help out from time to time has a similar wood rot issue at her home. She has four huge solid-oak 8-inch by 8-inch posts that support an exterior wall of her home. These wood posts sit on custom-made steel supports one of which was covered with 5 inches of soil.

The moist soil caused the dense oak to start to rot. Fortunately, this rot is somewhat shallow and it only extends into the oak about 1.5 inches. I feel the best way to make this repair is to carefully cut away the rot using several different power tools and a router with an extended bit.

I plan to cut away enough of the oak such that I can then replace it with a small length of a treated 2x4. I’ll use a piece that’s been graded for direct burial as it has quite a bit of the chemical preservatives in it. I plan to coat the entire oak post with two coats of liquid copper naphthenate. I’ll be sure to coat the hollowed-out portion of the oak with at least three coats before I insert the 2x4 patch.

I’ll also apply two coats of the copper naphthenate to the other oak posts as a preventative measure. CLICK HERE to purchase this amazing DIY wood-rot prevention liquid.

This product is easy to work with, and it allows you to do a fairly decent job of protecting wood. Copper is a natural biocide. This is why sheets of copper were applied to the hulls of clipper ships and Old Ironsides to prevent the growth of marine barnacles. Barnacles create lots of friction and slow the ships as they sail in the deep blue sea.

I used nothing but redwood trim on the last house I built for my family. Redwood contains lots of natural chemicals that fight against wood rot. Cedar also has natural chemicals that fungi find distasteful. These are the only two wood species I’d use if I had to put wood on the exterior of a home.

Plastic wood trim is available. The plastic house trim is white. My son’s new house has quite a bit of it on the exterior. You can paint this plastic trim, but you need to pay close attention to the recommendations of the manufacturer. The plastic has a very high expansion/contraction coefficient.

Painting the plastic with dark colors increases the amount of movement as it increases the amount of heat retained by the plastic. Most paints don’t have the adhesive strength to withstand this much movement. The paint may start to peel, and then you’ll have a real mess on your hands.

Column 1635

Finish Nail Guns are Affordable

senco finish nail gun

I’m using one of my favorite tools of all time. A pneumatic gun that fires thin finish nails and countersinks them too! CLICK THE PHOTO to buy the BEST BRAND - Senco. You can CLICK HERE too. Copyright 2025 Tim Carter

Finish Nail Guns - Affordable and Amazing

A few months ago, I brought my 20-ounce hammer and a traditional nail set tool with me to church. A six-penny finish nail, driven by a carpenter in the late 1800s through a piece of oak trim, had worked its way out of the wood about 1/8 inch. The head of the nail caught on my shirt one morning when I leaned against the wall to give my back a rest.

I arrived at church early so as not to bother those who were praying in peace. It only took me about five seconds to drive the nail head below the surface of the wood. I thought about how the finish carpenters who installed this stunning oak woodwork in my church would be in awe of modern finish nail guns that drive and countersink a nail in the blink of an eye.

I’ve used nail guns for nearly fifty years. You can only appreciate the magic of these tools by driving a nail the old-fashioned way using a hammer. Finish nails require much more hand-eye coordination than hammering a 16-penny nail driven into a rough 2 x 4. You must carefully hammer the small finish nail and not miss striking it. Should that happen, you end up with a nasty beauty mark on the surface of the wood. This is unacceptable in finished woodwork.

Once you get the top of the finish nail within 1/4 inch, or less, of the surface of the wood, you then have to place the correct nail set tool at the correct angle on top of the nail. You then start to carefully tap the top of the nail set to drive the nail deeper and deeper until the head is below the surface of the wood.

If the nail set tool slips off the top of the nail before it’s below the surface of the wood, you end up with a different defect. Now you have a much larger hole to fill in with wood putty or spackling compound.

Finish nail guns eliminate these mistakes. The tools are designed to drive the nail in one instant motion, much like a bullet leaves a rifle. You can adjust the depth of drive so the nail is set to the perfect depth. These guns can drive a nail through solid oak like you might push a pin into a cork bulletin board!

The common finish nail gun drives a 16-gauge nail up to 2.5 inches long. Just about all of the nails have a clear adhesive coating. The friction of the driving motion liquifies the glue, and once it is in the wood, the adhesive helps keep the nail in place. The 16-gauge nails can be as short as 1 and 1/4 inches.

There are different finish nail guns that drive smaller and smaller nails. An 18-gauge gun is perfect when dealing with small accent trim moulding. These nails have smaller heads, so the hole that needs to be filled is about the diameter of an uncooked grain of rice.

You can also purchase pin nail guns. These shoot extremely small fasteners, much like a needle or a straight pin. The holes they leave are almost invisible. These pin nailers are perfect for crafts where small pieces of wood are assembled.

The energy to drive the nails comes from three different sources: compressed air, propane, or electricity. The compressed air, or pneumatic, guns require you to have a small air compressor and a hose to deliver the air to the tool. Before you know it, you’ll have well over $500 invested.

The guns powered by propane or electricity have no hoses. A small propane cylinder that is contained within the gun can provide enough energy to drive thousands of nails. These guns do require a small rechargeable battery. The battery powers a spark plug that ignites the propane gas.

The electric finish nail guns are the simplest tools of all. They derive all their power from a rechargeable lithium-ion battery. Guns that come with two batteries allow you to work non-stop. One battery can be recharging while you use the other one.

I can assure you that once you use a finish nail gun, you’ll never go back to using a hammer and a nail set. I can drive 20 nails with a gun in the time it takes to carefully drive a normal nail and set it by hand.

As with many things, you get what you pay for. Beware of off-brand nail guns. They may jam or malfunction, causing you considerable grief. My brand-name guns have driven tens of thousands of nails and never malfunctioned. I can count on a perfect result so long as I keep the gun clean and oiled.

Be sure you test drive a finish nail gun. Some inferior ones have a design where you need to cock your head at an angle to see exactly where the nail will be driven. I once did a review of one of these inferior guns. The manufacturer was so incensed by my telling the truth that they stopped sending me tools to review. What’s that old saying? The truth hurts.

Column 1634