Architect Fee for Renovation

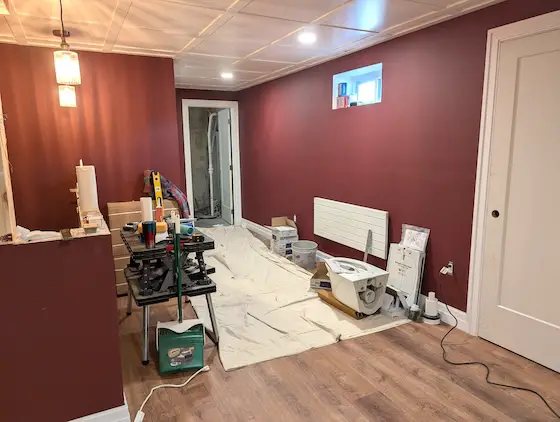
unfinished room in basement renovation

Architect Fee for Renovation - The owner of this house knew the cost per square foot of this basement remodeling job before plans were drawn. It’s easy to do. Copyright 2025 Tim Carter

Architect Fee for Renovation - How to Pay the Minimum

I was on the phone for an hour a few days ago with a young man who lives about 15 miles north of downtown Chicago. He’s used my affordable phone coaching service in the past to solve a complex heating and air conditioning problem with his old home. This call was about a new ambitious whole-house remodeling project he and his wife want to do.

This young man thought he had taken all the right steps before he asked for my advice. As you’re about to discover, I was the first person he should have talked to after he and his wife decided to embark on this remodeling adventure. Instead, I was the last person, and it cost him well over $10,000.00.

Months ago, he hired an architect to draw preliminary plans of what the house would look like after all the work was complete. This remodeling work involved both the first and second floors. I can tell you from doing jobs like this myself that this couple was thinking about a massive undertaking. I knew it would be very expensive.

The homeowner wanted me to be the devil’s advocate and share my feelings about the new floor plans. I’m honest to a fault in these situations, and I rarely sugarcoat my responses. Twenty minutes into the conversation, the homeowner said, “I’m starting to think I’ve wasted all of the money I’ve spent so far on these plans. I'm amazed at all the flaws you’re pointing out in such a short time.”

What is the Current Cost Per Square Foot Price?

The conversation then shifted to money. The young man never mentioned what his budget is, and to be honest, it’s none of my business. He could be very successful at a young age, like my son-in-law. He could have inherited vast sums of money so the cost of the job is immaterial. His wife may earn scads of money. Perhaps they hit the lottery.

I have a simple workaround to the budget issue. I’m astonished this is not employed by each and every architect. I can tell you for a fact, none of the Cincinnati, Ohio, architects who drew plans for the projects I built years ago did this. All too often, I sat at a couple’s dining room table only to see their faces turn ghostly white when I showed them my estimate. Many wasted thousands of dollars on architect fees.

You may be in the exact same position as this young Chicago couple. Here’s how easy it is to discover if you have enough money to move forward on creating plans for your upcoming project, be it a bathroom, kitchen, or large room addition. This same method works for building a new home, too.

Step 1: Gather Photos

The first thing I would have told the young man to do is scour the Internet for stunning photographs of exactly what he wants the inside of the house to look like. I’m talking about great kitchen and bath photos, vaulted ceilings, floor and wall finishes, etc. Pictures, as you know, are worth thousands of words.

Step two is to meet with several contractors who would be interested in getting the job. You ask them to come over and meet for just an hour. As you’re setting up the meeting, you let him know you’re trying to discover the cost per square foot to do what you want done. It’s not a bad idea to offer to compensate them for this time.

Your meeting goal is to determine the current cost per square foot for the type of job you want to do. The photos you’ve collected from the Internet will communicate to the contractors the level of finish they need to know.

Every decent contractor knows exactly what each of his finished jobs costs. Be sure to ask the contractor to bring sets of plans with him. Let him know on the phone call what you have in mind to do at your home, so he can bring plans of similar jobs he’s completed in the past 18 months or so. Tell him you don’t need to know the name or address of these jobs. That’s sensitive information.

Looking at the plans, it doesn’t take much time to determine how many square feet of space was remodeled. Using the finished price for each job, it’s simple math to determine the cost per square foot.

Not one of the architects I ever worked for bothered to track this invaluable information. Once they finished the plans, they all divorced themselves from the job. I’m sure some architects out there do track this information, and these are the ones you want to talk with once you start your planning process. They can verify the numbers you’re hearing from the contractors you talk with.

Let’s say my young couple in Chicago had a budget of $400,000. Imagine if they discover the current cost to do whole-house remodeling in Chicago is $300 per square foot, including a new kitchen and a bathroom or two. This means their planned job can’t exceed 1,300 square feet.

Knowing this, they can use a simple tape measure and calculate the number of square feet of space they intend to remodel. If it’s 1,300 square feet or less, they can now proceed to draw up plans. Nothing about this is hard; it’s just a matter of doing as much homework as you can before you commit to hiring an architect to draw plans for a project that may not be within your budget.

The last portion of the phone consult with the young man touched on critical flaws in his floor plan. I shared with him how to mark up simple plans showing the invisible interior hallways within rooms. These are the pathways you walk to get around in rooms. The minimum width of an invisible hallway in a room, in my opinion, is 24 inches. More often than not, they’re 30 inches wide.

It’s mission-critical that you draw these out and even shade them in with a color on plans. Furniture or built-in cabinets are not allowed to encroach on these spaces. The next step is to create scale cutouts of your furniture to see if it will fit in the remaining space in each room.

You can shortcut this exercise by looking at the existing rooms in your home. What rooms are too small? What rooms might have too much space? Look at each room in your home and write down the tiny things that aggravate you about it.

Lastly, each adult who lives in your house needs to provide input. Make a list of the top three things each person wants to see in the final project. It might be a spacious walk-in pantry. It might be a simple window seat. No matter what it is, try to see if it can’t be incorporated into the final product so everyone is happy!

Column 1638
Self Storage Savings

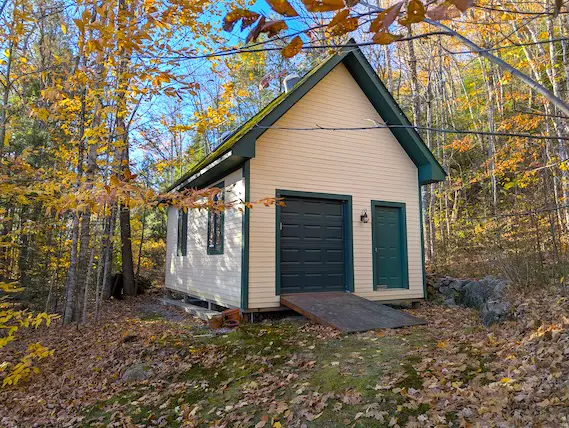
two-story outdoor shed

Self-storage savings: My two-story shed is now thirteen years old. It’s already saved me over $50,000 in off-site storage fees. You can BUY THE PLANS HERE. Copyright 2025 Tim Carter

Self Storage Savings - Build a Shed

Are you surrounded by off-site storage businesses like I am? Within a fifteen-mile radius of my rural home in central New Hampshire, there are thousands of storage spaces in metal buildings one can rent for a king’s ransom.

Self-storage is the key to saving huge money. There are a few ways to do this.

Within the past few months, an enormous multi-million dollar national-brand three-story storage business opened up. It’s got three loading docks renters can use to store or retrieve their belongings. Just 1,000 feet away, a more traditional single-story metal building with 50-plus units came online in the past month. Times must be really good for people to have so many possessions that they have to store them at one of these places.

The most shocking thing is the cost to rent a space. Are you sitting down? A tiny 5-foot by 5-foot by 8-foot tall cubicle costs $90 per month. That’s $3.60 per square foot per month. A 10-foot by 15-foot by 8-foot tall space is $194.95 per month, or $2,339.00 per year.

The good news is you might have quite a few options to avoid these breathtaking monthly fees. The best solution depends on the size of your lot and your local zoning laws. Your existing garage, should you have one, may be a storage goldmine you’ve overlooked.

I found myself in a storage crisis fifteen years ago. I moved from Cincinnati, Ohio, to central New Hampshire. My wife and I had thirty-five years of accumulated possessions, plastic bins full of cherished toys used by our three children, and lots of furniture. We moved from a larger house to a smaller one.

I had to rent a very large off-site storage space the day the movers arrived. We packed it full of all sorts of stuff. It cost me about $200 a month back in 2010. That same space today is now close to $350 a month.

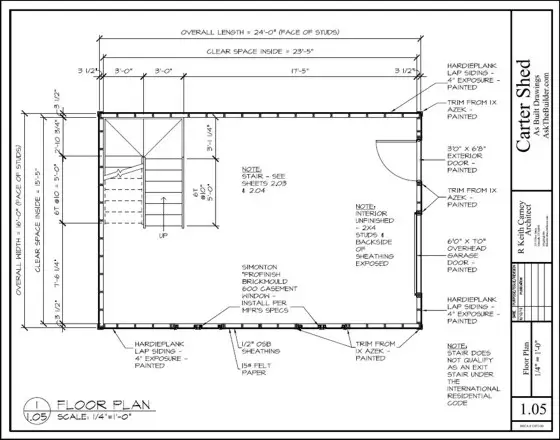
My lot was large enough that I could build a large 16-foot by 24-foot free-standing two-story shed. I built this shed thirteen years ago in my spare time. It only took about two months to complete it. You can purchase the detailed plans of my shed. Click the blueprint below. The seventeen pages were drawn by an architect friend. Go here to get the amazing plans.

SamplePlan Shed Plans Tim's

The materials for my shed cost just over $10,000.00. It’s a deluxe shed that matches my house. It’s got a handy 6-foot-wide overhead door, a man door, skylights, and two windows. I could have spent less, but I wanted the shed to look like it had been built at the same time as my home. I moved my possessions into the shed in 2012, and since that day, I’ve saved over $50,000 in off-site storage fees. You can save big money, too!

You may want to purchase a pre-built shed. These are built to minimum standards in my opinion, but one might suffice for you. I priced out a 12x10x7-foot shed that has a window and a large door. The cost is only $3,299.00. This shed, if maintained, might last for decades.

You can purchase larger pre-built sheds that can be delivered to your lot. Just be sure you check your local zoning laws before you sign a contract. It’s also important to anchor these sheds to the ground so they don’t blow away in a severe windstorm.

Your existing garage may have a tall ceiling. The garage at my son’s new home has a ceiling that’s almost 14 feet tall. This winter, he and I are going to build a loft with just enough headroom that he doesn’t have to duck up on the loft or underneath it down below.

I built a similar, smaller loft that was 4 feet deep in my last home. I made the bottom of the loft just 6 inches higher than the height of the hood of my wife’s car. She could pull forward and park the front of the car under the handy loft.

This small loft created 640 cubic feet of storage space from what was previously just empty air. Compare that to the tiny 200 cubic feet of space you’ll get with the 5x5 off-site storage locker for $90 per month! My loft only cost several hundred dollars to build.

Do an online search and you’ll discover all sorts of unique storage solutions for garages with taller-than-average ceilings. There’s one system I’d not recommend for my friends or family. This system requires you to install metal tracks on the ceiling. Large plastic bins slide into the tracks.

You need to be on a ladder to slide the bins into the tracks. That’s a very dangerous maneuver, in my opinion. You can lose your balance and fall off the ladder while lifting a heavy bin over your head.

Should you decide to build your own shed or buy a pre-built one, I urge you to watch a video I recorded years ago. The biggest mistake most make is buying or building a shed that’s too small. Empty sheds look spacious, but as soon as you start to put things in them, they shrink in size like a deflated balloon.

I show in my video how to place the things you want in the shed on your lawn or driveway apron. Boxes and bins are easy as they can stack. But lawn mowers, wheelbarrows, snowblowers, bicycles, etc., can take up vast amounts of floor space. https://www.askthebuilder.com/how-to-plan-a-shed/

Once you have all the items placed on the ground, stretch a string around them, creating a rectangle or square. This is the minimum size your shed needs to be to hold all you have now. You’ll need a bigger shed if you add more to your clutter collection.

You can also de-clutter. I’m in the midst of doing that now. I take clutter to my town dump each time I go there with my garbage. My town has a wonderful “free room” in the recycling building. You can take just about any item there and place it on the shelves. Clothes, appliances, books, trinkets, games, you name it, can all be found in the free room.

Some residents retrieve items from the free room and sell them online. You can do that too if you have the time and energy. It’s easy to sell online, and you can turn your clutter into cash with minimal effort.

Column 1637

Bathroom Condensation Leads to Mildew

condensation on painted wall

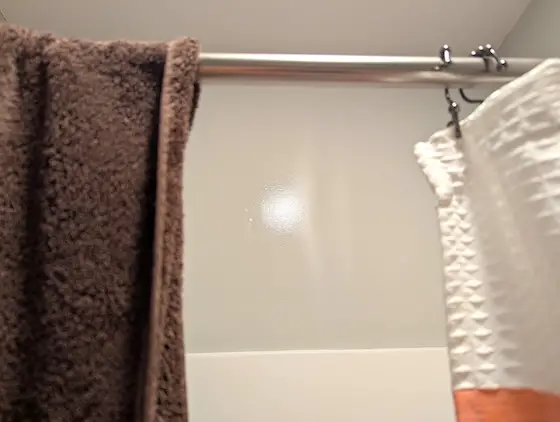
Bathroom condensation happens in your home. That reflection on the wall above the shower is caused by invisible condensation on the flat wall paint. Hot, steamy showers feed mold growth in your bathroom. Copyright 2025 Tim Carter

Bathroom Condensation Causes Mildew

Do you wage a constant war against mold and mildew in your home, especially in your bathroom? You’re not alone. Millions of people fight this scourge, and businesses have tried to develop all sorts of products to slow or stop the growth of this ugly, black organism.

Your chances of slowing mildew and mold growth increase exponentially once you understand the basics of how and why it flourishes inside and outside your home.

Mildew and mold are very similar to fire. Have you given much thought to what you need to have a fire? You need just three things: fuel, oxygen, and a heat source. Take away any one of those three, and you don’t have a fire.

Mildew and mold need just three things to grow: mold spores, food, and water. Eliminate just one of those, and you don’t have mold and mildew. It’s pretty much impossible for you to eliminate mold spores in your home. There are millions and millions of them coating just above every surface in your home. You’d need constant, expensive filtration systems to capture these tiny spores. Only high-tech laboratories can afford this type of filtration.

You have mildew and mold food all over your home. Dust, grease, body oils, soap film, etc., are all excellent food sources for mildew and mold. You can eliminate these by doing a deep clean of every surface in your home. Who has the time for this? I know I don’t. You’d have to be cleaning like crazy each and every day.

That leaves you with water. Eliminate water and you’re golden. This is why folks who live in the desert or a very arid climate have fewer issues with mold and mildew than those of us who get lots of rain.

Let’s talk about hot, steamy showers. I’m talking about the ones where, when you exit the shower, so much condensation has formed on the mirror that droplets of water have run down the glass.

You probably think the condensation just forms on the mirror. You’re wrong. I’m sure you remember your high school physics class about dew points, right? All the surfaces in your bathroom are pretty much the same temperature as the mirror before you turn on the hot water. Exterior bathroom walls in cold climates are very problematic. The surface of the wall could be five or ten degrees lower than the mirror surface!

This means that condensation forms on the walls, ceilings, and all other surfaces in the bathroom in addition to the mirror. You don’t see the condensation because the surfaces are not reflective, but believe me, it’s there.

I know you can’t eliminate water or water vapor in your bathroom. Your challenge is to minimize as much of it as possible to stop or minimize the mold and mildew you so dislike.

You can start with an excellent bathroom exhaust fan. Most homes have ones that do very little to exhaust the water vapor. The best ones will suck hundreds of cubic feet per minute of moist air and expel it to the outdoors. Never allow this humid air to dump into an attic space or out under a roof overhang. Install a roof vent or a wall vent outlet, much like a dryer vent, on vertical walls.

Keep in mind that these powerful fans must be able to pull into the bathroom the same amount of air they’re sending outdoors. This means you may need to crack the door a bit or install a new louvered vent in the bottom of your bathroom door. You can also keep the bathroom door open a bit, but this eliminates complete privacy.

In you live alone or are not overly modest, you might be able to shower with the bathroom door open. This will help send much of the steamy water vapor out into the rest of the home, where it mixes with drier air. I know this will make the bathroom cooler, but you can offset this by installing a radiant heater in the bathroom to keep you toasty warm in your birthday suit.

Here’s the hard part. Mold and mildew will not have a chance so long as you dry off all the surfaces in your shower area. A high-quality squeegee can help. You need to get all, or much of, the liquid water from the glass, tile, or acrylic surfaces into the drain. You can also use old towels to dry off the surfaces. Do this, and I can almost guarantee you that your caulk and grout will never have a mold or mildew issue.

It’s easier said than done. You may still be in a sleep daze, or running late, and can’t take the extra minute it takes to dry off everything. I get it. You may want to install a vertical oscillating fan in your bathroom that you can turn on as soon as you have your robe on.

Do you have a shower curtain? Be sure to wave it back and forth to try to get water off of it. Don’t pull the shower curtain all the way across the shower area to make it look pretty. You need air to get into the shower. Keep glass shower doors open after you leave the bathroom.

Leave the bathroom door wide open after you walk out. Your goal is to have all the surfaces in the bathroom dry as rapidly as possible. Do whatever it takes to get the condensation to evaporate as fast as possible.

Column 1636

Repair Wood Rot

wood rot under a dryer vent.

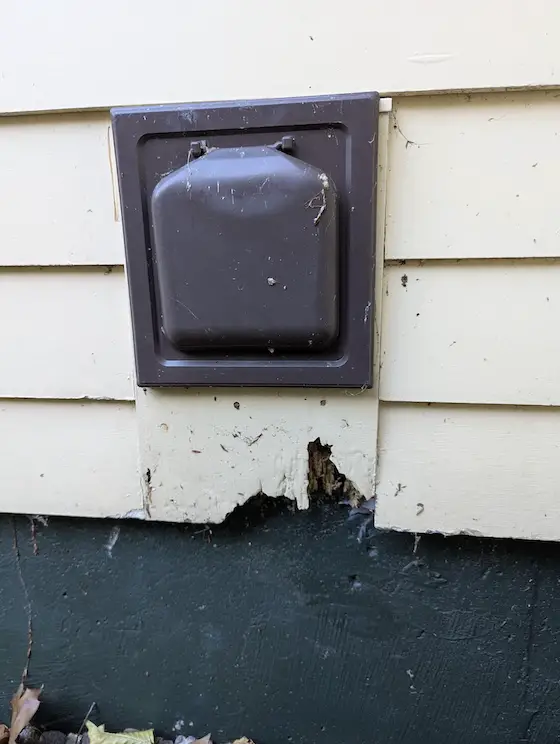
Rainwater splashing up from the gravel just below this dryer vent outlet is the primary cause of this wood rot. My guess is the painter never coated the bottom edge of the wood block allowing water to soak into the end grain. Copyright 2025 Tim Carter

Repair Wood Rot - There are Different Methods

Do you have wood rot happening at your home? It’s a very common problem. Wood rot, in my opinion, is getting worse each year because new wood is more susceptible to rot, and many tradespeople are not coating the fresh cut ends of wood with paint or preservative. As you might expect, clever alternative products have appeared in the marketplace to take wood rot off your plate. I’ll discuss those in a moment.

Wood rot is a sibling to mold growth. Mold growth requires but three things: a food source, mold spores, and water. Those three things are almost always available in and outside your home.

Wood fibers, and especially the soft light-colored spring wood, is the food source for wood rot. Fungus spores are a simple organism that’s also abundant around your home. Rainfall, moisture in the soil, and even water vapor in humid climates, allows the fungi to start to munch on the wood in and around your home.

Rot is more common with exterior wood than interior simply because water falling from the sky sustains the fungi that’s eating away at the wood. Wood rot happens indoors only when you allow interior wood to get wet and stay wet.

A leaking caulk joint in a shower can cause wood rot. Leaks around a toilet are a common cause of a wood subfloor and the joists below to rot. Roof leaks and dryer or bath-fan exhaust in attics can rot out roof sheathing, rafters, and trusses with ease.

Don’t mistake dry rot as some other issue. Dry rot is just wood rot but the rot stopped because the water supply was cut off. The fungi stop growing once their water source disappears. The active wood rot destroyed the lignin that holds together the wood. This is why dry rot wood crumbles in your hand much like a handful of crisp oyster crackers.

I had a wood rot issue at my own home a few years ago. I didn’t build the house I live in. The builder used cheap exterior wood trim to frame around all my windows and exterior doors. This trim is made from hybridized trees that have been genetically modified to grow fast. This fast growth creates huge amounts of less-dense spring wood. This is the wood that is created when a tree grows in the spring.

Water cascading down from my roof splashed up and onto the vertical trim on each side of my exterior doors on my upper deck. I had several choices how to deal with the problem.

The least expensive method was to remove the destroyed wood and patch it with wood epoxy. This method works well for small areas of rot.You need to have a bit of hand-eye coordination to make an expert repair as you have to apply the sticky epoxy compound much like you’d apply drywall joint compound to a wall. The issue is the wood epoxy has the consistency of peanut butter. It’s also very sticky and difficult to tool!

I decided the easiest thing to do was to cut off the bottom 9 inches of the wood trim. I then put in place new plastic trim that was the identical size of the original wood trim. My new plastic trim will never rot.

I used a vibrating multi-tool to cut out the old trim. I made a jig that has a 45-degree-angle cut to act as a cutting guide. I didn’t want a flat seam where the new trim met the old trim. I wanted a sloped seam so water would not flow back behind the trim. The flat surface of the multi-tool blade resting on the sloped jig made this a very simple task.

I then applied two coats of exterior paint to this angled upwards sloping cut of the wood trim. This paint would help prevent future wood rot by not allowing water to get to the wood fibers. I made an opposite 45-cut on the new plastic trim and slid it into position. You can barely see this thin mitered seam now that it’s finished.

A single mom I help out from time to time has a similar wood rot issue at her home. She has four huge solid-oak 8-inch by 8-inch posts that support an exterior wall of her home. These wood posts sit on custom-made steel supports one of which was covered with 5 inches of soil.

The moist soil caused the dense oak to start to rot. Fortunately, this rot is somewhat shallow and it only extends into the oak about 1.5 inches. I feel the best way to make this repair is to carefully cut away the rot using several different power tools and a router with an extended bit.

I plan to cut away enough of the oak such that I can then replace it with a small length of a treated 2x4. I’ll use a piece that’s been graded for direct burial as it has quite a bit of the chemical preservatives in it. I plan to coat the entire oak post with two coats of liquid copper naphthenate. I’ll be sure to coat the hollowed-out portion of the oak with at least three coats before I insert the 2x4 patch.

I’ll also apply two coats of the copper naphthenate to the other oak posts as a preventative measure. CLICK HERE to purchase this amazing DIY wood-rot prevention liquid.

This product is easy to work with, and it allows you to do a fairly decent job of protecting wood. Copper is a natural biocide. This is why sheets of copper were applied to the hulls of clipper ships and Old Ironsides to prevent the growth of marine barnacles. Barnacles create lots of friction and slow the ships as they sail in the deep blue sea.

I used nothing but redwood trim on the last house I built for my family. Redwood contains lots of natural chemicals that fight against wood rot. Cedar also has natural chemicals that fungi find distasteful. These are the only two wood species I’d use if I had to put wood on the exterior of a home.

Plastic wood trim is available. The plastic house trim is white. My son’s new house has quite a bit of it on the exterior. You can paint this plastic trim, but you need to pay close attention to the recommendations of the manufacturer. The plastic has a very high expansion/contraction coefficient.

Painting the plastic with dark colors increases the amount of movement as it increases the amount of heat retained by the plastic. Most paints don’t have the adhesive strength to withstand this much movement. The paint may start to peel, and then you’ll have a real mess on your hands.

Column 1635

Finish Nail Guns are Affordable

senco finish nail gun

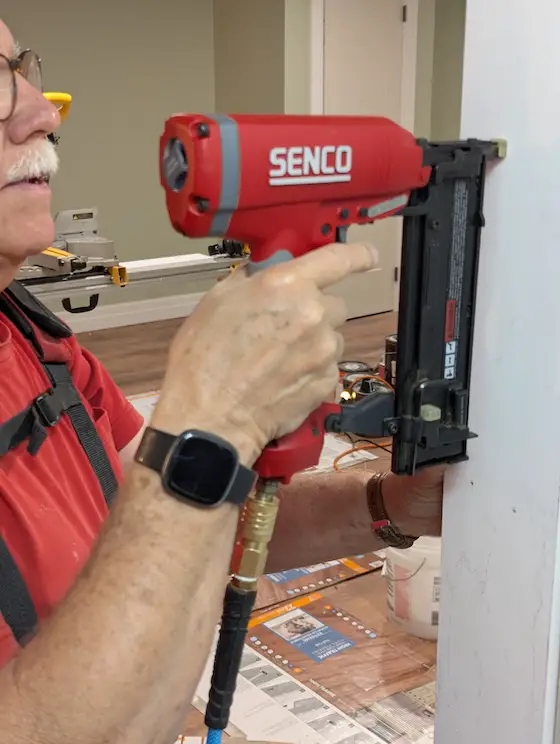
I’m using one of my favorite tools of all time. A pneumatic gun that fires thin finish nails and countersinks them too! CLICK THE PHOTO to buy the BEST BRAND - Senco. You can CLICK HERE too. Copyright 2025 Tim Carter

Finish Nail Guns - Affordable and Amazing

A few months ago, I brought my 20-ounce hammer and a traditional nail set tool with me to church. A six-penny finish nail, driven by a carpenter in the late 1800s through a piece of oak trim, had worked its way out of the wood about 1/8 inch. The head of the nail caught on my shirt one morning when I leaned against the wall to give my back a rest.

I arrived at church early so as not to bother those who were praying in peace. It only took me about five seconds to drive the nail head below the surface of the wood. I thought about how the finish carpenters who installed this stunning oak woodwork in my church would be in awe of modern finish nail guns that drive and countersink a nail in the blink of an eye.

I’ve used nail guns for nearly fifty years. You can only appreciate the magic of these tools by driving a nail the old-fashioned way using a hammer. Finish nails require much more hand-eye coordination than hammering a 16-penny nail driven into a rough 2 x 4. You must carefully hammer the small finish nail and not miss striking it. Should that happen, you end up with a nasty beauty mark on the surface of the wood. This is unacceptable in finished woodwork.

Once you get the top of the finish nail within 1/4 inch, or less, of the surface of the wood, you then have to place the correct nail set tool at the correct angle on top of the nail. You then start to carefully tap the top of the nail set to drive the nail deeper and deeper until the head is below the surface of the wood.

If the nail set tool slips off the top of the nail before it’s below the surface of the wood, you end up with a different defect. Now you have a much larger hole to fill in with wood putty or spackling compound.

Finish nail guns eliminate these mistakes. The tools are designed to drive the nail in one instant motion, much like a bullet leaves a rifle. You can adjust the depth of drive so the nail is set to the perfect depth. These guns can drive a nail through solid oak like you might push a pin into a cork bulletin board!

The common finish nail gun drives a 16-gauge nail up to 2.5 inches long. Just about all of the nails have a clear adhesive coating. The friction of the driving motion liquifies the glue, and once it is in the wood, the adhesive helps keep the nail in place. The 16-gauge nails can be as short as 1 and 1/4 inches.

There are different finish nail guns that drive smaller and smaller nails. An 18-gauge gun is perfect when dealing with small accent trim moulding. These nails have smaller heads, so the hole that needs to be filled is about the diameter of an uncooked grain of rice.

You can also purchase pin nail guns. These shoot extremely small fasteners, much like a needle or a straight pin. The holes they leave are almost invisible. These pin nailers are perfect for crafts where small pieces of wood are assembled.

The energy to drive the nails comes from three different sources: compressed air, propane, or electricity. The compressed air, or pneumatic, guns require you to have a small air compressor and a hose to deliver the air to the tool. Before you know it, you’ll have well over $500 invested.

The guns powered by propane or electricity have no hoses. A small propane cylinder that is contained within the gun can provide enough energy to drive thousands of nails. These guns do require a small rechargeable battery. The battery powers a spark plug that ignites the propane gas.

The electric finish nail guns are the simplest tools of all. They derive all their power from a rechargeable lithium-ion battery. Guns that come with two batteries allow you to work non-stop. One battery can be recharging while you use the other one.

I can assure you that once you use a finish nail gun, you’ll never go back to using a hammer and a nail set. I can drive 20 nails with a gun in the time it takes to carefully drive a normal nail and set it by hand.

As with many things, you get what you pay for. Beware of off-brand nail guns. They may jam or malfunction, causing you considerable grief. My brand-name guns have driven tens of thousands of nails and never malfunctioned. I can count on a perfect result so long as I keep the gun clean and oiled.

Be sure you test drive a finish nail gun. Some inferior ones have a design where you need to cock your head at an angle to see exactly where the nail will be driven. I once did a review of one of these inferior guns. The manufacturer was so incensed by my telling the truth that they stopped sending me tools to review. What’s that old saying? The truth hurts.

Column 1634

Pocket Door Installation Secrets

pocket door quality check tim carter bald spot

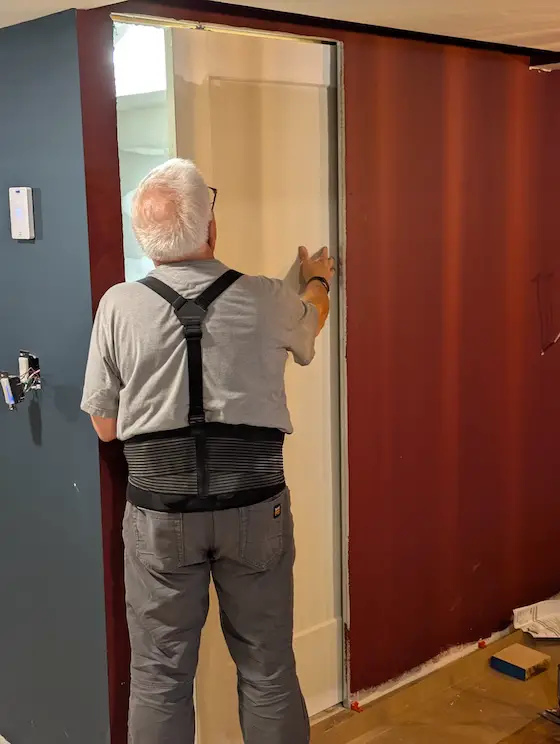
I’m checking a new pocket door in my son’s basement to ensure it glides in and out of the pocket. There are many reasons you should consider several in your home. Ignore the flaw in the camera lens that's created a glare in the back of my head. Copyright 2025 Tim Carter Son triangle stan

Pocket Door Installation Secrets

I installed a pocket door in my son’s basement several days ago. The basement remodeling project has stretched out over a year because we can only work together on Saturdays and on occasional days he can take off from work. It was a unique pleasure to show him how simple it is to install a door that disappears into a wall.

He remembered the pocket door we had at the last house I built for my family. He and I would play railroad crossing when he was a toddler. I would close the door slowly as he approached it on his tiny rolling horse toy. When the imaginary train had passed by, I’d open the door, allowing him to travel back to the laundry room. Such fun memories!

Pocket doors are sleek, and they save lots of space. Traditional hinged doors that swing take up lots of room. You can’t have the swinging door bump into things when it needs to be fully open. A pocket door just tucks itself away into the void space between two finished wall surfaces.

I grew up in Cincinnati, Ohio. There were thousands of stately Victorian homes in the Clifton, Hyde Park, East Walnut Hills, and Mt. Lookout suburbs that had double pocket doors between rooms. Most of these homes were built in the late 1800s or early 1900s. Architects of old used double pocket doors to create both privacy and version 1.0 of the open-concept floor plan.

These ancient pocket doors were heavy, hard to pull out of the pockets, and they often jumped off the tracks. It didn’t take long for these to fall out of favor with homeowners. New pocket door hardware is available that solves all these problems.

The first custom home I built had two pocket doors, one in a half bathroom and the other in the laundry room. The architect specified an inferior pocket door frame made from thin wood. These slats had a tendency to warp over time. The warped slats would rub against the door as it opened and closed.

I switched to a pocket door frame system that used thin wood wall studs wrapped in metal. These vertical studs were straight as an arrow, and the metal covering ensures the studs never warp. This same manufacturer also solved the problem of the doors jumping off the upper horizontal track.

The door is suspended from the frame by two trolleys. Each trolley had three wheels instead of the two-wheeled trolleys on the inferior frames. The track above the door had two parallel channels that the trolleys nested in. It was impossible for the door to jump off the track. This hardware is made by Johnson Hardware in the great state of Indiana. Use the following link to purchase the only hardware I'd use on any project.

CLICK HERE for the absolute BEST pocket door hardware made in the USA.

I used that same frame in my son’s basement. The frame takes only minutes to install, so long as you follow the instructions for creating the overall rough opening. The manufacturer creates all the components, so they don’t have to be cut. It’s a dream to install the rough pocket door frame.

Watch this video of me installing this frame in my son's basement:

The frame and system I used at my son’s home has delightful soft-close hardware. You probably have this in your kitchen or bathroom cabinets. As you close a drawer, the hardware takes over and magically pulls the drawer into the cabinet. There’s no banging noise or pinched fingers.

Moderate carpentry skills are required to trim out a pocket door. The jambs that hide the pocket must be cut to a width of 1 and 1/4 inches. The vertical jambs are applied first, and the ones for the top of the door are installed last. These jambs should be installed with decorative small-head trim screws. Using screws allows you to remove the jambs in minutes should you need to replace the door or retrieve something that found its way into the pocket.

Locking pocket door handles are available should you desire to install one for a bathroom or other room where you need privacy. You should have no issues locating the finish to match all the other hardware in your home.

You can mount two modern pocket door frames facing each other to create the look of the old Victorian homes. The pocket door frame doesn’t discriminate. You can install any normal-width door of any style in the frame. Heavy, solid doors that weigh up to 400 pounds can be supported using a special pocket door hardware kit.

My son’s home is only four years old. His builder made a terrible mistake by not using a pocket door for his small laundry room. This room is off the kitchen and has an inswing door into the tiny room. A pocket door would have made perfect sense in this situation. I’m sure you have pesky swinging doors in your home that you wish were pocket doors, don’t you?

Column 1633

Contractor Scams Incompetence

deck railing and chair with mountain view new hampshire

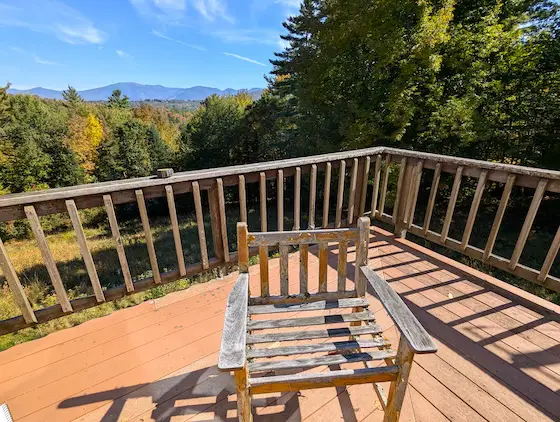
This deck railing is not safe for small children. Would you know what to tell contractors to ensure the railing is safe? Copyright 2025 Tim Carter

Contractor Scams & Incompetence

Each week, I extract homeowners just like you from horrible encounters with contractors. I do this via a short consult phone or video call. The situations range from faulty roofing work, new cracked or spalling concrete, wet basements, shoddy tile work, etc. The common denominator in every situation is trust. The homeowner trusted that the contractor would install this or that correctly. More often than not, they don’t.

Just days ago, I received the following email from a middle-aged woman who lives in the Pacific Northwest. She let me know immediately that her home improvement funds have been sucked dry. She’s now on her own and is using my DIY phone coaching services. The good news is she’s figured out how to avoid nightmares in the future with an assist from me. Here’s what she wrote:

“My house has been a disaster in many ways. It has taken all my money, so I am trying to do all of this myself. I need help knowing what materials to use for the various foundation repairs I mention in the attached video, and also what tools to use. I also need to be able to relay information to various contractors I may have to hire in the future when I’ve saved up more money. I haven't had any good luck with any for a long time, and my trust that they will know what to do is not very good. I really need to be able to tell them what to do and exactly what I want.

Have you had this happen to you? If my incoming email is a statistically relevant sample of the general population, then I’d say you’ve also lost money and sleep over faulty work.

You can see this woman has zeroed in on why she’s lost lots of money. I feel the most powerful sentence in her email is the last one. She’s done trusting that contractors know what to do. She’s not going to hope any longer that she’ll get the exact result she wants when it’s time to hire a contractor. Good for her! You can do the same.

I’m in the same boat as you are. I own a piece of land that has a common driveway on it. The driveway is used by two adjacent lot owners. The covenants attached to our deeds state we must contribute equally and maintain the common driveway to a certain standard.

It’s time for us to improve the drainage on each side of the driveway and add some new topping gravel. Most people would just call three contractors, show them the driveway, and share in a face-to-face conversation what they want done.

That’s a recipe for disaster before you even enter into a contract. The odds are the bidding contractors will come back with different ideas, methods, scope of what they’re going to do, and the materials they’d want to use. It’s impossible to compare quotes and bids when you do it this way.

I spent an hour and wrote up a very simple set of specifications. I described the problem, and then I shared what needs to be done, what topping gravel to use, etc. I also put in the specifications that each bidding contractor had to supply a valid certificate of general liability insurance and an up-to-date copy of their New Hampshire Workman’s Compensation certificate. I sent a copy of the specifications to each bidding contractor.

I can hear you now. You’re frustrated because you don’t know what to tell the contractors to do. It’s not that hard to create simple specifications. Almost all manufacturers of the products that will be used on your home have done the work for you.

Let’s say you want a new front door installed. Just about every major manufacturer has a step-by-step installation manual. Your specs simply have to state: “Remove the existing front door. Protect all interior and exterior surfaces from damage. Install the Frontier Door with beveled glass made by the Acme Door Company. Install the door exactly as stated in the manufacturer’s step-by-step installation instructions. Paint the door Sunflower Sunrise using the top-of-the-line exterior paint made by the Blozo Paint Company. Apply the paint exactly as it states on the label of the can.”

You then state in your contract that the bidding specifications are part of the contract and attached as an addendum.

You can do the above for just about every simple job you have around your home. If it’s a tile job, refer to the Tile Council of North America’s TCNA Handbook for Ceramic, Glass, and Stone Tile Installation. If you’re about to install exterior brick, rebuild a chimney, create a new brick patio, etc., then refer to the Brick Industry Association’s Technical Notes. Just about every product out there has a similar association that publishes clear instructions on how to install its products.

Decades ago, I created Contractor Hiring Guides. These documents share valuable tips for the top thirty projects around your home. Many of them include questions you’d probably never know to ask each contractor. The questions are written so you know the correct answer. This is exactly what the woman in the Pacific Northwest needs to help her with all her future projects.

You can obtain my hiring guides as well as many other helpful PDF files by going here:

Column 1632

Best Way to Clean Glass

french door with half glass clean half dirty

The glass on the left was cleaned in less than 30 seconds. It’s crystal clear in contrast to the fogged glass on the right. Copyright 2025 Tim Carter

Best Way to Clean Glass - Soapy Water & a Squeegee

I’m willing to wager a two-step hot fudge sundae made with mocha chip ice cream that you struggle to get the glass in and around your home perfectly clean. I’m talking crystal-clear glass that looks invisible. It might be glasses you drink from, the windows in your home, the glass in French doors, mirrors, your automotive glass, etc.

Visit a grocery store and you’ll see bottles of blue or green liquids that claim to be the best thing to use. Go online and you’ll discover a plethora of other cleaners. I’ve become so cynical in my many trips around the sun that I sometimes wonder if a few of these products actually attract dirt so you have to clean the glass more often

Did your mother teach you to use vinegar and water? Are you in the camp that was told to wash the windows and dry them with newspaper? You know, the newspaper that was printed with ink that washes off onto your hands?

Years ago, I tried everything to get the glass clean. My efforts never produced glass that was crystal clear. There were smudges, streaks, left-behind lint, etc. The manufacturers of paper towels loved me; I used so many!

Before I share the best way to clean glass, let’s talk about what causes your windows to get dirty and foggy. The windows inside your home, more often than not, get coated with an ultra-fine coating of aerosol grease. Cooking and baking produce water vapor. Grease attaches itself to this vapor. The invisible grease gas floats out of the kitchen. Not only does it coat all of your kitchen cabinets, the underside of your vent hood, walls, and ceiling, but it also settles on your windows, furniture, etc.

You can confirm this by noting the windows closest to your kitchen often are the foggiest, while those windows further away have less of the fog you see when sunlight hits the glass at nearly a 90-degree angle.

The outside surfaces of your window glass, should you live in an urban setting, are coated with a mix of diesel exhaust soot, dust, tree sap, and other pollutants.

Window glass can get dirty from the plastic inside your home. Direct sunlight can heat up these plastics. They off-gas invisible particles that adhere to glass. This is why the inside of your car's glass gets foggy. The sun heats up all the plastic in your car, causing it to release the micro airborne particles.

Indoor plants, to a very small degree, can contribute to dirty glass. Some can release tiny airborne sugar droplets that end up on your glass.

I decided to do a deep dive into how to best clean glass. I was sitting in my office and thought, “Who’s the best person to interview about glass cleaning?” Within seconds, I hit the jackpot. Why not call and talk to the presidents of the companies that wash skyscraper windows?

Wielding my nationally syndicated newspaper columnist title, I was able to schedule interviews with these men. I’ll be honest and tell you I wasn’t prepared for what they told me.

The first thing I discovered is that the window washer workers don’t have a magic solution inside the buckets on their scaffolding. The buckets contain water with just a small amount of normal liquid dishwashing soap.

Both executives shared that the squeegees used by the workers are not cleaning the glass. The glass is cleaned when the worker applies the soapy water with a lamb’s wool or microfiber applicator. That scrubbing motion and tool remove all the dirt, grease, and grime. The squeegee just removes the leftover water from the glass. There are many videos on YouTube recorded by professional window washers showing you the best way to use a squeegee.

You’ll be stunned by how easy it is to get professional results using this method. A week ago, I purchased two new 12-inch-wide squeegees. Each one was just $7.50 on Amazon. The best brand, in my opinion, is Ettore. I’ve had great success over the years with their squeegees.

It’s key that your squeegee has a supple rubber blade. Over time, the rubber can harden. You can get replacement rubber blades for Ettore squeegees and replace one in seconds.

The soapy water should be changed frequently if you want excellent results. I’ve had great success using a standard grout sponge for windows I can reach while standing. You may need a cleaning wand that attaches to a pole for hard-to-reach glass.

Don’t be fooled by products that say you can squirt them on your glass and magic happens. Mechanical agitation is part of cleaning anything. Your body is cleaned in the shower by rubbing your skin with your hands. You must rub the glass with soapy water to get everything off the glass

Column 1631

Baseboard and Casing Installation

baseboard, casing, and lvp flooring

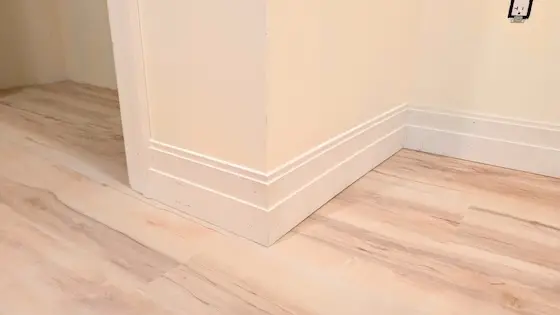
You can achieve professional results like this with a few inside tips and two important power tools. All that's required now is some spackling for the nail holes and a coat of finish paint. Copyright 2025 Tim Carter

Baseboard and Casing Installation

This past weekend, I had the good fortune to show my son how to install wood baseboard and interior door casing. We’re in the final stages of finishing over 1,000 square feet of finished living space in the basement of his three-year-old home. We only work on Saturdays because of his job constraints, and Sunday is a day of worship and rest for me.

This project began fifteen months ago. It took quite a few weeks to frame all of the 2x4 walls that were installed next to the cast concrete foundation walls, as well as all the interior walls that created the individual rooms. I remember sharing with my son, “The time we take now to get these rough walls perfect will pay off in spades when it comes time to do all the finish carpentry.”

I’m a firm believer that if you want to be a great rough carpenter, you should spend the first year of your career as an apprentice finish carpenter. It’s there that you discover why it’s so important to make sure the walls are square, plumb, and have minimal humps in them from studs that sport severe crowns.

You should always install the finished flooring before you begin to install the doors, casing, and baseboard. Do whatever is necessary to protect the flooring from damage. We saved the cardboard boxes from the luxury vinyl plank flooring, flattened them out, and laid them flat on the floor to create walking paths.

Take your time installing the doors. You want the edge of the door jambs to project 1/32nd of an inch beyond the surface of the drywall. You’ll discover at this point why it’s so important to use perfectly straight studs to create a rough opening for a door. I always use wall studs for my door jambs where I can see the center of the tree and the concentric growth rings. These studs are almost always perfectly straight and stay straight forever.

The casing looks magnificent if you hold it back 1/4 inch from the inside edge of the door jamb. The first thing I do is create these two fine pencil lines at the top of each corner of the door jamb. Use a standard or mechanical pencil with a very sharp point to make all your marks when doing finish carpentry. The margin of error when making cuts is less than 1/64th of an inch!

I only use two power tools for the most part when installing baseboard and door casing: my 10-inch sliding compound miter saw and a nail gun that shoots 16-gauge finish nails. The nail gun automatically countersinks the nails. This saves time and eliminates the old-school “beauty” marks left by hammer heads and nail-setting tools that jump off the heads of traditional finish nails.

I cut my two long side pieces of casing first and tack them in place. You make 45-degree-angle cuts because the door and door jambs have 90-degree angles at the top corners. I tack the side pieces of casing in place, making sure I maintain the 1/4-inch spacing away from the edge of the door jamb.

I then measure the precise distance from the two outer top corners of the mitered door casing. Be sure the end of your tape measure is not bent from dropping it on the ground. You’ll get false readings when you hook it onto one of the sharp mitered trim corners.

The top piece of casing should fit like a glove if you cut it to the exact length. You can always cut it about 1/64th of an inch long and tap it gently into place to get a precision fit that requires no spackle or caulk.

The baseboard installation comes next. I always mark the centerline of the wall studs on the rough floor once the walls are built. I then transfer these marks onto the primed or painted drywall before the flooring covers them up. This way, I know where to drive my finish nails through the baseboard to ensure they hit the center of the stud.

Another trick during framing is to install a small scrap 6-inch length of 2x4 on the side of the king stud that frames the doors. This little block of wood ensures solid framing that captures the nails driven at the end of the baseboard, should you use wide 3.5-inch casing like my son did.

The first pieces of baseboard you should install are along the walls where two inside corners meet. The easiest pieces to install are where the baseboards extend from an inside room corner to an outside corner or along a piece of door casing.

Once you get a perfect fit on your inside corners using a piece of baseboard that is a bit longer than you need, you can mark the baseboard with the pencil at the outside corners or a door casing to get the exact length. There’s no need to measure.

It’s best to purchase a few pieces of inexpensive trim and practice before you waste hundreds of dollars making inferior cuts on your actual trim. Feel free to call me should you get into a finish carpentry pickle!

Column 1630

Digital Library FAQs

Tim's Digital Library FAQs

First, watch this short 3-minute video. Wait until the END! I had a strange craving for bacon and eggs.

Do I have to download all the documents in the Digital Library by December 16, 2025?

No. You can download the ones you want at your leisure.

Why should I purchase the Digital Library?

I'm closing my shopping cart because it's too expensive to leave it open, and this assembled product will no longer be available as far as I can tell.

Will the Digital Library save me money?

Yes. If you decided to purchase each of the documents separately, you'd spend over $1,200.00.

Why is the Digital Library priced so low? You're only charging 73 cents per document.

I felt the need to give you a massive discount before the product no longer exists for $79.99.

CLICK HERE to purchase the Digital Library.