Deck Checklist Teleseminar

Thanks for purchasing the AsktheBuilder Deck Construction and Maintenance Checklist.

As mentioned, you are invited to attend a special deck teleseminar. This will take place prior to the 4th of July. The exact details will announced shortly.

In the mean time, you can submit two questions regarding deck construction or deck maintenance. These questions will be combined with other customer's questions and help determine the direction of the teleseminar.

Please enter your name, email address and your two questions below. Once  you click on the Submit button, your questions will be emailed to me.

Thanks again for your purchase.


Name:
Email Address:
1. What is your first question regarding deck construction or maintenance?
2. Your second question regarding deck construction or maintenance?

Workshop Storage – Start On Your Walls

akro plastic bins storage

Workshop Storage - These bins come in many different colors. They last for decades. You can purchase them right here.

Workshop Storage Solutions - Get Akro Bins

DEAR TIM: Now that I’m retired, it’s time to trick out my workshop. One thing that’s always been a problem is decent workshop storage. I’ve seen different solutions, but am still pondering what’s best for me. What about workshop storage shelves? To cut to the chase, I’m open to any and all workshop storage ideas you may have. Hank M., Lewiston, ID

DEAR HANK: You have a boatload of storage options. I’ll do my best to describe what’s worked well for me, but I’m sure there are others who’ve got excellent ideas and workshop storage solutions that will keep you highly organized.

Declutter With Great Shelves

For starters, I often see clutter happen because there’s not an efficient use of space on walls. Visit a home center store and you can see how they take advantage of space up in the air. That, in my opinion, is the key to maximizing storage. Get things off the floor and up in the air.

You’ll probably agree that you need two types of shelves in your workshop. The most basic one would be simple horizontal arms at the same level that support long lengths of lumber. There’s no need for a horizontal shelf as the lumber creates the shelf.

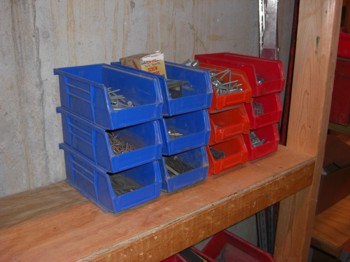
These workshop storage bins are perfect for screws, nails, small parts, etc. PHOTO CREDIT: Tim Carter

These workshop storage bins are perfect for screws, nails, small parts, etc. PHOTO CREDIT: Tim Carter

I’ve had great luck using simple angle iron that has holes punched in it. You commonly see this product used to support your garage door track and powered garage-door openers. You may be able to purchase this angle iron from a garage door installation company for far less than you might at a hardware store.

I assemble this material with nuts and bolts and firmly attach it to wall studs with long lag bolts to ensure the entire system will not pull away from the wall. A good-sized system might have well over 1,000 pounds of lumber on it, so be sure you don’t overtighten the lag bolts that hold the vertical standards to the wall studs.

For lightweight storage, you can make some dandy storage shelves using 2x2 pieces of lumber for the vertical standards and 3/8-inch plywood as the shelves. Additional 2x2s can be used as the horizontal supports that cradle the pieces of plywood. Once again, this is for lightweight items like sandpaper, some hand tools, glue, etc. Design the horizontal spacing of the shelves so there is minimal wasted space between each shelf. Allow at least two inches of clearance space between the top of the highest item and the bottom of the support of the next highest shelf.

I always have workshop storage cabinets in my mix. I was lucky to be able to salvage cabinets from jobs I was working on. They’re very hard to find, unless you have access to homes built in the 1950s, but try to get some excellent metal kitchen cabinets. I have several that lasted for 50 years in a kitchen before being drafted for use as part of my garage workshop storage team.

tool cabinet on wheels

Borrow a tip from an auto mechanic. Get these amazing tool cabinets to store hundreds of tools in one place. I LOVE MINE that you see above. This stainless-steel tool cabinet should have been bought 30 years ago! (C) Copyright 2022 Tim Carter

Regular wood cabinets will work just fine if that’s all you have access to. If you use base cabinets, try to outfit them with rollout shelves instead of fixed shelving that requires you to bend over and move things to get access to what you want. You’ll discover quickly that rollout shelves are magical and allow you to clearly see what you have and get it with minimal effort.

Stackable Akro Bins are Best

I use stackable workshop storage bins for all of my fasteners and small hardware. These handy items come in a variety of colors, sizes and shapes. You can use the colors to help you keep groups of things separate. For example, you may decide that blue bins are for screws of any type, while red bins are for tacks, nails and other steel fasteners.

akro bins storage colors

You can get CLEAR, and all these colors and even more. To see all the Akro bins I have, you should click or tap here.

Certain bins are made with a built-in french cleat. If you have a thin metal strip that protrudes slightly from your metal pegboard, the bins hang on it perfectly. Purchase the right bins and you can stack them four or five high and still be able to see what’s inside each one. The good ones have a slot that allows you to install a label telling you what’s in the bin.

Visit many retailers and you’ll probably see workshop storage units. Some may dazzle you at the store, but when you get them home you may discover they’re too small and impractical.

Before you buy a unit that’s made at a factory, take a scrap piece of salvaged kitchen countertop, or a piece of plywood, and make a test work surface. Place on the top what you think you want and need in your workshop. Determine what the minimum width is that will work for you.

Be sure that the top of your workbench is no deeper than 26 inches. If you go wider, you’ll quickly discover that it’s hard to reach any storage that you have above the workbench. This is true for pegboard, shelves or traditional wall cabinets. A deep workbench simply puts you too far away.

Column 835

June 13, 2010 AsktheBuilder News And Tips

What's in This Issue?

Father's Day Edition
Underwear
Gorilla Glue Hat
Bikes, Books or ?????

I do product reviews frequently. Please read my Disclosure Policy to understand the relationship between me and the companies that make the products or offer the services I review.

FOLLOW ME ON TWITTER

Friendly Question Reminder!

If you have a question for me, don't hit the Reply button just yet. Go immediately to my web site and type in the keywords about your problem into my Search engine. The search box is at the top of every page of my web site. You could have your answer in seconds if you do this! Please pay attention to all links you see at my web site. The exact products and services you often need are right in front of you, and you might be ignoring them

Father's Day Edition

This is a special edition for Father's Day, which is a week from today. If you're struggling for a gift idea, I've got a few that will help you score points with your Dad. If you had to send your Dad back to Heaven, like me, you may find something for yourself. After all, you deserve it, right?

Underwear

I hear you - BORING! But wait, what if I told you about a company that sells clothes to contractors that you can wear, and your Dad? Clothes that are really durable and GREAT for everyday use? I thought that would get your attention.

Last week, I got an email from the public relations (PR) person from Duluth Trading Company. What really put my head on a swivel was the mention of underwear. Okay, we're all adults here, so let me tell you why this interested me.

Over the past year, I've switched from the traditional jockey shorts to trunks. But not just ordinary floppy trunks. I've been wearing Hanes trunks that are a blend of spandex and cotton. WOW! They've been the most comfortable underwear I've ever worn.

Duluth Trading has their own line of Buck Naked Ultra-Light underwear that rivals the Hanes trunks I've been wearing. They sent me some to test including a tee shirt. These garments are 93 percent nylon and 7 percent spandex. I've never worn pantyhose, and never intend to, but are these things comfortable. I LOVE the tee shirt. And just as some of the reviews state, you don't even know you're wearing underwear it's that comfortable.

They are a little pricey, but I'm impressed. I'll be wearing these on the ski slopes this winter as you never want to wear cotton when perspiring in the cold.

Two thumbs and two fingers up for this underwear! Your Dad will LOVE it, trust me.  Buck Naked underwear and tee shirts come in some spiffy colors. Check them out. I'm going to get some of the red ones for sure. If you're an ND fan, you'll love the green ones.

Check out all the other clothing items while at the Duluth Trading Company site. They have a huge assortment of things your Dad, or you, will LOVE. Be sure to look at the the long tail tee shirt. I wear those bad boys each week during winter up in NH.

Finally, they have an entire Women's section, so ladies look around!

Gorilla Glue Hat

Do you think your Dad would want a unique baseball-style hat? You'll work hard to find one more trendy than this one from Gorilla Glue!

Bikes, Books or ???????

Last week while I was in Erie, PA, torturing my feet playing that flag football game, I got to ride a traditional bicycle. I can't remember the last time I did that! My neighbor Dave in NH rides a mountain bike around many of our back roads and I was sort of interested but never acted on the urge. But after riding the bike in Erie, I'm definitely going to get a neat bike that will let me cruise the back roads of NH.

Well, the first place that came to mind to start looking was my friend Steve's website. It's BestWebBuys.com. You can price bikes and MANY other things there. Wait and see!

This comparison shopping website was one of the FIRST ones on the Internet! It's a survivor to be sure. My guess is that you've never heard of it, but once you visit it, you'll bookmark it for sure. You can save tons of money using Steve's site on a regular basis. Instead of you checking around yourself for the BEST price on things like books, electronics, music, video, etc., and oh yes, BIKES!, let Steve and his team do it for you.

All you do is select what you want, and Steve goes in nanoseconds to find the best price for you out on the Web. You then click it and buy. It's like falling off a log.

Happy Father's Day Shopping!

Watch for a regular newsletter soon.   Don't forget to share your feelings about our great nation at my Tim Carter's Fire Pit website.

AsktheBuilder.com

June 8, 2010 AsktheBuilder News And Tips

What’s in This Issue?

Latest News
Funny-Looking Links
Follow Up on Maytag Dishwasher Recall
Septic Disposer in my Kitchen
Air Flow in Bathroom Exhaust Fans
Upcoming DC Trip
Long-Distance Moving Help
Latest Columns

I do product reviews frequently. Please read my Disclosure Policy to understand the relationship between me and the companies that make the products or offer the services I review.

FOLLOW ME ON TWITTER

Friendly Question Reminder!

If you have a question for me, don't hit the Reply button just yet. Go immediately to my web site and type in the keywords about your problem into my Search engine. The search box is at the top of every page of my web site. You could have your answer in seconds if you do this! Please pay attention to all links you see at my web site. The exact products and services you often need are right in front of you, and you might be ignoring them.

Latest News!

This past weekend I was in Erie, PA for about 36 hours visiting a childhood friend and his family. Saturday was an action-packed day with a morning walk on the beach with Bill and Jill's dog, riding on Bill's Fat Boy Harley, going for a boat ride in the bay between Presque Isle and downtown Erie and a neighborhood flag football game.

I couldn't resist playing in the football game, but am paying dearly for it. My mind is still young, but my feet are screaming at me three days later. I obviously pulled some muscles or slightly damaged some ligaments, as my heels are as tender as a newborn's bum.

I did catch two passes across the middle and provided the key block for our only touchdown. A mom, the only woman on our team, caught the pass after I tangled up my defender and hers as we streaked down the left side.

Damage Assessment Report: It appears the glory days of my football career are long gone. But I did have a good time. Erie's an interesting place. I'll go back to explore more for sure.

Funny-Looking Links

Last week, a subscriber emailed me about the suspicious-looking links he saw in my newsletter. He felt they were malicious and could trigger a virus.

I explained that these are tracking links set by the service I use to send this newsletter and manage the massive list of email addresses.

By using these tracking links, I can *see* in a report what topics of the newsletter most interest you. That way I can do a better job in future issues of the newsletter making sure I deliver relevant information. Believe me, it works, as week in week out I can predict what parts of the newsletter you'll click!

Follow Up on Maytag Dishwasher Recall

Last week, I sent out an emergency broadcast about a dishwasher recall. You may have been one of the hundreds that reached out to me with thanks. I was getting ready to travel and simply couldn't respond.

Quite a few subscribers had the dishwasher in their homes, and a few even commented on smelling burning plastic on occasion.

Elizabeth Hayduk's email to me pretty much sums up why I sent the broadcast and how you may have felt. She wrote:

"Thanks for caring enough to pass onto your readers this type of important info. With people living busy lives, we don't always hear about such recalls. You may be saving not only homes, but lives. Fire hazards can be unpredictable & be triggered when least suspected. How many people set their dishwasher to run when they go to bed? I know I do--not often--but I do.
 
Again, thank you!"

You may have been one of my subscribers that reminded me of the CPSC email alerts about product recalls. You can tell them exactly what announcements you want when you subscribe.

Septic Disposer in my Kitchen

I'm about to undertake a significant kitchen remodeling job in my NH house before Kathy moves in. Many houses in New Hampshire, as well as all over the USA, have septic tanks instead of public sewers. Every house I've lived in before this one in NH has been connected to a sewer.

I want to really take care of my septic tank and leach field, so I carefully watch what goes in the drains. I've got many past columns on my AsktheBuilder.com website about septic tanks. You just have to type  "septic tank" into the search engine to find them. Believe it or not, disposers are not harmful to septic systems if you use them correctly. Read about it at my website in my past columns.

In a box in my garage in NH is the disposer I'm installing. It's a cool machine designed to work with septic systems. It's the InSinkerator Evolution Septic Assist.

This disposer comes with an injection system that squirts in an enzyme as the food is being ground up into a liquid. This enzyme helps hasten the breakdown of food in the septic system. It claims to be quieter than many other models, has a stainless-steel grind chamber and grinders and is more compact. It looks like it's a magnificent machine, as I took a look at it just after it appeared out of the UPS truck.

If you don't want to install one of these machines, you can use the Stain Solver product I manufacture. If you pour one-half cup into your sink and send it to the septic tank, the billions of oxygen ions it releases helps the beneficial bacteria in the tank.

Air Flow in Bathroom Exhaust Fans

Sandra, from St. Petersburg, FL, wrote to me asking:

"Should a bathroom exhaust fan blow air out or draw air in?  Mine blows air out.  I tested it by holding a tissue up to it.  Is there something wrong with it that I can fix, or was it installed wrong?"

You may feel that's a silly question, but it's not. One could easily see why you would want to introduce fresh air into a bathroom. This would require the fan to blow air into the room instead of sucking it out.

Sandra, the good news is that the fan is working properly. Bath exhaust fans are designed to suck air out of the bath replacing it with air from adjacent rooms. The primary use of these fans, in my opinion, is to remove dangerously high levels of humidity from the bathroom after showers or baths. This water vapor rapidly condenses on cooler wall and ceiling surfaces contributing to mildew growth.

The humid air can also easily escape into hidden attic and wall cavities causing severe water issues. I suggest you read all of my past columns in my Ventilation category to see the bath fans I use in my own home. Here's a clue: They look like space ships in my attic.

Upcoming DC Trip

This Sunday morning, I'll be driving to Washington DC to attend a conference about Internet Advertising legislation. Part of the conference is face time with key Congresswomen/men and Senators who are working in this area.

But on Sunday afternoon, an hour after arriving in town, I have an interesting meeting. I have to do a tile floor cleaning demonstration in the lobby of a large condominium complex. One of the residents there used some of my Stain Solver to clean the dirty tile.

The cleaning was so dramatic, the Board of Directors of the condo felt my product ruined the floor. I have to prove to them it didn't. If I do, I've been told I'll save them over $100,000 - the cost they were looking at to replace the tile!

Based on photos sent to me, I already know that the tile that was cleaned looks like the day it was installed. Fortunately, the condo owner that did the test made sure the Stain Solver solution got on the grout lines as well as the tile. It made the grout look like it was just installed - perfectly clean. My Stain Solver can't hurt tile or grout. After all it's just oxygen, water and natural soda ash!

I intend to videotape this demonstration and will share it with you. It should be fun!

Long-Distance Moving Help

I'm meeting this week with long-distance movers to get quotes on moving my Cincinnati possessions to NH. Can you please help me?

Is it possible for you to share pointers and tips that will help me select the right company and how I can AVOID contract hassles, extra hidden fees, and uncomfortable surprises when the moving crew decides there was an eclipse during the drive from Cincinnati to NH that now will cost an extra $1,000 to open the doors of the moving van?

The research I've done so far online makes me shudder as most of the stories are very unpleasant. The last thing I need that week is one or more moving problems.

Latest Columns

Decking Boards - pick the right ones

Asphalt Driveway Tips

Firewood Splitter - use what I use

Rust Spray Paint


Tim Carter's Fire Pit

I'd like to hear what you have to say about our great nation. Share your feelings at a separate website of mine:

www.TimCartersFirePit.com

Recently, I talked about the problems in Greece. You may find that interesting!

AsktheBuilder.com

Shower Faucets

DEAR TIM: Can you help clear up some confusion I have about shower faucets? Is there a big difference between a shower faucet and a tub shower faucet? I don’t want to have to struggle to repair my faucet in the future. What steps can I take now to streamline repairs? What can I do to make sure the faucet doesn’t leak and is as quiet as possible? Do you have any other tips about installing a shower faucet? Leah H., Rochester, NY

DEAR LEAH: Whew! I could talk about faucets for hours. I’ve installed many, and remember clearly years ago when I was flummoxed as you seem to be about shower faucets. The basics are pretty much the same as they were years ago, however there seem to be far more faucets to choose from than there were 40 years ago.

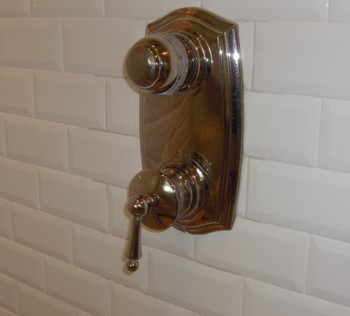
This polished nickel shower faucet can easily last 50 years or more because of its excellent engineering. PHOTO CREDIT:  Tim Carter

This polished nickel shower faucet can easily last 50 years or more because of its excellent engineering. PHOTO CREDIT: Tim Carter

The biggest difference between a dedicated bath shower faucet and a tub and shower faucet is that a true shower faucet doesn’t come from the factory with an outlet for both a shower head and a tub spigot. A tub and shower faucet comes with hot and cold-water inlets and a separate outlet for the shower head and the tub spigot.

To further confuse you, it’s absolutely possible to make a tub and shower faucet work exclusively as just a shower faucet. This is especially true if the diverter to make the water go to the shower head is in the actual tub spigot. All your plumber has to do is stub a dead end pipe with a cap on the outlet in the faucet that’s supposed to feed the tub spigot. I’ve had to do this on occasion when the faucet model and trim that a customer wanted didn’t come as a dedicated shower-only faucet.

Advancements in faucet technology have made most shower faucet repairs very easy. Years ago, it could be a major struggle to successfully repair a faucet washer and a valve seat. Most modern faucets have valve cartridges that can be replaced fairly easily by just taking apart the faucet from the finished wall side of the bathroom.

If you’re in the market now for new faucets, be sure to keep the written instructions that come with the faucet. These frequently have a parts list and exploded diagrams showing you how to access the faucet cartridge. I always take these instructions and place them in a clear plastic bag that I attach to the inside of the bath vanity cabinet.

To make repairs really easy down the road, I’ll often purchase the replacement cartridge(s) at the same time as I get the new faucet. I’ll place these parts in the same plastic bag with the instructions so I don’t have to hunt them down years later. These parts rarely go bad if left in their original packaging.

To prevent leaks, you need to follow the instructions that come with the faucet. Some faucets want you to remove the cartridge before you solder. Excessive heat from a torch can melt the plastic components of a faucet cartridge. Don’t try to outsmart the faucet manufacturer thinking you can control the heat flow to the body of the faucet.

Noise can be an issue with certain faucets. If you have high water pressure, say anything above 70 pounds per square inch, then it may behoove you to run larger diameter pipe to the faucet to minimize noise. The water moves more slowly through a 3/4-inch pipe than a 1/2-inch pipe when the faucet is turned on. This slower flow creates less noise. You can also wrap the water supply pipes with insulation and add sound batts in the wall where the faucet resides to keep down noise.

If possible, consider installing an access panel on the other side of the wall from the faucet body. Years ago this was a very common practice. In fact, just this past weekend I stayed at a private home as a guest. In my bedroom there was an access panel to the tub and shower faucet for the original bathroom in the house. You could remove this panel and immediately be able to service the faucet from behind the tiled wall.

Be sure to place the fitting for the shower head arm high enough so that tall people don’t have to duck to much to rinse off. But be careful about placing it so high that you can’t attach the shower arm. Some faucets come with highly decorative shower heads and arms that require quite a bit of clearance to screw the arm into the shower lug fitting.

Be sure you have roughed in the shower body at the correct distance from the finished wall surface. This is very critical. Many modern faucets come with a template or guide that helps you ensure you don’t make a mistake with this critical aspect of the installation.

Column 834

June 1, 2010 AsktheBuilder News And Tips

What's in This Issue?

Latest News
ServiceMagic
Sharpening Chainsaw Chains
Staining Decks in New York - Test Update

I do product reviews frequently. Please read my Disclosure Policy to understand the relationship between me and the companies that make the products or offer the services I review.

FOLLOW ME ON TWITTER

Friendly Question Reminder!

If you have a question for me, don't hit the Reply button just yet. Go immediately to my web site and type in the keywords about your problem into my Search engine. The search box is at the top of every page of my web site. You could have your answer in seconds if you do this! Please pay attention to all links you see at my web site. The exact products and services you often need are right in front of you, and you might be ignoring them.

Latest News!

Last week, I was getting ready to test exterior paint colors on my house here in New Hampshire. The house has a mix of dark green Andersen casement and double-hung windows. The house was built in 2002, and many of the vinyl parts of the windows have experienced significant color fade. I wanted to get rid of the fade so I could get the correct complementary colors on the body of the house.

I called Andersen to see if there was a wipe-on product that would restore the color much like you do with automotive vinyl. Much to my surprise I discovered the vinyl color fade is covered under warranty.

The Andersen folks sent out a professional painter, John Resnick with his crew to apply a special lacquer coating that matches the original finish. John's sister Lizzy and another employee Randy make up the team.

John, Lizzy and Randy do interior and exterior painting, wallpaper work and commercial painting. He told me he services much of Massachusetts, southern Vermont, New Hampshire and Maine. If you need a quote from a real professional, give John a call. 978-831-3924. Be sure to mention my name! Wait until you see the trailer he brings to the jobsite. Wow!

If you have some of these faded green Andersen windows, I suggest you contact Andersen now and get them taken care of. To the best of my knowledge, no other Andersen windows are suffering this fading issue.

I can't say enough good things about Andersen's response to this situation. It's refreshing to see companies that respond positively to problems. All too often companies run away from predicaments instead of running towards them. Remember, only contact Andersen if you have the dark green windows like mine.

ServiceMagic

I need your help. Are you a contractor that gets leads for your business from ServiceMagic? If so, can you please email me ASAP. I have some questions to ask you. Thanks in advance!

Exterior Painting Tip

As I just mentioned, I'm getting ready to paint the house here in New Hampshire. I wanted to paint an entire section of the house to get a good feel for the look of the paint on the siding and trim. As I've done my entire career, I washed the surfaces with soap, water and some of my magic Stain Solver.

Why do this? Be sure to read the label on any paint you intend to use. Everyone I've ever seen says: "Apply to a clean, dry surface." I don't like using pressure washers on houses because they blast water into cracks and behind the exterior surfaces if not used properly. What's more, they can leave behind a thin film of dirt.

The house is currently painted red with green trim. Surprisingly it doesn't look dirty at all. There's no visible dirt, dust or diesel soot on the siding. The exact opposite is true about my home we're selling in Cincinnati. I just washed it down last December and a month ago, it had a coating of soot on it. Imagine how much of that soot is in my lungs from all the years living in the city! But I digress.

As I washed the house here, the water in the bucket turned red and you could see the sun-damaged red pigment come out of the paint on the siding as I rinsed it. Based on past experience cleaning the solid color stain of my house in Cincinnati, the Stain Solver aggressively removed the damaged finish. That's a good thing when you're getting ready to repaint or stain.

Sharpening Chainsaw Chains

Up here in New Hampshire, people are busy as beavers getting ready for next winter. Now's the time to cut firewood as it needs time to season and dry so it burns hot. To cut wood efficiently and effectively, you need a sharp chain that cuts straight.

I tested a fantastic tool that sharpens chains used to cut logs and firewood. It's the Timber Tuff upright bench mount chainsaw chain sharpener. This tool works just like a compound miter saw. It has a spinning abrasive disc that you can rotate and tilt to match the grooves in cutting teeth of the chain.

If you've ever sharpened a chainsaw chain by hand, you know the issues you can have. The slightest mistake will have the chainsaw blade cutting the logs in a curve. This causes the blade to bind.

Using a professional tool like this Timber Tuff machine keeps the cutting teeth in the exact alignment they had when the chain left the factory. The best part is the price of the tool. It's just a little over $100. You'll save that money quickly in time and aggravation. If you use chain saws heavily, you'll love this tool.

It's sold at a few retailers, all with different prices! Take your pick:

Tractor Supply
Gempler's
Mills Fleet Farm

Staining Decks in New York - Test UPDATE!

Joan Rowland, from Lindenhurst, NY emailed me:

"We live on a river on long Island NY.  How often do we need to stain/seal our deck?  We cleaned (not power washed) and wood-lifed it last year and it looks a little faded. Is this an annual project?"

Joan, it depends on the sealer / stain you decide to use. I used a clear sealer last year that failed in just four months. I'm in the midst of a test now to see how three different sealers work. In rare cases you may get a deck stain/sealer to last three years. Colored sealers, because of the pigments they contain, may fare better for you, but these will fade over time from the direct ultraviolet rays of the sun that blast deck surfaces in the middle of the day.

I just taped the one-month video two days ago. I'll be loading that video tonight and will share it with you next issue. After one month, all the stains/sealers look pretty much the way they did when applied. The original deck stain test video showing the beginning of the test is available to watch.

AsktheBuilder.com

How to Paint

DEAR TIM: I’m embarrassed to say that I’ve never painted walls or woodwork. My dad always did it and I had no interest in helping. I now need to know how to paint as I just bought my first home. I tried painting the walls in my living room and made a huge mess. The paint looked good going on, but now looks transparent. Can you instruct me how to paint interior walls, ceilings and woodwork? How did you learn to paint? I’m so frustrated and am reluctant to call my dad. Angela P., Scranton, PA

DEAR ANGELA: I appreciate you asking me for advice, but your dad is the man who should be consulted. I say this assuming you’ve got a great relationship with him. He’ll be honored that you asked for his help and guidance. Being a dad, I can tell you that it should bring him great joy to hear his daughter ask for a demonstration of his skills and magic when it comes to painting. Do it. Make the call now.

Painting with a roller looks easy. Believe it or not, it takes a considerable amount of hand-eye coordination to achieve professional results. ©2017 Tim Carter

In case he’s out and can’t pick up the phone, I’ll fill in. First, it’s absolutely impossible to share even a small percentage of what I know about painting in this tiny column. What’s more, instruction works best if you’re in the same room as the teacher. You need to see the actual techniques.

Let’s start with painting tools. Professional painters typically purchase the best brushes, roller frames, roller covers, etc. Why? Because these tools produce better results faster.

Make sure you match the brush with the paint. Polyester brushes are typically used with latex or water-based paints. I prefer using angled brushes for many tasks, but find they are a must for painting woodwork trim and cutting in paint where one color is up against another. I’m not a fan of the sponge brushes, but you may end up liking them.

Roller covers come in different thicknesses of the nap. I prefer to use one that has 3/8-inch nap for painting walls and ceilings with a flat finish paint. If you’re painting coarse masonry surfaces, you’ll want a 1/2-inch or thicker nap. If you’re painting a smooth surface with a high-gloss or semi-gloss paint, you may want a short-nap roller cover that has 1/8 or 1/4-inch nap. Smaller nap produces less texture in the dried paint.

Not all paint is created equal. You get what you pay for. Remember that paint is, for the most part, glue with color in it. There are special paints for different situations. For example, if you want to know how to paint drywall, especially new drywall, you’ll quickly discover that you need to use special primers that both prime and seal in one step. Some newer finish paints make the claim of not needing these primers, as they include the heavy pigments and porosity sealers in the finish paint product.

The problem with your poor coverage could be related to the quality of the paint, your painting technique or both. A considerable amount of the volume of many water-based paints evaporates from the surface you paint, leaving behind a very thin film of pigment and the chemical glue. If you spread the paint too thin as you work it, when the paint dries there simply is not enough pigment and adhesive to cover what was on the wall before you started.

Most paint cans have printed on the label the recommended coverage rate. For many years, a gallon of latex or water-based paint would cover about 300-400 square feet of surface area. When you do the math, you’ll discover that one gallon of paint should cover only the walls in a small 10-foot by 12-foot room that has 8-foot ceilings.

Be sure you read the label on the paint can before you start your next job. If you want the best results, follow the instructions. When they say to apply to a clean, dry, dust-free surface, they mean it. Remember, paint is glue and for it to stick well, the surface needs to be clean.

When painting ceilings, you’ll discover that adjustable fiberglass extension poles will save you time. Using this accessory, you can paint ceilings without making numerous trips up and down a ladder. The same is true for walls. I have numerous adjustable extension poles that screw into the base of the roller frame.

Clean up after the paint job is over is an art all itself. You can ruin a high-quality paint brush in no time if you clean it incorrectly. Never hold the brush up-side-down in a stream of water. This drives paint higher up into the bristles and fans them out. It’s better to dip the brush in a can of soapy warm water and shake it back and forth in the frothy mix. Do this with the rinse water as well until the water remains clear as you shake the brush.

If your house has a septic tank do NOT clean your brushes indoors. You don’t want latex paint residue entering the septic tank or leach field. Clean your painting equipment in a large bucket indoors if necessary and dispose of the cleaning water safely outdoors in a sand pile or other media that will capture the paint and not pollute the soil or ground water.

Column 833

How to Stain a Deck

trex transcend partial

This is a photo of two decks that will NEVER need a sealer or stain. You should consider this option. The long deck with the furniture on it is the original 10 x 60-foot deck. The lower deck is new and is 24 feet wide and extends out 16 feet from the original deck. Copyright 2026 Tim Carter

How to Stain a Deck

DEAR TIM: I just bought my first home, and I have to discover how to stain a deck. I have so many questions. For example, how do you clean a deck before you start? Is there a difference between deck stains? Should I just paint my deck instead? Are there decks that don’t have to be stained? Jamie F., Nederland, CO

DEAR JAMIE: Let me start by saying that it’s impossible to completely cover this topic in the small amount of space I’m allotted. There are books written about all your questions and the one’s you failed to ask. But I can tell you that I’ll give you a crash course on cleaning and sealing a deck that will yield you great results over time.

Let’s start with selecting a stain. You can get at least two types of deck stain or sealer. One type is a penetrating finish that is designed to soak into dry wood. Other deck stains are formulated to perform much like varnishes or urethane. These products soak into the wood, but they also form a film on the surface much like a sheet of plastic wrap.

The problem with these film-forming deck stains is that they almost always peel when they eventually fail. The peeling is unsightly, and when you go to re-stain the deck, you must completely remove or strip off the old film. As you might imagine, this can be a tough job.

I prefer the penetrating deck stains and sealers that don’t peel when they fail. It’s easy to prepare a previously stained deck for re-coating if you have a penetrating finish on the deck.

You’ll next need to decide if you want your deck to be a color or do you want to have a clear finish. I happen to prefer colored stains that are a medium color of brown. Some people love a clear look that shows the natural color of the wood from the mill, while others happen to adore the gray look you see on weathered boardwalks or fishing piers.

The pigments used to color a deck stain perform a very important job. They help to absorb the ultraviolet (UV) light from the sun that bleaches out the natural color of wood causing it to turn gray. Some clear deck stains contain ingredients that also act as a sun screen much as the sun-screen lotions we put on our own bodies.

I tested the latest clear technology deck sealer last year and it failed miserably. The cedar wood I applied it to looked great for a month, then it started to turn gray. Within four months, my cedar wood looked like it was a neglected fishing pier it was so gray.

I complained to the sealer manufacturer and they sent me three different ones to test. I applied the products about a month ago, and I’ll know more by the end of the summer. I shot a video (see below) that’s also on my AsktheBuilder YouTube channel that shows me applying these deck stains.

You need to clean all wood surfaces before you apply and deck stain or sealer. This cleaning process is meant to get rid of all dirt, weathered sealers or stains, and any damaged wood fibers that may be barely hanging on at the surface.

Many people promote the use of pressure washers when cleaning a wood deck. If you use too much pressure, the wrong tip on the cleaning wand, and/or hold the tool too close to the wood, you can cause serious damage to the wood. The enormous pressure easily erodes the soft spring wood that’s in between the darker bands of summer wood. To get the wood smooth again, you have to sand the deck. That’s a tremendous amount of work.

I’ve found that cleaning the deck with oxygen bleach is a less-aggressive method that works well. Don’t confuse oxygen bleach with household chlorine bleach you might have in a white plastic jug in your home. Chlorine bleach takes the natural color out of wood, it’s highly toxic to all vegetation and trees around your deck, and it can accelerate the corrosion of any metal fasteners and structural connectors.

CLICK HERE to purchase Oxygen Bleach.

Oxygen bleach has none of these bad characteristics. It’s a powder you add to warm water. The oxygen ions that are then released in the solution are powerful cleaners that deep clean the wood. It’s best to apply the oxygen bleach to dry wood so it soaks in deeply cleaning the wood.

I would never paint a wood deck. Just this past weekend I was on a friend’s wood deck that had been painted a few years ago. The paint was peeling off in many places, and as you might imagine, the deck looked horrible.

My friend asked what the best thing to do in this situation. Knowing that she didn’t have a lot of time or inclination to restore the deck to it’s original natural wood, I suggested she just clean the deck, let it dry, and then repaint it. I only said to do it this way because she then told me that in a few years they were removing the wood decking boards. My friend intends to replace the wood with synthetic wood decking that never needs to be stained or sealed.

Column 832

May 18, 2010 AsktheBuilder News And Tips

What’s in This Issue?

Latest News
Cutting Off Fingers
Solar Attic Fans
Funny Home-Improvement Stories
Deck Stain Sealer Test
Mechanical Plumbing Vents
Chain Saw Chain Sharpener Test

I do product reviews frequently. Please read my Disclosure Policy to understand the relationship between me and the companies that make the products or offer the services I review.

FOLLOW ME ON TWITTER   

Friendly Question Reminder!

If you have a question for me, don't hit the Reply button just yet. Go immediately to my web site and type in the keywords about your problem into my Search engine. The search box is at the top of every page of my web site. You could have your answer in seconds if you do this! Please pay attention to all links you see at my web site. The exact products and services you often need are right in front of you, and you might be ignoring them.   

Latest News   

I got my exercise last week and it continues today! I went up and down from the garage to that attic no less than 40 times, maybe 50 as my son Tristan and I emptied the attic of years worth of clutter. It was a rainy day, and the temperature in the attic probably never got above 72 F. Just after sending this newsletter to you, I'll then start to carry up old games and 25 years worth of the Carter family life from some shelves in the basement storage room.

This is all happening here in Cincinnati as I get ready to move Kathy and Kelly up to NH later in the summer. The Victorian home here I build back in 1986 has a traditional walk-up attic that you'd expect to find in an older home, but not a modern one less than 25-years old.

I framed the attic the old-fashioned way with rafters instead of trusses. If you're building a new home or even a room addition, any rough carpenter worth his salt can frame a roof almost as fast as setting trusses. I say this assuming the roof is pretty simple.

If your builder or remodeler insists on using trusses, be aware you can get special storage trusses and even full attic trusses that allow you not to waste space up in the roof area.

Cutting Off Fingers

My ad salesman Loren sent me a video to watch that demonstrated a cool table saw that can prevent injuries. The person being interviewed said in the USA there are about 3,000 fingers and thumbs cut off in table-saw accidents per year. That nearly ten per day.

This saw is called the SawStop. The inventor got the idea back in 1999, and it took over four years before the saws went into production.

Solar Attic Fans

As summer is just about here, attic temperatures will begin to soar. It can easily get to 130 F and above in an attic. Several years ago, I installed two solar-powered attic fans in my attic that were GUARANTEED to lower my attic temperature.

I urge you to read about the results here my column about solar attic fans.

Funny Home-Improvement Stories

A month ago, I introduced a new feature to the newsletter: Your Funny and Embarrassing Home-Improvement Stories. Here's one that was sent to me by Wendy from Centerville, OH:

When my husband I lived in our first little house, someone gave us a humidifier for our furnace. My husband, never mechanical, installed it himself, but it didn't work. For several days I heard him down in the basement swearing. Finally we called a professional. My husband told him of all the trials and tribulations he had gone through. We all went down to the basement. The furnace guy looked things over, then flipped the ON SWITCH! It worked perfectly fine after that!

Wendy, I can relate to that. About two years ago, I couldn't get my scanner to work. I hadn't used it in quite a while and the button on the front of the panel wouldn't turn the machine on. Frustrated, I was about to go buy another scanner when my teenage son Tristan asked me what was going on. Within seconds the scanner came alive. Tristan gleefully exclaimed, "Dad, all you had to do was flip on the Power switch right here on the side of the scanner." Duh............

Do you want to share your funny or embarrassing story? Share it here.

Deck Stain Sealer Test

The day before I came back to Cincinnati from NH, it was a glorious spring day on Loch Winnisquam. I decided to start a real test of three wood deck/dock sealers. I had cleaned and sealed my cedar dock back in June of 2009, but the nano-technology clear sealer I used failed miserably. The wood turned gray within months.

I taped a video of the testing process. I urge you to watch it. I'll do followup videos at two-month intervals this summer until the dock comes out of the water. You'll see I had some fun taping this video. Pay attention and listen for the harp.

If you've had tremendous success with a CLEAR wood deck sealer, please email me with its name. I'm looking to test other brands this summer. I want to know if you have used a clear PENETRATING sealer that keeps the wood looking great for at least two years. Send me closeup photos of your deck wood that looks great and tell me the name of the sealer you used.

Mechanical Plumbing Vents

A friend remodeled his kitchen three years ago, and his sink ended up in an island cabinet. Prior to that, the sink had a standard vent line. The plumbing code allowed him to install a mechanical vent in the sink base cabinet. I've never been a fan of these vents as I always felt the spring mechanism in the vent would fail or slowly fail over time.

Sure enough, his sink has started to drain slowly because the vent is failing. You can vent an island sink with a loop vent that works well. Make sure your plumber does this in lieu of one of these inferior mechanical vents.

Chain Saw Chain Sharpener Test

I'll be finishing the testing of what appears to be a magical and affordable chain-saw chain sharpening tool this weekend. I'll share those results in the next newsletter. If you use a chain saw, you'll want to read this review.

AsktheBuilder.com