Basic Tools for Home Repair

assorted hand tools for diy repairs

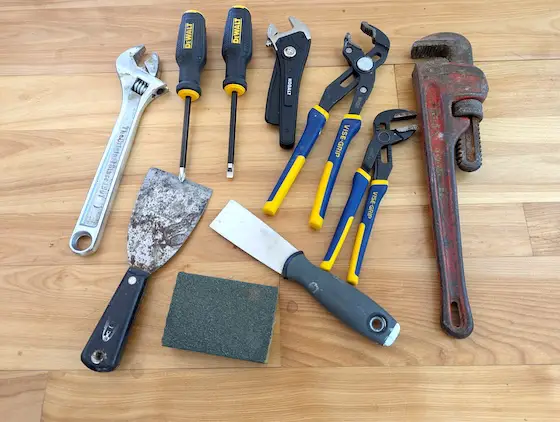
Basic tools like these can save you thousands of dollars over time. Copyright 2025 Tim Carter

Basic Tools for Home Repair - They Can Save Your Bacon and $$$

I’ve been helping several single women and single moms for the past few years. One has been featured in this column at least once in the past year. I’m pleased to report that she’s gaining confidence and tackling projects on her own now. My late father-in-law’s saying rings true: “Nothing builds success like success.”

I think you’ll enjoy a recap of an encounter I had with this woman about three years ago. She purchased a bidet toilet seat and thought she’d try to install it herself. All she had to do was loosen the nut on the shutoff valve under the toilet that connects to the flexible supply hose. She struggled to do this for two hours with no success.

My phone rang, and she begged me to help her. I arrived at her house and could tell she was frazzled. It was a combination of having to call in the cavalry and her having wasted time. She wanted me to take away all the pain, but I refused to do that.

“What tool were you using? I asked. She handed me a channel-lock pliers. I grimaced. No wonder she couldn’t loosen the nut. She didn’t have the hand strength to compress the jaws so they wouldn’t slip on the nut. This young lass should have been using an adjustable wrench. This tool has parallel jaws that you adjust to fit the flat surfaces on the nut. Once adjusted, you apply a small amount of pressure counterclockwise on the wrench handle, and the nut turns with ease.

“I’d like you to use my adjustable wrench and see what happens,” I suggested. The look on her face telegraphed that she was not happy about trying, but she was polite enough not to reject my request since I was there as a favor.

Within ten seconds, the nut was off, and she couldn’t believe how simple it was. She’s very smart, yet growing up, she had never received in-depth training on tools, how and when to use them, and how the right tool with a tiny amount of skill produces professional results.

This past week, she texted me. This woman decided to install a second bidet toilet seat, and had no idea where the main water shutoff valve was in her home. Using the magic of a live video call, I pointed it out within seconds. An hour later, she had successfully installed the seat. Good for her!

But in the process, a small piece of sediment dislodged in the water line, causing the toilet fill valve to malfunction. I told her it was much better to install a new one with better technology. I knew she was in a bind because of a recent death in her family. I happened to be going to a big box store to get something else, so I picked one up for her and offered to help her install it.

I knew to take a wide assortment of tools for the job. Normally, a regular open-end wrench and channel-lock pliers are what you need to do the job in just a few minutes. However, someone had installed a set of shelves above the toilet. The legs supporting the shelves extended to the floor just a few inches away from the sides of the toilet tank.

This made it very hard for larger tools to have enough room to work. Fortunately, I had brought along a small adjustable wrench as well as a short channel-lock pliers. These inexpensive tools saved my day, and they’ll do the same for you should you experience similar conditions.

Last week, I helped another single mom baby-proof a home they were moving into. This house was built in the 1970s. It sported an open concept with a loft space. The railing in the loft was only 32 inches tall, as were the railings next to the stairwell leading down from the loft. The stair railings only had a few parallel pieces of wood to keep an adult from tumbling down the steps. We had to block off the openings so the baby wouldn’t fall.

This woman had tried to install netting using zip ties to make the area safe for her crawling one-year-old. That was a dismal failure as her baby could easily fall through places where the netting was unsecured. I suggested we install 1/8-inch plexiglass, and it worked very well.

She wanted to cut away the zip ties she had attached to the finished wood railings without causing damage. I received a text asking how to do it and shared that I’d bring my inexpensive flush-cut wire cutters that have sharp tips on the jaws. This tool is perfect because the sharp tips can get under the zip tie while the rounded opposite edge glides on the fragile wood. I snipped off the zip ties in seconds without marring the wood.

What other tools should you have in your tool bag? I’d suggest you have a 14-inch pipe wrench. This allows you to turn off the gas on the house side of the gas meter if you suspect a leak. This same wrench can be used to tighten the compression nuts on p-traps under your sinks.

An assortment of flat-head and Phillips screwdrivers is a must. Putty knives, a 5-inch drywall taping knife, a simple plastic drywall mud pan, and a few sponge-core sanding blocks allow you to do simple wall and ceiling repairs before painting. These tools can save you hundreds or thousands of dollars in less than one year.

Column 1629

How to Pay Contractors

ten $100 bills

You may be about to sign a contract where you’ll need somewhere between 300 and 3,000 of these pieces of paper to pay the contractor. Woe is you if you don’t spell out when and how the contractor gets paid. Copyright 2025 Tim Carter

How to Pay Contractors - Avoid Getting Screwed

I’m a regular guest on the Happenings radio show broadcast on WLIP in Kenosha, Wisconsin. The show is streamed live on WLIP.com. This allows you to benefit from the tips and entertainment no matter where you live. Last week, the hosts Frank, Kim, and Reanna asked me about the best way to pay contractors.

A lively discussion ensued, and I tried to shed light on what’s going on inside the heads of both homeowners and contractors. The center of the discussion was debunking why contractors think they deserve a deposit up front before they even show up to do work at your home.

I think it’s worth understanding what happens to you should your job go off the rails, your contractor is not returning calls, and/or the workmanship is shoddy. You may think about hiring an attorney to initiate legal action.

I’ve been an expert witness in building and remodeling lawsuits for almost twenty-five years. My last case had me crawling all over the roof of the Brazilian Ambassador’s home on the island of Antigua. I can tell you from experience that the only guaranteed outcome in a lawsuit is that the attorneys and expert witnesses make lots of money.

Even if you win a lawsuit, you still have to collect the money. I can assure you you’ll never ever get back all the money owed to you, plus the money you spent to get it. This is why you don’t want to get into a position where you have to sue a contractor. You need to always have enough money in your possession to finish the job should the contractor disappear or you fire him for a host of reasons.

Hiring and paying contractors is a very unique financial experience. I’m talking about large jobs that may take a week, a month, or several months. Paying an electrician, plumber, or HVAC tech to do a repair in a few hours is not the subject of this column. Those are straightforward transactions.

There’s only one instance, in my opinion, when money should be advanced prior to the start of work. A contractor will request a deposit for any custom-ordered materials that are non-returnable. Often, the supplier wants a fifty-percent deposit. You can also choose to pay this money directly to the supplier in the event you don’t trust the contractor. If seeds of distrust are sprouting this early in the job, you’ve got serious problems ahead. This signals to me that you didn’t do a proper job of vetting the contractor.

Contractors don’t pay their employees or subcontractors in advance. Contractors don’t pay for their stock materials in advance unless they’re such a huge credit risk that no business will extend them credit. Most big box stores, lumberyards, etc. will extend credit to anyone who can fog a mirror and has reasonably good credit history. A contractor might not have to pay for materials on your job for over thirty days, depending on when he starts your job. Why would you ever give him money if this were the case?

Since the contractor isn’t paying anyone in advance, you have a strong argument to make that what’s good for the goose is good for the gander. Stand firm and do not advance money!

I shared on the radio show what I feel is the best way to pay a contractor. You should obtain in the bidding process a breakdown of all the costs on large jobs. I sell a fantastic spreadsheet that lists over 100 items that should be accounted for. Go here to get it: http://go.askthebuilder.com/costestimator

You then structure the payment schedule to match the job progress points. Let’s talk about a three-day re-roofing project as an example. You can ask before you sign the contract how much work will be done by the end of each day. Let’s say it works out to one-third each day.

You then tell the roofer that you’ll fill out three checks before the job starts. Show them to him when he arrives on the first day. The three checks total the contract price. Present him with the first check at the end of day one if he completes all he said he would. If the contractor is so distrusting that you won’t pay him, he’s only gambling on one day’s labor and the materials. He has lots of leverage because, at this point, your home is not 100 percent waterproof. You and the contractor have equal footing on the trust bridge.

A true professional contractor has considerable working capital. Back when I was still building, and that was over three decades ago, I routinely had $100,000 in my business checking account. I could easily make payroll and pay material bills for weeks or a month. Many contractors don’t have this working capital, which is why they’re asking you to be their personal banker.

On my larger jobs that lasted three or four months, I always had in my contract that I was to get paid for all labor and material that was onsite at the end of each month. I gave my customers a breakdown for full transparency. I simply asked to get paid within five days. This allowed me to pay my material invoices by the tenth of the month. My suppliers offered me a 2 percent discount if I paid by the 10th day. That discount adds up when you buy hundreds of thousands of dollars of material a year!

Column 1628

How to Eliminate Chipmunks, Rats, and Squirrels

chipmunk den hole in soil

This is just one entrance/exit to a large chipmunk den in my yard. Look at the huge pile of dirt the critters brought to the surface.. Copyright 2025 Tim Carter

Chipmunks, Mice, Rats, and Squirrels - How to Eliminate Them

You and I share the planet with lots of other creatures. Quite a few of them can be very problematic. A year ago, I shared with you how chipmunks had ruined my patio made with concrete pavers. The fuzzy brown pests created a maze of tunnels under the stones, causing them to tilt and rock when you walk on them.

Mice, chipmunks, birds, and all sorts of insects can make your day go from bad to worse. I live in central New Hampshire, where mice do everything possible to cohabitate in just about every house. All those cartoons and children’s books featuring harmless mice who live behind the walls and up in the ceilings are based on fact.

Mice can be very destructive. Two years ago, a mouse chewed through a water line in my home. It created a pinhole leak that caused just under $40,000 of damage to my home. It was extremely disruptive as we had to move out of our entire first floor to have all the wood floors refinished.

Mice love to chew fabrics, clothes, and upholstery. They use the fibers to make cozy nests. I’ve discovered that mothballs do a very good job of repelling mice from items stored in my attic. The issue is that you have to replenish the mothballs from time to time.

Several days ago, a good friend of mine reached out to me. He had his blacktop drive replaced a year ago. The old blacktop was removed and new put down. A chipmunk had created a nest under the old driveway. My friend thought he would fill the hole with small rocks before the new blacktop was installed.

This plan failed. He sent me a photo showing a 2-inch-diameter hole in his new blacktop driveway just above the nest location. The blacktop immediately surrounding the hole was sagging down towards the hole. You can imagine how upset he was.

I told him to carefully chip away the blacktop to enlarge the hole. It’s important to eliminate the sagging depression. Water puddling on the blacktop will cause future problems.

I then instructed him to get a bag of Portland cement and some fine sand. These materials would be used to create a slurry that would be poured into the nest opening.

The slurry is made by mixing one measure of Portland cement with two measures of sand. You blend these together dry until the color is uniform. Add enough water to make the slurry the consistency of a watery applesauce.

Using a large-mouthed funnel, pour the slurry into the nest. You’ll be stunned by how much slurry it might consume. Chipmunks are industrious and clever builders. The nests are convoluted to protect them from predators and the elements. A thick slurry will not penetrate deep enough into the nest.

Be aware that the chipmunk nest will have no less than two entrances/exits. It would behoove you to try to locate these openings and pour the cement slurry into them as well.

The chipmunks are determined, and they remove rocks you stuff into the holes you see in your yard. They won’t be able to remove the hardened cement slurry.

That said, it’s possible the critters will just get back to work and create new entrances and exits. You need to realize you’re in a war and the tiny brown pests have a very strong survival instinct. They will not be waving a tiny white flag anytime soon.

I’ve tried to drown the chipmunks by putting my garden hose into the holes. I’d turn on the water, and much to my surprise, the water rarely fills up the nest and overflows out of the holes. I’m astonished by how many gallons of water disappear into the soil.

I’m not a fan of using poison. The poison can enter the aquifer and then seep into my well. It can also poison things I don’t want to harm. I suggest you adopt the same strategy and shy away from toxic brews that might have unintended consequences.

You might also adopt a live-and-let-live policy. Try to adapt. Channel Mother Nature. Do some research and discover the predators one link up the food chain that love to feast on tender chipmunks. You might start doing things to attract these animals to your yard.

Hawks, owls, serpents, etc. might become your new friends as you wage war against the brown furry mammals that skitter across the grass like an all-star soccer player!

Column 1627

Solving the Starter Home Crisis

small ranch home nh

This is a very modest home just three miles from where I live. It’s the perfect size and shape for a starter home. Copyright 2025 Tim Carter

Starter Home Solution - Build Very Small Simple Homes

We have a true crisis unfolding here in the USA. It’s very difficult for a young person or couple in their mid-twenties to purchase a home. My youngest daughter, who is thirty-three, is facing this grim reality.

My other two children own a piece of the rock. I helped my oldest child, also a daughter, build her own home. She designed and drew the plans for the simple two-story home. My middle child, a son, was fortunate to purchase a new modest two-bedroom home three years ago. I’ve been working with him the past year on weekends to convert his massive basement into 1,200 square feet of finished living space, including a full bathroom.

I’m bound and determined to help my youngest daughter experience the joy of stepping across the threshold of her first home. In the process, I believe I can help you or your children do the same thing.

My college degree is in geology. One of the founding fathers of Earth science was James Hutton. He lived in the 1700s. He is credited with the profound statement, “The present is the key to the past.” I feel the opposite is the key to unlocking our current starter-home crisis. The past is the key to the future.

I grew up in Cincinnati, Ohio. My parents purchased a very small two-bedroom home when I was two years old. They paid $16,000 for it, and the mortgage payment was a staggering $60 a month. My mother told me she was stressed that they couldn’t afford it. I’m sure you have a similar story to share about your childhood home.

3101 Riddle View Lane Cincinnati OH

This is the house I grew up in. The lot is 40 feet wide. There's an 8-foot driveway on the left side of the house and a 6-foot-wide strip of grass on the right. Do the math! Photo Credit: Google Maps

This house was on a lot 40 feet wide by 150 feet deep. The two-story house was 22 feet wide and 22 feet deep. It had a full basement, one half of which was a one-car garage. Remove the thickness of the solid masonry exterior walls, and you only have about 950 square feet of living space.

This home had one tiny 5-foot by 7-foot bathroom. The first floor consisted of a living room, dining room, and kitchen. The living room and the stairwell to the second floor occupied the left half of the first floor. The dining room and kitchen comprised the second half. The second story includes two bedrooms, a bathroom, a hallway, and four closets. The furnace, washer, dryer, and a small, dank storage room could be found in the basement, located on the other side of the wall from the garage. My mom, dad, sister, and I lived here and thought everything was hunky dory.

New homes always cost more per square foot than an existing home. Twelve years ago, I was a member of a writers group at our local library. A divorced woman in this group purchased a tiny one-bedroom hobbit house in my town for less than $70,000 at that time. It had no garage, no basement, and was perfect for a single person. I think the house had less than 600 square feet of finished living space.

Entire neighborhoods in the suburbs surrounding Cincinnati are filled with tiny homes that were built for all the GIs coming back from the Great World War II. Silverton, Golf Manor, and Westwood are filled with these tiny two-bedroom homes like mine that look just like the green plastic homes in the Monopoly board game.

satellite view of Golf Manor

Last week I sold a power tool to a small independent builder who lives in a nearby town. We were sharing tales, and he told me how he was helping his son build his home. “We’re already at $600,000 in cost, and that’s not counting all of my free labor,” he mentioned. I then discovered this house is quite large and filled with all sorts of very nice finishes, including granite countertops, and top-of-the-line windows and doors.

I then shared what I’ve written just above. I talked about how if I were still building full-time, I’d be building small houses similar to the ones I was surrounded by in my childhood. This man asked me to draw the floor plan of my childhood home.

His eyes lit up like a Christmas tree when he saw my drawing. He instantly connected the dots. I shared how everything in a new home like this would be bare bones. The new starter homes would feature plastic laminate countertops, basic cabinets, windows and doors that barely meet current energy codes, and the least expensive flooring available, which should have a service life of at least ten years.

I guarantee you he’ll be building a test home within the next year to see what happens. I know he’ll sell it before it’s completed. It will be so much cheaper than renting.

My youngest daughter just moved back from California to my New Hampshire home. She told me the rent for her two-bedroom two-bath apartment was $3,200 a month. I almost choked while I was taking a sip of my lemon-lime ice water.

I went online and discovered that in today’s mortgage market, one can procure a thirty-year loan for $250,000 and have a monthly payment just under $1,600.00. The building costs for a bare-bones house in a Midwest market can be done for just under $200 a square foot in 2025 dollars. You need to add the lot cost, utilities, and permits to get to a final figure. In the end, it’s all about reducing the square footage in a new starter home.

Column 1626

AI and Home Improvement

billboard hiring plumbers

This billboard is advertising jobs that Artificial Intelligence (AI) will not devour. Is your job vulnerable? Copyright 2025 Tim Carter

AI and Home Building & Improvement

What do you know about Artificial Intelligence (AI)? Have you tested it? Do you think it will be your friend or foe when it comes to building your next new home, or when you tackle a project at your existing home? I’ve immersed myself in AI, and am here to tell you that your head should be on a swivel.

I don’t have enough space in this column to share all I want you to know about AI and home improvement. I will probably do a series of future articles doing deep dives into how it can both help and hurt you.

Days ago, I was continuing my research on AI. I came across a document that listed the jobs AI was about to replace. The document also had a list of jobs that are immune to AI. It was a sobering moment.

Writers and authors like me are among the top professions at risk. Technical writers and editors are also going to be devoured by AI. The jobs that are safe from AI attack are the trades. Plumbers, carpenters, painters, electricians, HVAC techs, etc., will always have work. Share this tip with your children and grandchildren.

I’ve been mentoring a young plumber in Oklahoma for the past year. He’s been investing in his future by scheduling consult calls with me. Just yesterday, I coached him on how to start up his own business. I shared what plumbing jobs I’d never do, leaving those high-risk, physically demanding jobs to my competitors.

I can assure you this young man is going to be one of the best plumbers, no matter where he ends up living and working. The good news is that there are young people entering the trades who have great attitudes, ethics, and the desire to create a vocation. The issue is we need more of them. It may not be too late for you to switch careers if you feel AI is going to replace you.

AI is going to crush all of the weak home improvement websites you might rely on. The data centers that fuel AI have already gobbled up all of the content on just about every website visible on the Internet. AI generates answers to your questions based on this pirated content. Authors like me are reconsidering whether to post new information on our websites, as AI will steal it. This content vacuum is destined to harm you. Why should authors and writers like me be expected to work for free?

What happens as we march down the AI timeline? What does the future hold when AI uses stale or bogus information to generate an answer? You, the trusting consumer, risk getting a pile of refuse with maybe some whipped cream on top.

Allow me to show you how AI can help you save hours of time. Let’s assume you have a problem at your home. You go to the Perplexity large language model (LLM) AI engine and type in something like: My house has a basement water leak. What are the primary sources of the water, and what are the best ways to stop the water from entering my basement?

In the past, you might have spent hours on Google, clicking blue links, hunting for the answer to the above dilemma. Each click opens a new tab in your browser. Soon, you have ten or twenty tabs open, and your head is exploding with all sorts of information. At this point, you may have invested an hour or two.

Go ahead, type my sample question above into Perplexity. Within ten seconds, you’ll have a mind-blowing experience. Several pages of content from my www.AsktheBuilder.com website were used to produce the answer you’ll see.

You can have AI write the specifications for any job around your home. You use these to hire contractors. This way, each bidding contractor is producing estimates based on the exact same scope of work.

How will you know if the specifications are correct? You may need to hire a professional like me for just 15 minutes to review them. Only a fool would assume the AI LLMs produce the exact specs you need for your particular situation.

You may not feel it, but you’re living in a time in history that is as significant as the 1100s, 1455, 1492, 1776, 1859, etc. 2025 will stake its claim in history to this prestigious list of historical events. What happened during all those years listed above? Go to Perplexity or ChatGPT and discover for yourself.

You can rest assured I’ll be sharing more insight about the benefits and dangers of AI when it comes to solving problems at your own home, condo, or apartment. If you need help from a human, don’t hesitate to arrange a phone call from me to ensure AI doesn’t give you bad advice.

Column 1625

DIY Deck Building Dangers

deck under construction treated lumber

This new deck being built near my home has no less than three serious flaws. Copyright 2025 Tim Carter

DIY Deck Building Dangers - Death is Possible

Is a deck in your future? You might want to build one to create a delightful outdoor living space. You may visit a friend’s home and step out onto their deck. You may be in a dancing throng of people on some other deck. I urge you to go to YouTube and watch any number of deck and railing failures before you do any of the above. Decks can be very dangerous places should they be built by someone who has no understanding of structural principles.

A month ago I inspected a deck for a single mom. She was thinking of buying a house that had been in her family for decades. This house was built on a fairly steep hillside. The outer edge of the deck was every bit of 14-16 feet in the air. I put minimal pressure on the railing and it wobbled. I immediately condemned the deck railing instructing her to not allow anyone on the deck until the railing was replaced.

The original builder of this deck had used lag bolts to bolt 4x4s on the outer rim joist of the deck. Lag bolts, in my opinion, should be outlawed for deck construction. These bolts can lose their gripping power from being overtightened. Weathering and wood rot can also cause them to produce a very weak connection.

Through bolts or special deck tension tie hardware are superior methods to connect a 4x4 railing post to the under carriage of the deck. I’ve used the deck tension tie hardware on my own deck, and the railing posts are rock solid.

You can watch a video showing the amazing deck tension tie hardware on my www.AsktheBuilder.com website. Type: “deck railing post danger” into my search engine. This video demonstrates a serious flaw many make when installing deck railing posts. I point out what happens when you notch a deck railing post.

This same tension tie hardware should be used to connect the deck joists to the house joists. Decks can and do pull away from houses for a host of reasons. A friend of my daughter broke her neck and ruptured her spleen when a deck she was standing on fell to the pavement below in Old San Juan, Puerto Rico. She’s lucky to be alive.

Days ago I drove past a large new deck being built near my home. I stopped by, and observed several serious mistakes.

This deck projects out from the house over 25 feet. This requires a support beam under the joists. The carpenters supported the beam with several 6x6 posts. This is all well and good, but they forgot to install special hardware on top of the posts that create a solid connection between the beam and the posts. Instead, they just put a few nails driven at an angle through the beam into the top of the posts. One of the nails was so high on the beam, my guess is it only penetrated into the post about one-half inch.

I didn’t see any diagonal braces nailed to the underside of the deck joists. In all fairness to the carpenters, they may decide to do this after the deck is complete. The joists need to be perfectly spaced before you install the bracing. If you install the bracing first and the joist spacing is not correct, it’s nearly impossible to move the joists left and right to achieve the correct spacing as you install the finished decking on top of the joists.

This diagonal bracing is very important. It prevents a deck from swaying sideways. This can happen should a large crowd on the deck start to dance. You should use large-diameter timber screws to fasten your 2x6 bracing under the joists. Install two of these fasteners per joist. They should penetrate at least two inches into the joist.

The carpenters did install a sheet of copper flashing behind the rim joist that was attached to the wall. However, the house is covered with Zip™ sheathing that requires no house wrap. The carpenters may install a strip of adhesive tape over the top of the flashing securing it to the Zip™ sheathing.

I doubt the adhesive in the tape will stand the test of time. Hundreds of expansion/contraction cycles can lead to the tape detaching from the sheathing. Water that gets behind the finished siding can then get behind the all-important flashing meant to prevent this water intrusion.

I feel it’s much better to install this copper flashing behind the rim joist but only as a secondary barrier to water entry. I feel it’s much better to install a copper flashing that extends up the wall above the deck, then across the top of the treated rim joist, then turns down over the face of the rim joist. It should extend down the face of the rim joist about 1.5 inches and have a 45-degree-angle kick out.

This kick out forces water drops to form on the tip of the flashing and fall to the ground. This precision detail requires a small 45-degree-angle fire cut to me made on the top of the joists. This fire cut doesn’t take away any of the structural integrity of the deck joists.

You can obtain a detailed illustration of this precision deck flashing detail from me. It also shows how to use the deck tension tie to connect the deck to your house.

Column 1624

Chip Seal Your Driveway

chip seal road surface

This rural road near my house was just coated with small stone chips embedded in a thin layer of asphalt cement. You can do the same thing on your driveway. Copyright 2025 Tim Carter

Chip Seal Your Driveway - Make it Colorful

What would you say if I told you your driveway doesn’t need to be boring blacktop or ho-hum gray concrete? Can you envision a red, orange, green, or light khaki color driveway? Would you like a driveway that provides maximum traction should you have to deal with snow and ice? I used to have a driveway like this and loved it. I’m talking about a chip seal or tar and chip surface.

A rural road in my New Hampshire town was repaved last week using the chip seal method. The contractor sprayed about one-half gallon of hot liquid asphalt per square yard on the old road surface. A special spreading machine then carefully dropped about 25 pounds of small stone chips per square yard onto the hot, gooey asphalt cement. A large roller then compacted the chips into the liquid tar.

A paving contractor in Cincinnati, Ohio, used to specialize in this paving alternative. They purchased stunning medium-brown flint chips scooped from the Wisconsin River in central Wisconsin. This stone looks similar to butterscotch candy you might use when baking cookies. The stones were tumbled in the riverbed, and the rough edges were nice and smooth.

I used this material and paving method for my own driveway. People walking past my house would always stop and look at it. I’d answer questions about it if I happened to be outdoors doing yard work. I loved being the spokesman for this unique and colorful pavement. You can watch a video of my tar and chip driveway on my www.AsktheBuilder.com website.

You can embed any stones you like in the liquid asphalt. You may live close to a gravel pit that has unique colored stones. Granites and marbles come in a vast variety of colors. A stunning red granite can be found on Mt. Desert Island in Maine. Imagine if a local quarry had a pile of small chips of this granite!

The chip seal method of paving is time-tested. It was the way many miles of roads were paved in the early 1900s. Thousands of miles of secondary roads are still paved this way today. Chip seal is quite common out West, where the distances from blacktop mixing plants are too far away from where the material will be used. Chip seal contractors just have to keep the liquid asphalt hot in special heated tanker trucks. This is easy to do.

Modern blacktop paving differs from chip seal in a few ways. Your blacktop driveway material is a mixture of small stones, sand, and the same asphalt cement. It’s blended together in a giant rotating drum. The sand and stones get completely coated with the asphalt cement, which, when cooled down, binds the aggregates together.

No sand is used in a chip seal pavement. The chip seal stones don’t get completely coated with the asphalt cement, allowing the color of the chips to be on display. The underside of the stones is bonded to the sticky asphalt cement. The bond is permanent. Snow, ice, and snowplows can’t easily pluck the stones from the asphalt.

The chip seal surface is not for everyone. I’d not recommend it if you play basketball on your driveway. The surface is not as smooth as concrete or blacktop. Chip seal is also unforgiving when it comes to toddlers’ skinned knees.

Your best bet at locating chip seal contractors is to call all the blacktop companies in your area. They’re the ones who deal with asphalt cement on a daily basis. The question is whether or not they have the truck that sprays the asphalt and the stone-spreading machine.

Let’s say you don’t want the chip seal surface, but you do want a colored driveway. Blacktop sealers are available in a variety of colors. These sealers are used by companies that maintain tennis and pickleball courts. There’s no reason why you can’t use these same bright colors on your driveway.

Your dingy, plain-vanilla concrete drive can be transformed to a stunning art piece by installing a thin cement stucco coating. You can add countless dry-shake pigments to the stucco just as stamped concrete contractors colorize regular concrete.

If you really want a challenge, you can do intricate stucco patterns on your driveway, much like terrazzo contractors create murals using different colored marble chips and the dry-shake pigments in the cement.

There are many videos on YouTube showing how to colorize concrete or stucco. I urge you to watch them. Experiment using cheap concrete paving blocks you can buy at a home center. Once you’ve perfected your technique, then advance to coating your driveway. I’d love to see photos of your completed project.

Column 1623