Two Closet Plans & Materials

Closet Plan #1 - The Basics

Here is the simplest of plans. A closet you can add in the corner of an existing room.

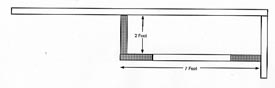
In this example, an existing room corner is shown. Those walls are not filled in. The closet walls have been shaded. The interior of the finished closet is two feet. The overall length of the outside of the closet is seven feet.

The portion of the wall taken up by the bi-fold doors is not shaded but you know that there is a bulkhead wall above the doors that fills in between the top of the doors and the existing ceiling, right? If you are stumped by this, you better call in a remodeler!
Closet Plan #1 Material List

  • 13 - 2x4 x8'
  • 2 lbs. 16d sinker nails
  • 6 - 4x8x1/2 drywall
  • 1 - 8' length of corner bead
  • 2 - gallons of drywall joint compound
  • 2 lbs. 1 1/4" drywall nails
  • 1 - set 4'0" Bi-fold Doors with jamb
  • 6 - 7' pieces of door casing
  • 16 lineal feet of baseboard
  • 1 qt. primer/sealer paint
  • 1 qt. finish wall paint
  • 8 lineal feet of pole and plank or wire shelving

Closet Plan #2 - Let's Get Serious

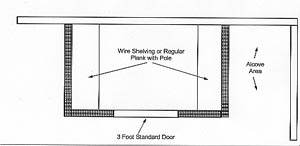
Option number two that I offer to you is no more than a larger walk in closet with a standard door. Depending upon where you place it, you may only need to build two walls or possibly three if the closet is centered on a wall. If you center the closet on a longer wall, remember that you can create nice alcoves on either side or perhaps a window type seat with storage below the seat.

The width and depth of this closet is variable - keep in mind though that the inside walls on either side of the door must be wide enough for clothes hangers. You can get away with 22 inches from the wall to the edge of the door frame if you are tight on space. The three foot walkway is plenty of room to maneuver. Beware of exposed light bulbs in closets. The National Electric Code is very restrictive about these. They have caused many a fire!

Closet Plan #2 Material List

  • 25 - 2x4 x8'
  • 3 lbs. 16d sinker nails
  • 8 - 4x8x1/2" drywall
  • 2 - 8' length of corner bead
  • 3 - gallons of drywall joint compound
  • 2 lbs. 1 1/4" drywall nails
  • 1 - 3'0" x 6' 8" Door with jamb
  • 1 - Door knob
  • 5 - 7' pieces of door casing
  • 30 lineal feet of baseboard
  • 1 qt. primer/sealer paint
  • 1 qt. finish wall paint
  • 10 lineal feet of pole and plank or wire shelving

Material List Notes for Closet Plans 1 & 2

The materials required to build an extra closet are minimal. Some of them may already be stashed in your garage or basement. The most expensive item is usually the door(s) and/or wire shelving kits. Just about all the materials are user friendly. The toughest material item to work will be the door(s). If you haven't been trained in how to hang a door, be prepared for some frustration. Be sure to paint the top and bottom edge of the door(s) to prevent warping and twisting of the door(s).

Related Articles: Closet Organizers, Shoe Storage, Adding Closet Storage Space, Two Closet Plans - Build

Column B241
Build Tim’s Simple, Safe & Sturdy Workbench

Clamps, tools, paint cans, nails, etc. all seem to gravitate towards my workbench. Possibly yours is the same - or soon will be! An inferior workbench or one that wobbles is useless and can be dangerous. A fully loaded workbench with supplies, its own components, tools, etc. can easily weigh in at over 500 lbs. You don't want something like that collapsing on you or your kids! If you follow the plans I have developed, your workbench will not collapse - that I can assure you!

A Simple Job

Building this workbench is really quite simple. The cut sheet of materials is very straightforward. The biggest challenge is cutting the plywood straight. You can achieve straight cuts if you use the factory edge of a new piece of plywood as a guide. Simply calculate where the edge of the saw base stops in relation to the actual saw blade cut. Draw this line, clamp the edge of the new piece of plywood to the pencil line and cut away. The result is a perfect cut each time. You should actually keep a six inch wide piece of plywood around for this purpose. It will come in handy on other projects.

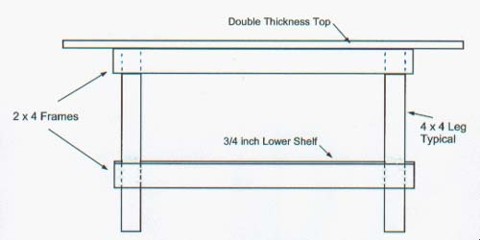
The cut list that follows tells you exactly how long to make each piece of wood for the work bench. The 3-D drawings show you the order of assembly. The only place you can make a mistake is when you pre-assemble the frames. Be sure that the 54" pieces overlap the 20" pieces. This way each completed frame will be 54 inches long and 23 inches wide. Everything else from that point is very cut and dried.

The Bottom Shelf

The bottom shelf goes in much easier if you cut it out and make a notch for the legs before you install the second frame. You must make both frames identical. Once all four legs are attached to the first frame, you can then cut out of the bottom shelf and lay it in between the legs and on top of the first frame. You then slide the bottom frame down the legs 11 and 1/4 inches. Bolt the frame to the legs and flip the workbench base over. The shelf will drop down to the top of the bottom frame and be in position! If you try to install the shelf after both frames are in place, you may get into a bind!

The Hardwood Top

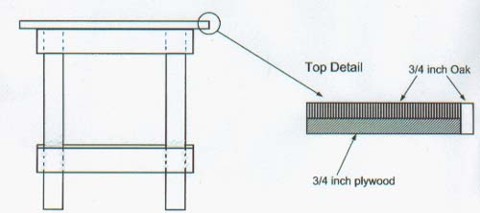
The hardwood top of my workbench sets it apart from all others I have seen. Oak is a super durable wood. It can take all you can dish out. Once completed and urethaned, it makes for an attractive and easy to care for surface. Oil, dirt and paint wipe right off if you attend to spills immediately.

You start the top by laying the hardwood pieces carefully to the edges. It is important that they are flush with the edge of the plywood so that the final hardwood edge band fits well. If you do anything, be a sixteenth of an inch short from the edge! You can always fill the tiny crack with wood filler and sand it before you urethane.

When you sand the hardwood after it is installed, just use a simple belt sander. The top doesn't have to be as smooth as a hardwood floor. Take the sander along the corner of the hardwood edge band and slightly "ease" it or bevel it. The sharp 90 degree corner can damage you or items as you work on them.

L Brackets

Do NOT screw the plywood top through the top into the top frame and the legs. If you do this, it will be nearly impossible to remove the top from the frame at a later date. I actually got this idea from a workbench that I received as a gift. An old neighbor was moving and offered his basement workbench. I knew it wouldn't fit up the steps. He said, "Yes it will. I built it so it can be taken apart!" Sure enough, we had the top off the workbench outside in about 10 minutes! A future granddaughter/grandson will appreciate it when you take the time to install the L brackets in your workbench. Be sure you square up the top to the frame with consistent overhangs before you attach the L brackets.

Fancy Plans

Workbench Magazine had a great plan for a workbench in the October 1997 issue of their magazine. It is similar to my workbench but offers the option of some drawers. Their plan is not for a beginner! The designer wants you to use mortise and tenon joints at the legs to make the base rock solid. My design achieves the same goal.

If you want a super attractive workbench you might want to blend their plan with mine. I am thinking of doing it myself one day. Check out this and other workbench plans offered by the magazine.

Related Articles:  Sturdy but Simple Garage Workbench, Materials List & Illustrations

Column B245

Tim’s Workbench – Materials List & Illustrations

Material List for Tim's Workbench

This workbench will set you back a little bit of money - possibly $150 - but it will last several generations. The workbench is incredibly strong if you assemble it with 3.5 inch long screws or 1/4 inch lag bolts where the frames attach to the legs. Once built, the workbench will support well over 1,000 pounds. If you plan to move it or take it with you for any reason, do NOT screw the plywood top down into the 2x4 frames. Remember, once the hardwood top is in place, you can't get to those screws. A better method would be to use eight L brackets under the top.

I suggest you use treated 4x4's for the legs. These can take abuse and can get wet with no concern whatsoever. Untreated lumber is susceptible to rot over time. All other materials can be untreated lumber. Use square edge plywood for the top - not tongue and groove subflooring. You want a smooth surface to act as a guide for the oak edging. Remember, the only time you can use nails is when you nail the oak flooring to the plywood top. All other fasteners need to be screws or lag bolts!

The offcuts from the two sheets of plywood can be used to make a shelf unit or two that can sit on the back of the workbench. Use your imagination and make a multi-level system depending upon your tools and needs.

  • Top:
    1 pc. 4 x 8 x 3/4" CDX plywood - cut to 27.5" x 70.5"
    19 square feet of 3/4 x 2.25 inch strip oak flooring
  • Stabilizing Frames:
    Two 2x4's by 10 feet long - cut two 54" pieces each
    One 2x4 by 8 feet long - cut four 20 inch pieces
  • Bottom Shelf:
    1 piece 4 x 8 x 3/4 inch CDX plywood - cut to 54" x 23" - make appropriate notches at each corner depending upon size of legs.
  • Legs:
    One 4x4 x 14' CCA Treated Post - cut 4 pieces exactly 31.5" long
  • Fasteners:
    16 - 3.5" x 1/4" lag bolts with washers
    16 - 3" coarse thread screws for frames
    8 - 2" x 2" L brackets with necessary 1.5" screws
    2 lbs - 6d flooring nails

Simple Workbench Plan Views


Front View


Side View


Related Articles:  Sturdy but Simple Garage Workbench, Build Simple, Safe & Sturdy Workbench

Column B245

Shelving Made Easy

Clutter..... ACCCCKKKK! What a waste of time looking for things or stepping over boxes and cartons of stuff. I have had to do this at my house too many times. I've found the best solution is to build custom shelves that maximize storage space and accommodate the items that I have.

My system is actually one I modified. My wife Kathy and I bought our second home in 1976. I think the house was built in the early 1900's based upon the solid stone foundation. In the basement, a carpenter had built some handy shelving. He used 1x6's and other 3/4 inch material to build the system. It was a brilliant piece of work that allowed me to store heavy tools, boxes of nails and electric motors. I had tried to do this on some prefabricated metal shelving, but the metal shelves bent!

Two to Three Hours and Presto!

If you have any experience with cutting lumber, and you have a few handy tools, you can build my shelf system in less than four hours. The biggest challenge will be attaching the system to a masonry wall. I had to do this in my own basement. To achieve this goal, you will need to rent or borrow a masonry hammer drill with a 1/4 inch drill bit. If you are attaching the shelves to a wood wall, this is a piece of cake!

The Cut List

Let's start out with an easy set of shelves - those that require a minimum of cutting. Your best bet is a shelf system eight feet long. Let's build a system with five shelves all the same depth. Here is the cut lumber list you need just before you start to assemble the system:

  • 5 pieces of 1/2 inch plywood 11 7/8 inch wide by 8 feet long

  • 5 pieces of 2x2 eight feet long
  • 5 pieces of 2x3 eight feet long
  • 2 pieces of 2x4 eight feet long

The plywood shelf depth is 1/8 inch less than 11 inches for a reason. This will allow you to get four pieces from a 4 by 8 foot piece of plywood.

The 2x4's will need to be cut, but I can't tell you the height because I don't know how high off the floor your last shelf will be AND I don't know if your basement floor is level.

The Legs

The only difficult part of building the shelves is the final height of the 2x4 vertical legs. Here is how I do it. I install all of the 2x2s on the back wall at predetermined heights. I then build the shelves by attaching the front of the shelf to the 1.5 inch edge of the 2x3 front shelf beam supports. You then take one of the shelves and screw down through the back of the shelf into the top 2x2 wall cleat. I like to put screws every one foot on center. If you have decent coordination, you will not need any help doing this.

It is now time to set your first vertical leg. If you want the top of the 2x4 to be flush with the top shelf (my preference), you need to make sure the 2x4 can stand vertically without hitting the ceiling. If it doesn't, trim it off a little. Take a short level, the 2x4 and stand on a ladder at one end of the shelf. Place the 2x4 so it projects about 16 inches out from the wall down at the floor. Hold it plumb next to the top shelf and use the small level to level the shelf. Since the 2x4 should be higher than the shelf, use a pencil to mark where the shelf passes by the vertical 2x4. Cut it off at this mark and then attach it to the 2x3 front shelf beam using two three inch long drywall screws. Do the same thing for the other end of the shelves. You can't necessarily cut both 2x4 legs the same length since the floor is probably out of level or the top 2x2 might be slightly out of level.

Once both legs are cut and screwed to the top shelf, the rest of the assembly goes lightning fast. Simply level each shelf as you go. A screw gun or a drill with a Phillips head bit in the chuck will make this job very easy.

The Three Inch Rule

I am planning to build additional shelving in my basement. I will modify my design slightly. I want to minimize the amount of air space above the objects on my shelves. In other words, if I want to store gallon paint cans, I want there to be just a 1/2 inch clearance space between the object and the 2x3 front beam of the shelf above.

To achieve this goal, you must keep in mind certain dimensions as you install the back wall 2x2 cleats. Let's say you want to have 10 inches of clearance between the top of a shelf and the 2x3 shelf beam above. To do this, you must install the back wall cleats so that the top of the one cleat is 15 inches higher than the one below! You will loose the three inches in the following way: The shelf itself is 1/2 inch higher than the lower 2x2. The 2x3 beam of the upper shelf hangs down 2.5 inches from the top of the upper 2x2 cleat. 2.5 inches plus 1/2 inch equals 3 inches. Don't forget this rule......!

Column B249

Shelving for Storage – Plans

Storage Shelves - The Plans

Following are very simple front and side plan views of my storage shelves. The dashed lines you see are telling you that something is hidden behind the object that is at the surface of the paper. Use these plans in conjunction with the 3D views to help you visualize the entire system. Note that the front 2x4 legs do NOT have to extend to the ceiling. They only need to be as high as the top surface of the top shelf.

Column B249

3D Perspectives – Shelving Construction

3D Shelving Construction Perspectives

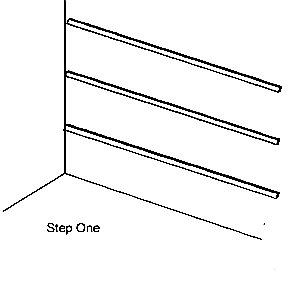
Start the project by attaching the 2x2's to the back wall. Don't forget about the Three Inch Rule for clearance purposes!

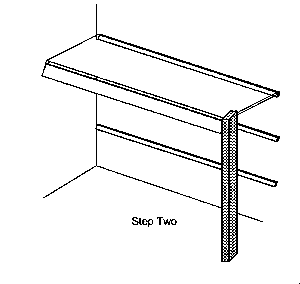
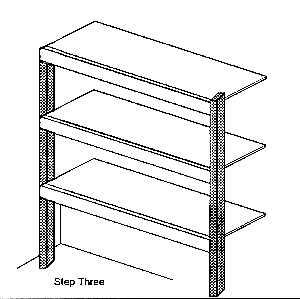
Simply put, if you want to slide a 12 inch object onto a shelf, the top of the 2x2 support for the shelf above must be 15 inches higher than the shelf where you intend to store the object. The thickness of the shelf and the height of the 2x3 account for the three inch difference. Install the top shelf first once all 2x2's are in place. With the shelf drooping after it has been attached to the 2x2, immediately attach a vertical 2x4 leg at each corner. With the 2x4's in place, the rest of the shelves install in a jiffy! Be sure to level the shelves front to back as you attach them to the vertical 2x4 legs.


I have only drawn three shelves in this 3D perspective view. I did that for the sake of simplicity.

You may only decide to do three shelves or possibly six or seven. I guarantee you that once you build your first set and see how strong they are, you will be building more.

Keep in mind that you can actually place a shelf upside down if you need a curb to restrain balls or other objects. If you decide to do this, be sure to screw the shelf into the 2x3 with two inch long screws at six inch intervals.

Column B249

Garage Storage Loft

Stuff.... I have WAY too much stuff. In fact, as I write this, I can't even get my vehicles into my garage. Last fall, I salvaged three giant rolls of wall to wall carpet that I intend to use in my basement office and kid's playroom. It is still on the floor of the garage!

There is also a giant pile of woodwork in the center of the garage. We are modifying the interior trim of my house to make it look like an 1890's Victorian farmhouse - the actual exterior architectural style. Add to this, kid's bikes, lawn mowers, table saw, etc. and you can see the problem.

It Was Worse!

When I was still doing construction work on a daily basis, I used to bring home leftover materials and parts from jobs. From past experience, I knew they would come in handy on a future job. Over time, I simply accumulated too much stuff. It got so bad that I couldn't pull my truck into the garage.

Several years ago, I decided to take advantage of my garage's large interior height. The walls of my garage are nearly 11 feet 6 inches tall. I had to build it this tall so that the roof of the garage would not interfere with the adjacent roof over the laundry room. If I had it to do over, I would have built 12 or 14 foot high walls!

Anyway, I constructed in one corner of my garage a wonderful loft that allowed me to take vast quantities of materials, parts, etc. and suspend them up in the air. My loft is nestled in a corner of my garage, although I am planning to extend it along the back wall of the garage much like I have described in the column and this bulletin.

Scads of Space

If you have a garage with only 9 foot high ceilings, you will be able to still make a wonderful loft area. Just look at your current garage and imagine all of the cubic feet of wasted space located over the hoods of your vehicles.

The trick is to place items in the loft that are needed on a seasonal basis. Plan the space so that you don't have to move things back and forth to retrieve something else.

Access to the Loft

I found a wonderful 10 foot long wooden ladder in perfect condition at a garage sale. I use it to access my loft. It just leans up against one end of my loft. I do not have it permanently attached to the loft since I use the ladder for other things. It would be safer if I did attach it, so keep this in mind for your situation.

I would not use a step ladder to access a loft unless the ladder was taller than the loft. Remember, you are not supposed to stand on the top two rungs of a stepladder. They can be come very unstable and you can fall. This situation becomes even worse when you are carrying some large box up or down the ladder. You have your hands full and your center of gravity is now altered! Avoid step ladders for loft access!

Beams and Joists

Most people have built decks before. It is common for the deck joists to be in the same plane as the deck ledger board at the house. In many instances the other end of the joists rest on top of a beam. I don't suggest you do this for a garage loft as it takes away precious inches of head room beneath the beam. Beams can be in the same plane as joists. You simply use joist hangers at each end of the joist!

Keep in mind that there is the possibility for vast amounts of weight in the loft. Use your existing floors in your house as a guideline for joist sizing and spans. If you decide to build a giant loft, consult with a seasoned carpenter or designer to make sure you have the lumber sized correctly.

When you load objects in the loft, keep heavy things towards the back of the loft. This will help to transfer the load to the ledger board and not the front beam. Distribute loads evenly. Try not to concentrate all of the weight in a small section of the loft. Use common sense.

Remember, you can hang rakes, shovels, hand tools etc. from the joists! Be creative!

Fan Mail

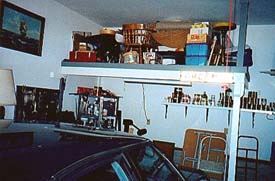
Betty and Don M.'s garage loft.

Betty and Don M.'s garage loft.

After my column ran in the many papers across the nation, I received a very nice letter from Betty and Don M. in Bellingham, Washington. They read my column each week in the Bellingham Herald. They were kind enough to write to me and tell me about a nearly identical loft that they built in their own home. They commented that the loft is saving them $50 per month in off site storage fees and that they can easily park both cars in the garage. Betty and Don, thanks so much for sharing your photo and story with all of us!

Companion Articles: A Storage Loft in a Garage, Garage Storage - Loft Material List, Floor Plan for Garage Storage Loft

Column B265

Floor Plan for Garage Storage Loft

A Very Simple Structural Floor Plan

The following plan is about as simple as they come. Your mission is simply to build an elevated deck in your garage. The ledger board is the first thing that is installed.

Simply make sure you have it positioned correctly so that the 4x4 posts will not interfere with your cars.


I accomplish this by pulling the vehicle into the garage in its normal position. Use a level and plumb down the sides of the car at its widest point or where the 4x4 posts will be closest to the car. Make marks on the garage floor and then pull the car out of the way. Take a full sheet of plywood and lay it on the floor so that its long 8 foot edge is parallel with the back wall of the garage. Make it overlap the two marks on the floor equally. Project the two 4 foot plywood edges back to the rear wall of the garage and you now know where the ledger board must be. Simply plumb a line up from one of the new marks and this is a starting / ending point for the ledger board. Going through this exercise will keep the platform framing square so it is easy to attach the plywood flooring.

The 4x4 posts can extend to the ceiling but should be secured to the ceiling joists or collar ties or new 2x4 blocking between these existing members.

For a list of materials required for this loft, read the column Garage Storage - Loft Material List.

Companion Articles: A Storage Loft in a Garage, Garage Storage - Loft Material List, Garage Storage Loft

Column B265

Garage Storage – Loft Material List


Garage Storage - Loft Material List

Building my garage storage loft does not require too much material. If you visit a full service lumber yard, they will have everything on the following list. Do NOT use roofing nails to attach the joist hangers to the beams and ledger board. Roofing nails are designed for shingles, not for supporting large amounts of weight. The heads of the nails can pop off and the shafts of the nails can break. You can buy short nails that have a thick shaft and thick head that are meant to take weight. They are specified in the following list.

This is the material list for the garage storage platform shown in the column Floor Plan for Garage Storage Loft. If you build it wider or deeper, you will need to modify the list dramatically. Remember, if the span between the 4x4 posts is more than 8 feet, make the front beam double 2x8's.

The Material List:

  • Four 2x6 x 12's - Cut to 6' long for joists

  • Three 2x6 x 8's - Ledger and Double Beam
  • Two 4x4 x ? - Length depends upon height of your garage
  • Two 2x4 x 8's - Blocking material for anchoring top of 4x4 posts
  • Four 1/2 inch x 7 inch long carriage bolts with washers and nuts - Use these to attach the beam to the 4x4 posts - two bolts per post.
  • Six 3/8 x 5 inch long lag bolts with washers - Use these to attach the ledger board to the rear wall of the garage.
  • Twelve single 2x6 Simpson or equivalent metal joist hangers
  • 1 small box Simpson or equivalent joist hanger nails
  • Two 4' x 8' x 3/4 inch pieces of plywood for loft flooring ( 5/8 or 1/2 inch can be substituted)
  • Two Simpson or equivalent 4x4 post bases
  • Two 1/2" x 3" expansion stud anchors for post bases
  • Two pounds of 8 penny sinker nails - For subfloor attachment
  • Two pounds of 16 penny sinker nails - for misc. attachment of joists to beams, beam construction, etc.

Companion Articles: A Storage Loft in a Garage, Floor Plan for Garage Storage Loft, Garage Storage Loft

Column B265

Garage Plans & Construction Costs

What About Cost?

To build the dream garage I have described and illustrated in other articles, it will probably cost you between $35 and $45 per square foot (Actual Costs as of 1999) if you have a contractor do it for you. If you happen to be handy and can do lots of the work yourself, you might be able to get it done for about half of that.

If you do decide to build the garage yourself, you will need at least 6 people to help you tilt up the walls. The garage door wall should be built without the beam in place. It will be very hard to erect as it will be top heavy. Create the pocket for the beam and slide and fasten it in place after the wall is up and braced.

The beam over the garage door will need to be sized by an engineer. Its size depends on what type of trusses you decide to use. If you go with the attic storage trusses, be prepared for a slightly larger beam.

Exterior Surface?

If your budget starts to get tight, give vinyl siding a serious look. Be sure to look at the ones that are multi-colored. When viewed from a distance of 20 or more feet, they will usually fool most people into thinking you covered your garage with expensive cedar or redwood. Buy a siding that has passed the voluntary standards of the Vinyl Institute!

Companion Articles: Dream Garage Has Lots of Room, Dream Garage Illustrations, Ideal Garage Plans & Tips

Column B271