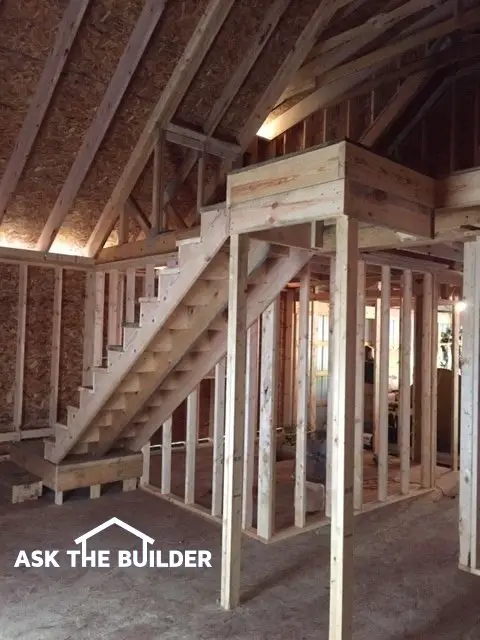
Interior Framing

Interior Framing


Interior Framing

After building homes for nearly 20 years, I still love to see the look on customers' faces when they visit the jobsite just after the house frame is complete. The skeletal frame of the home allows people to make the jump from the two-dimensional blueprints into the three-dimensional world of what the living spaces will be like. That same enjoyment can be seen in Cary Grant's face when he stops by to check on progress in the classic movie Mr. Blandings Builds His Dream House.

But if you want to avoid problems in the future, there are certain things you need to tell your builder, or rough carpenters, before they build the walls. Don't make the same mistake Cary Grant made and talk about changes after the work is in place. If you want to:

  • eliminate wavy walls where cabinets will hang
  • minimize or totally eliminate wall anchors when hanging fixtures or paintings of any type
  • guarantee crisp lines along chair rails or wainscoting in long hallways

Then, you must make sure the rough carpenters employ some very simple framing techniques that they know about, but don't always do. To make sure these things happen, you need to put them in writing and make sure they appear in the plans and specifications for your new home.

The traditional dimensional framing lumber, that is used in many of today's new homes, is a great material. But, it is far from perfect. Hybridization by the forest products industry has created many species of trees that grow much faster than older lumber. This rapid-growth characteristic can create problems with certain wall studs as the wide light-colored spring wood growth rings stabilize once exposed to the atmosphere in and about your new home site. This drying-out process can cause the lumber to twist and bow.


How would you like me to build your new home? It's probably impossible for me to fit your job into my schedule, but I will gladly share hundreds of my tricks and building secrets with you and your builder. Check out my New House Specifications.


Slight imperfections in wall studs are not a problem in most walls, but they can create huge problems in kitchens, bathrooms or family rooms where wall and base cabinetry and countertops will be installed. The wavy walls can cause all sorts of fitting problems for finish carpenters and those that install other finish materials. In these areas, it might be a better idea to use steel wall studs or special engineered lumber that is perfectly straight and will remain so even as the house acclimates. The rough carpenters can include solid wood blocking in these walls at prescribed heights so the finish carpenter does not have to hunt and peck for wall stud locations as the cabinets are installed.

CLICK or TAP HERE to get FREE quotes from local companies to build your house.

These same framing materials also produce perfectly flat walls in hallways, stairwells and other rooms where trim moldings, wainscoting and even staircases must fit perfectly. Working with these materials is not difficult. They may cost a little bit more, but the long term benefits are worth double or triple what you will pay today.

I doubt you are devoting much thought to towel bars, toilet paper holders, drapery rods, paintings, shower grab bars, dart boards, stair handrails, shelving and electrical light switches, etc. at this time. But you may be broadcasting unkind thoughts to those unnamed carpenters and your builder as you discover nothing but air behind the drywall as you start to hang things on walls, during the weeks or months after you move in to your new home.

These nightmares can be avoided with some forethought. If you plan ahead and know where you will be hanging things on walls, the carpenters can spend just a few hours installing scrap lumber blocking. These slabs of wood insure you will hit solid lumber each time you drill a hole in a wall. Use your existing home as a template. If you like the location and height of your current toilet paper holder, towel bars, etc., tell your builder where to put the new ones. The same goes for anything you currently have hanging on your walls.

Once the carpenters are finished, and before the plumbers and electricians arrive, double check the locations yourself and take photographs of the blocking. Use a large permanent marker and write the centerline height and distance from the nearest corner on the block. A close up photo in addition to a wide angle photo will allow you to easily locate the block, once it is hidden by drywall or tile. But, visit the home days before the drywall will be installed. Some of the blocking may be missing as the other tradespeople might have knocked it out. Unless they are instructed to work around the blocking, an impatient subcontractor might remove one or more pieces of blocking.

A pet peeve of mine happens to be light switches. When I visit homes I haven't built, I hate how the cover plate is always so close to the wood trim around doors. Adding a simple scrap of 2x4 lumber to the rough door frame at each switch location gently nudges the switch away from the finished trim lumber.

Column NH003

Pressure Washing Wood Decks

! ! Please Read Author's Notes at the end of this column ! !

Pressure Wash Wood Decks - Not a Good Idea!

DEAR TIM: It's time again to clean and seal our wood deck. I have watched a number of TV shows that advocate the use of pressure washers and a mixture of chlorine bleach and water. I am afraid that a pressure washer will harm my wood deck, but the TV shows made it seem so simple and easy to use. What is a good way to safely clean a wood deck? What is the best sealer to use once I have finished? Jackie F., Versailles, KY

DEAR JACKIE: Many of those TV shows bring a smile to my face. They often create a fantasy land where household projects go smoothly, the workers rarely sweat, and there are never any problems. My twenty plus years of experience in the field tell me that the exact opposite is true of most home improvement projects. Cleaning wood decks is no different. If you want excellent results you have to do some work, but it is not that hard.

How Do Pressure Washers Harm Wood Decks?

scrubbing a wood deck with Stain Solver

Using a pressure washer to clean a wood deck is a huge mistake in my opinion. High-pressure streams of water easily erode the soft light-colored spring wood that is found in between the darker bands of summerwood on each piece of lumber. I have actually cut my hand on pressure cleaned deck handrails. So much softwood was eroded by a pressure washer that sharp slivers of summer grain wood were left behind. The surface of the handrail resembled an upside-down multiple blade razor.

To make matters worse, many of the pressure washed decks I have examined were cleaned by professional deck cleaning companies. If you have no experience working with a pressure washer, the last place to start is a wood deck.

If you want to make an even bigger mistake, then use chlorine bleach to clean your deck! In my opinion, it is the absolute worst ingredient to apply to a wood deck. Chlorine bleach, better identified on deck cleaning product labels as sodium hypochlorite, removes the natural color from your wood, it destroys the lignin or glue that holds together the wood deck fibers, is toxic to surrounding vegetation, and is corrosive to all metal fasteners and components that hold your deck together.

What's a Better Way To Clean Wood Decks?

A far better wood deck cleaner is oxygen bleach. Stain Solver is a certified organic oxygen bleach formulated for cleaning wood decks.

Stain Solver Oxygen Bleach

Stain Solver is MADE in the USA with USA ingredients that are food-grade quality. CLICK THE IMAGE to order some NOW.

Will Stain Solver Kill Mildew and Algae?

This powdered product when mixed with water releases non-toxic oxygen ions that kill mildew and algae. In addition, the foaming oxygen bleach loosens grey weathered wood fibers and dirt from the deck surface. In the process, it does not remove natural wood color, nor does it hurt nails and joist hangers. Possibly one of oxygen bleach's best attributes is that it will not harm plants, vegetation or you.


Wood deck surfaces need to be cleaned and sealed to keep them in good condition. The cleaner I recommend is oxygen bleach.


EB015 Cleaning & Sealing Deck eBoo Cover

How Do You Use Stain Solver?

I have found that the best way to clean a wood deck is to mix the powdered oxygen bleach with warm water. Once the powder is dissolved, you liberally apply the solution to the wood surface. It immediately foams up as the oxygen ions attack the mildew, algae, and dirt. I prefer to let the solution sit for 10 or 15 minutes. Using a scrub brush on a pole or a large push broom to gently scrub the surface to lift-wood fibers and dirt. To complete the cleaning process you simply use a regular garden hose to rinse away all traces of dirt and grime.

Over the past few years, popular consumer magazines have revealed that many deck sealers perform poorly. Most, if not all of the ones tested, contain animal fat, vegetable, linseed, and other natural oils that are food for mildew and algae. It is no wonder decks turn black and green after the water-soluble mildewcides contained in these products are washed away by repeated rainfall. If you want lasting results from a deck sealer, you should apply one that contains synthetic resins.

Be sure to purchase a synthetic resin deck water repellent that penetrates into the wood. Do not buy a product that forms a film on the wood surface. Film-forming wood sealants will eventually peel. I have applied penetrating wood water repellents to my outdoor wood porches and have achieved extraordinary results. I prefer to use ones that have some pigment in them. The pigment or color helps to slow down the wear caused by the sun's ultraviolet rays.


Author's Notes:

June 1, 2004

I just got this wonderful e-mail from a person who has been victimized. Read this:

Hi Tim ,

I've read everything you've written about cleaning and sealing decks and am even purchasing your Oxygen Bleach - Stain Solver tonight. However, the one thing you don't write about at all is what to do with deck wood that has been blasted to pieces by previous pressure washing so that now, it's like a bunch of razor blades on edge. I want to clean and seal the deck but it will then be a clean, sealed bunch of razor blades. Do you have any advice on how to repair this problem? It's apparent on the deck surface and on the railings and rail slats, as well as on the tops of the vertical deck posts supporting the deck.

I appreciate any help you can offer.

Thank you.
Buck Smolow

- - -

Buck,

Great question! You have two choices: Sand the deck before cleaning or after cleaning with my product. If I was doing it, I would clean the deck with my Stain Solver, then I would wait until the deck was nice and dry and sand it with any number of electric sanding tools. You may have to rent a big pad sander, or at the very least use a belt sander for the large flat deck area. The spindles and railing will need lots of attention with palm sanders or even hand-held sanding blocks.


Read Sheryl's comments about using a pressure washer on her deck.

"Tim,

I am going to order some of your oxygen bleach to clean my wooden deck that is on "the list" this summer. I sure wish I had known about this product before I power washed it two years ago - as I wondered why the wood looked messed up afterwards."

- Sheryl W., State Park, SC


Message from Tim:

Years ago while researching a column about cleaning decks, I discovered the wonders of Oxygen Bleach. It is perhaps the 'greenest' cleaner I know of as it uses oxygen ions to break apart stains, dirt and odor molecules. There are no harsh chemicals, and it works on just about anything that is water washable.

I decided to create my own special blend using ingredients made in the USA. In fact, the raw materials in the active ingredient are food-grade quality registered with the FDA. I call my product Stain Solver. I urge you to use it to help clean your deck. You will be amazed at the results!

Column 315

Building Small Model Cars

model race car

DEAR TIM: My mom and dad read your column each week. You help them a lot. But I need your help now. My girl scout troop has a Powder Puff derby competition each spring and we build small model cars that race down a sloped track. I would really like to get a medal for the fastest car. Looks don't mean as much to me. Can you help me? What do I need to do to make my little race car go fast? Bridget M., Denver, CO

DEAR BRIDGET: So you feel the need, the need for speed? My children are just like you. They both enjoy scouting as did I when I was a child. Each year, I help them work on their gravity powered race cars. We have built some screaming machines but I have also had a few slackers as well. I'm more than happy to share some of my secrets.

What is friction?


Your biggest enemy in this car race is friction. This happens when two moving parts rub against one another. Since these cars don't have any motors, the friction happens at each wheel and as air passes over the car. You need to do everything possible to reduce friction where the plastic wheels touch the car body and the steel axle. Keep in mind that certain girl and boy scout councils have strict rules with respect to what you can and can't do to each of the cars.

Should a model race car be balanced?

The second enemy is balance. The kits that are often provided to you by your troop leaders need to have weight added to them. This weight needs to be spread out as much as possible over the length of the car. If too much weight ends up on either the front or rear end, you increase friction on those wheels. Unbalanced cars are also very unstable on the race course and can actually jump off the track. If this happens, you will experience the agony of defeat.

How do you reduce friction?

To reduce friction at the wheels use fine sandpaper to remove any plastic burrs that might be on the inside edge of the wheel or the hub that is near the axle hole. If you are permitted to sand the hub, make it slightly rounded so that when it touches the body of the car just a small amount of plastic contacts the wood, not the entire hub. Use emery cloth to polish the shafts of the small nails that act as the car axles. Check for metal burrs under the heads of each nail at this time. Remove the burrs with a small file if this is permitted. Sand the sides of the wood car and coat the areas near each wheel with multiple coats of high gloss polyurethane after the car has been painted. It is much easier to paint the car before you assemble the wheels.

Check wheel spin on each axle before you assemble the car. You want the wheels to rotate with ease. When you attach the wheels and axles to the car, be sure that you don't drive the nails too tightly. If this happens, the wheels will not spin freely on the axles. Use powdered graphite to lubricate the wheels.

Should weight be added to the model car?

I like to add weight using pieces of solder. I create a 3/16 inch deep recess that is 1.25 inches wide by 3 inches long in between the saw cut axle channels on the bottom of the wood car. It is best to create this channel before you cut out the shape of your car. Your mom or dad can do this with a router or a sharp wood chisel. Cut out the car shape next. Sand the car and paint it at this time. Allow the paint to dry thoroughly.

I then place the car upside down on a highly accurate postal scale so that the recess area is level. Use one of the car wheels to do this if necessary. Place the remaining wheels, axles and any decals on the scale. Cut pieces of plumber's roll solder that are just the right length to fit into the recess. Make them as straight as possible and glue them into the recessed area. Glue just enough solder to take the car up to its maximum allowable weight.

Does the design of the model race car matter?

Your car design doesn't need to be fancy to win. A simple wedge shape produces minimal air friction. Be sure to cut out some material from the rear bottom of the block of wood. This excess wood can rub on the track when the car gets to the bottom of the hill. One last thing: try to remember that the car race is about working together and having fun. The thrill of victory lasts but a few minutes. The joy of competing fairly and working hard towards a goal is much more fulfilling and long lasting.

Walk Through Inspection Checklist

Walk Through Inspection Checklist

Discover Defects BEFORE You
Close on Your New Home
! Instant Download PDF Document !

Just $19.95 - Instant Download!

! 100% Money-Back Guarantee !

Order Now

Morning Tim,

Just wanted to share my opinion with you, I have down loaded the checklist I purchased from you. I have to say you knocked the ball out of the park. Thank you for a excellent job, my gain.
- Jim Richardson

Here is how it helped Ethan Chamberlin:

"Tim, Thank you very much for the Walk Through Inspection Checklist. It was invaluable. Using the list, I found 40 items that need to be repaired/completed before I make my final payment to the builder. The checklist is well worth the $17.00.00. Thanks again!"

And Holley S. of Nashville, TN had this to say:

"I used your checklist for the condo I plan to buy and really surprised all involved. They had only allocated 30 minutes for my walk through since it's just a condo, but I kept them there longer and feel much better. There were only a few things that need attention, but I would have never noticed them if it weren't for your packet. So, thank you."

A walk through inspection can be very stressful. It is often your last chance to discover flaws in your new home. The last thing you need is to completely miss one or two mistakes that might cost you thousands of dollars after your warranty expires. Ouch!

I can relieve and remove that stress.

You will be empowered when you meet with your builder armed with my Walk Through Inspection Checklist.

My Walk Through Inspection Checklist costs just $19.95.

The cool thing about my Checklist is that it is a tool that can help you long after the inspection. Why? The checklist, once completed, acts as an important benchmark. You have a snapshot of the EXACT condition of all things in your new home the day of the walk-through. There will not be any arguments as to what something really looked like. Your builder will not have any wiggle room 6 months or 1 year down the road just before your warranty expires.

My checklist can and will save you heartache and lots of money.

 DELIVERED INSTANTLY!

This checklist contains over 215 checklist items. Each item needs to be inspected to make sure you are getting what you paid for. The checklist allows you to protect thousands of dollars of your money. Once completed, you have a written record of the condition of your home before you close on your new home loan. The checklist allows you to quickly identify flaws, mistakes, poor workmanship and other defects.

Below is a screenshot of some of the questions from the foundation section of this Checklist.

sample questions in the walk through checklist

Order Now

If the defects can't be cured before the closing you can request that the bank withhold an agreed to sum of your money until such time as you are satisfied. I guarantee that the checklist will help you find flaws in your home that you might have overlooked! It worked for Ed Jendon. Here is what he told me:

"I purchased and utilized your checklist for the walk-through inspection of our new house. The number of items in the checklist was incredible. It saved both myself and the builder a lot of time."

HOW WOULD YOU LIKE?

  • Over 215 detailed checklist items
  • Written tips that help you maximize the power of the checklist
  • Professional Home Inspection Association listings in case you decide to have a professional assist you
  • Instant Download as an attached Adobe PDF Format file

My Walk Through Inspection Checklist costs just $19.95.
 
It is delivered to you the instant your credit is approved in the common PDF format that can be viewed with free Adobe Acrobat Reader software. Click the Adobe graphic just below to download the latest version of this free software. Many modern computers already have this software installed at the factory. You simply double click the attached file icon in the email that is sent to you and the Checklist automatically opens.

Purchase my products online at my AsktheBuilder Store. Online ordering is secure.

Minimize Cracks while Pouring Concrete

Cracks in concrete

Minimize Cracks while Pouring Concrete


DEAR TIM: Is there a magical trick or an incantation one has to recite to make sure ugly cracks don't appear in new concrete work? There must be something the contractors can do to minimize or eliminate cracks. Tell me it can be done? Marsha B., Fort Pierce, FL

DEAR MARSHA: I'm sorry to say that even the best voodoo princess can't guarantee you crack free concrete. Concrete is indeed a magical material when you think of it. It begins its life as a fluid or plastic material and then within a few hours it becomes solid. This transformation is actually a chemical reaction and the hardness occurs because billions of microscopic crystals grow in between the sand and rock particles to make up a solid matrix.

What causes the cracks while pouring concrete?

The crack trouble can sometimes be traced to the water used in the concrete mix. As the water is consumed by the chemical reaction that creates the crystals, the concrete actually shrinks. Typical concrete used in residential work tends to shrink about 1/16th inch for every ten lineal feet. This shrinkage produces a tension force within the slab and the concrete can and will tear itself apart just as you can tear a piece of paper.

What are control joints?

The trick is to persuade the concrete to crack where you want it to crack. You can do this by creating weak zones within the slab. Contractors call these control joints. To the average homeowner these joints look like decorative lines. The principal is to make the slab thinner by cutting a line in the slab or by removing actual material so that the concrete doesn't crack randomly. It is no different than creasing a piece of paper several times before you rip it apart. Do this and frequently you get a straight line when pulling the paper apart. Concrete reacts in the same way if you make the cut or the line deep enough.


Want perfect concrete work? Find a pro by using my Concrete Work (Sidewalks, Driveways, Patios & Steps) Checklist. I offer a 100% Money Back Guarantee.


But concrete masons often fail to do this. The control joint depth needs to be a minimum of one fourth the slab thickness. If the slab is four inches thick, the control joint needs to be a minimum of one inch deep. Frequently the tool a mason uses only cuts a line 5/8 inch deep. If the contractor chooses to saw cut the joint, he should frequently check the depth of the saw blade to insure that the saw cut line meets or exceeds the minimum depth.

How can cracks be minimized?

Cracks can also be minimized before the concrete is poured. The ground beneath the slab needs to be solid. Don't pour concrete over trenches that were filled with uncompacted material. If a utility line trench passes under a driveway or sidewalk, be sure the contractor fills this portion of the trench with self-compacting gravel or a special lower cost mixture of concrete, sand and fly ash. Soil should be compacted with machines that eliminate air pockets within the soil. Concrete will crack readily if subjected to tension forces. This is exactly what happens if a car drives over concrete that is bridging a hollow spot in the soil.

Reinforcing steel is also a great preventative crack control measure. This steel holds the concrete together and is often 100 times stronger in tension than the actual concrete itself. If your contractor uses reinforcing steel be sure it is suspended within the concrete and not laying on the soil before the pour. Steel at the bottom of a slab is virtually useless.

You can also order concrete that contains millions of polypropylene fibers. These fibers knit the concrete together and help to prevent random cracking. They are often inexpensive and once the concrete is finished they tend to blend in with the finished surface.

Handicap Ramps

DEAR TIM: After years of using a walker, my father's condition has worsened. He is now confined to a wheel chair. I have to have a ramp built so that he can get into and out of our home. I have seen many ramps but what are the necessary specifications to build one? How wide should they be? What is the slope? How do you calculate the slope? What is the best material to use for the ramp? Is this a do-it-yourself project? Becky D., Visalia, CA

DEAR BECKY: Years ago, I had a business partner who required a wheelchair. His sons built a circuitous ramp from his driveway up to the living level of his home. Although the ramp worked for him, I doubt it would meet the minimum specifications outlined in the Americans with Disabilities Act (ADA) for handicap ramps. Fortunately, for you and your dad, there is an enormous variety of handicap ramp systems available to you. Some are even factory-built and can be shipped to your home.

What is the code for a handicap ramp?

Handicap Ramps

There are minimum specifications that have been developed for handicap ramps. These specifications are not mandated for ramps built at private homes, but they do work well for many people who are confined to wheel chairs. Certain aspects of the specifications can be fairly complicated if the ramp has lots of turns and has to climb a significant vertical distance. If your ramp is simply a straight shot from bottom to top, then the job is somewhat straightforward.

The most basic specifications for handicap ramps are as follows:

  • the maximum slope of the ramp is one inch of rise for each linear foot of run
  • the minimum clear inside width of the ramp between guardrails is 36 inches
  • the maximum rise for any given ramp segment is 30 inches. After rising 30 inches in elevation, a flat rest platform must be provided before the ramp continues to climb
  • flat landings must be at the top and bottom of all ramps
  • landings should always be as wide as the ramp itself and a minimum of 60 inches in length
  • handrails/guardrails must be on each side of the ramp. The top of the handrail must be at least 30 inches above the ramp and no more than 38 inches above the ramp measured vertically


Keep in mind that some of these specifications are minimum standards. In other words, if your father is very frail, a slope of one inch rise per one foot of run may be too steep for him. You may be forced to build a ramp that has a slope of one inch of rise for every 18 inches of run. The recommended specifications say a 36 inch width will work. In reality, you may find this to be too tight. You may want a 42 or even 48 inch wide ramp should you have the space.

What should the slope be for the ramp?

When calculating total slope for your ramp, you must determine the end point of the ramp. The total vertical rise of the ramp is not equal to the vertical distance or sum total of the stair risers of your current front or back steps. Keep in mind that the sidewalk leading up to a flight of steps might also be sloped. This additional vertical distance must be factored into your total rise. Be aware that there are all sorts of ramp designs that can work in very tight situations. Although a straight ramp is often the most desirable, you may find that your ramp will have several switchbacks with 180 degree turns. Every situation is a little different.

What type of ramp is the best?

A concrete ramp offers superior slip resistance if the final surface is finished with a wood or magnesium float. This creates a sandy surface that provides fantastic traction even in wet weather. But concrete ramps are a challenge to build. You can purchase factory-built ramps made from steel or aluminum. They meet all ADA standards. But if you live in a cold climate, they may ice up in certain weather conditions. Wood ramps are an affordable alternative, but they can get very slippery. Wood ramps must be kept clean or be covered with a slip resistant material such as rolled roofing, which has a slip resistant ceramic granular surface.

Is a handicap ramp a do-it-yourself project?

Unless you have significant building experience, ramp construction is not a do-it-yourself project. A project of this nature requires several skill sets. The best thing to do first is to have the ramp designed by a professional architect or other individual who can visit your home and make an assessment of what can and can't be done. Once you see the final plans of exactly how the ramp needs to be built, you will most certainly have a grasp of what it takes to do such a project. It is also a good idea to contact your local building and zoning department. You must make certain that your ramp will not be in violation of any ordinances or code requirements.

Tar and Chip Driveway Update

Tar and chip drive (Tim)

Tar and Chip Driveway Update | Even on a cloudy day, my tar and chip drive looks so much different than the blacktop roadway.

Tar and chip pavement surfaces are nothing new. In fact, they have been around for well over 100 years. The blacktop you see installed today is a hybrid of traditional tar and chip.

DEAR TIM: It is time for a new driveway at my home. Neither concrete nor traditional blacktop appeal to me. The look I desire is that of a groomed gravel drive similar to ones I often see on British television shows. But I do not want the dust that goes with gravel surfaces. Is it possible to get what I want? If so, how is it done? Cindy M., Waterloo, IA

DEAR CINDY: Don't be too harsh on concrete and blacktop surfaces. Many people do not like the stark look of regular concrete, even if it has a handsome broom-finish or an expertly applied swirl trowel finish. Even the rich velvet-smooth appearance of a new ebony blacktop drive also can be a turn-off. But keep in mind that both concrete and blacktop can be installed with faux finishes. They can be colorized and stamped with patterns that allow them to look like brick, cobblestones, stone, etc.

The driveway you want is at my own home. For the past 15 years, I have driven up and down my eye-popping tar and chip driveway. It looks exactly like - well, actually better than - the driveways leading up to the gorgeous castles and country homes featured in many British TV shows. Can you imagine a deep-brown colored gravel driveway? That is what I have. How about one that is light green, red or even buff colored. Would you like a driveway that had gravel chips that have multi-colored sparkling minerals in each stone? All of this and more is possible.


Get the best-looking Tar and Chip Driveway around!
Use my Asphalt/Blacktop/Tar & Chip Installation & Repair Checklist and learn what to ask your contractor.
I offer a 100% Money Back Guarantee.


When my wife and I built our new home we had the same feelings as you did. We did not want concrete or blacktop. I chose tar and chip for many reasons:

  • It is durable;
  • It provides excellent traction;
  • It is virtually maintenance free;
  • It can be very affordable;
  • It is drop-dead gorgeous!

Tar and chip pavement surfaces are nothing new. In fact, they have been around for well over 100 years. The blacktop you see installed today is a hybrid of traditional tar and chip. Many years ago hot liquid tar or asphalt cement would be sprayed on a gravel surface. Within minutes, small, clean and dry stone chips would be broadcast into the liquid tar. As the tar cooled, it grabbed onto each of the stone chips. The resulting surface was nearly identical to blacktop that you see on many roadways around the nation. In fact, virtually every asphalt roadway or highway built in America prior to 1930 was done in this way. Many secondary county roadways are still paved with tar and chip. It is a time-tested paving method that is affordable and long-lasting.


Would you like to have a gorgeous driveway? How about step-by-step photos and instructions that show you how I had my own tar and chip drive installed? If so, you might want my Instant Download Tar and Chip eBook.


granite cobblestone edging

The granite cobblestone edging adds a distinctive look and keeps the chips out of the grass.

But the tar and chip method of making roads was pushed aside by central mixed asphalt and blacktop plants. Blacktop today is made very much as is concrete. The ingredients are mixed at a central plant and shipped by truck to the jobsite. Blacktop can be installed in weather conditions that are not favorable for tar and chip. The installation season can be extended when using blacktop. Tar and chip is still done in many states, but it is not nearly as common as it once was.

Click here to watch Tim describe his Tar and Chip Driveway.

Click here to watch Tim describe his Tar and Chip Driveway.

I am astonished at the enormous business opportunity that tar and chip driveways represent. Tens of thousands of people love the look, yet I find blacktop installers ignore this demand. The equipment needed to install the tar and chip surfaces is already owned by many blacktop contractors. For residential applications the only specialized piece of equipment is a truck with an insulated tank used for transporting the hot liquid tar to the jobsite.

Onboard this truck is a small engine that is connected to a pump. The pump delivers the tar through a hose and nozzle to a trained operator. He carefully applies the hot tar to the gravel base and laborers broadcast the stone chips immediately into the liquid tar. Once all of the stone chips are applied, a powered roller no different than the one used for blacktop compacts the stones into the tar. New driveways require two applications of the tar and chips.

The different colored stone chips are the hardest thing to find. Mine came from gravel pits in Missouri. Visit a progressive landscape supply store. Often they have different colored decorative stone chips for garden pathways. Locate the sources of these stones and see if you can't buy them in bulk quantities. The tar or asphalt cement is the easiest thing to find. It is sold at just about any central plant that makes blacktop. This tar is the same ingredient used to make blacktop.

Locating a tar and chip contractor is done one of two ways. Open your Yellow Pages and call each and every blacktop contractor. If you strike out, contact large paving contractors who do public roadways. They just might have a division that does smaller commercial or residential tar and chip jobs. Finally, contact the blacktop plants. Any contractor who does tar and chip must buy their tar from these businesses. Call the plants on a rainy day when they are slow. Don't bother them on sunny days when the demand for blacktop is high.

State Route 29 Fresh Tar sign

This photo was taken on September 22, 2004, on State Route 29, just northwest of where Route 29 passes over Interstate 75. People out West see these signs each summer.

old road surface vs new road surface - tar and chip

This is a rare situation where you can see the old road surface - in the center of the road - next to a fresh tar and chip application. The new tar and chip surface starts at the edge of the road on each side and extends towards the centerline about 6 feet in each direction. I assume the road crew is coming back to coat the center of the road. You should be able to determine that the thickness of the new tar and chip is no more than 1/2 inch. But it will wear like iron for perhaps 7 - 10 years.

tar and chip road

I can't say enough good things about tar and chip. It is an excellent surface for moderate to lightly traveled roadways.

tar and chip drive with fire engine

Are you worried that a couple of thin layers of tar and chip can't support the weight of trucks? This fire engine is parked on my driveway and its wheels are not sinking a fraction of an inch. The truck weighs 50,000 pounds or more! It is a combination aerial ladder truck and 1,500 gpm pumper! It also carries 500 gallons of water. Just the water alone weighs 4,144 pounds. Remember, tar and chip and blacktop driveways gather their strength from the crushed gravel base beneath the finished surfaces.


Wood Pellet Stoves

wood-pellet-stove-insert

Wood pellet stoves look good and can keep you toasty warm. Photo credit: Hearth, Patio and Barbecue Association

There are two types of pellet stoves: freestanding decorative models, and those that can be inserted into an existing fireplace. You can also buy an actual wood pellet burner that is more utilitarian and resembles a boxy furnace similar to the one in your home.

DEAR TIM: Natural gas heating costs are expected to soar this winter. I thought I read about an inexpensive wood stove that burned some sort of pellets. My home is fairly well insulated and has a two-year old furnace and five-year old replacement windows. Should I buy one of these stoves? Will I save money doing so? Sherry A., Louisville, KY

DEAR SHERRY: The heating appliance you mentioned is most likely a pellet stove. These interesting devices burn countless small pellets that are made from wood that otherwise might be wasted or discarded from lumber mills and other raw wood sources. The wood pellets come in two different grades: premium and standard. The premium pellets produce less inorganic ash when burned. Wood stoves that burn premium pellets also require significantly less maintenance. Some pellet stoves also burn pellets with corn!

What are the types of pellet stoves?

But some people may debate with you the affordability issue of a new pellet stove. You may be able to buy an inexpensive used pellet stove, but a new one can often cost $2,000 or more. There are two types of pellet stoves: freestanding decorative models, and those that can be inserted into an existing fireplace. You can also buy an actual wood pellet burner that is more utilitarian and resembles a boxy furnace similar to the one in your home.

What are the differences between natural gas heating and a pellet stove?

If you are like most people who heat their homes with natural gas, the heating is done automatically. In other words, you set your thermostat or you program an automatic setback-type thermostat and do nothing for the entire heating season. The furnace turns on and off automatically and produces heat as you need it. A pellet stove is not as user friendly. You need to feed it pellets and the feeding schedule might be daily or every few days. If you stop feeding the stove, it will eventually run out of fuel. If time indeed is money, then you need to think about what your time is worth to feed the stove.

How fuel is needed for a pellet stove?

If you decide to abandon your new furnace for a pellet stove that produces the amount of heat you need, you might discover that you need between three and four tons of pellets per heating season. This quantity can vary significantly depending upon the amount of cold weather, the size of the home and the desired interior temperature a person or family requires to stay comfortable.

CLICK or TAP HERE to get FREE quotes from local companies who can install a wood pellet stove in your home.

The pellets are often available in 40 pound bags that might cost $3.50 each. Experts in the industry often suggest buying the pellets in bulk so that you get a discount and have enough fuel for the entire heating season. For sake of discussion, let's say you will need 3.5 tons of pellets, or 7,000 pounds. This means you will need to buy 175 bags at an estimated discounted price of $3.20 per bag. I compute a wood pellet fuel cost of $568.75 plus tax and perhaps a delivery charge. Keep in mind that the cost could be significantly higher for premium pellets, and can vary in different parts of the nation.

What is the cost difference in gas vs pellets?

Now it is time to look at last year's heating bills. Get out all of your utility bills from last year. If your bills are like mine, you will note that the electricity and natural gas usages are split and the costs associated with each are listed. Even though your current gas furnace uses electricity to operate the blower, let's just look at the natural gas part of your bills.

Add up the total cost of natural gas for October through and including April. These are the normal months when you heat your home. The peak heating months are typically December, January and February, but I'll bet your furnace operates to some degree during the other four months. Now add up the gas costs for the other remaining months. This gas cost includes what you might spend to heat water, dry clothes and cook food for the six months you do not heat your home. Subtracting this total from the total gas costs experienced from October through April will give you a rough estimate of what you actually spend in a given season to stay warm.

Once you have the estimated heating cost, you need to project what the higher cost might be this year. Your local utility company can assist you with this calculation. If your projected heating cost is less than the cost of the pellet fuel, you know it is smarter to stay with what you have. To save money on heating your home, the projected cost of natural gas must be higher than the annual cost of the wood pellets and the amortized cost of the pellet stove, plus any costs associated with its installation and ongoing maintenance.

One other issue comes into play when trying to make a decision on wood pellet stoves. The free-standing models are very attractive. A person may be willing to spend more money for an appliance that produces heat and looks good at the same time.

Pellet stoves also allow for zone heating. If you want to heat just part of your home during certain hours of the day, you can turn down the regular furnace thermostat and rely on the pellet stove to produce heat for the room or rooms you might be occupying. The exercise of trying to calculate the actual cost may seem easy, but alas there are some emotional issues that may come into play as you put the pencil to the paper.

Paint or Stain the Exterior

Outside Tim's Cincinnati House

Paint or Stain the Exterior  | Even the best paint put on by the best painter will fail. But semi-transparent water repellents also wear out. Photo credit: Tim Carter

A high quality paint or an epoxy fortified synthetic resin water repellent applied to the cedar siding will stop water from entering the wood.

DEAR TIM: The cedar siding on our modified A-frame house needs to be re-stained. But a neighbor suggests that we paint the house. Can you paint a house that has been stained? Is it a good idea? To add further confusion, a different neighbor says that painting the house will stop the wood from expanding and contracting leading to possible structural damage. Who is right? What would you do? Robert L., Lake Geneva, WI

DEAR ROBERT: Neither of your neighbors is 100 percent correct. Neighbor number two's advice is the least accurate in my opinion. Even if painted, the wood siding will absolutely continue to expand and contract. In fact, that is why paint often peels and flakes from wood siding. The seasonal expansion and contraction of the wood breaks the bond between the wood siding and the paint.

Is wood siding on a house acting as a structural component?

What's more, there is no connection between structural failure and expanding and contracting wood siding. The wood siding on a house is not supposed to act as a structural component. It is simply a skin that protects the structure from the elements. Keeping the skin of your home in good condition is necessary and you must maintain it with one of the two coatings you are contemplating.

What is the primary goal of a water repellent paint?

A high quality paint or an epoxy fortified synthetic resin water repellent applied to the cedar siding will stop water from entering the wood. Minimizing or eliminating water penetration into the siding should be your primary goal. The aesthetic look of your home should be secondary. A house that has strong curb appeal does add value, but beware of making this your primary objective.

Water repellents and paint are coatings. A paint is considered a film that lays on top of the surface. Many water repellents soak into the wood and do not leave a film at the surface. Some water repellents do create a film or skin at the surface. The problem with films or surface coatings is that they eventually peel. When this happens, you are forced to scrape or strip the loose and peeling film off before you can apply a second coat. For this single reason, I try to avoid coatings that are films.

What do you do when it is time to re-coat the wood?

Penetrating water repellents do not peel, but they wear out. When it is time to re-coat the wood, you simply do not have to scrape the wood. This can save a tremendous amount of work. No matter which coating you choose to use, you will still be faced with lots of other work. You will still have to carefully and thoroughly wash the siding with soap and water and then do what is necessary to apply the coating of your choice. Scraping or stripping loose films is simply an additional step to a process.

Can redwood siding be painted?

If you really want to be confused, just look at my home. It is redwood siding and painted! My wife and I love Victorian style architecture and I built a Queen Anne Victorian home. These painted ladies just don't seem to look good with semi-transparent stains, so I painted the home for Kathy. Did I know I was going down the high-maintenance highway when I popped the lid off the first can of primer? You bet I did. But I also decided to use a paint that contained a blend of water-based urethane and acrylic resins. These are very sticky and I am confident it will be many years before my paint film peels or blisters.

CLICK or TAP HERE to get FREE quotes from local companies that will paint your house.

Keep in mind that painting your A-frame home may significantly change its appearance. Certain architecture styles lend themselves to a certain look. When I think log cabin and A-frame, I see in my mind a rustic wood look. If you say two-story colonial or Victorian, the image in my brain is paint. If you paint your A-frame, will it lower it value to a potential buyer? That may not concern you, but it could be a factor in another person's mind.

If you do decide to paint instead of applying the epoxy fortified synthetic resin water repellent, be sure you hand wash the siding as you would your car. Avoid pressure washing this delicate wood. You need the wood to be perfectly clean. Read the label of the finish paint and follow the directions to the letter with respect to any primer they say you must use. Never forget that paint is simply a glue with color added to it. Both the primer and the finish paint must be the best glues and they stick best to clean surfaces.

What is the best formulation for water repellents?

Semi-transparent water repellents for wood come in many different formulations. Unfortunately a majority of them are made from natural oils that are food for mildew and algae. The best water repellents are ones that are made from synthetic resins. Do a search on the Internet for epoxy water repellents and you will quickly discover good ones.

The urethane - acrylic resin house paints are also readily available. They are sold at national chain paint stores as well as several major retail stores that have tool and paint departments. Look at the label and when you see the words "urethane and acrylic", you know you have a winner. Be sure to pay strict attention to the temperature ranges when the paint can be applied. Do not stray outside of these ranges.

The best weather to apply paint is when the temperature is near 70F and the winds are calm. An overcast day is much better than a sunny day. It is best for paint to dry slowly.

Termites

termites side of house gravel barrier

Termites | Many houses have vast areas of wood mulch that provides both food and cover for termites. Creating a decorative gravel barrier against a home might be a good idea. Photo by: Tim Carter

DEAR TIM: I recently purchased a home that has an inground termite colony elimination system. The property has been termite-free for the past five years. But I am an avid gardener and would love to install lots of wood mulch in the plant beds next to my home. Is this a good idea? Would it be better to have a band of decorative gravel that extends from the house into the plant beds? What would you do if it were your home? Coylie R., Schaumburg, IL

DEAR COYLIE: The first thing I would do is call the pest control company that is performing the periodic inspections of the inground bait stations. I would ask them if your planned gardening activity will in some way void the warranty that they provide. If they tell you it is no problem to dig and garden in the vicinity of the bait stations, be sure to get it in writing.

Do the colony elimination system work?

The colony elimination system you own is a great way to protect your home. But this system can contribute to a false sense of security if it is not maintained on a regular basis. The worker termites that wander from the nest to gather food for themselves and the rest of the colony do so constantly and randomly. A clever termite just might bypass a bait station and find its way into your home. To make matters worse, the existing termite colonies have reproductive termites that leave the nest each year to form new colonies.

But don't rest on your laurels. Even though you have been termite-free for the past five years, make sure you get one or two annual visits from a trained pest control professional. These people know how to keep your investment safe.

What is the decorative gravel concept?

I think the decorative gravel concept is a good, no great, one. The soil under the gravel layer may stay drier than if a smothering layer of moist mulch was on top of it. Foraging termites prefer wet soil over dry soil. Dry soil is simply too hard to tunnel through. Installing a layer of plastic under the gravel may also help to direct water away from the underlying soil. If you decide to put a plastic layer under the gravel, be sure the plastic slopes away from your foundation. You do not want to direct water against your foundation.


Termite infestation? Pick the best exterminator using my Termite and Carpenter Ant Checklist. I offer a 100% Money Back Guarantee.


What is the best slope around a foundation?

You also must be very vigilant when you start to garden and add mulch. Just today, I visited a home during a consultation meeting and discovered the homeowner had added so much mulch that much of the ground around his home actually sloped towards the foundation instead of away from it. This type of negative pitch can increase the water content in the soil around a home. It can also cause water leakage into a home.

A good rule of thumb for positive grade and pitch around a foundation is what I call the six-ten rule. I suggest you have a minimum of six inches of foundation stick up above the ground that abuts your home. Then the ground should start to slope away from the home at least six inches of vertical fall in the first ten horizontal feet of run away from the foundation. More slope is better but not always possible.

If you do not have this positive pitch, you may have to create it by removing soil the builder left behind. If you do decide to excavate and remove earth, be sure to check for buried utility lines and drainage pipes. You can rent powerful digging machines that will make the task a breeze. But unless you have lots of experience operating one, you can dig through a buried power line or gas pipe and never even know you hit a thing.

If you are building a new home be sure to talk about positive pitch with your builder. All too often I see homes that sit too far into the ground. In almost all cases had I been the builder, I would have had the top of the foundation 12 or even 18 inches higher than what the average builder installs.

You may think this looks odd, but when you use the dirt from the excavation and slope it gently away from the house, you achieve the same look but with excellent positive drainage.