Wood Pellet Stoves

wood-pellet-stove-insert

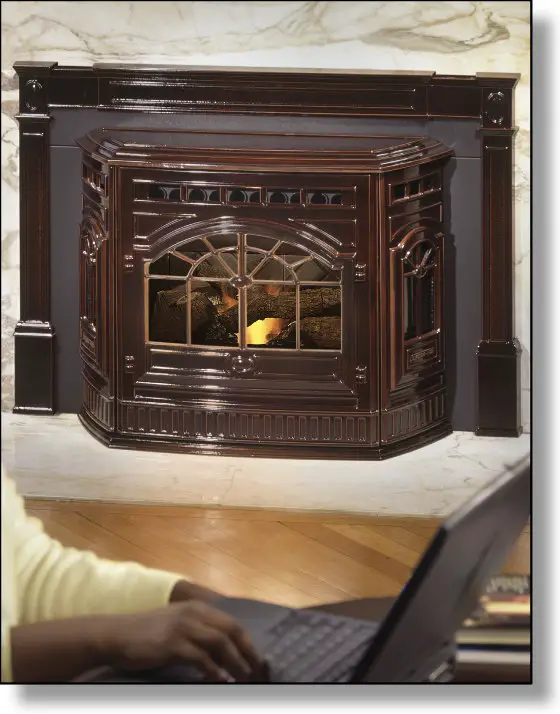
Wood pellet stoves look good and can keep you toasty warm. Photo credit: Hearth, Patio and Barbecue Association

There are two types of pellet stoves: freestanding decorative models, and those that can be inserted into an existing fireplace. You can also buy an actual wood pellet burner that is more utilitarian and resembles a boxy furnace similar to the one in your home.

DEAR TIM: Natural gas heating costs are expected to soar this winter. I thought I read about an inexpensive wood stove that burned some sort of pellets. My home is fairly well insulated and has a two-year old furnace and five-year old replacement windows. Should I buy one of these stoves? Will I save money doing so? Sherry A., Louisville, KY

DEAR SHERRY: The heating appliance you mentioned is most likely a pellet stove. These interesting devices burn countless small pellets that are made from wood that otherwise might be wasted or discarded from lumber mills and other raw wood sources. The wood pellets come in two different grades: premium and standard. The premium pellets produce less inorganic ash when burned. Wood stoves that burn premium pellets also require significantly less maintenance. Some pellet stoves also burn pellets with corn!

What are the types of pellet stoves?

But some people may debate with you the affordability issue of a new pellet stove. You may be able to buy an inexpensive used pellet stove, but a new one can often cost $2,000 or more. There are two types of pellet stoves: freestanding decorative models, and those that can be inserted into an existing fireplace. You can also buy an actual wood pellet burner that is more utilitarian and resembles a boxy furnace similar to the one in your home.

What are the differences between natural gas heating and a pellet stove?

If you are like most people who heat their homes with natural gas, the heating is done automatically. In other words, you set your thermostat or you program an automatic setback-type thermostat and do nothing for the entire heating season. The furnace turns on and off automatically and produces heat as you need it. A pellet stove is not as user friendly. You need to feed it pellets and the feeding schedule might be daily or every few days. If you stop feeding the stove, it will eventually run out of fuel. If time indeed is money, then you need to think about what your time is worth to feed the stove.

How fuel is needed for a pellet stove?

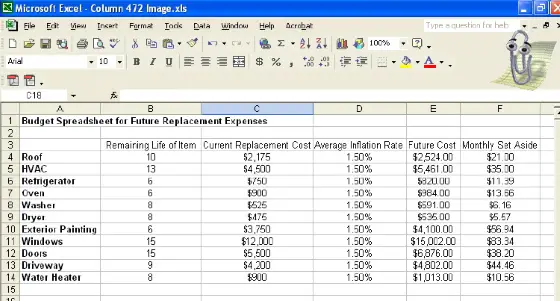
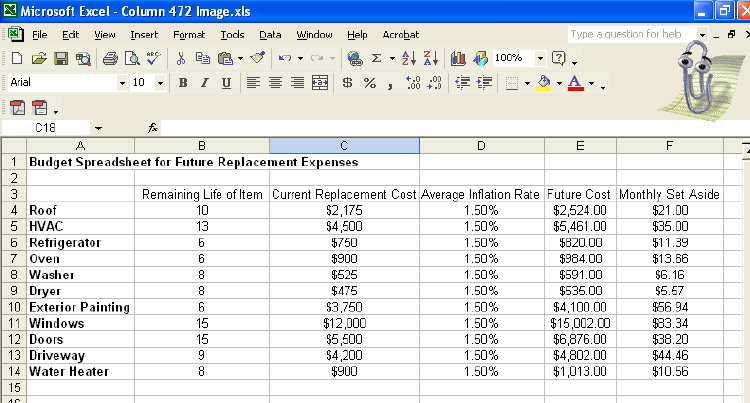
If you decide to abandon your new furnace for a pellet stove that produces the amount of heat you need, you might discover that you need between three and four tons of pellets per heating season. This quantity can vary significantly depending upon the amount of cold weather, the size of the home and the desired interior temperature a person or family requires to stay comfortable.

CLICK or TAP HERE to get FREE quotes from local companies who can install a wood pellet stove in your home.

The pellets are often available in 40 pound bags that might cost $3.50 each. Experts in the industry often suggest buying the pellets in bulk so that you get a discount and have enough fuel for the entire heating season. For sake of discussion, let's say you will need 3.5 tons of pellets, or 7,000 pounds. This means you will need to buy 175 bags at an estimated discounted price of $3.20 per bag. I compute a wood pellet fuel cost of $568.75 plus tax and perhaps a delivery charge. Keep in mind that the cost could be significantly higher for premium pellets, and can vary in different parts of the nation.

What is the cost difference in gas vs pellets?

Now it is time to look at last year's heating bills. Get out all of your utility bills from last year. If your bills are like mine, you will note that the electricity and natural gas usages are split and the costs associated with each are listed. Even though your current gas furnace uses electricity to operate the blower, let's just look at the natural gas part of your bills.

Add up the total cost of natural gas for October through and including April. These are the normal months when you heat your home. The peak heating months are typically December, January and February, but I'll bet your furnace operates to some degree during the other four months. Now add up the gas costs for the other remaining months. This gas cost includes what you might spend to heat water, dry clothes and cook food for the six months you do not heat your home. Subtracting this total from the total gas costs experienced from October through April will give you a rough estimate of what you actually spend in a given season to stay warm.

Once you have the estimated heating cost, you need to project what the higher cost might be this year. Your local utility company can assist you with this calculation. If your projected heating cost is less than the cost of the pellet fuel, you know it is smarter to stay with what you have. To save money on heating your home, the projected cost of natural gas must be higher than the annual cost of the wood pellets and the amortized cost of the pellet stove, plus any costs associated with its installation and ongoing maintenance.

One other issue comes into play when trying to make a decision on wood pellet stoves. The free-standing models are very attractive. A person may be willing to spend more money for an appliance that produces heat and looks good at the same time.

Pellet stoves also allow for zone heating. If you want to heat just part of your home during certain hours of the day, you can turn down the regular furnace thermostat and rely on the pellet stove to produce heat for the room or rooms you might be occupying. The exercise of trying to calculate the actual cost may seem easy, but alas there are some emotional issues that may come into play as you put the pencil to the paper.

Paint or Stain the Exterior

Outside Tim's Cincinnati House

Paint or Stain the Exterior  | Even the best paint put on by the best painter will fail. But semi-transparent water repellents also wear out. Photo credit: Tim Carter

A high quality paint or an epoxy fortified synthetic resin water repellent applied to the cedar siding will stop water from entering the wood.

DEAR TIM: The cedar siding on our modified A-frame house needs to be re-stained. But a neighbor suggests that we paint the house. Can you paint a house that has been stained? Is it a good idea? To add further confusion, a different neighbor says that painting the house will stop the wood from expanding and contracting leading to possible structural damage. Who is right? What would you do? Robert L., Lake Geneva, WI

DEAR ROBERT: Neither of your neighbors is 100 percent correct. Neighbor number two's advice is the least accurate in my opinion. Even if painted, the wood siding will absolutely continue to expand and contract. In fact, that is why paint often peels and flakes from wood siding. The seasonal expansion and contraction of the wood breaks the bond between the wood siding and the paint.

Is wood siding on a house acting as a structural component?

What's more, there is no connection between structural failure and expanding and contracting wood siding. The wood siding on a house is not supposed to act as a structural component. It is simply a skin that protects the structure from the elements. Keeping the skin of your home in good condition is necessary and you must maintain it with one of the two coatings you are contemplating.

What is the primary goal of a water repellent paint?

A high quality paint or an epoxy fortified synthetic resin water repellent applied to the cedar siding will stop water from entering the wood. Minimizing or eliminating water penetration into the siding should be your primary goal. The aesthetic look of your home should be secondary. A house that has strong curb appeal does add value, but beware of making this your primary objective.

Water repellents and paint are coatings. A paint is considered a film that lays on top of the surface. Many water repellents soak into the wood and do not leave a film at the surface. Some water repellents do create a film or skin at the surface. The problem with films or surface coatings is that they eventually peel. When this happens, you are forced to scrape or strip the loose and peeling film off before you can apply a second coat. For this single reason, I try to avoid coatings that are films.

What do you do when it is time to re-coat the wood?

Penetrating water repellents do not peel, but they wear out. When it is time to re-coat the wood, you simply do not have to scrape the wood. This can save a tremendous amount of work. No matter which coating you choose to use, you will still be faced with lots of other work. You will still have to carefully and thoroughly wash the siding with soap and water and then do what is necessary to apply the coating of your choice. Scraping or stripping loose films is simply an additional step to a process.

Can redwood siding be painted?

If you really want to be confused, just look at my home. It is redwood siding and painted! My wife and I love Victorian style architecture and I built a Queen Anne Victorian home. These painted ladies just don't seem to look good with semi-transparent stains, so I painted the home for Kathy. Did I know I was going down the high-maintenance highway when I popped the lid off the first can of primer? You bet I did. But I also decided to use a paint that contained a blend of water-based urethane and acrylic resins. These are very sticky and I am confident it will be many years before my paint film peels or blisters.

CLICK or TAP HERE to get FREE quotes from local companies that will paint your house.

Keep in mind that painting your A-frame home may significantly change its appearance. Certain architecture styles lend themselves to a certain look. When I think log cabin and A-frame, I see in my mind a rustic wood look. If you say two-story colonial or Victorian, the image in my brain is paint. If you paint your A-frame, will it lower it value to a potential buyer? That may not concern you, but it could be a factor in another person's mind.

If you do decide to paint instead of applying the epoxy fortified synthetic resin water repellent, be sure you hand wash the siding as you would your car. Avoid pressure washing this delicate wood. You need the wood to be perfectly clean. Read the label of the finish paint and follow the directions to the letter with respect to any primer they say you must use. Never forget that paint is simply a glue with color added to it. Both the primer and the finish paint must be the best glues and they stick best to clean surfaces.

What is the best formulation for water repellents?

Semi-transparent water repellents for wood come in many different formulations. Unfortunately a majority of them are made from natural oils that are food for mildew and algae. The best water repellents are ones that are made from synthetic resins. Do a search on the Internet for epoxy water repellents and you will quickly discover good ones.

The urethane - acrylic resin house paints are also readily available. They are sold at national chain paint stores as well as several major retail stores that have tool and paint departments. Look at the label and when you see the words "urethane and acrylic", you know you have a winner. Be sure to pay strict attention to the temperature ranges when the paint can be applied. Do not stray outside of these ranges.

The best weather to apply paint is when the temperature is near 70F and the winds are calm. An overcast day is much better than a sunny day. It is best for paint to dry slowly.

Termites

termites side of house gravel barrier

Termites | Many houses have vast areas of wood mulch that provides both food and cover for termites. Creating a decorative gravel barrier against a home might be a good idea. Photo by: Tim Carter

DEAR TIM: I recently purchased a home that has an inground termite colony elimination system. The property has been termite-free for the past five years. But I am an avid gardener and would love to install lots of wood mulch in the plant beds next to my home. Is this a good idea? Would it be better to have a band of decorative gravel that extends from the house into the plant beds? What would you do if it were your home? Coylie R., Schaumburg, IL

DEAR COYLIE: The first thing I would do is call the pest control company that is performing the periodic inspections of the inground bait stations. I would ask them if your planned gardening activity will in some way void the warranty that they provide. If they tell you it is no problem to dig and garden in the vicinity of the bait stations, be sure to get it in writing.

Do the colony elimination system work?

The colony elimination system you own is a great way to protect your home. But this system can contribute to a false sense of security if it is not maintained on a regular basis. The worker termites that wander from the nest to gather food for themselves and the rest of the colony do so constantly and randomly. A clever termite just might bypass a bait station and find its way into your home. To make matters worse, the existing termite colonies have reproductive termites that leave the nest each year to form new colonies.

But don't rest on your laurels. Even though you have been termite-free for the past five years, make sure you get one or two annual visits from a trained pest control professional. These people know how to keep your investment safe.

What is the decorative gravel concept?

I think the decorative gravel concept is a good, no great, one. The soil under the gravel layer may stay drier than if a smothering layer of moist mulch was on top of it. Foraging termites prefer wet soil over dry soil. Dry soil is simply too hard to tunnel through. Installing a layer of plastic under the gravel may also help to direct water away from the underlying soil. If you decide to put a plastic layer under the gravel, be sure the plastic slopes away from your foundation. You do not want to direct water against your foundation.


Termite infestation? Pick the best exterminator using my Termite and Carpenter Ant Checklist. I offer a 100% Money Back Guarantee.


What is the best slope around a foundation?

You also must be very vigilant when you start to garden and add mulch. Just today, I visited a home during a consultation meeting and discovered the homeowner had added so much mulch that much of the ground around his home actually sloped towards the foundation instead of away from it. This type of negative pitch can increase the water content in the soil around a home. It can also cause water leakage into a home.

A good rule of thumb for positive grade and pitch around a foundation is what I call the six-ten rule. I suggest you have a minimum of six inches of foundation stick up above the ground that abuts your home. Then the ground should start to slope away from the home at least six inches of vertical fall in the first ten horizontal feet of run away from the foundation. More slope is better but not always possible.

If you do not have this positive pitch, you may have to create it by removing soil the builder left behind. If you do decide to excavate and remove earth, be sure to check for buried utility lines and drainage pipes. You can rent powerful digging machines that will make the task a breeze. But unless you have lots of experience operating one, you can dig through a buried power line or gas pipe and never even know you hit a thing.

If you are building a new home be sure to talk about positive pitch with your builder. All too often I see homes that sit too far into the ground. In almost all cases had I been the builder, I would have had the top of the foundation 12 or even 18 inches higher than what the average builder installs.

You may think this looks odd, but when you use the dirt from the excavation and slope it gently away from the house, you achieve the same look but with excellent positive drainage.

Home Quality and Perfection

DEAR TIM: My husband is driving me nuts. He is currently building a barn and has taken the horizontal wood siding down several times because it is not perfectly straight and level. Believe it or not, he is going to do lots of work on our new home. I am afraid the house will never get finished as he tries to make everything perfect. I know building materials are not always perfect and humans can make mistakes. What is an acceptable level of quality or perfection? Kimberly A., Westerville, OH

DEAR KIMBERLY: Your question reminds me of those floating passes I used to ball hawk, intercept and run back for touchdowns when I played football. Given the space, I can have a field day with your question. Quality issues have been a pet peeve of mine for many years. The trouble with quality is that in my opinion it is purely subjective. Countless attempts have been made to quantify, measure, standardize and describe levels of quality, but it is indeed a very hard thing to measure. In fact, even the tools to measure quality can be flawed.

Is house siding wood perfect?

For just a moment let's talk about the wood siding issue. The wood he is using may not be perfect to begin with. It can come from the mill warped, bowed and crowned. The siding may actually differ in size from piece to piece. The vertical spacing between pieces, in certain instances, may have to be different so the siding looks good to the eye when complete. In other words, the perfection your husband desires may only be achieved by being slightly imperfect as he builds.

I have worked for my fair share of obsessive-compulsive customers. Being on the receiving end of quality demands can be extremely stressful. To make matters worse, a builder or remodeler can rarely know how demanding a customer might be. There are some behavioral clues and body language that telegraph obsessive-compulsive tendencies, but few builders are savvy enough to notice them.

The bottom line is that each person has their own level of quality. To make matters worse, quality is a learned trait and people can be influenced by what they see. In my opinion, quality standards in the overall residential construction industry are in a period of decline. There are real craftsman out there who do superb work, but their numbers are dwindling. If there are fewer and fewer quality jobs to view, people start to think that lower quality is acceptable. This is a very dangerous and slippery slope.

Are photos in home building magazines misleading?

Add to this the home building/decorating magazine syndrome. People see gorgeous photos of kitchens, bathrooms, family rooms, etc. in books and magazines. The scale of the photographs does not allow you to see the room as if you were there. But in your mind the workmanship and materials in this gorgeous room in the photo are perfect. In reality, if you and I could visit the site where the photo was taken I would be willing to bet tomorrow's lunch money I could point out a minimum of five moderate to glaring imperfections in materials or workmanship.

What is a glaring defect?

So how good is good enough? It depends upon the material. Let's talk about foundations. I realize that the plan may say your foundation will be 46 feet 6 inches long. If it is short or long by one quarter inch, that is acceptable in my book. But if a piece of woodwork trim or a mitered wood joint is off by the same amount, I would call that a glaring defect. You may see bricks in a wall that seem uneven when the sun glances across them at a low or nearly parallel angle. But look at the same wall an hour later and the bricks appear perfect. Are the bricks installed right or wrong? In my opinion, the workmanship is very likely acceptable. Keep in mind that bricks are not a perfectly flat material.

Your husband might feel the urge to place a level or straightedge on a traditional wood joist floor that is covered with oak flooring, tile, sheet vinyl, etc. Upon close inspection he might discover all sorts of minor humps and dips. Did the carpenters and floor installers do bad work? Maybe not. The floor joists may not have been perfect to start with. But, if the rough carpenter put in a badly crowned joist next to one that is straight, that is a workmanship error. If you want perfectly flat floors, be sure you specify a joist material that produces this level of quality. It does indeed exist.

How much perfection is too much?

I suggest you talk with your husband and discuss what is fueling his desire for perfection. As much as I hate to say it, he may need some professional counseling. I have always strived for a very high level of quality in all of the jobs I have done. But there is an old saying in construction: You have to know when to do what. You can rest assured that siding installed by me at eye level and three feet up or down from eye level will be as close to perfect as possible. But the pieces of siding 25 feet in the air will not meet this standard. Why? Because few people are willing to pay for this level of quality and not one in 100,000 people can see the difference from 25 feet on the ground with their heads tilted at a 45 degree angle.

Years ago many of the craftsmen who built homes also helped to build their churches. The level of workmanship in older church buildings was perhaps the best quality work ever done. The next time you are in an old church look at how all of the surfaces interact and meet one another. Odds are it will take you quite a long time to discover a flaw.

These craftsmen felt that God would accept no less. If a craftsman did not do his absolute finest work, he very likely would feel guilty knowing that God knew he could do better. Unfortunately not all people are as exacting as God, and builders discovered very quickly that the quality standard could be lowered for houses that humans occupied. It didn't take long for a phrase to be coined that would be heard every now and then on a jobsite when a good intentioned worker was taking too much time on a task. Sooner or later his boss might say, "Hey, move on -that's good enough. This isn't a church job you know."

Contractors and suppliers also should take a tip from the retail industry. You can go to any store and buy different levels of quality for the same item. It is possible to buy a pair of slip-on loafer shoes for $39.00. But you can also buy a nearly identical pair for $89.00. Your expectations for the more expensive pair with respect to detail, craftsmanship, longevity, etc. will be higher than those for the $39.00 pair.

So why not do the same for countertops? If a person wants an absolutely perfect granite countertop then perhaps they should expect to pay more than the person who can live with a chip here or there. I think it is a novel concept that just might catch on one day!

Ceramic Tile Repair

Cutting circles in replacement tile

Ceramic Tile Repair

DEAR TIM: A plumber had to replace the shower and tub valve in our home. Unfortunately it could only be done from the tub side of the wall. We have a new valve but are left with a rough gaping hole with no tile or backer board.

How does one go about restoring the tile? How will I make the circular cuts in the tile that are needed to go around the new valve? The plumber said to just install some gypsum board and cover it with tile. Is this right? Terrell T. Memphis, TN

DEAR TERRELL: I think the plumber you used was trying to hoodoo you. Telling you to install regular gypsum board in a wet area such as a shower or bathtub is not much different than casting an evil spell upon you.

Drywall or regular gypsum board is simply not acceptable as a backer board for ceramic tile in a wet environment.

To successfully repair the gaping hole, you are going to have to do additional demolition.

The piece of replacement backer material which supports the replacement tile must extend at least three or four inches or more in every direction beyond the perfect circular hole that will be cut into the backer material to accommodate the new shower valve.

CLICK HERE to get FREE & FAST BIDS from local ceramic tile contractors.

Undoubtedly you will create a rectangular opening about 16 inches wide by approximately 16 or 18 inches high. Be sure the top and bottom seam of the new repair piece of backer board does NOT end up directly under the seam where two pieces of ceramic tile touch one another.

The left and right seams for the repair piece work best if they are centered on the wall studs that are on each side of the new shower valve.

A piece this size or larger will be strong enough after you cut the shower valve hole. If I were doing the job for you, I would try to use cement backer board.

If that material were not available, I might chose to use a fiberglass reinforced silicone-treated gypsum board product. Some of these special gypsum tile backer boards are completely waterproof.

The high gloss finish on ceramic tile is your worst enemy in this repair project. High gloss surfaces telegraph imperfections. If the surface under the tile is not in the same plane, once glued in place the tile will conform to the irregular surface.

When this happens, the humped or uneven tiles reflect light at slightly different angles. Your eye quickly sees this imperfection.

To prevent this mistake, it is best to remove tile from some of the existing backer board. Try to remove at least one full tile in each direction.

Be sure to scrape off all old adhesive from the newly exposed backer board that was not destroyed by the plumber. As you fit the new piece of backer board, use a straightedge that spans from the existing backer board across the new piece.

Be sure there are no humps or voids as the straightedge contacts the new and existing backer board. Fasten the backer board to the studs with hot-dipped galvanized nails.

CLICK HERE to get FREE & FAST BIDS from local ceramic tile contractors.

Full Tile Tool List

Here's a list of tools that I've used for years to successfully install thousands of square feet of ceramic tile.

  • tape measure
  • pencil
  • tile cutter
  • nippers
  • a 1/4 by 1/4 inch v-notched trowel
  • a hammer
  • some 6d finish nails
  • 8 lineal feet of straight 1/4 inch wood lattice strip
  • putty knife
  • 3-inch wide-bladed scraper
  • grout sponge
  • rubber grout float
  • several buckets
  • accurate 4 foot level

Click the image below to BUY all, or some, of the tools in the above list.

ceramic tile tools

CLICK THIS IMAGE NOW TO ORDER ALL THE TOOLS YOU NEED TO DO CERAMIC TILE.

Cutting circles in ceramic tile is not too hard if you have the right tools. Small diameter holes up to 1.5 inches or so can be cut with diamond grit hole saws.

It is not uncommon to have a one piece shower valve that creates a 5 or 6-inch diameter hole. Several pieces of tile may need to be cut to produce the finished hole.

Trace the arc of the circle onto each piece of tile and make straight cuts into the tile so the cut lines touch the arc. Space the cut lines so they are about one-quarter inch apart.

Use a tile nipper to bite away at these fingers of tile. As you get close to the arc, take small bites with the nipper. A tile nipper is simply a pliers-like tool that has sharp jaws that can easily crack the tile.

Performing repairs on shower and tub valves from the wall inside the shower or tub area is a mistake. The most common cause is a lack of planning on the part of the architect or builder. If you ever stay in an older home take a look inside the closets.

Often you will discover a clever access door that allows you quick and easy access to the plumbing behind a tub or shower.

For some crazy reason, these access doors seemed to go the way of laundry chutes. Many planners and builders have forgotten how handy these amenities can be.

If this bathtub and shower does backup to a closet, you may want to install an access panel now as part of the tile repair job. It will prevent all sorts of misery for the next person who has to replace the tub and shower valve.

CLICK HERE to get FREE & FAST BIDS from local ceramic tile contractors.

Column 005

Caring for Water and Drain Lines

washing machine drain pipe riser diagram

This is what the drain pipe for your washing machine might look like if you had x-ray vision and could see into your walls. The u-shaped pipe near the floor is a trap that holds water. It prevents sewer gas and vermin from entering your home. Copyright 2023 Tim Carter

Clean plumbing pipes are easy to have in your home. Sop up grease from pots, pans, and plates and discard in the garbage. Pour five gallons of hot water down drain lines once a month.

Revised February 2018

Clean Plumbing Pipes - Easy To Achieve Once A Month

DEAR TIM: The water in my kitchen sink drained slowly for a period of months. Last week it stopped draining completely.

A plumber discovered the drain line was clogged with grease. I can't believe this happened as I have been very careful about wiping out my cooking pans. The plumbing service call was very expensive.

Are there things I should do on a regular basis to prevent clogged drain lines? Are there other preventative maintenance things that should be done for my water supply lines? Pamela S., Twin Falls, ID

Related Links

Drain Cleaner Debate - Do They Really Work?

Drain Cleaners & Methods That Absolutely DO Work!

Free & Fast Bids

CLICK HERE to get FREE & FAST BIDS from local drain-cleaning contractors.

Clean Plumbing Pipes Start With Grease Control

DEAR PAMELA: As much as I hate to say it, I don't think you were careful enough. If you're connected to a septic system, your nightmare may be just beginning.

Grease can and does wreak havoc on both the septic tank as well as the drain lines in the leach field. Never pour any grease down any drain line that's connected to a septic system.

If you're on a city sewer, grease can still cause problems over time, as it can completely clog the large-diameter sewer line that leads from your home to the street.

Flushing out sink drain lines can be as simple as filling them with warm soapy water. Photo by: Tim Carter

Flushing out sink drain lines can be as simple as filling them with warm soapy water. Photo by: Tim Carter

Save Used Paper Towels For Grease

Many years ago, my mother taught me a trick. I'd see her use a paper towel and it really wasn't that dirty. She'd lay it on the counter to dry.

The dried towels would be stored in a paper bag. She'd recycle these used towels to soak up grease from skillets, pans, pots, and dishes. These grease-soaked towels would go in the garbage.

This simple task really works to stop grease from coagulating in drains and city sewer lines.

Paper Towels & Grease Video

This may seem like a silly video, but it shows you how well paper towels deal with grease. It's a short video.

Maintain Drain Lines With Water

Many people are unaware that plumbing drain lines and water lines can benefit from simple and periodic maintenance. Drain lines are simple to maintain.

The first thing you need to understand is that it takes quite a bit of energy to move solid objects from your home out to the septic tank or the city sewer line. Often the journey is 100 feet or more.

Flowing water contains lots of energy. Pouring lots of water in drain lines helps flush out debris.

If the main building drain line under your slab or basement and in your yard has minimal pitch, the friction inside the pipe can slow the flow of water. A bigger problem can be too much pitch. If drain lines have too much slant to them, the water in the pipe can actually outrun the solids and leave them behind to accumulate. One-quarter inch of fall per foot of run in drain lines provides for excellent drainage.

Fill All Sinks With Hot Water

It is a great idea to fill all sinks to the brim with hot water once a month. Pull the stopper up and let the water out of the vessel. The volume of water and the hydrostatic pressure of the large volume of water will completely fill the drain line in the wall and possibly the drain stack. This rushing water helps to keep the drain lines squeaky clean.

Drain All Sinks & Toilets At The Same Time

To achieve the same results for the primary vertical drain stacks and the buried building drain under your floors, you must fill all sinks, tubs, etc. in the house at the same time. With the help of family members and friends, pull the stoppers in all fixtures at the same time and flush all toilets simultaneously.

This massive slug of water will help to keep your primary drain line clear of obstructions.

Exercise Water Shut-Off Valves

Water supply lines need little care but the shut-off valves to sinks and other fixtures do need maintenance if you expect them to work when you need them. It is a great idea to exercise valves every six months.

ball valves

Turning these valves on and off monthly is a great idea to exercise them. Here are two ball valves that control the hot and cold water to my washing machine. I have them up above the machine in view so it's easy to operate. I also exercise them once a month so they don't get stuck. Copyright 2017 Tim Carter CLICK THE IMAGE NOW TO ORDER BALL VALVES.

This simply means closing a valve and then reopening it. If the valve has a traditional stem, this may cause a tiny leak around the valve stem. Simply use an adjustable wrench and tighten the packing nut to stop the leak.

If you want to avoid valve stem leaks, I suggest you install ball valves whenever possible. Ball valves cost just a few dollars more than standard valves. But because of their internal design, they allow for full water flow. Ball valves also are much more reliable than traditional washer-type valves.

Invisible Fence

Cinder wearing invisible fence collar

Invisible Fence | Cinder wearing his invisible fence collar. PHOTO CREDIT: Tim Carter

DEAR TIM: I am about to add a new member to my family - a dog. I hate it when other neighbor's dogs roam so I intend to be a good neighbor and will install a fence. But a traditional fence will spoil the natural look of my yard. I have seen ads for fences that work via radio waves through a buried wire. My dog will be a large one and I just can't believe a buried wire can contain my beast. How do these buried wire fences work and are they reliable? Anne M., San Jose, CA

DEAR ANNE: Do buried wire fences work? Absolutely, positively Yes! Believe it or not they work for both dogs and cats. I have my own buried wire fence system and several of my neighbors have had one for years. In my opinion, this invention is one of the most practical, innovative and reliable inventions ever conceived for pet safety and control.

Will an invisible fence stop your dog from escaping?

My own dog would have had a star role in the movie The Great Escape had he been cast for a part. He is a tenacious digger and could create an escape hole under a traditional fence in a matter of minutes. I never have to worry about him digging under the wire as he maintains an enormous respect for the boundaries of his personal territory created by the simple buried wire.

How do buried wire fences work?

Buried wire fences are not much different than the radio in your home or car. A compact transmitter in your home or garage is connected to one end of a wire that loops around the safe area you create for your pet. After creating the loop, the other end of this wire connects to a second terminal at the transmitter. Once the transmitter is powered up, the buried wire becomes a simple antenna that transmits a radio signal, just as a commercial radio station does. The difference is that a real radio station creates a different frequency signal that travels for miles, while the buried wire creates a far weaker adjustable signal that can be transmitted anywhere from four to fifteen feet away from the wire. The circular signal field created around the entire wire stops animals from crossing or jumping over the wire.

How does the dog collar work?

Your pet wears a compact receiver on a special collar. The highest quality and most reliable receivers are those that can be programmed for your particular pet. The pet's personality, age and weight are all considered when the professional installer programs the receiver. The best receivers can be reprogrammed in just seconds if your pet starts to disrespect the boundaries you create. Not all buried wire fences have this innovative feature.

When your pet wears the best receiver collar, he hears a tone that warns him he is at the edge of his boundary. If he does not respond within a second or two, the receiver collar delivers a simple static electricity correction to the underside of your pet's neck. This stimulus is no different than the one you or I receive when we walk across a carpet and touch a door knob during dry winter weather. The system I use is so pet-friendly it is the only one of its kind to be granted the prestigious Seal of Approval from the American Society for the Prevention of Cruelty to Animals.

Can a buried wire fence protect your flower beds?

My wife Kathy loves our system for another reason. Before we installed it, our dog loved to bury things in her flower beds. Kathy is putting up with this bad habit for now, but if she snaps one day, the professionals can come back out to our home and create secondary off-limit islands within the primary outer boundary zone. You may decide that your pet is not allowed near a swimming pool, a vegetable garden, or pond. The right buried wire fence system will protect your beloved pet as well as all the other things you value in your yard.

Perhaps the most important part of the system I use is the professional training that was part of what I received when I ordered the system. I researched all buried wire fences and saw you could buy several from the Internet or a home center. But after talking to a real company that installs these systems each day, I quickly discovered that teaching my dog how to respect his boundaries was the most important thing. This hands-on training by a pro was so good that within an hour our dog knew where his new boundary was.

A professional trainer visited our home within an hour after our buried wire fence was installed. He worked personally with our dog. For the first three days, our dog learned the boundaries by responding to a special clicker attachment to his receiver collar. On the fourth day, this clicker was removed by the professional trainer. The training was so effective that our dog had no desire to cross test the buried wire fence. Believe it or not he would not even chase our frisky white kitty across the boundary. Imagine how effective both the fence and the training must be to keep an energetic puppy away from a swaggering cat!

Painting New Stucco

Painting New Stucco

Painting New Stucco | New stucco and the right primer and paint make for a very long marriage. Photo credit: Tim Carter

DEAR TIM: I am going to paint the exterior of my stucco home early this fall. The stucco is seven years old and has never been painted. Is there a specific paint to use on bare stucco? I know to caulk the small settlement cracks, but what about the stucco that extends below the grade. Should I paint that as well? I have seen other paint low to the ground peel. I want to avoid blisters and peeling paint if at al possible. What finish paint would you use? John B., Columbus, NJ

DEAR JOHN: You are already on track for a first-class paint job without knowing it. Applying the paint in the early fall is a fantastic idea. The weather is often dry and the daytime temperatures are well within the acceptable high and low temperature limits that are published on the labels of virtually every can of paint. Furthermore, your productivity should be very high since the weather will be so fair.

Can stucco be painted?

Unpainted stucco or virtually any masonry material is well suited to paint. The rough texture of stucco, brick, concrete block, even stone provides lots of micro nooks and crannies where the paint can lock itself onto and into the surface. In essence, the paint and the stucco, or other masonry, become one and the same. In my opinion, there is only one finish paint I would use. I prefer exterior paints that have a blend of urethane and acrylic resins. I have used this type on my own home and the paint sticks like epoxy to my wood siding. This same paint will grab tenaciously to your stucco.

How long do you have to wait before painting stucco?

Since your stucco is seven years old, you have waited more than enough time to allow it to cure. Brand-new stucco needs to cure for several months before it can be successfully painted. This 90-day wait period allows sufficient time for the original mix water to liberate itself from the stucco. Much of the mixing water is needed to fuel the hydration chemical reaction that happens as the stucco gets hard over time. But any leftover water that remains in the stucco will cause fresh paint to peel and blister if it is not allowed to escape prior to painting.

CLICK or TAP HERE to get FREE quotes from local companies that can paint your house.

Does stucco need to be primed before painting?

You must prime your bare stucco before you apply a finish coat of paint. The primer you use should be matched to the exterior paint you choose to use. Each paint manufacturer will tell you on the label of their finish paint what the compatible primer is for a given substrate. For example, if the surface being painted is new wood, they may say to use oil primer or a water based primer. In your case, one manufacture may feel an oil primer is better than a water based primer. Avoid amateur chemistry! Do not buy a bargain primer and hope it will work. Only use the specific primer as recommended and manufactured by the finish paint company.

You should also read the instructions on the can of primer. They often tell you to apply the finish coat of paint within so many hours to achieve the best bond between the finish paint and the primer. It may not be a good idea to prime the entire house and then follow behind with the finish paint days later. You may have to work in sections where you prime one side of your home on one day and then finish paint it the following morning.

How do you prepare the house to be painted?

Be sure to wash the house down well with soap and water before you begin to paint. Wash it as you would your car. Use a firm brush on a pole to scrub the stucco with a soapy solution. Rinse well with a garden hose. If you are tempted to use a power washer, be very careful. They can damage a stucco surface and inject water behind the stucco where it touches up against doors and windows.

Dealing with the stucco at the base of the wall is simple. The stucco below grade will wick water up the wall. You want to create a strip of stucco where this water can freely evaporate to the atmosphere. I suggest that you stop the primer and paint about 1.5 inches above the current grade. A week after the paint job is complete, install some small decorative gravel around the house that slopes from the stucco down to the soil. You can find beautiful colored stones at landscape supply stores. A wedge of colored gravel will hide the unpainted stucco and provide a wonderful colored transition between the earth and your home.

Dress Up a Plain Mirror

plain flat mirror

Dress Up a Plain Mirror | Applying wood trim around a plain flat mirror is a simple task. The end results, however, are anything but ordinary. Photo credit: Tim Carter

DEAR TIM: I have a 40 inch high by 60 inch wide plate glass mirror in my bathroom. My wife wants to dress up the mirror and asked me if I could frame the mirror with wood trim. I said I could before thinking it through. Is it possible to do this? How would you frame this mirror? Is it safe to do? Carl R., Fayetteville, NC

DEAR CARL: Gosh, I thought I was the only one who spoke too soon. But my wife Kathy knows better - she knows if she can dream it, I can usually do it. In your case, you dodged the bullet. Transforming the plain float glass mirror into an asset within the bathroom is not very difficult. To achieve excellent results, you will need to do some work ahead of time.

What type of wood should be used to frame a mirror?

Depending upon the tools you own and your skill level, you have two basic options with respect to the type of wood you will use. Perhaps the simplest wood frame would be a flat piece of wood that covers the outer edge of the mirror. When you look straight at the mirror, you will get the desired wood-frame look. But this method does not cover the actual edge of the glass mirror. Your wife may not mind but I can tell you that Kathy would want that edge covered as well.

What is a rabbet cut?

To do this, you need to use a piece of wood that has been cut with a rabbet on the underside. This rabbet allows the wood to overlap the edge of the mirror and hide the edge of the glass. The depth of the rabbet equals or slightly exceeds the thickness of the mirror. Many traditional lumber yards often have decorative wood moldings that have this rabbeted profile. You may be able to find one or more pieces of trim that are ready to miter. If not, you can create a rabbet profile with a standard table saw. Be sure to buy or make a small amount of trim for testing purposes. I will describe that in a few moments.

When do you prefinish the wood trim?

Once you have the necessary wood trim, you need to prefinish it before you attach it to the mirror. Finish the test piece of trim with the rest of the wood. Failure to do this may lead to an undesirable look as you look closely where the wood ends and the mirror begins. The reflectivity of the mirror will allow you to see the first one eighth inch or so of the under side of the wood trim. For example, if you were to stain a light wood a dark color, you would end up with a light colored racing stripe around the interior of the wood frame. This same thing can happen if you paint the wood trim a medium or dark color.

Once you have prefinished the wood trim, it is a good idea to let the finish cure for a minimum of two weeks. This wait time will help insure there is no adverse reaction between the paint or urethane and the adhesive that will be used to hold the wood to the glass mirror.

How do you attach the wood to the mirror?

I prefer to use clear fast-setting epoxy when attaching wood to glass. This durable adhesive can often be found at a hardware store or home center. When you are buying the adhesive, purchase or obtain a small piece of clear glass at the same time. You will use the test piece of trim, the epoxy and the scrap glass to see how well the epoxy works.

Follow the directions on the epoxy and mix as directed. Apply a thin coat to the back of the wood trim and tape it to the scrap glass. Use the special low strength painter's tape for this task. Do not use aggressive regular masking tape.

CLICK or TAP HERE to get FREE quotes from Local Glass & Mirrors Services.

Wait the required time for the epoxy to cure and test to see if the wood trim is securely fastened to the glass. If all is well, proceed to epoxy the wood trim to the mirror. Take your time and do not use too much epoxy. You do not want any epoxy to drip down onto the face of the finished mirror.

Save for a Rainy Day

electronic spreadsheet

Save for a Rainy Day Accounts | An electronic spreadsheet can help you determine how much money you need to set aside each month for periodic repairs. Image credit: Tim Carter

DEAR TIM: I realize that interest rates are at or near historic lows, but my home improvement emergencies and needs don't always happen at once. It seems I always fret about how to pay for the next thing that breaks or needs updating. Is there a way to create a realistic budget for home repairs and emergencies? If so, how do you account for things that seem to have a medium to long useful life? Maria B., Cincinnati, OH

DEAR MARIA: Owning a home is indeed wonderful, but the maintenance baggage that comes with home ownership can cause financial hardships on a frequent basis if you don't put away money on a regular basis. To make matters worse, if an expensive repair becomes necessary when funds are limited, the low bidder may actually cost you more money down the road when his work falls apart prematurely or he causes damage to parts of your home that previously were in fine shape. Home maintenance financial issues can be challenging and complicated to say the least.

It is extremely interesting how many people who buy new homes think they have nothing to worry about for a very long time. Anyone who has bought a new condominium knows differently.Those who took out a loan for their condos not only have to pay a monthly mortgage payment but they also have to pay a monthly condominium assessment fee. Part of that fee covers current expenses of garbage removal, hallway cleanup, security, grass cutting, etc., but a significant portion of the fee is actually salted away in an interest-bearing savings account to pay for common space repairs that may be one, five or even 15 years down the road.

What is a sinking fund?

Everyone who owns a home, no matter if it is new or 100 years old, needs to create a special savings account to cover the cost of future home repairs. Accountants often call this a sinking fund because you need to make regular payments into a fund whose proceeds will pay off a future expense or expenses. The trouble is, many people do not set aside enough money each month and they do not raise the monthly payment each year to account for inflation.


If you want to see the full size image of the Spreadsheet page I created showing an example of different items in a typical house, the remaining useful life at that point in time for each item, and how much money you need to put away each month to be prepared for the anticipated cost, then Click Here now.

If you want to make your own calculations, open the Save For A Rainy Day Google spreadsheet. Enter your information and see how much you will have to save for that rainy day. A Google account is required to view the spreadsheet. Signing up is free. If you aren't currently signed into your Google account, the above link will take you to the sign in or sign up page.


How do you get starting saving for the rainy day?

If you live in an existing home, the best way to get started is to complete an appraisal of all of the major systems in your home. Inspect your roof, heating and cooling equipment, appliances, exterior surfaces, windows, doors, exterior paving, plumbing, and possibly your electrical equipment. Determine the condition of all of these and more importantly the remaining useful life in each category. Fortunately, some things in the above list have longer useful lives than others. If they all had the same useful lives and were installed at the same time, they might all go bad at the same time. This could become a financial time bomb.

Where do you get quotes on replacements?

Try to get quotes as to the current cost to replace each item on the list. Friends and neighbors who have had similar work done may be able to help you with pricing. Do not rely on a price that is 18 months old or older. If you can get free estimates from contractors that advertise this service, do so. Be sure to always ask how long the repaired or new item will last. This information will be needed to keep your sinking fund calculations accurate as time passes.

To determine how much money you need to set aside now for future repairs start with just one item on the list. For example, let's say you determine your roof has only ten more years of useful life. If your roof is 15 squares in size and the current roof you prefer costs $145.00 per square for total replacement, then it would cost $2,175.00 in today's money to have a new roof installed.

Assuming a 1.5 percent inflation rate per year over the next yen years, you will need $2,524.00 to pay for the roof replacement. Since there are 120 months between now and when the roofer pulls away from your house, you should begin to set aside about $21.00 per month. This computation does not cover the interest that will accrue as that money sits in the savings account. Use that extra money to cover any cost overruns or estimating mistakes.

CLICK or TAP HERE to get FREE quotes from local General Contractors.

Using a spreadsheet to calculate your monthly deposit

To get the total number you need to deposit each month into your new sinking fund, you must run the calculation for each item on your list. This total number will possibly surprise you. If saving money is not an option because your budget is already too tight, you will have to make these payments in another fashion. My guess is that you will bundle the repairs into one lump sum and then apply for a home equity loan. One thing is for sure, you will pay the money in one form or another. I suggest you set aside money now by cutting back or eliminating some other extravagance in your lifestyle.