Efflorescence Causes

efflorescence on masonry

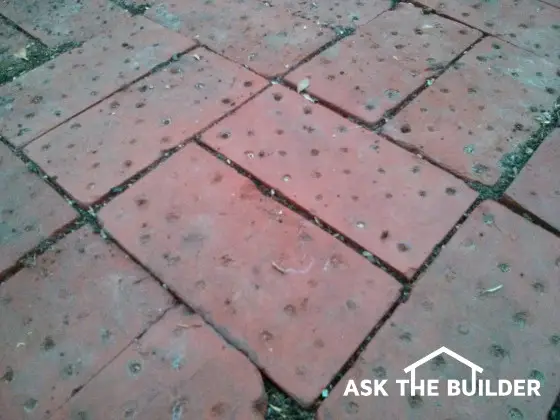
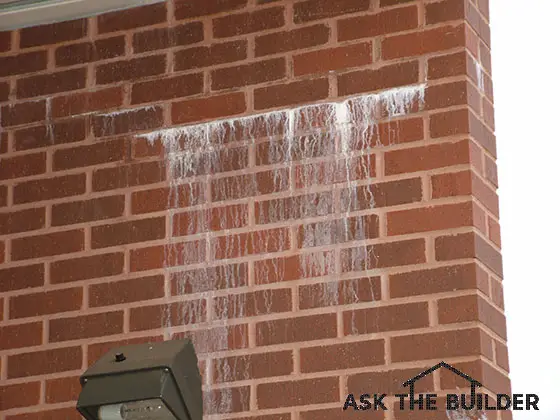
Here is classic efflorescence. It may take years for this to disappear.

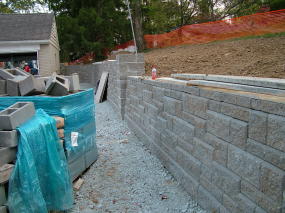
DEAR TIM: Six months ago a masonry contractor constructed a brick retaining wall in my garden. Two months after he finished, white deposits began to appear in many locations on the face of the brick. The contractor has tried to wash them off with acid but the stains continue to reappear. I think the brick is defective. What if anything can be done? A. M.

DEAR A. M.: You appear to be a victim of efflorescence. Efflorescence is a common problem which can occur with masonry walls. It is a deposit of a soluble salt which was either present in the bricks, mortar, or the backfill material behind the wall. I don't feel that your bricks are defective.

Efflorescence is, for the most part, a visual problem. Very rarely does it cause structural problems. It is not a simple problem to correct. Often, the efflorescence diminishes with time.

The condition can occur on concrete as well as brick or masonry surfaces. Several conditions must occur for efflorescence to appear. The soluble salts must be present in the bricks, mortar, or transported by water into the masonry from another source.

CLICK HERE to get FREE & FAST BIDS from local masonry experts who can help clean or repair your brick and stonework.

You need sufficient water to carry the salts, in solution, to the surface of the masonry. Finally, evaporation must take place. This evaporation cause the salts to come out of solution and be left behind as the salt deposits which you see.

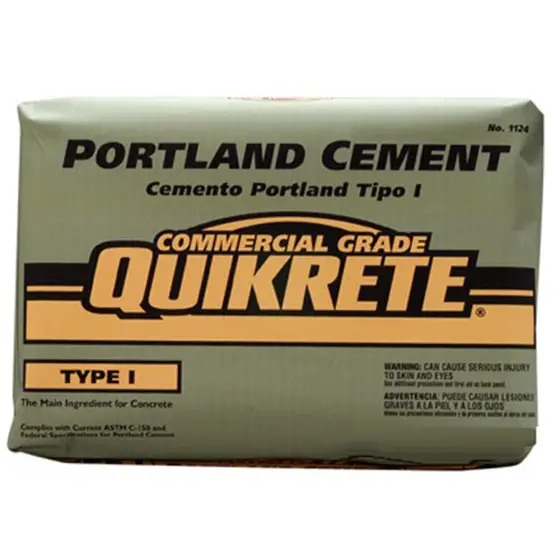
The soluble salts which cause the problem can come from many chemical elements or minerals. Many of these elements can be found in the materials from which bricks are made. Also, the sand which is used in the mortar can have significant quantities of soluble salts.

For this reason, it is always best to use washed sand from a high quality sand and gravel pit. The soluble salts can also be present in the soil behind your wall or the water which was used to mix the mortar.

Efflorescence will in many cases stop on its own. The efflorescence can cease if supply of soluble salt material in the bricks or mortar becomes exhausted.


It can also stop if the source of water which dissolves the soluble salts is cut off. The process can also stop if the water in which the salts are dissolved is prevented from getting to the surface of the masonry.

In your particular case, the location of your wall will make it difficult to quickly stop the process. Because your wall is located in a garden, the supply of water which dissolves the salts and carries them to the surface of the wall will probably be sufficient for a long period of time.

If the back or top of the wall was not treated with a compound which will prevent water penetration, you will have to wait for the supply of salt material to diminish. I have seen cases where it takes several years for the salt deposits to totally disappear.

Efflorescence growing

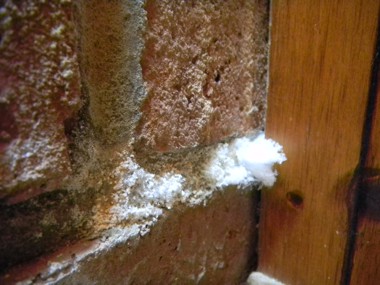
Efflorescence growing in the mortar of a brick fireplace. Photo Credit: Michael Hannum

Depending upon the soluble salt or salts which are causing the problem, you have several options as to removing the deposits. You can sometimes remove the dried deposits with a stiff brush. Sometimes water will wash the salts from the wall.

Muriatic acid

Muriatic acid is powerful and needs to be treated with lots of respect. CLICK THE IMAGE TO ORDER SOME NOW.

However, this process can sometimes dissolve the salts and cause them to soak back into the wall. You may have to use a very weak solution of muriatic acid. Only attempt this method if you know for a fact that the acid will work effectively on the type of salt present.

Acid solutions can cause severe burns to skin and eyes. If you attempt to try this yourself, be certain to wear complete protective gear. Follow the directions on the acid container explicitly.

Acid washes improperly applied can damage the masonry surface as well. They should only be performed by experienced applicators.

Over the years, I've seen many different spellings of efflorescence. Here's my growing list: effervesce, effervescence, effervescent, effleresants, effloreflance, efflorescence, efflorressance, effluorescence, eflorescence, eflorescents, ellforesce and ifflorescence.

CLICK HERE to get FREE & FAST BIDS from local masonry experts who can help clean or repair your brick and stonework.

Column 033


Fire Sprinklers – Small but Effective

DEAR TIM: We are getting ready to build a new home in an area served by a volunteer fire department. Due to the great distance between our house and the firehouse, I feel that a residential fire sprinkler system will be a good idea. My husband disagrees. He says that smoke detectors are good enough. He also says that sprinklers can create massive water damage. What advice can you offer to settle this disagreement? W.C.

DEAR W. C.: Residential fire sprinklers are one of the best investments you can make in your new home. Resolve not to give in to your husband on this issue. The stakes are too high.

Residential fire sprinklers serve an entirely different function than smoke detectors. Smoke detectors tell you, as long as they are maintained in working order, that a fire is in progress. Sprinklers actually have the capability to extinguish or control a fire until such time as the fire department responds.

In your case, a single sprinkler may have already extinguished the fire before the volunteers have reached your house. Without sprinklers your fire department may arrive just in time to save your foundation. Sprinklers make good sense even if you live across the street from a firehouse.

Residential fire sprinklers have many myths attached to them. One of these is water damage. Many people believe that all sprinklers activate in a fire situation. This simply is not true.

CLICK HERE to get FREE & FAST BIDS from local specialists who can install a sprinkler system to protect your home from fire.

Only the sprinklers in the fire area activate. Sprinkler heads are set to operate as soon as the air temperature surrounding the head reaches a factory set temperature. Many residential sprinklers activate at 160 - 165 degrees F. Some fires generate temperatures like this near the sprinkler heads in as little as 45 seconds.

A standard quick response sprinkler head usually discharges about 13 -18 gallons of water per minute. Studies have shown that a single sprinkler head can extinguish many common residential fires in about four minutes. A wide majority of residential fires only activate one or two sprinkler heads. Early extinguishment of fires also limits smoke and heat damage as well.


Save time and money on your next security or fire alarm installation. Find the pros using my Security & Fire Alarm Installation Checklist. I offer a 100% Money Back Guarantee.


Let's talk about water damage. A fire department responding to a house fire that has been burning without any extinguishing efforts may use several large diameter hoses to begin their fire fighting efforts. Temperatures in the fire area can exceed 1,300 degrees F.

The fire fighters may have to use several 1 3/4 inch diameter hoses set at a flow rate of 150 gallons per minute to extinguish the blaze. They will probably use hundreds, if not thousands, of gallons of water to extinguish the fire. Smoke, heat, water, and steam damage throughout the house can be significant.

Residential Fire Sprinkler Guide

Want more information on the importance and use of Fire Sprinkler systems? CLICK THE IMAGE to get the ultimate guide to Fire Sprinklers.

Many people think that sprinklers are costly. This also is a myth. In many areas of the nation, sprinklers can be installed for about 1 percent of the cost of the home. Virtually every insurance company offers substantial discounts on fire insurance policies if you install a sprinkler system. Savings on insurance premiums can, over a period of time, actually pay for the installation of the system.

Residential sprinkler systems do not require specialized plumbing or water supplies. The sprinklers operate from your standard domestic water source or supply. The design of residential sprinkler heads has also come a long way. Many are quite attractive.

They bear no resemblance whatsoever to those that you may have seen in warehouses or commercial buildings. Some come in polished brass, chrome, or white. Often they project only one half or three quarters of an inch below the finished ceiling materials.

Retrofitting an existing house can be done, but it will be more expensive. Consider installing sprinklers near your heating equipment and in your kitchen area. Statistics confirm that these areas of your home are the most likely place a fire will start. Unfinished basements are also very easy to sprinkler. The easy access to plumbing lines makes it a natural place to begin.

Residential fire sprinklers save lives and property. They also afford great peace of mind. I intend to include them in my next new house. Your failure to include them in yours may cause you to become a grim statistic.

CLICK HERE to get FREE & FAST BIDS from local specialists who can install a sprinkler system to protect your home from fire.

Column 034

Clay Paving Bricks

Clay Paving Bricks

close up paving brick

DEAR TIM: I am getting ready to install a new driveway and several sidewalks. Brick appears to me to be a very attractive material. Will harsh winter weather destroy the brick? What type of brick do you recommend? What installation method do you suggest? Are there alternatives? A. P.

DEAR A. P.: I compliment you on your tastes. Brick driveways are extremely attractive. The colors and textures available today allow you to match your driveway to your exterior color scheme, if you so choose.

Paving bricks are different from regular house bricks. They must pass more stringent testing requirements with respect to compressive strength and cold water absorption.

The Midwest, East Coast, and some Northwestern states require that the bricks must have a minimum compressive strength of 8,000 pounds per square inch. They must also exhibit an absorption rate of cold water less than 8 percent. Areas of the country with milder climates have less stringent requirements.

So long as you choose the correct brick for your part of the country, the weather should not harm it. Bricks were used successfully on many city roads for years before asphalt paving became widespread and popular.

CLICK HERE to get FREE & FAST BIDS from local contractors who can install your brick or stone patio and walkways.

I have had excellent personal experience with brick pavers. I installed brick pavers on a sidewalk and patio 14 years ago. Several years of severe winter weather have not harmed the brick or the mortar joints between them. Snow removal is not a problem as long as you exercise reasonable care.

There are several installation methods. Paving bricks can be installed either with or without mortar. They can be set directly on a sand base, on asphalt, or in a bed of mortar on top of a concrete base. You can install the paving bricks tightly against one another or install mortar between them. There are pros and cons to each method.

Paving bricks installed using a gravel base with a sand setting bed are easy to repair. However, sand sometimes works it way from beneath the bricks. This sand is then tracked into the house. Weed control can become a problem. Paving bricks set in mortar do not have the sand and weed problems. However, they are difficult to repair.

Driveways usually will have heavy car and occasional truck traffic. The base beneath the bricks must be exceptionally strong. You will probably achieve your best results by using an asphalt or concrete base beneath the bricks.

Consult a structural engineer for his or her recommendation as to the thickness of the base for your particular situation. The local brick supplier may also have guidelines available as well.

Portland Cement bag

In need of a durable easy to use Portland Cement. CLICK THE IMAGE to get Portland Cement now.

Should you decide to install the bricks using mortar, consider the following. Avoid using mortar mix that bricklayers commonly use when installing bricks in a wall. Substitute Portland cement for the mortar mix. A rich mixture (2 parts fine sand to 1 part cement) will insure a strong, long lasting bond between the base and the bricks.

Consider looking at interlocking concrete paving bricks. These bricks are made using concrete with small aggregate. They come in a multitude of colors and patterns. These bricks are extremely durable and exhibit many of the same qualities of traditional paving bricks. Give them serious consideration prior to making your final decision.


CLICK HERE to get FREE & FAST BIDS from local contractors who can install your brick or stone patio and walkways.

Column 035

Plumbing Vent Pipes – Can They Be Relocated?

Ultimate Plumbing Guide

Want to know more about Vent Pipes and other plumbing topics. CLICK THE IMAGE to get the comprehensive guide to plumbing.

DEAR TIM: I have two pipes which project through the roof on the front of my house. I have been told that they are plumbing pipes. They are very objectionable. I am getting ready to install a new roof on my house. The pipes are clearly visible in the attic. Are they really necessary? Is it possible to have them moved to the back side of the roof? D. T.

DEAR D. T.: Plumbing vent pipe locations have angered many homeowners. In almost all cases, the frustration and disappointment that homeowners felt could have been avoided.

Plumbing vent pipes are a necessity. They allow your plumbing drainage system to breathe. Their primary function is to equalize pressure in the drainage system every time you run water in a sink, drain a bathtub, or flush a toilet.

In many homes, all of the plumbing fixtures are interconnected to the same drainage system. The system looks very similar to a tree. In fact, certain parts of a plumbing system are called branches. These branches can drain one or more fixtures.

If a drainage system is constructed without vents, strange things begin to happen. For example, you may flush a toilet on the second floor of your house and the kitchen sink drain might begin to make strange sounds. The drain will sound like someone with a giant straw is sucking the water from the trap beneath the sink. In fact, that is exactly what is occurring.

CLICK HERE to get FREE & FAST BIDS from local Plumbers who can install your new fixtures.

This happens for a very simple reason. As the water from the toilet drains down the pipe going to the basement or sewer, it is pushing ahead of it the air that was in the pipe just before you tripped the toilet handle.


This creates a vacuum just behind the water. Because the system is unvented, it searches for the easiest place to replace this air. The vacuum can actually be strong enough to suction the water from a fixture trap.

It is extremely important for the water to remain in the traps below the fixtures. This water seal stops offensive odors and vermin from entering your house.

Plumbing fixture vents solve this problem. Plumbing vents form another type of tree within your house.

For the most part, each plumbing fixture has a vent pipe associated with it. These vent pipes also interconnect in many instances. The termination point for the vent system is the roof of your house. The roof vent pipes are the point where the replacement air enters your plumbing system as a fixture drains water.

The Complete Guide To Plumbing

Need to fix your Vent Pipe or install a water heater? CLICK THE IMAGE to get a complete guide to all your plumbing needs.

These vent pipes have certain requirements with regards to their size and length. They also must be installed in such a manner so as to continually slope toward the drainage lines. Water or debris must not be allowed to collect in vent pipes.

Blocked vent pipes can create a scenario as described above. If one of your existing drains bubbles or gurgles when another fixture is draining, you may have a blocked vent pipe.


Vent pipes, in many instances, can be installed so that they exit the roof where you would find them to be the least objectionable. The plumber merely has to avoid as many sharp bends as possible. Based upon your description, your vents pipes can be easily relocated.

Planning comes into play as well. Architects and designers should consult with plumbers if they intend to place plumbing fixtures on the front half of a house. Many plumbers will gladly discuss what they can and can't do with the vent pipes. This simple step will go a long way in avoiding homeowner disappointment and frustration.

CLICK HERE to get FREE & FAST BIDS from local Plumbers who can install your new fixtures.

Column 036

Retaining Wall Design

DEAR TIM: I need to construct two retaining walls, one in my garden and one along side my driveway. The height of both walls needs to be about 4 1/2 feet tall. Also, the ground above the garden wall will not be level, it will slope upwards from the wall. I have an ample supply of rocks which I can fashion into a wall without mortar. Will this work? What do I need to be concerned with? T. H.

DEAR T.H.: You need to be concerned with several things. The first of which is to check the yellow pages for a structural or civil engineer in your town. I suggest that you arrange for a consultation.

Retaining walls are not simple. The job they are expected to do, hold back soil, involves several critical factors. These factors can be different in each situation.

Basically, engineers look at four things: the proposed height of the wall - the slope of the ground above the wall - the type of soil behind the wall - additional weight applied on the soil above the wall (cars, trucks, structures, etc.).

The tall concrete pier halfway down the wall is plumb. Note how the segmental retaining wall has a cant or backwards lean to it.

The tall concrete pier halfway down the wall is plumb. Note how the segmental retaining wall has a cant or backwards lean to it.

Gravity is a primary force working against retaining walls. The creation of a retaining wall alters the dynamic equilibrium of a hillside. Prior to construction of the wall, everything was just fine. The retaining wall is now put in the position of doing the work of the soil that was taken away.

CLICK HERE to get FREE & FAST BIDS from local masonry contractors who can build your new retaining wall.

Retaining wall height is extremely important. As the height of a wall increases, the forces which want to make the wall tip over or slide are increasing at an exponential rate.

Retaining Walls

CLICK THE IMAGE to get an essential guide on building retaining walls for whatever situation you may be dealing with.

This means that if you double the height of a retaining wall, the forces pushing against the wall could be 3 or 4 times as great. The forces behind retaining walls higher than 3 feet begin to get very impressive.


Need to build a retaining wall? Build a sturdy, durable wall with my Retaining Walls Checklist. I offer a 100% Money Back Guarantee.


The slope of the soil behind a wall also is important. The wall in your garden not only has to contend with the soil behind the wall but also the soil upslope from it. The weight pressing against this wall quite possibly will be measured in thousands of pounds.

Soil drainage capabilities are also important. A soil which retains water will put additional loads against the wall during rainy seasons. For this reason, retaining walls should be designed with excellent drainage systems within the soil behind the wall.

woven geotextile

CLICK THE IMAGE to get a woven geotextile that will keep soil in place.

Install drainage tile, washed gravel backfill, geo-tech fabrics to prevent siltation of the gravel backfill, and weep holes within the wall to allow water to escape from behind the wall.

Often, retaining walls are created for parking lots, driveways, etc. As vehicles pass over the ground above the wall, they add additional weight which engineers call surcharge. In some cases, this weight can be extreme.

For example, imagine a fully loaded concrete truck on your driveway. These trucks can, in some instances, weigh 35 tons. Poorly engineered walls can not resist this type of loading.

Your situation, I feel, calls for a different type of retaining wall. The wall you are proposing is commonly referred to as a gravity wall. It relies on its own weight to resist the tipping and sliding forces working against retaining walls.

retaining wall design

CLICK THE IMAGE to view a wide selection of books and guides on how to build, drain, and design retaining walls.

The engineer you call will probably suggest a cantilever wall, counterfort, or buttress wall. All of these can be faced with the stone which you have available.

Many retaining walls require vast amounts of time, labor, and money. Don't gamble if the wall is higher than 3 feet. The services of a qualified engineer will afford you great peace of mind. If you want a user friendly retaining wall system that minimizes labor, then read Stackable & Segmental Retaining Walls.

CLICK HERE to get FREE & FAST BIDS from local masonry contractors who can build your new retaining wall.

Read my column Retaining Wall Basics and Blacktop Cracks for a reader's question on a failing retaining wall.

Column 037

Plaster vs. Drywall

DEAR TIM: Help! My husband wants to install drywall in our new room addition project. Drywall seems to dent easily and the finishing process involves tremendous quantities of dust. Is it still possible to use old fashioned plaster? Is it still manufactured, and if so, is it expensive? S. O.

DEAR S. O.: Do I ever have good news for you! Not only is plaster still available, it is, in my opinion, a tremendous value.

Your observation of drywall's tenderness is quite accurate. Drywall is, by and large, a fantastic product. However, the soft (relatively speaking) gypsum core of drywall is simply covered with a thick paper. It doesn't take much force to create a dent in drywall surfaces. Plaster surfaces, on the other hand, are much harder.

Plaster, in many respects, can be compared with concrete. Plaster, like concrete, begins as a mixture of dry compounds. When mixed with water, a chemical reaction begins to occur.

This chemical reaction causes the ingredients to begin a crystallization process. Within several hours,enough crystals have formed to cause the plaster to become solid. These crystals interlock with one another and form a dense, hard surface.

Plastering systems have come a long way in the past 70 years. Many years ago, plaster was applied over thin wood strips called lath boards. The plaster sometimes had horse hair added to make it stronger. Modern advancements have led to veneer plaster systems.

CLICK HERE to get FREE & FAST BIDS from local Contractors who can install your new plaster wall.

These systems incorporate many of the advantages of drywall to make them cost effective. Horse hair is no longer needed for strength. Modern plaster compounds are exceedingly strong.


Learn the secrets to great drywall and plaster techniques in this Drywall / Plaster Installation Checklist. I offer a 100% Money Back Guarantee.


Plaster veneer systems are applied over special gypsum core boards very similar to regular drywall. However, there is a very important distinction between the two. If you intend to plaster, you must use a gypsum board often referred to as blue board.

This board is manufactured using a special paper which has a distinctive blue color. The blue paper can readily accept the large quantity of water from the plaster without causing damage to the inner gypsum core. This paper also helps to insure a good bond between the plaster and the gypsum board.

Veneer plaster work has two other advantages. Once the blue board is fastened to the walls and ceilings, dust can be kept to a minimum. The wet plaster is applied to the blue board and dries to a smooth, hard finish. The plaster requires no sanding after it drys. A professional plasterer can achieve a finish which is as smooth as glass.

drywall taping knife

CLICK THE IMAGE to get a Durable Taping Knife for Drywall and Plaster projects.

The other advantage is speed. Some veneer plasters are one step operations. The plasterer trowels it on and finishes it in one step. Small jobs can be totally completed in one day. Your job, however, would only take two days. The blue board would be hung the first day and the plasterer would finish it on the second day. A similar drywall job would last five to six days.

Plaster is affordable. Often, a one coat veneer systems only costs 25 percent more than a similar drywall job. A drywall job for an average house in the Midwest costs approximately $4,800. An upgrade to plaster may only add $1,200 to the overall cost of the job.

While that may seem like a substantial amount, consider the fact that you only get one chance to do this. If you decide, after your home or room addition is built, to switch from drywall to plaster, you will have to remove the drywall and start over. Give serious consideration to using plaster on your next project. I'm confident that you will be satisfied.

CLICK HERE to get FREE & FAST BIDS from local Contractors who can install your new plaster wall.

Column 038

Vinyl Flooring Alternatives

DEAR TIM: I am considering alternatives for a new kitchen floor. A surface which is virtually maintenance free would be highly desirable. Is such a material available? I am not interested in hardwood or ceramic materials. Can you suggest alternatives? M. H.

DEAR M. H.: You have come to the right source! I would be glad to offer you alternatives. You are the perfect candidate for resilient flooring.

Resilient flooring refers to any vinyl flooring product, such as vinyl tiles and sheet vinyl flooring. Many homeowners still use the term 'linoleum' for resilient sheet vinyl.

Modern resilient flooring has come a long way from the days of linoleum. The vinyl flooring materials available today offer a wide variety of styles, patterns, and colors. Because these materials incorporate modern plastics, they can also be extremely durable.

Modern sheet vinyl flooring is manufactured in layers, much like a layer cake. Colors and patterns are incorporated in the middle layers. Sheet vinyl flooring derives its durability from its upper layer, often called the wearlayer.

CLICK HERE to get FREE & FAST BIDS from local flooring contractors who can install a new or replacement vinyl floor.

This wearlayer, in many cases, is a clear vinyl resin available in different thicknesses. Generally speaking, the thicker the wearlayer the more expensive and longer lasting the product will be. The thickness of wearlayers can range from 0.005 to 0.025 of an inch.

Many of the sheet vinyl floors have a very high gloss. This gloss is often achieved by adding a urethane on top of the clear, vinyl wearlayer. These urethanes often are as durable as the urethanes which are used on hardwood flooring.

Depending upon the size of the room in which you intend to use sheet vinyl flooring, you may be able to install it in one giant piece. Many patterns and styles are available in 12 foot widths. In the event your room is wider than 12 feet, it is not a problem.

Because the flooring is, for the most part, plastic, special glues have been developed to join pieces together. This glue, or seam sealer, actually welds the two pieces of flooring together into one solid piece.

vinyl flooring

CLICK THE IMAGE to order Vinyl flooring that can simulate slate, marble and other materials.

Many resilient flooring products are just that. They have a bounce or cushioning quality. This is achieved by incorporating a thin layer of foam in the bottom of the product. If you intend to spend a great deal of time standing or walking in your kitchen, your legs and back may not ache as much at the end of the day.

Vinyl tiles are also an alternative. These products are often available in pieces one foot square. They often are available in two thicknesses, 1/16 and 1/8 inch. Vinyl tiles floors can withstand tremendous amounts of abuse.

These floors also have a clear vinyl or urethane finish which makes them easy to clean and care for. Some manufactures of these tiles go to great lengths to precision grind the edges of each tile. This effort produces a floor which has the appearance of a similar one piece sheet vinyl floor.

Maintenance of resilient flooring is quite simple in many instances. Because the upper layers are plastic, these floors are rarely harmed by household spills. Simply wipe up spills with a damp mop or cloth and remove dust and grit on a regular basis. This simple, ordinary work will reward you with a brilliant floor for many years to come.

CLICK HERE to get FREE & FAST BIDS from local flooring contractors who can install a new or replacement vinyl floor.

Column 039

Home Construction – Eco-Friendly

DEAR TIM: I am planning to build a new home soon. Protecting our natural resources, energy efficiency, and minimizing damage to the environment are extremely important to me. What can I do to be 'environmentally' responsible as I build? Are there any programs or guidelines available which to follow? E. G.

DEAR E. G.: The eco-friendly or 'green' movement has become very popular in residential construction. There are many environmentally friendly products available. Building practices are also changing to reflect the responsible attitude people, such as yourself, have towards the environment.

Fortunately, within the past year, a program has been developed to help you build your home and satisfy all of your concerns. If you fulfill many of the guidelines outlined in this program, you can reduce the environmental impact of construction by a minimum of 25 percent. The name of this program is "The Good Cents Environmental Home program.

This home construction program is very unique in that it measures the impact on the external environment and helps to improve the interior environment of the house as well. It achieves this goal by examining the following areas: energy efficiency, building materials, construction practices, water efficiency, building design, and ecological living.

CLICK HERE to get FREE & FAST BIDS from local companies who can help make your home more energy efficient.

Individuals who wish to enroll in this program must do so through their builder. Many local utility companies across the nation have information regarding this program. Your plans, materials, house fixtures, construction practices, etc. are graded, much like a test.

In order to have your new home certified as a "Good Cents Environmental Home", you must accumulate a minimum of 700 "EcoScore" points out of a total of 1,300.

Points are scored by answering 'yes' to questions in each of the six categories mentioned above. The questions deal with specific topics such as landscape plants which require little watering, availability of walking or bike paths, disposal of unused paints and sealers, use of organic pesticides and herbicides, etc.

The benefits to the environment are significant. Houses which conform to the guidelines help to conserve electricity over the life span of the structure. Conservation of electricity minimizes the amount of carbon dioxide, sulfur dioxide, and nitrous oxide emissions.

Good Cents Environmental Homes also conserve fresh water. Because of minimal waste and intelligent construction practices, construction debris is kept to a minimum. This helps to extend the life span of our landfills.

The "Good Cents Environmental Home" program is a spin off of the original "Good Cents" energy efficiency program which appeared approximately 18-years-ago. That program was, and still is, licensed by almost 300 utility companies in 29 states.

Many of these same utility companies will, in all likelihood, license this new program as well. Consider contacting your local utility company to see if they are currently participating in the new program.

Environmentally friendly building is not that difficult. As with anything, it requires planning. Almost all manufacturers of building products are doing something to make their products 'green'. You won't have any trouble finding products which will help you achieve your environmental goals.

CLICK HERE to get FREE & FAST BIDS from local companies who can help make your home more energy efficient.

Column 040

Solid Surface Countertops

DEAR TIM: I am developing plans for a major kitchen remodeling job. The solid surface countertop materials appeal to me. My husband is skeptical of their long term durability. Are they all the same, or are there distinct differences? Are there other long lasting countertop alternatives? Do you feel that solid surface materials are a good value? T. T.

DEAR T. T.: After installing hundreds of different countertops as a builder, I can see why the solid surface countertops appeal to you. All of my customers who have purchased them have been delighted with the material. Solid surface countertops are both beautiful and easy to care for. I feel that they represent a fantastic value.

Solid surface countertops have been available for over 25 years. They are a product of the plastics industry. Plastics, in one form or another, dominate the kitchen and bath countertop industry.

The vast majority of plastic countertops are made from thin sheets of plastic laminated to wood or wood by-product substrates. Solid surface countertops are simply that, they are solid plastic.

The solid nature of these materials offers distinct advantages. Colors and patterns are solid throughout the material. These solid surface materials have many of the same properties of wood, which allows them to be shaped and molded into countless shapes and figures.

Because the material is plastic, special adhesives allow separate pieces of the material to be welded to one another to make one solid piece. These adhesives actually cause the plastic molecules of one piece to interlock with the molecules of the other piece.

CLICK HERE to get FREE & FAST BIDS from local contractors who can install a new Solid Surface Countertop in your home.

Solid surface countertops do have distinct differences. Different materials are made from different plastics. Some materials are primarily acrylic while others are a blend of acrylic and polyester plastics. Those solid surface materials which have a high content of acrylic plastic seem to have higher performance standards.

Your husband's concerns about durability are, for the most part, groundless. These materials have excellent characteristics. They have great impact resistance. Virtually all of them are nonporous, so they are unaffected by food and liquid stains. These nonporous surfaces also inhibit the growth of bacteria, mold, and germs.

solid surface countertops

If you've suffered damage to your Solid Surface Countertop CLICK THE IMAGE to get an all inclusive kit to repair the damage.

A unique property of these solid surface materials is their ability to be easily repaired. Scratches can be buffed out by hand. Cigarette burns can be sanded away. Severe damage to the surfaces can also be repaired in virtually all instances. To the best of my knowledge, no other countertop material can make similar claims.

Solid surface countertops do have a slight drawback. Excessive, concentrated heat can damage the surfaces. However, this problem is frequently overcome with the use of decorative trivets made from the scrap material from the sink and cooktop cutouts.

You do have other alternatives, however, no single one seems to have as many advantages as solid surface materials. Natural stone products, such as marble and granite, can be difficult to repair. Solid color laminate plastics offer fewer advantages, yet cost virtually the same as solid surface materials.

Artificial stone products, because of their composition, do not seem to perform as well as the plastics. Remember, as with many other things, you get what you pay for!

CLICK HERE to get FREE & FAST BIDS from local contractors who can install a new Solid Surface Countertop in your home.

Column 041

Job Pricing -Time & Material Method

DEAR TIM: I just received three bids for a major remodeling / rehabilitation project for my home. I have an excellent set of blueprints and written specifications for the work. Two of the contractors have suggested doing the job "time and material". They indicated that I would save money in the long run. I'm not quite sure I agree. What do you recommend that I should do? L. M.

DEAR L. M.: I recommend that you meet with the two contractors who have suggested this method and ask them a series of hard questions. A time and material job, in your case, could become a financial nightmare.

Based upon the facts which you presented to me, I do not feel that your job is a candidate for the time and material approach. Time and material jobs seem to work out for the best when there are many 'unknowns' about a job. Because your plans and specifications are so complete, there is virtually no speculation attached to your remodeling project.

Job pricing

A major problem associated with time and material projects is one of accountability. It is easy for workers on the job to loose the incentive to be as productive as possible.

Mistakes made by workmen can be buried in the cost of the job. Material waste can become a problem. The temptation for dishonesty is exceedingly great.

CLICK HERE to get FREE & FAST BIDS from local contractors who can finish your new remodeling project.

Time and material jobs, when performed by honest contractors, do permit a homeowner to pay exactly what a job should cost. Certain remodeling jobs may encounter hidden defects.

Planners may make false assumptions regarding the existing structural soundness of an existing home. Water or termite damage may be discovered. Poor soil conditions may exist at the construction site.

However, professional contractors almost always know when these things may be encountered. They can discuss with you these aspects of your job during the bidding stage.

Those areas of the job which may have hidden costs can be approached on a time and material basis. All other aspects should be quoted as fixed costs like a regular bid.

There are certain jobs which do work well in a time and material format. However, I highly recommend that a 'not - to -exceed' figure be called for if you must do business this way.

With such a figure, you, the homeowner, have some form of cost control. A time and material job with no cost control is like a financial time bomb waiting to go off.

I suggest that you ask the following questions to the contractors who wish to work 'time and material': What aspects of the job are unclear? What is prohibiting them from attaching specific time estimates to specific tasks?

Why can't material costs be accurately forecast? If certain tasks remain unclear, or hidden conditions exist, what is the worst case scenario for that aspect of the job? In other words, how much will that aspect cost if everything possible goes wrong.

Finally, if you must do a job 'time and material' let me make the following suggestions. Obtain specific material costs and quantities. Obtain a list of workmen and the labor rate that each will be paid.

Arrange for close monitoring to make sure that each person did, in fact, work the amount for which you are being charged. By all means, insist on a not - to - exceed number. The contractor should be able to predict the worst case scenario.

Always obtain at least 2 - 3 estimates. Different contractors may have a more innovative approach which can possibly save you time and money.

CLICK HERE to get FREE & FAST BIDS from local contractors who can finish your new remodeling project.

Column 042