Retaining Wall Basics and Blacktop Cracks
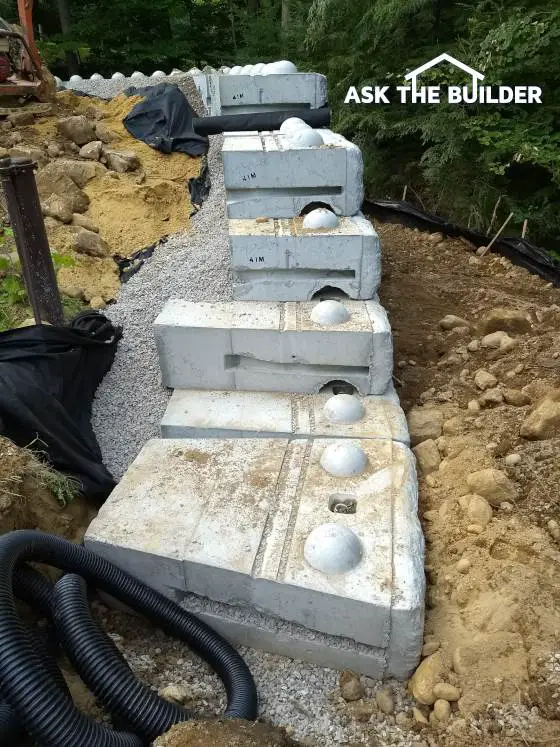
The giant precast-concrete retaining wall blocks stack and click together just like Lego blocks . (C) Copyright 2018 Tim Carter
Retaining Wall Basics
Question #1: Tim, I’ve seen quite a few failed retaining walls. Many have bulges or have tipped over. What needs to be done to ensure I only do mine one time? I’ve seen photos of walls hundreds of years old that look like they were built yesterday. What’s the secret? Chuck W., Boise, ID
I’m fortunate like Chuck and have seen my share of failed retaining walls. I grew up in Cincinnati, OH, and retaining walls can be found all over the city and in the suburbs.
You may have not enjoyed physics class in high school, but remember when one of your frustrated classmates might have said, “Give me an example of when I’ll ever use this stuff in real life!” Well, this is one of those times.
Gravity wants to tip over all retaining walls. It’s all part of Mother Nature’s plan to transport rock and soil back into the oceans. Those engineers that design a retaining wall that lasts and lasts can say they won an arm-wrestling competition with her - at least temporarily as Mother Nature always bats last.
The problem you face with retaining walls is the taller they are, the more weight they’re holding back. It’s very complex. This is why any wall taller than 6 feet should be designed by an engineer who’s got experience in retaining walls.
Short walls 2 feet high that you might build in your yard can be done with little fear of failure. But once you get higher than that, things can go wrong fast.
I’ll never forget the first retaining wall I built. It was a 50-foot-long wall that started out 1 foot high but ended up 42 inches high. I built it in front of another retaining wall and there was just 3 feet of dirt behind the wall, not a hill rising up behind the wall.
After five years, I noticed the tall end of the wall seemed to be tilting outwards. I had used regular brick, 4-inch back-up concrete block and some vertical steel rods in between the brick and the block to try to ensure the wall would not tilt. I lost that arm wrestling match!
Years later I discovered the freezing weather contributed to the failure. The soil behind my wall would freeze and expand. Each year the ice would push the wall out another 1/4 inch or so. A much-thicker wall and pea-gravel fill between the soil and the wall would have prevented the failure.
I have great retaining wall step-by-step tips and videos for you at my website. Go to: retainingwall
Blacktop Cracks
Question #2: Help, Tim! I need to patch some cracks in my older blacktop driveway and I don’t want to do it a second time. Let me state up front I’m no fan of the liquids or black caulks that end up looking worse than the crack itself. Have you figured out a way to patch blacktop cracks and disguise the repair? Constance M., Springfield, MA
I know I feel like Constance about the black caulk products and liquid crack fillers. They look like a facial scar to me. You may not pay much attention to aged blacktop but what you’re really seeing are tens of thousands of small rocks that have lost their jet-black coating of liquid asphalt.
Just this past week, I patched quite a few cracks in my own aged blacktop driveway. I’ve perfected a method of doing it so you simply can’t see the crack repair, even if you stand ten feet away.
I start by cleaning out the crack of all debris. If the crack is wide enough, I use my battery-powered demolition hammer with a 3/4-inch wide bit. I chisel the sides of the crack so the bottom of the crack is wider than the top. The profile resembles a dovetail carpentry joint or the shape of the hole in your tooth just before a dentist fills a cavity.
I make sure the crack depth is at least one inch before squirting in a magic epoxy I discovered about six years ago. It comes in caulking tubes and has a magic nozzle that mixes the two components that come out of the tube.
I keep the epoxy about 1/8 inch below the top of the blacktop and then begin to press into the fresh epoxy small stones that match the ones in the blacktop. You’ll find these all along the edge of your driveway. I embed stones as small as 1/8 inch into the epoxy all in a random pattern as you see in the blacktop. The last step is to scatter dry sand onto any visible epoxy and tamp it with my finger. Hours later you can sweep away the excess sand.
I’ve got step-by-step photos of this magic blacktop crack-filling process and a link to the epoxy I’ve tested at my website waiting for you. Go to: crackrepair
Column 1264
Tim built custom homes and did ultra-custom remodeling for 20+ years before launching his Ask the Builder media presence. He was selected as one of the Big 50 by Remodeling magazine in 1993. This award gave birth to Ask the Builder in October 1993. Tim also operates https://DrawPlumbingPlans.com. His @askthebuilder YouTube channel was the first home improvement channel on YouTube.