How To Protect Trees During Construction

saving trees

The large beech tree in the right of this photo is as sensitive as the skin of a newborn baby. We didn't allow any trucks or equipment within its drip line.

DEAR TIM: We built our home on a wooded lot 4 years ago. Within the past 6 months over 50 percent of the trees on our lot have died. Several other trees appear unhealthy. I seem to remember that the excess dirt from the excavation was spread around the lot. My builder confirmed this and added that this is a common practice. Could this have caused the problem? Is there anything I could have done to save my trees? R.C.

DEAR R. C.: Your builder should be arraigned and charged with involuntary tree slaughter. The spreading of excess dirt could very likely have been the main factor in the death and sickness of your trees. There is a strong possibility that other construction events hurt your trees as well.

The root systems of trees can be severely damaged by construction activities. Soil compaction is one of the biggest problems. Prior to construction, the undisturbed top soil on your lot contained vast amounts of oxygen. The trees use this oxygen when they extract nutrients from the soil. Excavation equipment, concrete trucks, delivery trucks, even light pickup trucks squeeze this oxygen out of the soil. Soil compaction affects soil moisture content. Rain water is more likely to runoff than be absorbed. Soils containing high amounts of clay compact more readily than sandy soils.

In your case, the extra excavation dirt was the kiss of death. There is no doubt that the soil was compacted beneath the trees, as the loader or dump trucks had to drive beneath the trees to dump the dirt. This extra soil then made it virtually impossible for air and water to get to the buried tree roots.

Shallow trenching and excavating activities can cut into root systems. A majority of tree roots are in the top 2 - 3 feet of soil. Tree root systems serve two primary functions. They provide the nutrients and moisture for the tree and also act as an energy storehouse. Root systems are a two way street. Nutrients and water from the soil are transported by the roots, up through the tree, and into the leaves. The leaves are miniature factories. They transform the nutrients and water into energy, some of which is sent back down the tree into the roots. This energy is used each spring to produce leaves and seeds.

Your soil chemistry may have changed as well. It is possible that some of your trees died because the soil pH level became too alkaline. The most common causes of this result from the washout of concrete trucks and bricklayer's mortar mixers. Burying scrap drywall also can change soil chemistry.

If you could go back in time, you should have hired a certified arborist. This individual would most likely have developed a plan to protect all of your trees before the first shovelful of dirt was turned.

Secure fencing would have been placed around all trees that required protection. Financial penalties could have been included in contracts for any workman who violated a fenced area.

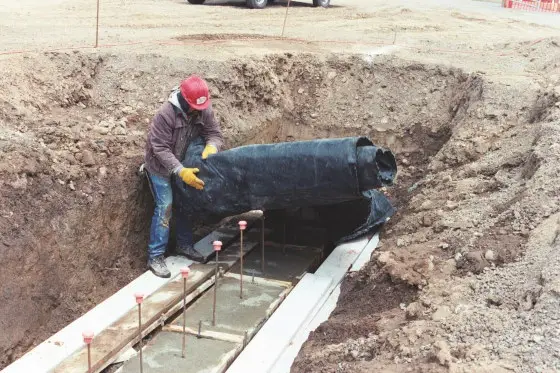
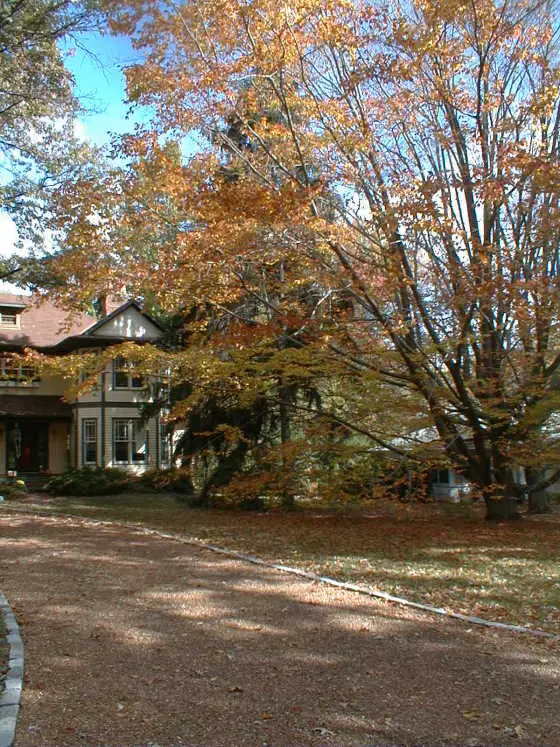
A system of aeration and watering pipes could have been placed beneath the soil which was placed over the tree roots. An arborist could have saved your trees. My wife was smart enough to call one years ago, before we built our house. Every tree on our lot is alive and healthy.

Tim's drive with trees

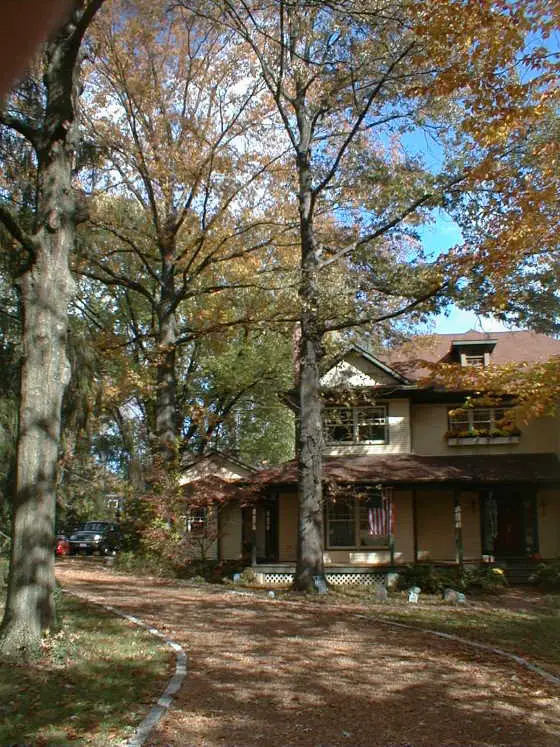
This is my own home. The large trees were on the lot before I started. They are in perfect health because I listened to Kathy my wife. She insisted we call in a certified arborist to tell us what to do.

Plastic Laminate Countertops

DEAR TIM: It's time to remodel my kitchen. I was thinking of using plastic laminate countertops again. However, my neighbor has plastic laminate cabinets that have numerous chips. Is plastic laminate not as durable now as it has been in the past? Also, can I avoid that ugly brown line at the edges? If I decide to purchase it, how can I keep it looking brand new? A.R.

DEAR A. R.: Don't base your purchasing decision entirely on the condition of your neighbor's cabinets. The chips on your neighbor's cabinets may be a result of abuse. If anything, plastic laminate is quite possibly more durable than at any time in its history.

The decorative plastic laminate on your kitchen and bath countertops was born in another industry in the early 1900's. The first plastic laminate was used as an insulator in the electrical industry. It was a replacement for heavy ceramic insulators.

Plastic laminate is basically a sandwich of plastic coated papers. It is made by combining layers of kraft paper, a decorative paper layer, and a clear surface layer under high temperature and pressure. The color and patterns you see are simply the layer of decorative paper. The clear surface layer protects the decorative paper from abrasion and moisture.

Decorative laminates are available in different thicknesses. The thickness of the final product is usually a function of how many slices of kraft paper are in the sandwich. The greater the number of slices of kraft paper, the higher the product's impact resistance and resilience. Your neighbor's cabinets most likely are covered with a thinner laminate designed for vertical surfaces. Choose the thickest laminate you can find for your new countertops.


Author's Note: I have a wonderful step-by-step eBook that shows you how to get professional results when painting cabinets. It is easy to follow and affordable. Plus, you get the eBook instantly!


That ugly brown line you see on your older laminate tops is simply the layers of kraft paper. Newer laminate edge moldings are available that eliminate this unsightly line. Laminate moldings offer a variety of shapes and profiles. These are applied to the front and side edges of your countertops. You can mix and match different colors, textures and patterns to create your own distinctive countertop. Wood edge moldings in red oak and hard maple are also available.

If you desire the real look of wood and the benefits of plastic laminate, consider using laminate veneers. This is a laminate product that substitutes thin wood veneers for the decorative paper in the laminate sandwich. Some of these laminates are available that allow you to stain and finish the surface to your liking. These laminates can be used to make beautiful cabinets.

Caring for your new laminate countertop is a breeze. The trick is to wipe up spills as fast as possible. Always use a mild liquid or powdered detergent to wash the countertops. Be sure to rinse the surface after cleaning. Some detergent residues can cause permanent surface blemishes if they come into contact with water on the bottom of plates, bowls, or glasses. Finally, while these new laminates are durable, they are not cutting surfaces. Get out that seasoned cutting board for cutlery chores.

Related Column: Ceramic Tile on Laminate

Gas Logs – Vented and Ventless

DEAR TIM: I am considering purchasing a set of gas fireplace logs. My shopping trip left me overwhelmed with decisions. Do they really look like a real wood fire? Some log sets need to be vented, while others do not. How can this be? Can the logs be installed safely in an existing wood burning fireplace? Are there any other considerations? D. P.

DEAR D. P.: Three years ago, I installed a high quality set of vented gas logs for a customer. Just before lighting them, I made fun of their appearance. My comments quickly went up in smoke! I was entranced by the realism of the logs, flames, and the glowing embers. Generally speaking, the vented logs appear more realistic than the ventless gas logs.

The vented gas logs require a flue or a chimney to exhaust the toxic carbon monoxide they produce. Many of these log sets burn gas that passes through sand beneath the logs. Often vermiculite and clumps of rock wool are placed over the sand. These elements produce the highly realistic glowing embers. Vented gas logs also are capable of consuming large amounts of gas. Some can ingest up to 90,000 Btus per hour! Unfortunately, 85 - 90 percent of this energy goes up the chimney. Fireplace dampers must be locked or clamped in the open position at all times.

Ventless gas logs are technological marvels. They have special burner elements that burn gas with minimal carbon monoxide production. Vent free gas logs certified by the American Gas Association (AGA) are equipped with oxygen depletion sensors (ODS). These devices sense when oxygen in the room drops to a certain percentage. If this occurs, the sensor shuts off the supply of gas to the logs. Defective sensors fail in the safe mode. They will not allow gas to pass to the logs.

Ventless gas logs burn less gas than their big brothers. They are only permitted to burn a maximum of 40,000 BTU's per hour. However, since your fireplace flue is closed or non existent, all of this energy is released into your house. During a power outage, these appliances can be used as a temporary heat source.

All gas logs have the capability of producing huge amounts of water vapor. 1.5 gallons of water is produced for every 100,000 BTU's of gas burned. This massive amount of water can condense on cold chimney flue walls and drip into your fireplace. In the case of vent free logs, this water vapor can condense on windows and any other cold surfaces. Should you install these in a newer air-tight home, you may create severe moisture problems in your attic and in exterior wall cavities.

Certain states prohibit the sale and/or use of ventless gas logs: Alaska, California, Massachusetts, Minnesota, Montana, New York, Utah, and Colorado (30 counties permit their use). Certain other municipalities in other states may also prohibit their use. Check with your local building department prior to purchasing your set. Have your chimney professionally inspected and cleaned prior to any installation. Look for the AGA seal on all products. Follow manufacturer's instructions to the letter!

Bathroom and Kitchen Ventilation Fans

DEAR TIM: What appears to be a roof leak has developed in the ceiling of my 5 x 7 foot bathroom. A professional inspection of the roof revealed no problems. I looked into the attic and noticed that the bath ventilation fan pipe simply discharges air near a roof vent. The noisy fan doesn't seem to move that much air. Could this be a problem? How can it be corrected? F.E.

DEAR F. E.: Your bathroom fan is very likely the cause of your wet ceiling. My guess is that this problem became noticeable when the outdoor and attic temperature began to drop. Moist, humid air from bath activities was exhausted into your attic. This water vapor then condensed on the cold surfaces (rafters, roof sheathing, exposed nails) in the attic space. This condensed water dripped onto your ceiling and produced the phantom leak.

Bathroom ventilation is extremely important. Many people think that you need to simply exhaust the steam from hot showers or baths and unpleasant odors. Residual surface moisture on towels, carpeting, wash rags, and shower walls can significantly raise the humidity level in a bathroom after you have dressed and left the house. This moisture can be removed by controlling the bathroom fan with a humidistat rather than a standard on and off switch. The humidistat will automatically turn the fan off when the humidity has dropped to a satisfactory level.

The moist, humid air from bathrooms and kitchens must be ducted to the exterior of a house. This ducting can be achieved through an exterior wall, a soffit or eave, or the roof. Many fan manufacturers make special fittings that allow you to extend ductwork to the exterior of your house.


I have found that it is often best to vent fans and dryers through the roof. I urge you to watch this video of mine to see how easy it is to install the correct vent-cap flashing on a roof. Have no fear - if done right you will have no leaks.

Your existing fan may not be moving enough air for several reasons: it's not sized properly, the exhaust pipe is too long, sized improperly, or is obstructed, or the fan is simply worn out. Many of these things you can check.

Fans are sized depending upon how many cubic feet of air they can move each minute at a given pressure (static pressure). This quantity of air is often expressed as cubic feet per minute (CFM). The Home Ventilating Institute recommends that bathroom air be totally replaced a minimum of 8 times per hour. Kitchens require a minimum of 15 air replacements per hour.

Your bathroom contains 280 cubic feet of air (5x7x8). Using the above recommendation, you need to exhaust 2,240 CF in an hour (280x8). Purchasing a fan with a capacity of 37 CFM will meet this minimum standard (2,240 / 60).

It is vitally important to follow manufacturer's instructions regarding exhaust ducting. If you use the proper size duct pipe, minimize bends, tape all joints, and exhaust your fan to the exterior, you should have a dry ceiling in the future.

Paul had an issue with water dripping from his bathroom fan. Click to read about his issue in the January 10, 2010 Newsletter.

DIY Wood Window Replacement Kits

marvin tilt pak

These window sashes have a vintage look and they can replace older double-hung windows. The windows are custom made to fit the opening and two side jamb liners are sent with the kit. These are Marvin and I've installed hundreds of these in older homes not harming the exterior or interior woodwork trim. Copyright 2019 Tim Carter

DEAR TIM: I live in a beautiful old home that has drafty double hung wood windows. I am really interested in the new high performance windows. However, I don't wish to alter the appearance of my grand old home. Is there a window replacement alternative that will work for me? I have changed window ropes before. Do you think I can install these myself? C.T.

DEAR C.T.: This is your lucky day! Not only is there a wide range of high performance wood products from which to choose, but many of them can also be installed by you. You will need a several standard hand tools and a little patience. I have installed hundreds of these products with great success.

The beauty and architectural integrity of your home will not be compromised. All of the interior and exterior trim around your windows will not be harmed. The only things that need to be removed in most cases are the actual windows themselves and the narrow parting strip between each sash.

Several of the major wood window manufacturers offer replacement kits that are custom made for each of your window openings. As long as your measurements are accurate and your openings are square, you can install many of these products in less than 1 hour.

These replacement kits offer, in almost all cases, all of the same options as you would find in a new window. You have your choice of glass options, different species of wood, authentic divided lites, bare or primed wood, aluminum clad, etc. In fact, you can actually order different options for top and bottom sash. For example, many older homes often had a two pane divided lite window for the top sash and a clear window for the lower sash. You can duplicate your existing sashes in almost every instance.


Buy the right replacement windows with the help of my Window Replacement Checklist. I offer a 100% Money Back Guarantee.


Installation of these products is really quite simple. Virtually all work can be done from inside your home. Because you have successfully replaced broken sash cords, this project should be a no brainer. Gently remove the sash stop moldings that hold the bottom sash in its track. Remove the sashes, parting strip, cut the sash cords and remove the metal pulleys. Now for the fun part.

Most kits have metal clips that hold the new side jambs in place. These vinyl jambs replace the old sash cords and metal weights. The are exactly the same product used in the new windows. These jambs insure a snug fit to eliminate the draft you now feel. Once the clips are in place you simply snap in the new jamb liners and install the new windows. Often the kits require the installation of a small piece of weatherstripping near the top sash.

If you want to really make the job go smoothly, consider finishing the windows (painting & staining) before they are installed. Don't discard the old sashes. Many salvage companies will buy them from you. They often sell them to people who need replacement sashes or who need old glass for historic restoration projects.

Vinyl Siding Information

DEAR TIM: The wood siding on our 70-year-old house needs to be painted, again. I have mentioned to my husband that vinyl siding might be a better alternative. He tells me that the siding will not last more than 10 -15 years. He also would like to paint the house in the original period colors. If I prevail in this decision and the vinyl siding performs poorly, I will never hear the end of it. I need your advice. Would you install vinyl siding? A. D.

DEAR A. D.: What is it worth to you to keep your husband's lips tightly sealed for the rest of his life? If you take the time to select a high-quality vinyl siding, you will have peace and quiet for a very long time. Vinyl siding has come a long way in a very short period of time. It is a great product.

Vinyl siding is a better alternative to painting for any number of reasons. Because of the age of your house, there is a 90 percent chance that there is lead in some of the original paint layers. If you decide to paint your house again, scraping and sanding of the old paint could create toxic lead dust. Paint chips containing lead can contaminate the soil around your house.

To keep a wood siding finish looking like new, it may require repainting every four years or so. Depending upon its size, you may spend in excess of $30,000 in the next 20 years repainting your home. High quality vinyl siding, on the other hand, will require simple periodic cleanings.


Installing vinyl siding on your house? Find the best professionals by using my Vinyl Siding Checklist. I offer a 100% Money Back Guarantee.


Vinyl siding, when installed with half-inch insulation board, can actually help insulate your house. This could produce up to an 11 percent savings annually on your heating bills. You will actually recapture part of the installation cost by using foam insulation beneath new vinyl siding.

The magical performance characteristics of vinyl siding are based in its formulation. All vinyl sidings are made from polyvinyl chloride (PVC) resins. Flexible acrylic resins are often added to make sure the siding doesn't become brittle. Vinyl siding exposed to cold weather, hail storms, or baseballs needs this flexibility.

Ultraviolet (UV) light will break down vinyl siding. Without adequate protection, low-quality vinyl sidings will suffer from severe chalking and color fade. Virtually every vinyl siding has UV inhibitors, but some have more than others. At least one manufacturer has gone a step further. They add an additional layer of sun screen UV protection on the surface of the vinyl.

Recreating the period colors of your house should not be too difficult. Several vinyl-siding manufacturers have developed color coordinated product lines. These products allow you to mix and match different colors, many of which may duplicate your period house colors. Vinyl manufacturers have gone to great detail to recreate period accent pieces such as columns, fancy cut shakes, and dentil moldings. With minimal effort, you can make your Victorian style home look like the grand lady that she is.

Author's Notes:

The Vinyl Siding Institute has a voluntary certification program for vinyl siding manufacturers. Those manufacturers who want to prove to you that they indeed make a quality product now have a mechanism to do just that.

If you want to find out more about the certification program and manufacturers who participate, visit the Vinyl Siding Institute's website.

Light Bulbs and Color Temperature

peace app color bulb

Color Temperature and Light Bulbs | A light bulb can be made to look any color, but even when it seems like it's creating just WHITE light, it can create odd colors in your home.

Color Temperature - The Sun Creates Perfect Color

DEAR TIM: I was recently involved in a dispute between a paint store and a carpet store. We attempted to match expensive wallpaper with carpeting. In the showrooms, everything looked fine. In my house, the colors are not right. The colors even change in daylight. What in the world is going on? The problem is not in the dyes. Could the problem be in my eyes? V. E.

DEAR V. E.: I don't think the problem is in your eyes. Believe it or not, the problem most likely has its source in the light bulbs used at the wallpaper and carpet stores as well as your house. Light bulbs, both fluorescent and incandescent, can affect the color rendition of an object. A simple bulb change at your house may solve this complicated problem.

Light Bulbs Produce Different Colors

Different light bulbs actually produce different colored light. This color is often referred to as the bulb's color temperature. It is actually measured in degrees on the Kelvin (K) scale. Heat an object sufficiently and it will give off light. As the object gets hotter its color will change and imitate a rainbow. First, it glows a cherry red. Further heating causes it to glow orange, yellow, white, and eventually blue. You can demonstrate this, to a degree, with an electric stove burner. You absolutely can see this if you heat a piece of steel in a blacksmith's forge. Steel can go from cherry-red to white-hot just before it melts

Cool and Warm Bulbs

Quite possibly you are familiar with traditional cool white and warm white fluorescent light bulbs. The words cool and warm refer to the feeling that the light produces. The warm fluorescent bulb produces a reddish orange warm light (3,000 degrees K). A cool white fluorescent bulb burns with a bluish tint similar to ice. Its color temperature is very nearly 4,100 degrees K. In comparison, a regular incandescent bulb produces light at 2,750 degrees K. It just so happens that human skin looks best at that color temperature.

Color Changes During the Day

To make matters even more confusing, the color temperature of natural sunlight changes through the day. In the morning and at sunset, natural sunlight is in the 2,500 - 3000 degree K range. That is why the Grand Canyon and fall trees look so brilliant in the morning and afternoon sun. Conversely, at high noon, normal sunlight is very near 6,000 degrees K. That is why evergreen trees (green) and water (blue) look so good in brilliant sunlight.

More Confusion - Color Rendering Index

It gets worse. Two bulbs that burn in the same temperature range can produce yet different colors! This is especially true in fluorescent bulbs. Back in the 1930s, lighting experts created a color rendering index (CRI) to compare how a bulb affects the true color of an object. The scale goes from 0 to 100. Bulbs with a high rating on the scale (80 or above) produce excellent color rendition.

Look at the Bulb Label

Legislation that went into effect November 1, 1995 was created to help you with this color issue. Light bulb manufacturers are now required to produce fluorescent and some common residential reflector incandescent bulbs that meet minimum Federal efficiency and/or CRI requirements.  Look at the bulb labels for information that will allow you to easily determine how well a light bulb will perform. Good luck!

Piering Foundations – Lifting and Pushing

DEAR TIM: My old house has started to develop cracks in the foundation and brickwork. The cracks in the brickwork look like steps. Are these settlement cracks? Why would it take so many years for these to suddenly appear? The clay soil in my area seems very stable. Is there a way to stabilize the foundation to stop further damage? R. T.

DEAR R.T.: Your photos clearly indicate that a portion of your foundation has dropped. The reasons for failure are numerous. For example, the ground beneath the foundation could be eroding, the soil could have softened, fill dirt could have finally compressed, or a portion of your foundation could have actually heaved. In your case, however, I believe that your clay soil is to blame.

I consulted the county soil map which I received from your county agricultural agent. The map clearly shows that the clay soil beneath your house has significant shrink / swell capabilities. Certain clay soils respond dramatically to changes in moisture content. For example, have you ever seen huge cracks in a dried mud puddle? That shrinkage not only occurs sideways, but up and down as well.

The cause for this moisture loss may be two fold. I believe that your region suffered from a severe drought during the past two years. In addition, I noticed a large oak tree near the failed portion of your foundation. This tree most probably sucked water from deep within the soil to compensate for the drought. If you would have created some artificial rain with a sprinkler, you possibly could have prevented the cracks.

You may be able to lift the failed portion of your house with some water. You can start to water the ground outside of your house around the failed portion of the foundation. Water the soil as frequently as you can. You may begin to see a change within several weeks or months.

Foundations that suffer from other forms of settlement can be repaired using several methods: underpinning, steel pipe piers with support brackets, or helical piers. Underpinning a foundation usually involves digging beneath a failed portion of foundation until firm soil is reached. Concrete is poured into this excavation to resupport the foundation.

The steel pipe piers employ friction to support foundations. Small (3 - 4 inch) diameter pipes are driven deep into the soil. They encounter increasing resistance as they penetrate the ground. Once in place a bracket is attached that cradles your foundation. Often this cradle is ratcheted up the pipes to lift your foundation to its original position. Helical piers work in almost an identical fashion. They are basically giant screws that are twisted into the soil until they hit firm soil. Once in place a bracket is attached to the pier. This bracket can be used to lift and resupport the failed foundation.

If you decide to use one of these methods, consider consulting a licensed structural engineer. Using piers under one portion of your foundation may cause cracking at other areas in your foundation. The engineer will develop a plan that should stabilize your sagging foundation.

Indoor Humidity – How Much Is Needed

condensation on mirror

Indoor Humidity | This is normal condensation on a mirror. Water vapor in the air has transformed into liquid water on the COOLER mirror surface. The same fog is FORMING on your walls and you DON'T SEE IT because of the paint on the walls. Too much humidity in a house can lead to serious mold and mildew issues.

Indoor Humidity - You Need Just Enough

DEAR TIM: My house seems to require more humidity in the winter than my neighbor's house. Both houses are the same age, size, style, and use identical heating and humidification equipment. I constantly get zotted by static electricity at my house but not at my neighbor's house. Our humidistats and thermostats are set identically. Both have been calibrated and are functioning properly, but my heating bills are higher. The weatherperson on TV reports relative humidity readings in excess of 70 percent daily. What is going on? I. S.

DEAR I. S.: So, those fingertips are a little tender? Well, I may be able to help you and save you some money at the same time. There are several things that may be happening in your situation. More than one thing could be wrong. Let's start with the easy things.

Should I Check My Humidifier?

Let's check your humidifier first. Make sure that the water supply to the humidifier is turned on and that water actually flows into your humidifier. Some humidifiers have a small plastic flow restrictor at the end of the water tube as it enters the humidifier. This restrictor has a very tiny hole through which the water flows. If obstructed, this could be the source of your problem. I have had trouble in the past with this restriction on my own humidifier.

Can You Explain Attic Insulation and Humidity to Me?

Yes, I can explain attic insulation and humidity in this LIVE stream video broadcast I did. Watch it:

Do Humidifiers Get Clogged?

The water transfer pads or media inside the humidifier may be clogged with mineral deposits. If this is the case, cleaning or replacing them should solve the problem. Often these pads can be reused by allowing them to soak in warm vinegar. The acidic vinegar dissolves the mineral deposits. You may need to let it soak overnight and repeat the process to remove heavy mineral buildup.

Can Dry Outside Air Lower Indoor Humidity?

If your humidifier is working properly and you still have lower indoor relative humidity than your neighbor, it is a sign of a more serious problem. Your higher heating bills may be the clue. I feel that your humid air is leaking out of your house and being replaced by drier, outside air.

Can Cold Air Hold More Water Vapor Than Warm Air?

Don't be fooled by the weather reports. As the temperature of the outside air drops, it can hold much less moisture. The relative humidity of cold outside air may well be 70 - 80 percent. Bring this air inside, heat it to 72 degrees, and the relative humidity of that same air drops to 2 percent!

Are Air Leaks Serious?

Houses often have hidden air leaks. You can discover more about air leaks in homes here. Seal any and all areas where you feel cold air entering your house. If you feel cold air entering, it is a sure sign that humid, warm air is escaping. If you can inspect your attic, look for places where pipes and wires penetrate the attic from below. Quite possibly these penetrations are not sealed. Look for these same penetrations in your basement ceiling. Often, electricians and plumbers create open chimneys within exterior and interior walls when they install their wires and pipes.

What is the Best Indoor Humidity Setting?

Once you locate the leaks, adjust your humidifier to a minimal setting of about 45-50% humidity. Remember, humidity is a moving target as it depends on what temperature the air is inside your home. Most normal household activities (bathing, breathing, cooking, etc.) produce adequate indoor humidity. Don't overdo it!

Can Tim Carter Call Me to Help?

Yes, Tim can call you. CLICK or TAP HERE to set up a fast phone call.

Cold Weather Concrete Installation

thermal blanket concrete cold weather

This worker is using a waterproof insulating blanket to cover a freshly poured footer. The heat produced by the chemical reaction of hydration within the concrete will be retained within the concrete by using the blanket.

DEAR TIM: Last winter I had a new concrete driveway and sidewalk installed. Months later the finish began to scale off and spall. The concrete finisher is blaming the concrete supplier. The concrete supplier says the mix was fine. I'm stuck in the middle. What do you think happened? Could my problem have been prevented? Was it a mistake to pour concrete in cold weather? E. G.

DEAR E. G.: If I was a betting man, I'd place my money on the concrete supplier's statement. In all probability, your spalling concrete is a workmanship issue. You need to recreate the events and weather conditions at the time of the pour and ask your concrete finisher some hard questions. Your local branch of the National Weather Service can provide you with excellent weather data for this time period.

First of all, let's define cold weather with respect to concrete. As stated in ACI 306 (American Concrete Institute Code), the definition of cold-weather is “a period when for more than 3 successive days, the average daily air temperature drops below 5°C (40°F) and stays below 10°C (50°F) for more than one-half of any 24 hour period.” Cold weather can have a detrimental affect on concrete for several reasons.

Concrete is an interesting material. It transforms magically from a liquid to a solid material chemically. The speed of the reaction depends upon the temperature of the concrete. When it's hot outside, the reaction proceeds quickly. When it is cold, the reaction slows down. Herein lies the problem. The concrete needs to harden as rapidly as possible to resist pressures caused by water which may freeze within the concrete.


Want perfect concrete work? Find a pro by using my Concrete Work (Sidewalks, Driveways, Patios & Steps) Checklist. I offer a 100% Money Back Guarantee.


In your case several things may have happened. The concrete may not have attained a minimum strength (500 PSI) soon enough to resist the effects of freezing temperatures. Was your concrete protected with insulated blankets after it was poured? If not, it may have cooled too rapidly, slowing the chemical reaction.

Poor finishing techniques may have doomed your slabs. Freshly poured concrete often bleeds. The water in the mix floats to the top, as it is the lightest ingredient. Floating or troweling this water into the concrete weakens the top layer. Troweling the concrete too early can seal this bleed water just below the surface as well. If your slab was then exposed to freezing temperatures several days later, this water could have frozen and fractured the top layer.

Concrete can be successfully poured in cold weather. Several precautions need to be taken. Never pour concrete on frozen ground, snow or ice. Be sure to order air-entrained concrete. Request a heated mix or order 100 lbs of extra cement for each cubic yard of concrete. This extra cement helps develop early strength. Be sure the concrete is ordered with a low slump (drier mix). This minimizes bleed water. After the final finish is completed, cover the concrete with plastic and insulated blankets. The plastic will cure the concrete. Finally after 7 - 10 days, remove the plastic and allow the concrete to air dry before exposing it to freezing temperatures.