Construction Photography – Benefits

DEAR TIM: I'm about to have some reroofing work performed. I would like to be able to see the condition of my roof boards after the old roofing is removed. However, I am afraid to climb ladders. Do you think it is unreasonable for me to ask the roofers to take pictures of the work they are doing? Do you have any other suggestions concerning construction photography? D. I.

DEAR D.I.: I think your photography idea is fantastic. I have hundreds of photographs that I shot on many of my past jobs. Often these photos saved me money by proving that I performed certain tasks. In your case, they can lessen your anxiety concerning the sound condition of your wood roof deck.

The only problem I see in your case is timing. Often roofers feel the need for speed. They have anxiety about raindrops. You may need to use an instant photography camera. This will allow them to uncover a portion of the roof and immediately photograph it. By the time they climb down the ladder, you will be able to view the photo.

Why not ask them to photograph their work in progress as well. For example, suggest they photograph all flashing details as the roof is being installed. Take close up before and after photographs of chimney flashings. The 'after' photos will tell you how well the flashings were installed. You will be able to see the soldered corners and the fresh mortar in the brickwork.

On full scale new construction or remodeling jobs, photography is a must. These projects allow you to make use of conventional, instant, and video camera photography methods. If you decide to pursue such a project, carry your camera(s) with you each time you visit the job site. Take photos of all walls, floors, window and door installations, and other work in progress.

Consider taking photographs standing at the same spot on a daily or weekly basis. When viewed in sequence it will appear that your house or room addition bloomed like a flower. Use a video camera to capture high energy activity such as the foundation being excavated by heavy equipment. Concrete trucks that spin their drums while pouring the foundation also make for great action shots you may wish to capture.

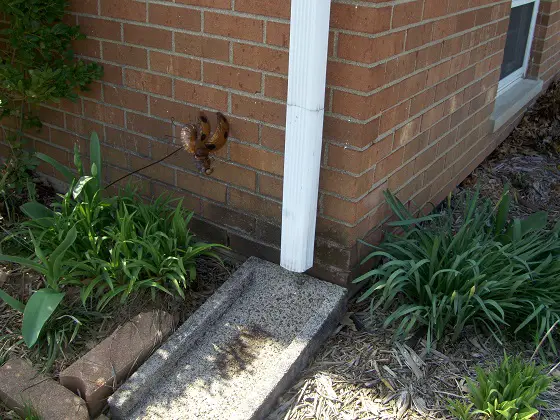
Photographing all aspects of the job may help provide clues for future problems. For example, what happens if the drywall installers cover a wall plug? Your photos of the walls just prior to drywalling will tell you the exact location of the covered plug. I always took numerous shots of utility and downspout trenches before the dirt was backfilled. By taking numerous photos from different angles, you can locate quite accurately underground pipes at a future date.

Construction photographs, especially those with the date and time imprinted on them, may prove useful in the event of a work slowdown. You can document daily progress, or the lack thereof, with photographs. O.K. say cheese everybody!


High-Quality Vapor Retarders

vapor barrier

This is the special vapor barrier that meets the ASTM standard.

DEAR TIM: My room addition is built over a crawl space. The air in our family room always smells musty. The foundation vents are open. The uncovered dirt in the crawl space seems very dry. We have no roof leaks or moisture in the exterior walls. What is causing the smell? O. R.

DEAR O. R.: Do you know the location of all of your teenager's socks? No, seriously, the musty smell in your family room can be traced directly to the uncovered dirt in your crawl space. The dry upper layer of dirt is creating an illusion.

Massive amounts of water are constantly being pulled to the surface beneath your crawl space. This process occurs 24 hours a day, 7 days a week. Just below the surface of the dirt, this water turns into water vapor. Water vapor is attracted to warm air. The air in your family room is almost always warmer than the air in your crawl space. The floor insulation and wood flooring do little or nothing to stop the water vapor in its constant pursuit of heat.

The only effective way to stop this water vapor migration is to properly install a high performance vapor barrier. Many builders, remodelers, and homeowners commonly mistake low density polyethylene plastic ( 4 or 6 mil poly) as being a high performance product. This material is often used in crawl spaces, beneath concrete slabs, or as a vapor barrier on exterior walls.

Often this product is manufactured using reprocessed plastic resins, scrap polyethylene, and fillers. The quality is sometimes inconsistent. Certain alkaline chemicals in soils can actually degrade the material. Small pin holes can exist in brand new material.

A better choice might be to use a high density cross laminated polyethylene vapor barrier. These products often are formulated from high quality virgin polyethylene. They are extremely resistant to punctures and tears. The high quality vinyl resists alkaline soils as well. They also do a much better job of stopping water vapor.

Installation of crawl space vapor barriers is not an easy task. All seams must overlap a minimum of 12 inches and be sealed with a special pressure sensitive tape. The vapor barrier must lap up onto the side walls of the crawl space. Here it should be caulked and attached tightly to the side foundation walls. Use three quarter inch furring strips and masonry nails for this job.

All objects (pipes, columns, masonry piers, etc.) that are sprouting from the soil beneath your crawl space require special attention. The vapor barrier must be carefully cut around these objects and sealed with pressure sensitive tape.

Prior to installing the vapor barrier, be sure the soil is smooth and free from all sharp objects. As you work on top of the material installing it, these sharp objects may tear or puncture the vapor barrier. These punctures or tears will allow water vapor to escape into the crawl space.


Author's Notes:

I received this email from Michael P, Cincinnati, OH. Here's how he helped with his crawl space problem.

"I live in Turpin Hills and wanted to thank you for your advice for sealing a crawl space. This is our third winter in our home and the basement is always much colder than previous basements from other homes. I did as you suggested and put heavy duty, thick plastic on the gravel and put doors on the opening of the crawl space. It's been a few weeks and I can see water droplets forming under the plastic. I may put a second layer of plastic for good measure. The basement is warmer and so is the room above the crawl space. I don't smell the mustiness either. Thanks again for the tip."


Smoke Free Masonry Chimneys

wood-burning fireplace

This is my own wood-burning fireplace. The firebox is built to exact standards including the hidden smoke chamber directly behind the wood mantle.

DEAR TIM: My husband and I just moved into a new home with a masonry fireplace. We started a fire and smoke rolled into the room. We checked the chimney for blockages and found none. The damper was wide open as well. What could be the problem? Our fireplace is three feet wide. Is that too small? Can you see anything else in my photos? E.G.

DEAR E. G.: Tell me, did your home construction contract include a strong warranty? You're going to need it. Your photos clearly show several major problems with your fireplace design and construction that are contributing to your smoking problem.

The combustion of wood in a fireplace is very complex. The exhausting of smoke and toxic gases from the fireplace is controlled by three major factors: air pressure, temperature difference between inside and outside air, and the fuel combustion process. Improper design and/or sizing of the firebox, smoke chamber, and your chimney can cause an imbalance which will lead to a smoking fireplace.

Believe it or not, the actual fireplace opening (width and height) controls the size and shape of the firebox, the flue, and the height of the chimney. The width of the fireplace opening controls all other dimensions. This dimension is a function of the size of the room in which the fireplace sits. It is all very complicated. Fortunately, years of trial and error have produced very successful designs and size proportions for smoke free masonry fireplaces.

Several problems are obvious in your photographs. The height of your fireplace opening is too tall in relationship to the 36 inch width of the opening. Furthermore, your firebox appears to be too shallow. This puts the fire too close to the fireplace opening and your room.

Your three foot wide fireplace opening should only be 29 inches tall. The firebox depth should be 16 inches. This depth does not include the thickness of the decorative brick which faces your fireplace. The distance from the floor of the fireplace to the bottom of the damper should be 37 inches. The smoke chamber, the area between the damper and the first flue liner, needs to be a minimum of 27 inches high.

Speaking of flue liners, I think the mason installed one that is too large. In your case, it should have inside dimensions of very nearly 10 inches by 14 inches. Smoke has to push the heavy, cold air up and out of the chimney. An oversize flue liner can make this a difficult process. What's more, my tables indicate that the minimum height for your chimney should be 21.5 feet. That measurement is taken from the top of the last flue liner to the floor of the fireplace.

As much as I hate to say it, I'm afraid that your entire fireplace and chimney need to be reconstructed. The two week process will be long forgotten after the smoke clears.

Interior Doors Changeover Project

DEAR TIM: My house was constructed in the early 1960's. The interior is quite plain looking. All of the interior doors are smooth hollow core painted slabs. I was thinking of installing new decorative paneled pre hung doors. However, I hesitate to do this because the frames and door trim are in excellent condition. My doors fit perfectly in each frame. Is there an easy way to simply change out each door? How would you do it? S. T.

DEAR S. T.: Talk about an excellent indoor project for a serious do-it-yourselfer, this is it! The simple process of changing out interior doors can make a dramatic difference on the inside appearance of your home. Many of my past clients were delighted with the look and feel of their new doors.

During the past five years, interior door manufacturers have expanded the styles and options of interior doors. Numerous styles are available that allow you to match virtually any architectural style or time period. Many of the doors can be purchased as solid or hollow core units. Some home center stores have specialized door machines that will actually machine a new door of any style to match your existing doors. If you can locate such a machine, you can change all of your doors in less than a day!

If not, you will need a router, drill, hole saw, spade bit, wood chisel, and various screwdrivers in order to tackle this project. The hard work has already been done by the carpenter or mill that hung your original doors. You simply need to create hinge mortises (recessed slots) and door knob holes in precise locations on the new door. To accomplish this, you are going to use the old door as a template.

Using a pencil, write lightly on each new door its intended location. Now, go through the house and do the same thing on the existing doors. While you are at each existing door, write in bold letters the word TOP on each side of the door. Don't guess where doors go or came from, you will get confused!

Remove an existing door from its frame. Strip the door of its hinges, doorknob, and latch. Stand this door on edge with the old hinge locations pointing up. Slide the new replacement door next to the old door being careful that the top of both doors are pointing in the same direction and flush with one another! Using a square and a sharp pencil, transfer the old hinge locations onto the edge of the new door. Use the hinge to create the shape of the mortise. Adjust the router depth and get to work.

After the hinges are complete, recreate the door knob holes using the same transfer process. However, if you intend to purchase new decorative door knobs let me share a secret. Consider purchasing knobs that have a two and three-quarter inch back set. This is three-eighths of an inch larger than most standard knobs. Your knuckles are less likely to rub against the door frame with this measurement.

Downspout Drain Lines

down spouts downspouts

Drain tiles can stop soil erosion under downspouts. PHOTO CREDIT: Roger Henthorn

DEAR TIM: I purchased some splash blocks to set on the ground immediately below my down spouts. My wife thinks they are useless. I feel that they help divert water away from my foundation and water her gardens at the same time. She thinks that the roof water and my basement sump pump water should be piped away from the house. What do you think? T. E.

DEAR T. E.: Well (no pun intended)... I think I have to side with your wife on this one. The splash blocks are not entirely useless, however. They can effectively control erosion of the soil. The blocks can absorb some of the energy of the moving water before it hits the soil.

Rainwater that drains onto soil near your home is generally not a problem if you have sandy or very well drained soil. However, a large portion of the USA does not have well drained soil. Many of us (including myself) live in regions that have clay rich soils. Clay soils don't always drain that well. Basements and crawlspaces can become indoor swimming pools in periods of heavy rainfall or sustained wet spells.

Many people do not realize just how much rain falls from the sky in a moderate rainfall. For sake of discussion, let's consider a normal ranch house that has an attached two car garage. If the structure measures 30 feet by 66 feet and has a 2 foot roof overhang, there is 2,380 square feet of roof ready and waiting to catch rain drops.

A moderate 1 inch rainfall will generate 1,483 gallons of water on this roof. This water will hit your splash blocks and enter the soil about 30 inches away from your foundation. If your region receives 40 inches of rainfall a year, you will inject about 59,320 gallons of water into your wife's gardens. That might be a little overkill, don't you think?

If your foundation is currently leak proof, your sump probably accepts a good portion of this water. If the sump pump discharge pipe merely dumps the water along side your house, you end up recirculating this same water time and time again. This wastes electricity and leads to premature pump failure.

I feel that your storm water and sump water should be piped away from your house. Some urban areas allow this water to be connected to public storm sewers and water retention basins. If this is not available, pipe the water to the lowest portion of your lot where it would have drained naturally before your house was built.

Consider using SDR 35 or Schedule 40 PVC plumbing drainage pipe for this job. Install 4 inch diameter pipes in all locations. Use 90 degree elbows only at the base of down spouts. Use 45 degree fittings to change direction in all underground work. Before you bury the pipes, take photos of their locations. These will come in useful as your wife's gardens expand.

Column 112

Crawl Space vs. Full Foundation

DEAR TIM: My husband and I are having a large (24x18 feet) room addition built. Our house has a full basement. Our builder says the cost to upgrade from a crawl space to a full basement under the room addition is prohibitively expensive. Is this true? How would the two basements be connected? What could be done to waterproof the new foundation? P. A.

DEAR P. A.: I don't know if I necessarily agree with your builder. Yes, there is extra cost involved to turn your proposed crawl space into a basement. However, the added cost to create usable basement space is a worthwhile investment.

From a building standpoint not much has to be done to create this space. Your backhoe is already there to dig for the crawl space. He just needs to stay for an additional 4 - six hours. There is no up charge for the footer. Your foundation walls only need five or so extra feet of height. Add a concrete floor, foundation waterproofing, and an entry opening to this new basement and you are ready to play some ping pong!

I did a quick cost analysis. At current prices (1996) in my city, here is the cost breakdown to achieve the full basement:

  • extra excavation $250
  • extra foundation height $1,650
  • cut opening into old basement $380
  • concrete floor $1,050
  • foundation waterproofing $480

You get a $150 credit for the floor insulation you would have had for your crawl space. The total cost of the upgrade, less profit and overhead, would be $3,660.

That may seem like a large sum of money to many people. However, let's compare the cost of this usable space on a square foot basis. You only need to spend an additional $8.50 per square foot to get a basement. Compare this to the square foot cost of the room above. I'll bet that your contract price for the room addition is very nearly $45,000. If that is the case, you are paying a little more than $100.00 per square foot for the finished room space. The new basement is a huge value.

Many people who have abandoned cisterns have the capability to create similar spaces. In these cases they simply need to empty the cistern and cut an opening from the existing basement into the cistern. A special contractor uses a large water cooled concrete saw to create the opening. This can be done in my city for less than $400.

Your new foundation should be waterproofed if you intend to use it as a living space. Some companies can spray a modified asphalt that contains flexible compounds. Another process involves spraying a liquid rubber compound. Special panels containing an expansive clay can be used as well. All of these processes are designed to bridge or fill a crack in the foundation which may develop at a later date. They must all be used in conjunction with an excellent drain tile and gravel backfill system. Ordinary asphalt coatings are not waterproof. They will not bridge a crack in your foundation.

Hardwood Flooring

DEAR TIM: I have a hardwood floor in my home that is approximately six years old. Late each winter, tiny cracks appear between many of the boards. These cracks seem to disappear each summer. Also, I recently hosted a party. The narrow high heeled shoes one of my guests wore created depressions in the wood. Did I get a bad batch of wood? C.K.

DEAR C.K.: I don't think you are going to like my answer. My intuition tells me that your wood flooring is not defective. Your hardwood flooring is responding to seasonal swings in the relative humidity of the air.

Wood is a very interesting building material. It is hygroscopic. This means that when exposed to air, it will pick up or release moisture until it is in equilibrium to the current relative humidity. Anyone who owns white painted cabinetry or paneled doors has probably witnessed this phenomenon. The mitered corners of painted cabinets will develop hair line cracks. Door panels will crack the paint where they fit between the stiles and rails of a door.

To make matters worse, wood does not expand or contract equally in all directions. It moves the least along the grain of a piece of wood. It expands or contracts the greatest amount across the grain of the wood in a direction parallel to the growth rings. It just so happens that a majority of wood is sawn in this fashion. This method of sawing produces the least amount of waste from a log. Dimensional changes of 5 - 15 percent are not out of the question.

AsktheBuilder Podcast

CLICK this image and listen to the first call on the podcast. I talked to Jill about how to repair wood kitchen flooring, and possibly installing an inlay border as an option. Copyright 2018 Tim Carter

What do these numbers mean to your oak strip flooring? Some areas of the nation see significant changes in relative humidity from winter to summer. In your state, Minnesota, the moisture content of your hardwood floor can range from 5 percent in the winter months to 10 percent in the summer. That fluctuation in moisture content will cause a single two and one-quarter inch piece of oak flooring to shrink or swell 1/32 of an inch, the thickness of a worn dime.

Don't be fooled by the high quality layers of finish on your flooring. Most floor finishes do a substandard job of blocking water vapor. Not only that, your wood flooring can absorb moisture from its underside. If you want to eliminate this seasonal movement, you must maintain a constant level of humidity within your home.


Installing a new hardwood floor? Use my Hardwood Flooring Installation / Refinishing Checklist to avoid costly mistakes. I offer a 100% Money Back Guarantee.


The damage that your flooring received from the high heeled guest is very understandable. Hardwood flooring can be damaged by any concentrated pressure in excess of 1,000 pounds per square inch (PSI). If those high heels had a tip of only one-quarter inch and your guest weighed 130 pounds, each step she took exerted more than 2,000 PSI! Your floor would be in excellent shape had you invited elephants to your party. They only exert 75 PSI with each foot fall.

Column 114

Pneumatic Nailing Tools

pneumatic nailer

Pneumatic Nailer

DEAR TIM: I am on the fence deciding which remodeling contractor to choose. The one contractor uses pneumatic nailers for just about every task. The other company uses traditional hand nailing for all tasks. Is there a difference between the two methods? Are the air driven nails inferior? Is there an advantage to using pneumatic nailers? How do you drive your nails? A. R.

DEAR A. R.: I drive my nails to the jobsite in my truck. Ha Ha! Just kidding! To be honest, I have a wide assortment of pneumatic nailers. Several have served me without a breakdown for more than eight years. I still use my hammer as well for certain rough framing tasks, however.

The use of pneumatic nailers has grown significantly in both the new home construction and remodeling industries. The reasons are simple. Pneumatic nailers increase productivity and offer superior fastener withdrawal resistance when compared to certain hand driven nails. An average home may use up to 70,000 nails. Nail guns don't get tired like arms do.

Major tool manufacturers offer an extensive assortment of nail guns. Yes, I said guns. Pneumatic nailers fire sharp objects at high speeds. If used improperly, they can cause serious injury.

My collection of pneumatic nailers includes a framing tool that can shoot a three and one-half inch nail into a piece of solid oak. I also have a nail gun that can shoot a small one half inch brad for fine trim or cabinet work. My favorite gun is one that fires two inch finish nails into interior trim lumber.

Nails driven with pneumatic nailers are tough to remove. The nails are coated with a resin that performs two primary functions. The resin glues one nail to another much like a strip of common staples. When the nail gun fires, friction is produced as the nail enters the wood. The resulting heat melts the resin. The liquid resin acts as a lubricant. Within seconds the resin becomes solid once again. The nail is actually glued into the wood!

If you choose the remodeler who hammers everything by hand, your interior trim may have an occasional beauty mark where a hammer kisses your wood trim. Most customers find these dents objectionable. A nail set may also slip off the nail head and mar the trim. Pneumatic nailers, when adjusted properly, will not create blemishes. In fact, they drive and countersink the nail in one rapid motion.

There are some slight disadvantages when using these fine tools. For example, when nailing roof or flooring plywood it is virtually impossible to tell if a nail misses a joist or roof truss. You need to visually check the underside of the plywood to make sure each nail is buried in wood. Also, the electrogalvanized coating on exterior nails does not offer the same level of protection as a twice dipped hot galvanized nail. If you must use a pneumatic nailer for outside work, use stainless steel nails.

The above is an affiliate link. I get a tiny commission if you purchase this item from Amazon.

Slate Roofing – Repair or Replace?

DEAR TIM: My older home has a slate roof. Some of the pieces of slate have cracked and fallen. Entire pieces have come loose. The slate is very brittle. Is it time for my roof to be replaced? If not, why is the slate breaking and falling? In my attic you can see the bottom of the slate. Half of my roof boards are missing. Is this the cause of my problems? D. D.

DEAR D. D.: Brittle is good! If you had told me that your slate was soft and flaky like my favorite dinner rolls, you would have a major job ahead. Slate is one of the finest roofing materials available. It is fireproof, resists hail damage, possesses unquestionable beauty, and often has a service life of 100 years or more.

Prior to the development of asphalt roofing products, slate was a major player in the roofing products industry. Slate peaked in popularity at the turn of the century. The move away from steep roof slopes and less expensive roofing products have caused the slate roofing industry to shrink to one twentieth of its original size. Cost is a factor as well. New slate roofs can cost as much as $900 per square (100 square feet) installed! Compare that figure to say $60 per square for a standard asphalt shingle roof.

There are several possibilities why your slate is cracking and falling. Slate is a rigid natural stone product. Think of it as a piece of glass. If you stress a piece of glass, it usually cracks. Slate is no different.

Stress can be introduced to slate in several ways. The nails used to attach the individual pieces of slate are possibly to blame. They need to be fastened so that the slate merely hangs on the nail much like a picture on your wall. If the nail is pounded too tightly, it will pinch the slate. Should the nail stick slightly above the slate, the overlapping piece above may crack from this hidden pressure point. There is very little room for error.

The wood decking may be to blame. Wide swings in temperature and humidity cause your wood roof sheathing to expand and contract. This creates stresses on the slate. If the nails are in a bind, a corner may pop off and the slate will crack or fall.

The nails themselves may have failed. If a galvanized nail was used, it simply may have reached the end of its life. Nails, flashings, etc. used in conjunction with slate roofing should have the same service life as the slate itself. Copper nails and heavy gauge copper flashings are a must.

Slate can succumb to the forces of nature. Not all slate is created equal; quality can vary significantly. Acid rain and freezing temperatures can damage slate and shorten its life. It is important that slate dries as rapidly as possible after a rain. Your missing roof boards allow the slate to dry rapidly. Your roof was built this way on purpose.


Septic Tanks – How They Work

DEAR TIM: I recently purchased a home with a septic tank. Prior to this, all of my houses had public sewers. How in the world do these things work? Should I be concerned with what I put down my drains? What about maintenance, is it required? Bea S., Sugartown, PA

DEAR BEA: Don't worry about a thing, septic tanks are fairly common. Your household as well as approximately 25 million others in the USA rely on these simple, yet highly efficient systems to treat household wastewater. Septic systems, when designed, installed, and maintained properly do a fantastic job of protecting your family's health and that of the environment.

A typical household septic system consists of two major components: the septic tank and the drainfield. Wastewater from your house travels, in most cases, by gravity to the septic tank. The tank's main purpose is to detain the wastewater for 1 - 2 days. It uses this time to separate solids, greases, oils, and floating objects from the wastewater. Bacteria within the tank starts to attack and break down the waste immediately.

Although the bacteria does a good job, it can't eat everything. Septic tanks develop a layered look. Scum floats on the top, partially treated wastewater is in the middle, and sludge settles at the bottom.

After its 1 - 2 day stay, the partially treated wastewater leaves the tank. If everything is working right, virtually all of the solids have settled out of the water. The wastewater now heads for the drain field. This area is comprised of a series of interconnected pipes that lie in sand or gravel filled trenches. The pipes are perforated. The wastewater exits the perforations and enters the soil. The soil acts as a biological filter. Oxygen and organisms in the soil combine to break down any remaining toxins, bacteria, or viruses in the wastewater.

Septic tanks must be sized in accordance with the number of people in the household. Tanks with too little capacity allow the wastewater to enter the drain field too quickly. Solid particles that were supposed to settle into the tank are inadvertently carried into the drain field. These tiny solid particles can clog the sand, gravel and soil filters in the drain field. If this happens, your septic tank can backup and/or the drain field can become flooded with untreated wastewater. Both of these situations are unsanitary and pose serious health risks to you and the environment.

Click below to view Tim's video on the care of Septic Systems.

You can extend the life of your entire septic system by watching what you put into your drains and toilet. Minimize the introduction of solid particles and scum forming compounds. This means no food scraps, coffee grinds, sand, gravel, greases, oils, washing machine lint, etc. Beware of chemicals or solvents that will kill the helpful bacteria in your tank. Do not put pesticides, paints (even latex!), organic chemicals, paint thinner, etc. into your drains. Finally, have your septic system inspected annually and pumped clean on a regular basis. Remember, the sludge and scum must not be allowed to accumulate. If they enter the drain field, you will have an expensive repair bill.

The beneficial bacteria that break down waste inside the septic tank can be stimulated if they get a dose of oxygen every week or so. The oxygen enhances their growth and more bacteria simply means more rapid breakdown of waste particles. One of the best ways to accomplish this is to pour 4 ounces of powdered oxygen bleach into a toilet and flush it immediately. Do this two times a week and your septic system will silently thank you.

Author's Note: We've received other questions with similar problems or questions. Here's one from Howard Stein of Oklahoma City, OK, regarding his home septic system.

"We have ten inches of snow and the temperature is near zero Fahrenheit. It will stay like this for several days.  Is it safe to use our washing machine (doing regular laundry) in this frigid weather since we have a septic tank and fear that the "arms" cannot properly dispose of large volumes of water into the ground?  Many thanks for your help."

Howard, typically in most septic systems, the tank and drainage fields are located well below the frost line.

Message from Tim:

Years ago while researching a column about cleaning decks, I discovered the wonders of Oxygen Bleach. It is perhaps the 'greenest' cleaner I know of as it uses oxygen ions to break apart stains, dirt and odor molecules. There are no harsh chemicals, and it works on just about anything that is water washable.

I decided to create my own special blend using ingredients made in the USA. In fact, the raw materials in the active ingredient are food-grade quality registered with the FDA. I call my product Stain Solver. I urge you to use it to help maintain your septic system. You will be amazed at the results!