Podcast 4
Ask the Builder Podcast 4 Highlights:
- Robert has a cracked floor joist under his bathroom. He needs to fix it fast and easy. I've got the answer. (Featured March 25, 2018 Newsletter)
- Bob lives in rural upstate New York. He wonders about using chemicals on his lawn above his well. Lots of laughter!
- Sue has rotten 4x8 fake stucco panels on her home. I've got the magic epoxy repair product to solve the problem.
- Tim shares a story about his first general contracting job. The roof leaked and the wife shrieked! - NOTE: Transcript of this story below.
Podcast Sponsor: Stain Solver - Certified Organic Oxygen Bleach

Stain Solver is MADE in the USA with USA ingredients that are food-grade quality. CLICK THE IMAGE to order some NOW.
Home Improvement and Home Construction Podcast
Photos, Links and Great Stuff:
CALL 1: Robert's Cracked Floor Joist
Load Bearing Walls - How to Identify Them to Be Safe
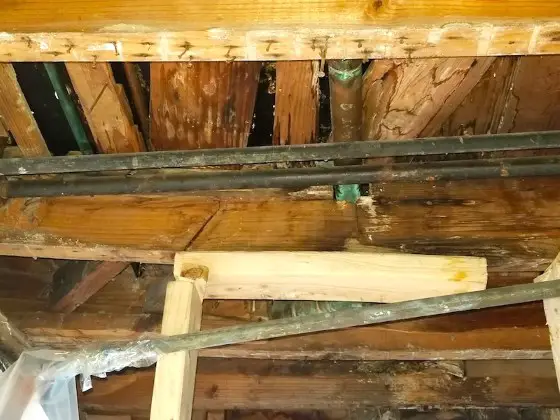
Robert's got a temporary support under the cracked floor joist. Copyright 2018 Tim Carter
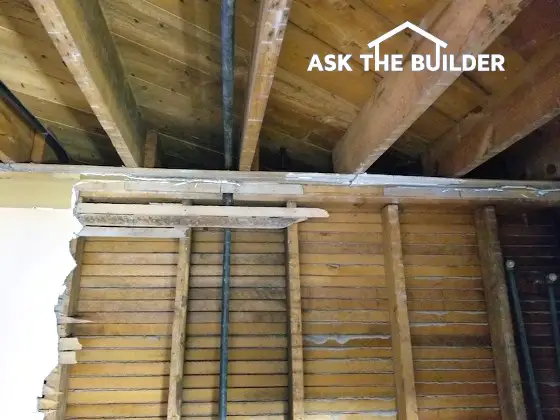
This is the wall in Robert's job. See how the wall studs are not lined up with the ceiling joists overhead? That's a framing mistake. Copyright 2018 Tim Carter
Call 2: Bob's Chemical Weed Killers, His Well & Organic Alternatives
Related Links:

This is the fertilizer Bob should use. CLICK the BAG to have it delivered to your home.
Call 3: Sue's Rotten 4x8 Fake Stucco Panels
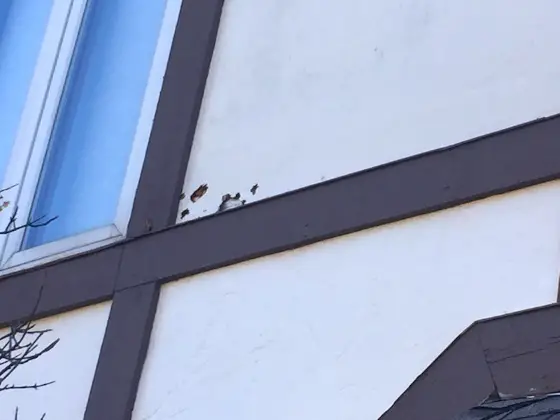
Those holes can be repaired permanently with PC Woody. WATCH the video just below to see how to use it. Copyright 2018 Tim Carter
Related Links:
CLICK HERE to ORDER the PC Woody Epoxy.
CLICK HERE to get FREE & FAST BIDS from local painters who can install PC Woody on your home.
Magic Wood Epoxy Repair Products - These Really Work!
Tim's First General Contracting Nightmare Story
I’d like to go back in time to when I built my first room addition. It’s a great example of you don’t know what you don’t know. The most fitting title to this story would be: Mystery Roof Leaks - They’re Easy to Locate If You Know Where to Look!
I can’t remember how I got the small job of building the tiny room addition. This small 80-square-foot addition was cobbled onto a simple Crest Home located in a sprawling subdivision in the Delhi suburb of western Cincinnati, Ohio. The room addition was on the right rear corner of the house and transformed the original medium-sized master bedroom into a very nice spacious room.
I was young, perhaps only twenty-seven years old. This room addition was my first venture as a general contractor where I hired subcontractors. I have to admit it didn’t go well right from the start.
You know that old saying, “When the cat’s away the mice will play.” In the contracting field we say, “When the GC’s a cub, the subs will flub.”
It’s important to realize a nice level and square foundation is required to make the job go smoothly from the get go. The foundation contractor I hired poured the footing out of level to start with. I mean really out of level. As best as I can remember, it was about four inches high at one corner.
When you install concrete block on an out-of-level footing, you can only try to correct so much of the mistake in seven courses of block. I should have been on the job site when the footing was poured, not working on my own home.
Fortunately the young carpenter I hired to do the wall and roof framing corrected this mistake. Looking back, I should have been there to supervise them when they laid the first course of block. I could have had my own builders level set up taking measurements trying to make the finished foundation height as close as possible to level. But I digress!
The plans for this small room addition called for a traditional triangular gable end on the rear wall that faced the backyard. Each side of the house had this same gable end. Most houses have this simple roof where one half slopes to the front and the other half slopes to the back.
When you add a room addition onto a home with this type of roof, you create two valleys where the addition roof starts to meet the existing roof at a 90-degree angle.
Roof valleys are very common. I’ve got ten of them on my existing home here in New Hampshire. Lots of rainwater can flow down a valley much as it might in real river valleys that have steep mountains rising up from the river bed.
It’s not hard to roof a valley. It’s just a matter of cutting the shingles at an angle. Some roofers don’t do any cuts at all as they weave the shingles together at the valley much like you might weave a basket.
But in Cincinnati, the local custom is to install a formed galvanized metal valley flashing and then cover most of the metal with the shingles. The shingles are trimmed so the cut is parallel with the centerline of the valley.
WATCH THIS VIDEO to see the exact valley I installed on the room addition:
I’ve got no memory at all of the roofers I hired to install the shingles. That makes perfect sense when one thinks about it. When you have a bad experience with anything, you tend to want to forget about it.
This room addition was being built in the horrid months of June and July. That particular summer was hot as Hades with humidity so high you felt like you hit a wall of water when you stepped outdoors. These weather conditions tend to breed vicious wind-driven thunderstorms in the Midwest.
I’ve got a crisp memory that the woman who I was working for knew I was wet behind the ears and let her husband know about it. He was much nicer to me and would always point out any and all mistakes like the tiny brown paint dots all over their white deck furniture.
These micro polka dots were not there the morning my painters were getting their spray-painter out of their truck. Their job was to paint the new aluminum siding to match the existing house siding.
The last week of the job a monster storm lashed the roof of my room addition. Think of the videos you see on TV when hurricanes strike. The rain was going sideways.
The room addition was complete, the inside was painted and their new bedroom furniture was in place. My phone rang as the storm was raging over in Delhi. It was just muggy on the other side of Cincinnati where I lived. When I answered the phone, the husband was on the line. In the background, I could hear the shrill voice of his wife screeching something.
“Tim, we have all sorts of water leaking onto our bed.”
I have no idea what I said, but I knew that I told him I’d take care of it.
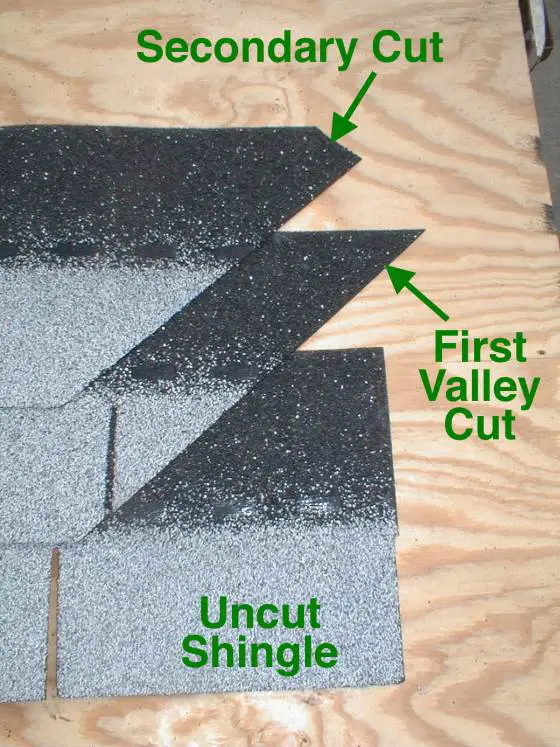
The bottom shingle is a regular one before being cut. The middle shingle has been cut so it runs parallel with the center of the valley. See the sharp tip? The top shingle has the second cut creating an arrow point so water runs down the valley and not up along the top edge of the shingle. Copyright 2018 Tim Carter
The next day I arrived at their house, set a ladder and climbed up onto the roof. Everything looked perfect. There were no missing shingles, no exposed nails and all the ridge shingles were in place.
I had no clue how the roof could be leaking. I called in an experienced roofer. He quickly made the repair so the roof would never leak again.
It turns out the idiot roofers I hired had not clipped off the sharp cut tip at the top of the shingles where they terminate in the middle of the valley flashing. (CLICK HERE to see how to make the correct cut.)
If you don’t cut off this tip so it creates an arrow point, the wind-driven rain catches the top edge of the shingle and is driven back under the shingles by the wind only to find a way into the house. CLICK HERE to see the way to make this cut.
As with many construction mistakes, you tend to only make them one time if you end up staying in business. That simple step of clipping the tip of the shingles only takes seconds, but if you don’t know it needs to be done, you don’t do it or you don’t know to inspect to see if it was done.
What’s your takeaway? Don’t hope something’s going to be done right by others. If you don’t know how something should be done, then by gosh discover how. It’s never been easier than it is now with so much great information online.
Always read the installation instructions for whatever products are going to be installed at your home. Then do whatever you need to do to ensure the contractors don’t flub up like my subs did!
Never forget - Do It Right, Not Over!
Subscribe to the AsktheBuilder Podcast