Vessel Sink Drain
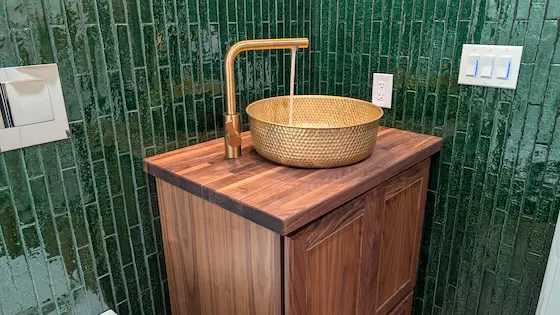
This solid-brass vessel sink is installed on a solid walnut butcher block top. The crackled green subway tile walls create a dramatic look. Copyright 2026 Tim Carter
Vessel Sink Drain
A Vessel Sink Drain is Much Higher
I installed a stunning vessel sink two weeks ago at my son’s house. We’re in the homestretch of a large basement remodeling project. It’s fulfilling to see all of our hard work and planning pay off. My biggest thrill has been watching him soak up building knowledge like a bone-dry sponge. Ask my sweet, loving wife, and she’ll tell you that before our children were even a glint in our eyes, I had proclaimed that I wanted to help my kids build or remodel their own homes.
Vessel Sinks are Not New!
Vessel sinks are a fascinating throwback to the days of old. My wife and I were antique lovers and hunters before we were married. We accumulated all sorts of things from the late 1800s, including two solid-walnut breakdown wardrobes, a very old solid walnut drop-leaf table with tiger-stripe maple legs, and a solid-oak washstand complete with a water pitcher and wash basin.
You probably take your vanity and kitchen sinks for granted. Keep in mind indoor plumbing for the masses didn’t really exist until the late 1800s and early 1900s. There were no sinks in homes before this. You’d use a giant china wash basin or a crude bucket to wash your face!
You’d pour the warm or cold water into the giant basin or bowl. The next step would be you bending over the basin to then splash water up onto your face. The giant basin captured most, but not all, of the water.
A modern vessel sink is just a new and improved basin! Some are works of art. My son’s is solid brass. All of the modern vessel sinks have a hole in the bottom, allowing the water to flow into your plumbing system.
Vessel Sink Drain Problem
There are several very important things you need to consider should you decide you want a vessel sink. The biggest mistake I see is that they end up too high. Washing your hands can be awkward as you have to lift your hands up to get over the rim of the sink.
The good news is vanity cabinets are available in different heights to compensate for this. The best way to ensure your sink is the right height for you is to try to match the height of the sink you want to the height of a large kitchen mixing bowl. Take your mixing bowl and set it on your kitchen countertop. The odds are your countertop is about 36 inches above the finished floor. If you’re a tall person, that might be the right height. I’m not too tall, and that standard kitchen-countertop height! would be too tall for me.
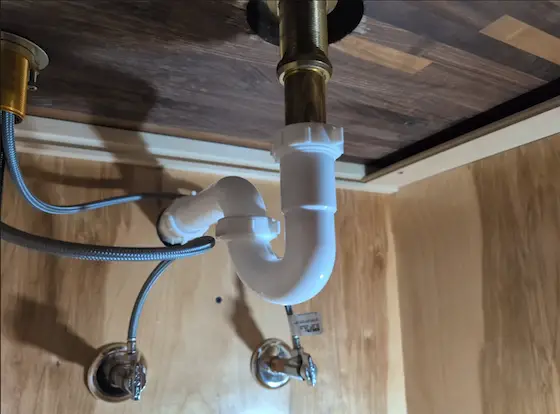
Look how high this vessel sink drain is. It exits the vanity cabinet just below the rear screw cleat! Copyright 2026 Tim Carter
The drain pipe that sticks out of the wall also needs to be much higher than normal. If you don’t do this, you end up with a tremendous amount of wasted space in the vanity cabinet. The plumber will have to install a very long tailpiece from the bottom of the sink to the P-trap. I ended up roughing in the drain pipe about 28 inches above the finished floor in my son’s basement. That’s almost 10 inches higher than normal.
The Faucet Must Be Special
You’ll have to have a special faucet that has a high arm that clears the top rim of the sink. You’ll discover it’s best to have a single-handle faucet. You should consider one that has a swivel faucet arm, as the valve handle will end up almost 90 degrees away from the direction of the faucet arm.
The length of the horizontal part of the faucet arm is also critical. It needs to be long enough to get well into the inner diameter of the vessel sink. If it’s too short, when you wash your hands, your hands will bump up against the rear wall of the sink. Water will splash out of the sink, creating a very big mess.
Don’t hope the countertop fabricator will get the location of the faucet hole right. It’s best for you to do a dry run using a piece of cardboard, your new vessel sink, and your faucet. Cut the cardboard to match what the actual size of the countertop will be. The next step is to set the vessel sink on the cardboard so the front of it is about 3 inches from the front edge.
Hold the faucet next to the sink, making sure you can operate the valve handle with ease. Make a mark on the cardboard where the center of the faucet hole should be. Cut the hole and see if everything is just how you want it.
It’s best to do this exercise with an inexpensive piece of 1/4-inch luan plywood. This way you can install the faucet as it will be in a real countertop. You must make sure the faucet has all the necessary clearances.
Column 1678

Tim built custom homes and did ultra-custom remodeling for 20+ years before launching his Ask the Builder media presence. He was selected as one of the Big 50 by Remodeling magazine in 1993. This award gave birth to Ask the Builder in October 1993. Tim also operates https://DrawPlumbingPlans.com. His @askthebuilder YouTube channel was the first home improvement channel on YouTube.