White Salt on Brick and 3 Ways
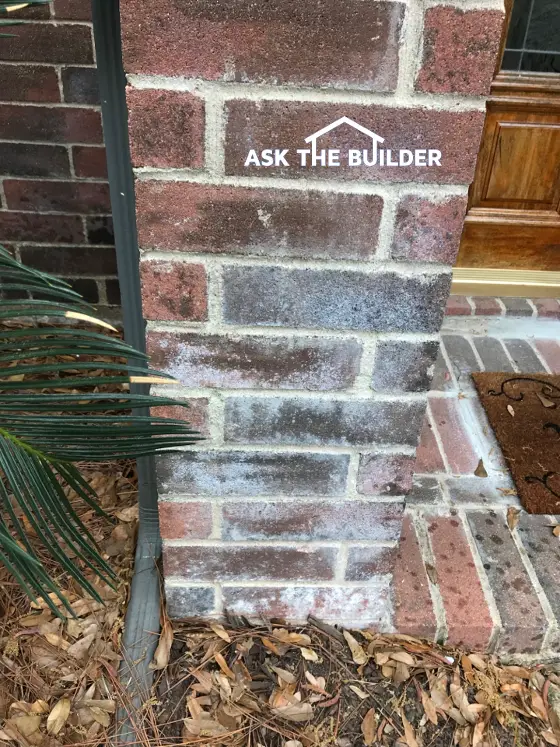
The white stains on Joel’s brick are water-soluble salts. Trying to clean them off with more water or acid is a MISTAKE. (C) Copyright 2018 Tim Carter
White Salt on Brick and 3 Ways
Question #1: Tim, I’ve got a mess on my brick home. I live in Houston, TX and have a sprinkler system for my lawn. The water sometimes gets sprayed on my brick exterior. White stains appear. I’ve tried scrubbing with water and a water/acid mix. Nothing is working. What’s going on and how do I stop it? - Joel
Answer #1: Joel’s problem is quite common. I even have the issue in my own garage in the winter months. He’s dealing with efflorescence.
Joel sent me three photos using the Ask Tim page on my website that allowed me to zero in on the exact problem. That old saying, “A picture is worth 1,000 words” is so very true. If you’ve got a problem at your home, by gosh I want to hear from you!
There are dissolved minerals in just about all drinking water. Some cities, towns, and wells have more than others. You might see white water stains on your drinking glasses or a dark countertop if a water drop dries.
The minerals can also be in Joel’s brick or the mortar in between the brick. Even if he poured pure distilled water on his brick, that water could soak into the brick and mortar, dissolve the salts and then bring them to the surface when the water evaporates.
The efflorescence on my garage floor is caused by snow and slush that contains rock salt used by my town in the winter to melt snow on the roads. This saltwater drips from the underside of my car and soaks into my garage floor concrete. As the water is drawn to the surface to evaporate the water goes into the air, but it leaves behind gorgeous fluffy salt crystals.
The only way to solve the problem is to stop getting the brick wet. When salts do appear, brush them off with a stiff brush while the brick is dry. Do NOT wet the salts. That just drives them back into the brick and mortar.
Question #2: Tim, I tried to be a hero at my house and now I’m a heel. I wanted to replace a dingy 3-way switch in our dining room with a new one. Now the light switching doesn’t work right. Sleeping on the couch is getting old. Help! - Rich
Answer #2: Ten years ago I taped a video showing how the wires are connected to a 3-way switch. It’s the most popular 3-way switch video in the world as it’s been watched over 1,293,393 times! You can watch this video on my AsktheBuilder website. CLICK HERE to watch the video.
The issue with the video is that it shows the wires with no drywall on the walls. That’s not too helpful to Rich or possibly you when you just see four wires poking from a hole in the wall!
Here’s how to get the switch working again. Be sure the current is off to the switch by turning off the power at the electric panel. Take small pieces of painters tape and put a little tab on the three wires that have insulation on them. The bare wire or one with green insulation is the ground wire. Connect that to the green grounding screw on the new switch and leave it there.
Number each of the tape tabs: 1, 2 and 3. Orient the new switch so the screw that’s painted black is pointing up and the two brass screws are aiming down to the floor. Keep the switch in this position the entire time.
Start to attach the numbered wires to the screws in a clockwise fashion as you face the front of the switch. The #1 wire should be on the black screw then the #2 wire should be on the screw down low and to the right with the #3 wire on the remaining screw to the left of the #2 wire.
Carefully turn the power on and see if the switch works right. You may have lucked out and got it right the first time. If not turn the power off again and start to play musical chairs with the wires. Put the #1 wire where the #2 wire was before. Put the #2 wire where the #3 wire was just before and finish up putting the #3 wire where the #1 wire was.
Turn the power back on and see if the switches work correctly. If not, you’re one step away from success! Turn the power off and do musical chairs one last time. Move the wires around the switch one last time just like you did before. I guarantee you it will work perfectly this time!
I’ve created a free downloadable document for you at my website. This document contains diagrams of how the wires should be connected each time to the new 3-way switch. It also contains links to both my 3-way and 4-way switch videos. The PDF document also has several great photos of efflorescence and a link to a video I recorded about efflorescence. You’ll also discover the best brush to use to remove efflorescence from brick or concrete.
Just go to: https://www.askthebuilder.com/b1241/ to get the free PDF document.
Tim built custom homes and did ultra-custom remodeling for 20+ years before launching his Ask the Builder media presence. He was selected as one of the Big 50 by Remodeling magazine in 1993. This award gave birth to Ask the Builder in October 1993. Tim also operates https://DrawPlumbingPlans.com. His @askthebuilder YouTube channel was the first home improvement channel on YouTube.