Level Sand and Gravel – Use a Transit or Laser Level
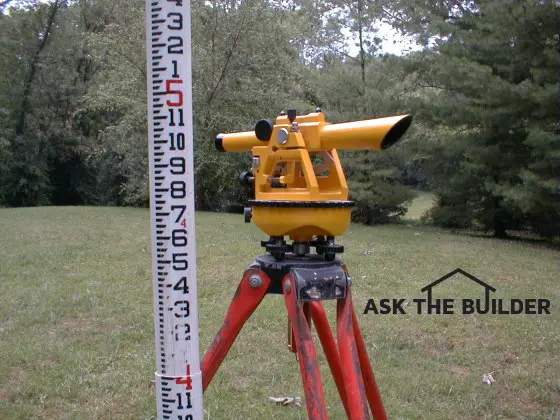
Level Sand and Gravel | This is my builders level and it has served me very well for nearly 30 years. It's highly accurate if you take the few moments and set it up properly. The fiberglass grade pole is leaning against the tripod and extends out to 14.5 feet. It is easy to operate both with just a ten-minute training session.
DEAR TIM: I am in the process of installing a brick patio around a pool. The brick needs to be placed on compacted gravel upon which I then place a two-inch-thick layer of sand. The sand must be smooth and even so the finish bricks look right. How in the world do I establish the proper heights for all of these materials? I need help picking the right tools and the right methods. Jose N., New Brunswick, NJ
DEAR JOSE: Oh gosh, I wish I could just come over and help do this. In the time I spend trying to explain it, I think you and I could have two or three jobs finished. Once you see how easy it can be, you'll be amazed. The methods work for just about any finished surface whether there is a pool nearby or not.
Optical or Laser Level - Which One?
An optical level is one you look through like you would a telescope. You see a crosshairs much like you see markings looking through a submarine periscope. You need two people to operate an optical level. The second person holds the grade pole. See below for what a grade pole is.
A laser level shoots out a laser light in the same plane. A sensor device on a grade pole emits a sound when the grade pole is at the right height. You can operate a laser level with one person. Watch this short video about how a laser level works:
What is a Good Laser Level?
Look at this one. I have one just like it. You'll need all you see in the photo to work alone. CLICK or TAP HERE to order one.
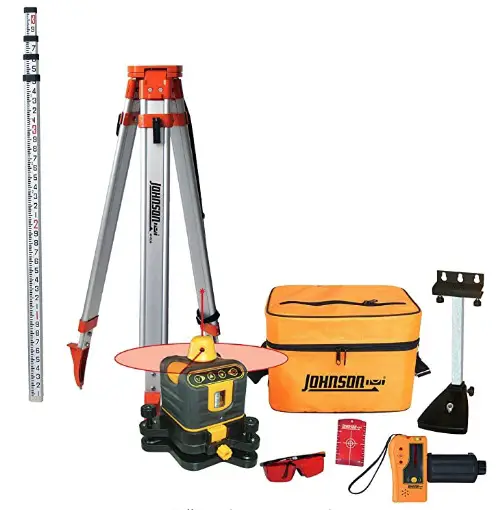
This is a fantastic kit for an outdoor laser level. You get all you need to work alone. CLICK on THE IMAGE to order one.
What is Finished Grade Height?
The first thing one must do is to establish the final finished surface height. In your case, you have this grade elevation. It is the finished edge or lip around the swimming pool. In the case of a regular patio or sidewalk, you might determine the finished surface by the surrounding ground or the relationship between the surface and nearby steps, decks or driveways.
Should the Finished Surface Slope for Drainage?
Yes, in almost all cases the finished surface should slope to drain water to the edges. A gentle slope of 1/8-inch per foot to many looks level to the naked eye.
The next thing you have to consider is any slope you want in the finished surface. Slope is good, as it allows rainwater and snow melt to run off the surface. I would think you would want water from the surface to absolutely drain away from your pool. Who wants debris-filled storm water running into the fresh, clean pool water? A gradual slope of one-eighth inch of drop per every two feet of run should be enough slope in most instances.
Where Should Grade Stakes Be Placed?
I prefer to establish grade stakes driven into the ground for reference points. The tops of these stakes represent the different heights you need to hit. For example, you need three different grade stake elevations: one for the height of the compacted gravel, one for the uncompacted sand and the final one for the finish brick at various points around the pool.
How Close Should Grade Stakes be Placed?
These stakes need to be placed perhaps eight feet on center, so that you can set a very straight piece of wood or perfectly straight metal straightedge on top of the stakes. If there is a gap under the wood or straightedge, this tells you that more material needs to be added. If too much material is placed, then the straightedge will not rest upon the tops of the stakes.
How Do You Know When You Have Enough Fill?
When you have the perfect amount of material in place, with respect to the given stakes, the surface will be perfectly smooth. You and a helper can check by rotating the straightedge, on top of any of the stakes, just as the hands of a watch or clock rotate around the dial. The network of stakes allows you to move the straightedge to different stakes to check that all points are in the same plane.
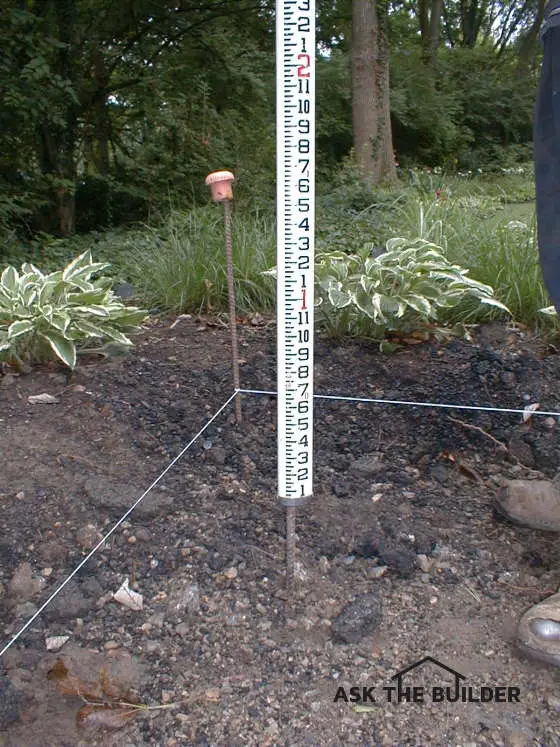
The bottom of the grade pole is resting on the top of a piece of rebar. The top of the rebar can represent any height that you determine. Once at the right height, you place the straightedge on top of it and any other grade stake at the same height.
Establishing the proper height of the stakes can be a challenge. I have used by trusty builders level or transit for years to do accomplish this goal. My level looks similar to the expensive transits that surveyors use, but all my instrument does is establish a level sight line as you look through it.
What is a Grade Pole?
A grade pole is a straight rod that has accurate measurements printed on it. By using a graduated grade pole on top of each stake, I can tell if the stake is level or in the same plane as all of the rest. My grade pole is simply a long vertical ruler that is marked in increments of one-quarter inch. The person looking through the builders level focuses on the grade pole markings to determine how high or low the top of a stake might be.
How Does a Grade Pole Work?
For example, once my instrument is set and level, I look through it. If the grade pole is resting on top of the pool edge and reads 4 feet 1 inch, then I need to make sure the top of the stake representing the finished brick produces a reading greater than 4 feet 1 inch. This greater amount is a function of the amount of slope I am trying to create at any given location. So if I am say 6 feet away from the pool edge, the reading looking through the transit might be 4 feet 1 and three eighths inch. Since the instrument is projecting a straight line as you look through it, any reading that gets bigger means the bottom of the grade pole is dropping.
You can often rent builders levels or laser leveling equipment at tool rental shops. The store manager should be able to give you a quick tutorial, just after you hand over your deposit. You will be amazed at how well these tools work, so long as you get them level before you use them.
Are All Grade Stakes at the Same Elevation?
No, in many cases the grade stakes are not at the same elevation. If you want a concrete slab or some other surface to be perfectly level, then the grade stakes should be at the same elevation.
Keep in mind, that not all grade stakes will always be at the same elevation. If the pool patio is not a consistent width around the pool, the grade stakes farther from the pool edge will be lower and lower as you continue to create fall as you move away from the pool edge.
It is always best to make a written plan of the grade stakes and confirm the mathematics. You can also string lines if the stakes are in line with one another. The string will prove if one stake is higher than an adjacent one. Of course the builders levels will do the same as long as you keep track of the different stake heights. See why I wanted to come over to help?
Jackie wrote about leveling her driveway. Read her story in the August 18, 2009 AsktheBuilder Newsletter.
Tim built custom homes and did ultra-custom remodeling for 20+ years before launching his Ask the Builder media presence. He was selected as one of the Big 50 by Remodeling magazine in 1993. This award gave birth to Ask the Builder in October 1993. Tim also operates https://DrawPlumbingPlans.com. His @askthebuilder YouTube channel was the first home improvement channel on YouTube.