Crown Molding Installation On A Sloped Ceiling
"Steeper sloped ceilings are problematic because the horizontal pieces of crown molding may not fit well against the wall or the sloped ceiling."
Crown Molding Sloped Ceiling - It's Not Easy
You may need to install crown molding on a slanted, sloped, or vaulted ceiling. I want to tell you right not it's not easy.
The slope of the ceiling can create all sorts of challenges for you.
Related Links
Cutting Crown Molding - Standard Basic Cuts
Crown Molding DVD - Tim Carter Shows You How!
Are There Different Methods?
Yes, you have multiple methods to chose from. The slope of your ceiling will determine which method works best for you.
Steeper sloped ceilings are problematic because the horizontal pieces of crown molding may not fit well against the wall or the sloped ceiling.
Free & Fast Bids
CLICK HERE to get FREE & FAST BIDS from local trim carpenters who can install your crown molding.
Is the Triangular Transition Piece Necessary?
No, it's not necessary to cut and use the complicated triangular piece. Standard 45-degree cuts can be used on a sloped ceiling.
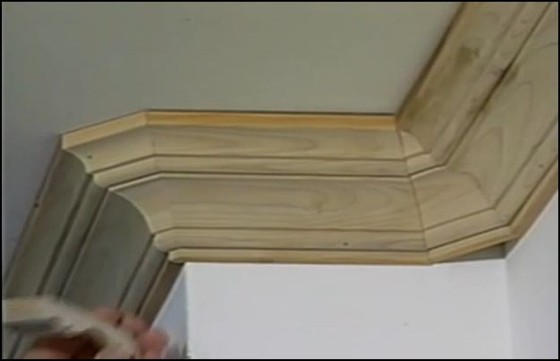
It's best to cut a standard inside corner template as you see in the video above. Use that to determine the exact low point of where the two pieces of crown will touch in the corner on the wall.
How Do You Cut the Triangular Transition Piece of Crown?
Watch the video below to get your head around how to cut the triangular piece of crown molding. You may like the look and choose to do the job this way.
The best way to do it is to make a small transition piece of crown molding that acts like the crown is being installed on a flat ceiling on one side of the piece, but on the other edge, it is making a transition as if the crown molding is climbing a stairway making the bend that happens as you transition from the sloped ceiling along the stairs to the flat ceiling below or at a flat landing.
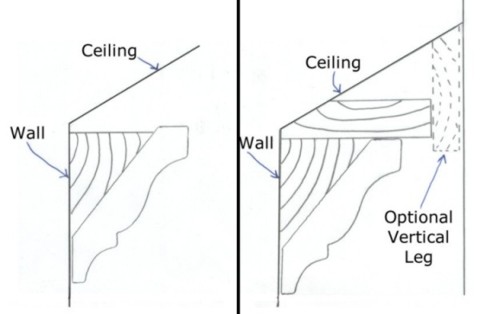
What About Adding Flat Stock to the Slope?
Yet another option - and it is much harder - is to make a flat area that simulates a traditional flat ceiling. This flat surface is created using regular lumber. The regular lumber can just extend out and above the crown molding or it can do that and actually return vertically to intersect the vaulted ceiling.
Either way, you better have some moderate to expert carpentry skills. These illustrations should help you visualize what you need to do to accomplish the task.
CLICK HERE to get FREE & FAST BIDS from local trim carpenters who can install your crown molding.
Would you like step-by-step photos and instructions that show you how I install crown molding anywhere in a home? If so, you might want my Instant Download Crown Molding eBook.
But, if you want to actually see me install crown molding in all the same places while watching an action-packed interactive DVD that was filmed in High Definition, then you may want my Crown Molding DVD.

Click here to watch a video on cutting crown molding the easy way.
This popular column was mentioned in the December 8, 2010 Newsletter.
Column B354
Tim built custom homes and did ultra-custom remodeling for 20+ years before launching his Ask the Builder media presence. He was selected as one of the Big 50 by Remodeling magazine in 1993. This award gave birth to Ask the Builder in October 1993. Tim also operates https://DrawPlumbingPlans.com. His @askthebuilder YouTube channel was the first home improvement channel on YouTube.

what about going all the way up to the ceiling
How to measure and cut crown molding for a vaulted ceiling?
Thanks
John,
Ask and you shall receive! I cover that EXACT situation in the DVD.
http://shop.askthebuilder.com/products/Crown-Molding-DVD-and-eBook-Combo.html
I have an 8 side tray with two sides 8', two sides 3' and 4 side 29". My problem is that the sides all slop.
How do I measure the angles to cut the crown molding?
does your video cover installing crown molding on a hip ceiling (maybe inverted hip ceiling) (ceiling is sloped from all 4 walls, with a flat rectangular flat portion in the center
How do you install crown molding on a beam where it meets the ceiling but the ceiling drops away at a steep downward pitch? The ceiling on the other side of the beam meets the beam at a 90 degree angle so no problem, but timing out the beam on the other side is the issue.