Backerboard Installation Around Tub
DEAR TIM: I embarked on a simple caulking repair around my bathtub that's now turned into a quest. While pulling out old caulk I discovered loose tile. After removing four rows of tile up from the top of the tub, I then was met by a crumbling wall surface behind the tile. I took out this material and have now installed new backerboard. The issue is the new backerboard is not flush with the old that's exposed just below the tile still on the wall. How do I remedy this situation? What would you do? Money is tight so please don't tell me to tear everything out and start over. That option is not on the wall so to speak. Tim D., Everett, MA
DEAR TIM: Oh, you've got a problem, but the good news it's not too terribly difficult to solve it. Before I tell you what I'd do, I feel it's mandatory to discuss backerboard. What you feel is backerboard might be something entirely different from what I consider backerboard.
I'm quite concerned that you don't really have a waterproof backerboard since you said it crumbled. Technically, you have a board that backing up tile, so I guess you can call it backerboard. My guess is that you might have some version of a water-resistant gypsum board behind your tile.
If that's the case, then there's a good chance that the tile you still have on the wall will eventually fail when the water that penetrates the grout between the tiles degrades the paper covering the gypsum core.
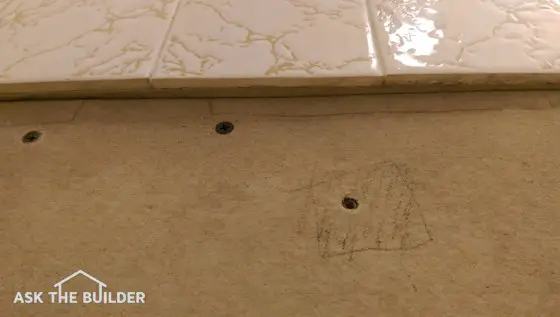
Here’s a low angle shot clearing showing the one piece of backer board is higher than the other. This must be corrected. Photo credit: Tim Dez
Let's talk for a moment about the old days. I feel obligated to do this so we have a base line of the ultimate backer behind ceramic tile. That would be concrete. Houses built in the decades just after WW II and just about all the ones built prior to the great conflict had ceramic wall and floor tile that was set on real concrete.
The master tile setters would install wire mesh on walls and then coat it with two coats of coarse sand concrete made with real Portland cement producing a smooth and plumb sandy surface that was perfect for the high-quality tile that loves to be set on surfaces in the same plane.
The best tile setters did the work so that the tile was set on the third day from the start of the job so the cement paste they used to set the tile chemically and mechanically bonded with the sandy concrete mix that had just been installed the day before.
This is why if you go into an older home like my father-in-law's, and others I remodeled the tile is still on the walls and the only way you're getting it off is with a 4, 8 or 16-pound hammer. Tile set this way can stay on walls for hundreds of years as long as the wood studs the metal lath is attached to doesn't rot.
When new construction surged for the Baby Boomer generation companies tried to create products that took the place of the labor-intensive concrete put on the walls and floors. Some manufacturers went for a water-resistant drywall or gypsum panel. I remember, as a very young builder, thinking this gypsum product was great. It wasn't.
Then a company started to produce sheets of sandy concrete that was the same thickness as drywall and could be nailed or screwed to the walls. This product is still made and it's as waterproof as the original concrete troweled onto the houses of old.
There are other gypsum-core products that claim to be waterproof and are easier to install than the sheets of concrete. You may want to look at these if your project scope increases.
Here's what you need to know about ceramic tile. It looks best if it's installed on surfaces that are flat and in the same plane. This means you might want to take down your backerboard and shim behind it before attaching it to the wall to ensure it's in the same plane as the piece you don't want to remove.
Your other option, and it requires greater skill, is to leave what you have on the wall and float a layer of cement mortar or tile thinset over the lower piece of backerboard so you fill this gap you've got between the two boards.
Realize that glazed ceramic tile will telegraph the slightest defect in the subsurface. Light will be reflected differently off any highly glazed tile that's not in the same plane as the one adjacent to it. Humps, dips or other defects in the backerboard will be as obvious as fireworks in the sky on the Fourth of July.
This is one reason it's a great idea to use metal studs any place you'll install wall tile in new construction or remodeling. These framing members are straight and true and any large sheet that's flat attached to the metal studs will produce a surface all in the same plane. Ceramic tile loves to be laid on surfaces like this and you'll have a much easier time installing the tile if you can make this happen.
I wish you the best of luck on the remainder of your ceramic tile journey!
Column 1078
4 Responses to Backerboard Installation Around Tub