Closet Organizers
Closet Organizers - Cubbie Closet Storage Plans
Closets, at least in my house, are the black holes that capture anything and everything. In just a matter of weeks or months there can be a big mess just behind the bulging door. To compound the matter, myself and many of my family members are pack rats. I contracted the disease from my mother, bless her heart! But I have started to solve the problem at my home the way I did it for years for some of my customers: simple closet organizers made from scrap plywood.
Factory Made Systems
You don't have to go to all the trouble to build your own setup if you don't want to. There are all sorts of companies that fabricate closet organizers and you can even buy factory made ones at most of the home centers and larger chain retailers. But the trouble with factory made units is that you get what they build and design. If you want custom sizing, you need to do it yourself or go with a local fabricator. Fabricated units made with melamine or laminate covered particle board can be very expensive. The price of larger setups may take your breath away.
Layout Tricks
Looking at the simple plan, the cut sheet requirements and the photos that are part of this bulletin will give you an idea of how to build this unit. The method I prefer to use incorporates mortise joints or grooves that can be found on some of the different parts. These mortise joints align the shelves and vertical dividers. They also make for solid connections between the parts so that you don't have to rely on mechanical fasteners such as nails or screws. The trouble is, it takes a router and a little layout skill to create these grooves. In fact, it is the most difficult part of the job. You don't have to do it, but it does aid, to some degree, the assembly of the closet cubbie system.
The trick to getting the grooves in all the correct places on the dividers is to make the marks at the same time on all of them. You can lay different dividers next to one another so that the two interior surfaces that face each other are aligned just like two pages in a book. When you open a book and lay it on a table the pages are flat but once the book closes they face one another.
Some Critical Measurements
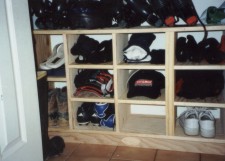
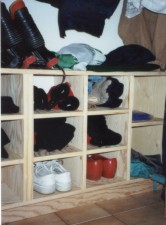
I used 3/4 inch thick plywood to make my cubbies. One of the reasons is that I like to create a 1/4 inch deep mortise groove. If I were to use just 1/2 inch thick plywood for my system this would cause huge problems when two grooves would be next to one another. There are several places where this happens. Look at the photos and see how several shelves are at the same level and they both connect to one vertical divider. You can use thinner wood and go with a more shallow mortise say 1/8 of an inch, but that is often impractical.
Knowing that you are going to have a 1/4 inch deep groove, you need to always keep this in mind as you measure. As I have noted in the Cut List, not all vertical dividers are the same length. The inner dividers are 1/2 inch longer than the end ones because they extend 1/4 inch into the top and bottom shelf.
Router Layout
I used a hand held router to create my mortises. You can buy a 3/4 inch wide router bit. A 1/4 inch deep groove can be made in one pass with the router. To keep the lines straight, I clamp a framing square to the wood piece and glide the router along the framing square edge. It works perfectly. The trick is to determine the offset. My router starts the cut 2.5 inches away from the outer ring of the router. Yours will be different! Do a test on a scrap piece of lumber to determine the offset.
Closet Cubbie Cut List
Below are the dimensions of some of the pieces I used to build my closet cubbie system. Keep in mind that the most critical pieces are actually the vertical dividers. The overall width of the unit will change depending upon your closet! But, you can have some excess space if you like at each end. I built mine so it fit almost perfectly within the total available width of the closet.
If you look at the photos, each inner vertical divider is 20 inches tall. The vertical piece at each end and in the middle where you see the extra wide cap molding are only 19.5 inches tall. Why? Because I wanted the top and bottom to overlap the sides. Keep in mind that I built two units and butted them together. The extra wide cap molding that hides the rough plywood edge hides this joint. So, each cubbie unit of mine has two vertical pieces of each height since there are four vertical pieces per unit. The top and bottom of each unit in my setup were simply 30 inches long. All pieces, including the small shelves, were the same depth -- 11 and 3/4 inches. I made them this size so I could confidently get four 8 foot long pieces of material out of each sheet of plywood.
Assembly
I assembled the units by building the outer shell first. I used three 2 inch long drywall screws at each corner. Remember, the top and bottom overlap the sides. Once the outer box was built I slid the two vertical dividers into position and used small 4d finish nails to hold them in position. The last things that are installed are the small shelves. I actually determined their width only after the unit was built. Since I wanted a tight fit for each shelf, I custom cut each one ONLY after the unit was assembled and I could get a crisp measurement at each shelf location. Precutting these shelves is a mistake in my opinion. It is safe to cut the top, bottom and vertical pieces since they work out. But if you don't have the depth of your mortise router bit just right, you may create a shelf that is too tight or too loose. You don't lose any time by cutting the shelves last.
Closet Cubbie Plans
Front View
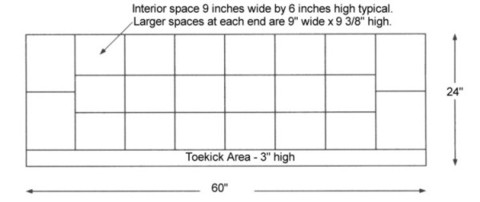
The beauty of this system is that you can make the interior spaces whatever you want. The only two limiting factors are the closet width and the height you wish to go. Keep in mind that I wanted to use the top of my setup as a shelf. Therefore, I kept it about 10 inches below were average coats hang from the closet rod.
Side View

The dashed lines are the horizontal shelves within the unit. I didn't show the dashed line for the shelf at each end that is actually centered between the top and the bottom of the unit.
The toe kick was just made out of scrap plywood. I felt that it would be better if the unit was not just sitting on the floor. I recessed the toe kick in from the front just about two inches. The closet cubbie ;unit just sits on the toe kick and is not permanently attached. The weight of the unit will easily hold the toe kick in place. The toe kick is just 3 inches high.
Related Articles: Shoe Storage, Adding Closet Storage Space, Two Closet Plans - Materials, Two Closet Plans - Build
Column B388