How To Replace Paneling With Drywall
Drywall Over Paneling TIPS
- Replacing paneling is hard
- Transforming paneling with paint is easy
- Do a test to prove it
- Test paint one wall in three hours
- CLICK HERE to Get Tim's FREE & FUNNY Newsletter!
DEAR TIM: My wife and I bought a 35-year-old home that has thin wood paneling in several rooms. We don't like the dark paneling and want to make the room lighter in appearance. We're thinking about drywalling the rooms, but the paneling is so much thinner than regular drywall.
If I install drywall, it will stick out past the door and window jambs. What can we do to solve this problem?
To add insult to injury, the height from the floor to the ceiling is 8 feet 8 inches. Should we cut 10 foot long pieces to fit and install them vertically? Is there some other option to make the room look great without all the work? Jeremy S., Green Bay, WI
DEAR JEREMY: I'll bet you were perplexed when you pulled off that first piece of paneling to see how thin it was. I remember that happening to me many years ago.
Stop! Options
The great news is that you have several options and I urge you to stop removing paneling immediately until you test at least one of my ideas. Since you've already considered removing the paneling, what I propose is not going to create problems.
In reality, I believe I can save you lots of sweet moola (money) and days and days of time.
Stain Solver Cleaner

Stain Solver is MADE in the USA with USA ingredients that are food-grade quality. CLICK THE IMAGE to order some NOW.
As crazy as this sounds I want you to clean one wall of the paneling with Stain Solver oxygen bleach, soap and water and rinse it with clear water.
The Stain Solver oxygen bleach will do an amazing job of removing any wax or polish previous homeowners may have applied to the paneling.
Stain Solver is Made in the USA with USA ingredients. It's certified organic. It's a fantastic de-greaser. You'll need this in case the paneling has an oil-based polish on it.
Paint Is Light
Your goal is to lighten up the room. You can achieve this without removing the paneling.
All you have to do is paint the paneling a nice off-white color.
Be sure the paneling is free of any wax or polish before you paint. If you don't do this, the paint will peel in the future.
Use a primer for bare wood. If you're using a new paint that says it contains the primer read the label to ensure it's made for bare wood.
Finish Paint Immediately
If you use a traditional primer, the label will tell you how soon you can apply the finish coat of paint. Follow those directions.
Assuming the primer is water-based, you can usually apply the finish paint within two hours.
Behold The Beauty
The purpose of painting this one wall as fast as possible is to do a proof of concept.
I think you and your wife are going to be quite surprised how good the painted paneling looks. To really get a good feel, I want you to move some of the furniture up to this wall and hang one or two pictures.
Vertical Lines Add
You may be shocked at how good this one painted paneling wall looks. The vertical lines in the paneling can add character and depth to the otherwise flat surface you'll get when you drywall.
Over the years on several jobs I did this for customers and each one was stunned by how good the painted paneling looked. They were originally going to remove it like you're thinking of doing.
Fill The Grooves
If the vertical lines or grooves in the paneling bother you or your wife, you can also fill them with spackling compound. It may take several attempts to get the cracks filled so they are perfectly even with the paneling, but it is far less time than you will spend installing and finishing the new drywall.
You can use a newer spackling that has paint primer built into it saving you a step I mention below.

Here's a pretty cool spackling compound. It's got paint primer built into it. This saves you time and money. CLCK THE IMAGE NOW TO ORDER THIS SPACKLING.
Special Bonding Primer
If you use spackling without a built-in primer, you must prime the paneling with a special clear bonding primer/sealer that will take care of both the texture difference between the smooth paneling and coarse spackling and the vast porosity differences between the two materials.
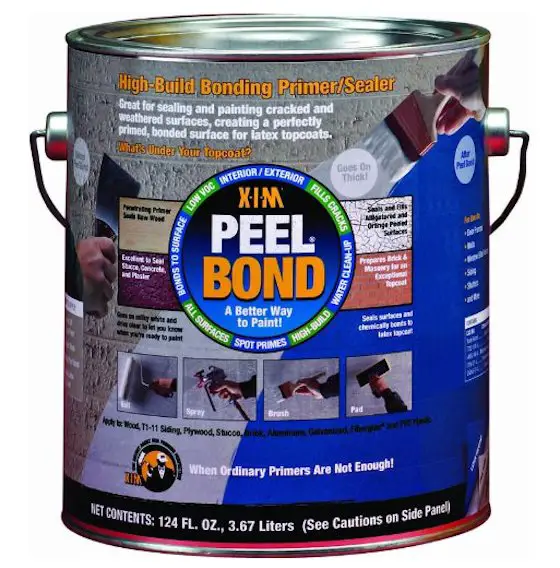
This is a great clear bonding primer. CLICK THE IMAGE NOW TO ORDER IT.
You apply this special bonding primer / sealer after you've filled the grooves and sanded them.
If you don't use this special primer/sealer, you may see the vertical lines even after the finish paint is applied.
Must Do Drywall
If you and your wife are stuck on drywall, then you need to choose the thickness you want and make adjustments to the jambs at each door and window after the drywall is installed.
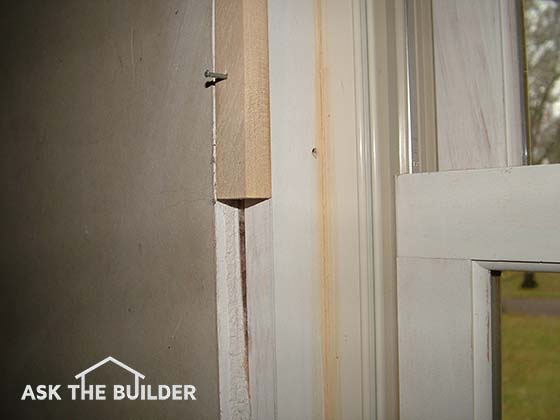
Look at the window jamb and notice how it is recessed from the face of the added drywall. The natural-colored wood strip with the finish nail has been added to extend the window jamb so it is flush with the drywall. The wood strip would normally continue all the way down to the window sill but was left short for this photo to illustrate why it needs to be added in the first place. ©2017 Tim Carter
I'd use drywall that is at least one-half inch thick and would seriously consider using 5/8 inch drywall on walls and ceilings where I want sound transmission to be minimal. Thicker drywall helps soundproof rooms.
9-Foot Ceilings
There's another distinct advantage to using one-half or 5/8 inch drywall. Both of these sizes are commonly available in stretch boards that are 54 inches wide instead of the normal 48 inch width.
These wider sheets will allow you to install the drywall horizontally since your ceiling is higher than 8 feet. Using the wider sized drywall allows you to have one continuous tapered seam all the way around the room.
There will be no need for the small troublesome ripper strip that would have been only 7 or 8 inches wide near the floor or ceiling.
Hang drywall the correct way. Learn the secrets to great drywall installation in this Drywall / Plaster Installation Checklist. I offer a 100% Money Back Guarantee.
Extension Jamb Hassle
Once the drywall is installed, you will need to add small pieces of finish lumber at all window and door jambs. White pine, poplar or other fine-grained lumber can be used with great success to make these small extension jambs.
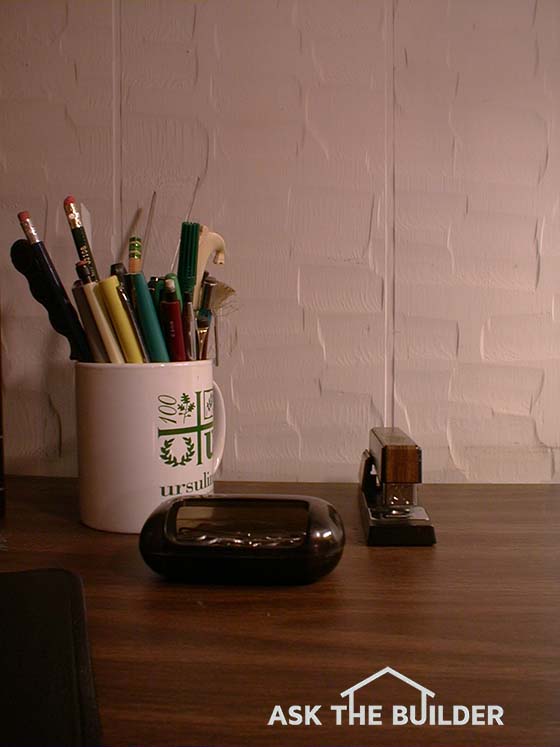
Check out how great this painted paneling looks! The entire room was painted in half a day. It would take days to add drywall and make all of the necessary carpentry changes for the drywall to work. PHOTO BY: Kathleen Connick with Tim Carter's camera
Try to make sure the added lumber sticks about 1/32nd of an inch past the finished surface of the drywall. This very slight offset will help you as you start to reinstall the exiting or new woodwork around each window and door.
Electric Box Code
You also need to be very observant around all electrical boxes. The electrical code is very specific about the distance between the edge of electrical boxes and the finished wall surface. The safest approach is to have the front edge of the electrical box flush with the finished surface of the wall.
But the code understands this can be tough to achieve and typically the maximum distance the box edge can be away from the finished wall is only 1/4 inch. But check with your local code authorities for the exact distance.
Extension Rings
If you plan to exceed this distance, you must either move the boxes so they comply with the code or you must add code-compliant extension rings. This is a very small detail, but an extremely important one.
Door Swing Issues
The extension jambs can cause small headaches around doors that pivot on traditional hinges. When a standard swing door is hung properly, the hinge is set so the door can swing back on itself and open a full 180 degrees.
But if you start to bring the finished wall surface out from the pivot point, the door starts to hit the wall before it opens 180 degrees. Usually you have to have the wall sticking out from the pivot point more than one-half inch for this to be a big problem.
Do The Test
As for painting paneling, you would be shocked how well it can look. A close friend of mine did this in her study and the look was stunning. The paneling in this room actually had a hand-hewn texture in addition to the vertical lines. Once the flat paint was applied to the paneling, the wall surface look much better than adjacent rooms that had smooth plaster. I was amazed at how nice the painted paneling looked.
Column 542
3 Responses to How To Replace Paneling With Drywall