Flashing a Deck
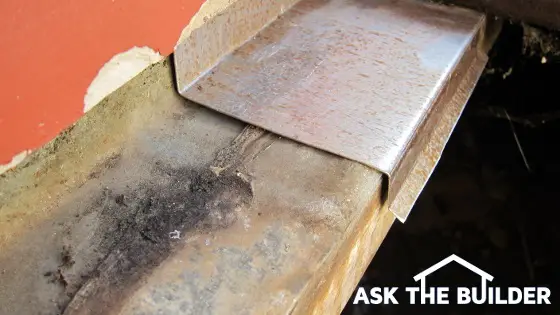
Flashing a Deck | The correct flashing with the proper profile is seen overlaying the inferior deck flashing that was installed by a nonprofessional. PHOTO CREDIT: Tim Carter
DEAR TIM: I need to install a deck ledger board against a house with wood lap siding. Soon I'll be doing the same on a brick home. What's the proper way to install flashing so I don't get any leaks where the ledger board connects to the house? My online research indicates this could be a serious problem. Something tells me that it's very important to get this right. Tony P., Waltham, MA
DEAR TONY: Your research is spot on. Leaks at or around deck ledger boards are a serious issue. A couple of years ago, a new home was being constructed next door to me. I was stunned when I saw the builder nail a deck ledger board directly to the side of the house. Not only was no flashing installed, the builder nailed, instead of through bolting, the board directly to the oriented strand board sheathing with no water membrane behind it.
It's a shame that many young carpenters, builders and homeowners don't connect the dots about how the exterior finishing material on a home - be it wood, brick, stone, vinyl, etc. - needs to act just like shingles on a roof. Traditional asphalt shingles keep you dry inside because one shingle overlaps another as they march up the roof.
A deck ledger board needs to do the same thing. It needs to be just one more component in a waterproof assembly on the side of a home. The trouble is, it takes some skill to make this happen.
In the case of your wood siding, it's not too tough. What's more, there are new flexible membrane flashings that may make the job easier for you. I'm a little concerned about these new materials. I'm a fan of metal because I know it will work and is much tougher than the membranes. Some of the membranes are sensitive to ultraviolet light, and may break down if they are exposed to sunlight. Be sure you read the product label about exposure to direct sunlight.
Stop and think about how wood lap siding works to keep your walls dry. Each piece above the one below overlaps so that water can't get behind each piece of siding. You need to use flashings to provide this same overlapping effect where the deck ledger board connects to the house.
Once you've cut away the siding at the deck ledger location, you install a metal or membrane flashing that overlaps the siding below the ledger board. This needs to overlap the siding at least as much as the wood siding did before you cut it away.
What's more, the metal flashing needs to be bent so the bottom 3/8 inch of the flashing is bent at a 30-degree angle so it doesn't touch the siding. This little kick out allows water flowing over the flashing to turn to droplets that fall to the ground. If you don't do this and the bottom of the flashing is in direct contact with the siding, capillary attraction can pull the water up so it leaks behind the siding.
opens in a new window This first piece of flashing needs to extend up at least 2 inches behind the deck ledger board. You then attach the ledger board to the wall using approved through bolts, not lag bolts. Drill the holes through the ledger board the exact same diameter as the shank of the bolt so it's a tight fit. Use a heavy rubber flat washer that will get sandwiched between the ledger board and the metal washer that's under the head of the bolt. Once the bolt is tightened, the rubber washer will produce a waterproof connection at each hole.
A secondary top flashing now needs to be installed over the top of the ledger board. This flashing needs to extend up at least 2 or 3 inches up under the siding above the deck. Keep in mind the bottom of the upper siding should be at least two inches above the flashing or the decking that's near the house. Never put horizontal siding in direct contact with any horizontal material.
This upper flashing must extend over the top of the ledger board, down the face of the ledger perhaps one-half inch and then kick out away from the front face of the ledger board. Bend the metal so it has the 30-degree angle so water turns to drops of the edge of the metal and is not pulled up by capillary attraction.
The top of the deck joists that connect to the ledger board has to have a minor fire cut put into the top corner of the joist where it connects to the ledger. This 45-degree cut does not weaken the joist at all and it prevents the joist from crushing the metal where you have bent it so it doesn't touch the ledger board. This first cut is mission critical.
This flashing method works for brick or stone homes as well. The only problem is that the upper flashing needs to be inserted into a mortar joint up on the brick above the ledger board. You'll have to use a chisel or a grinder to remove the mortar at least 3/4-inch deep.
I prefer to use 40-pound tin flashing for this work because it's easy to solder it when you need to install long lengths. You can't just overlap the metal and hope it won't leak. Where two pieces of flashing connect or overlap, you need to solder that joint to make one continuous piece of flashing.
Column 902