Foundation Drain Tile Installation

The builder is doing just about everything right installing this drain tile. The drain tile is the white pipe next to the footer. He should have 2 or 3 inches of gravel under the pipe. If the pipe has two rows of holes, they should point down in the 4 and 8-o'clock position. Finally, he should cover the drain tile with about 2 or 3 feet of gravel, not 3 inches like you see. He did put the pipe alongside the footer instead of on top and he's covered the gravel with tar paper, so it doesn't get clogged with silt from the backfill soil. Copyright 2017 Tim Carter
"The basement, before the house is built on top of it, looks just like the typical in-ground swimming pool. Once the house is built, this swimming pool gets covered."
Foundation Drain Tile Installation TIPS
- Use 4-inch white perforated pipe
- Cover with 2 feet of large, washed gravel
- Protect gravel with straw or tar paper
- Extend pipe to daylight - sumps suck
- CLICK HERE to Get Tim's FREE & FUNNY Newsletter!
Foundation drain tile systems are one of the most important aspects of residential construction if your home has a full basement or crawlspace.
Drain tile systems are also one of the most misunderstood parts of the average home - both by most uninformed builders and homeowners.
Related Links
Foundation Waterproofing Systems and Tips
Water Sitting Around Shallow Foundations
Free & Fast Bids
CLICK HERE to get FREE & FAST BIDS from local contractors who can install drainage tile.
Where Is Drain Tile Placed?
Drain tile is placed deep in the ground alongside the foundation footing.
Because these systems are usually deeply buried and cannot be easily modified or corrected, it's vitally important that they are installed correctly. Foundation drainage systems which are installed properly can serve a dual role.
Drain Tile Pipe Video
Watch this video to see the correct white PVC pipe to use and the orientation of the drain holes.
He doesn't show this pipe along a foundation but what you see are the first three steps of doing the job right.
Foundations Are Covered Swimming Pools
Many homes around the nation have full or partial basements. These basements are really reverse swimming pools.
The basement, before the house is built on top of it, looks just like the typical in-ground swimming pool. Once the house is built, this swimming pool gets covered.
But most people don't want water in their basements. Foundation drain tile systems are the means by which groundwater can be transported away from your basement. If you want a dry basement, you must have fantastic drain tile and waterproofing on the outside of the foundation.
CLICK HERE to get FREE & FAST BIDS from local foundation drainage experts.
Is There Water in Soil?
There is water in the soil. Thousands of gallons of water can be in the soil on your lot.
The water content in the soil surrounding your house can fluctuate seasonally. There's always a point at which you can dig and hit water. Geologists often refer to this as the water table.
This water table rises and falls in response to the amount of precipitation in any given time period. The water table in many parts of the country can rise to within a few feet of the surface during wet spells.
How Does Water Move Through Soil?
The water in the soil is moving all the time. In almost all cases, it moves down a few inches then it begins to move sideways. Gravity is pulling it to the oceans around the world.
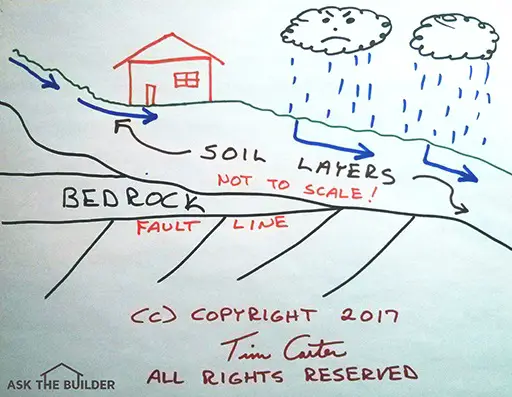
Here's a side view of a typical house. The black clouds release rain. It falls into the soil and starts to go down, but then sideways. The bedrock under the soil generally, but not always, follows the shape of the soil above it. Soil depths can vary from several feet to tens-of-feet thick. ©2017 Tim Carter
Most people think that the water in soil moves straight down but in reality, it moves sideways through the topsoil and upper layers of the B horizon of soil.
Almost all homes are built on some sort of slope, so if you have acres of land above your home, the water in the soil is all marching and flowing towards your house.
Does Water Take The Path Of Least Resistance?
Water will take the path of least resistance. It can choose to go sideways through a crack in your foundation, or it can go down alongside your foundation through clean, washed gravel into a pipe.
I'm sure that you will agree that it is a better idea for the water to go down the pipe.
How Many Parts are There to Drain Tile?
A foundation drain tile system has four main components:
- Drain tile pipe
- Gravel
- Gravel Protection
- Water outlet
All of these elements must be installed for the system to function properly.
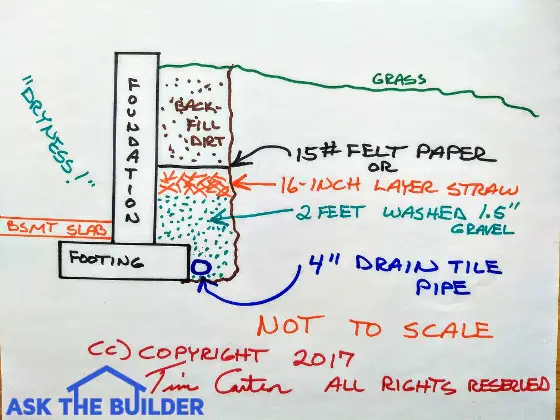
Here are three of the four parts of the system. The missing part is what happens with the round drain pipe. It will either extend sideways to daylight if the slope is steep around the house, or it will go under the footing to a sump pit in the basement or crawlspace. (c) 2017 Tim Carter
How Big is Drain Tile Pipe?
The drain tile or pipe is usually 4" in diameter and is perforated or has pre-drilled holes along its length. Depending upon the type, it can be purchased in rolls up to 250' or in 10-foot sections. Fittings are available to allow you to go around corners or interconnect the pipe.
I've never been a fan of the rolls of black corrugated drain tile with the slits in the cracks. I prefer the more rigid white plastic pipe with two rows of drainage holes drilled into the pipe.
CLICK HERE to get FREE & FAST BIDS from local foundation drainage experts.
How Much Gravel is Needed?
Install at least at least 2 or 3-foot thick layer of gravel over the drain tile. More is better.
The filter media or gravel is used to cover the drain tile. Water can flow readily through this gravel and find its way to the pipe.
One customer wanted me to ensure his room addition basement never had water in it. He was willing to pay to have the high-side foundation wall that pointed upslope filled completely with the nice rounded gravel.
There was no way water was going to ever try to force its way into his basement when it had the chance to go straight down to the drain-tile pipe.
Remember, water takes the path of least resistance. Some soils, heavy clays, resist water movement.
What Type and Size Gravel?
The gravel that is used most often is large 1 - 1 1/2" diameter washed rounded gravel. This gravel is about the size of a walnut or large grapes.
Some parts of the USA have crushed gravel this size. It's not rounded, but that really doesn't matter. All that matters is that you just put in this rock and no sandy gravel. Sand slows down the movement of the moving water.
If your soil is like this, the water would rather go sideways into your basement than down through the clay soil to the drain tile.
How Do You Protect the Gravel?
You must protect the gravel with a barrier. It prevents silt and mud from the soil from clogging the gravel or the drain tile pipe.
During excavation, dirt removed from the hole is fluffed. This means that it is disturbed and broken up.
It's volume usually increases about ten percent. It's loosened and disturbed more during backfilling procedures.
Does Gravity Compact the Backfill Dirt?
As the soil gets disturbed, small dirt particles, or silt, are created and separated. These are carried through the gravel by the rainwater or snowmelt which enters this soil.
Very few builders take the time to compact the soil around the outside of a house so Mother Nature does it using water and gravity.
Without a barrier of some type covering the clean gravel, these silt particles immediately clog the gravel and drain tile and render it useless.
IMPORTANT TIP: Most builders often do not install this barrier. It's a HUGE MISTAKE to eliminate it. Do NOT ALLOW them to tell you it's not needed. They're either ill-informed or lying to you.
What Material Covers the Gravel?
The materials commonly used to stop the silt from getting to the gravel are straw or tar paper.
If you use straw, just scatter a 16-inch layer on top of the gravel before you put in any soil on top of the gravel.
Tar paper is easy as you just cut the correct width and lay it on top of the gravel.
Where Does the Drain Tile Pipe End?
The water outlet is simply the place where the collected water flows to. It can be one of two places:
- Daylight - downslope from your home
- Sump Pit - inside a basement or crawlspace
If you build on a hillside, your drain tile will simply 'daylight' or come to the surface. This happens naturally because the drain tile pipe is installed nearly level and as the ground falls away from the house at some point the pipe will be visible.
This is the best situation because your system depends entirely on gravity to work.
Are Sump Pumps a Good Idea?
No, sump pumps are a bad idea.
If you build on level ground, you have to install a sump pit. A sump pit is usually installed inside the basement of your home.
The pit is nothing more than a buried plastic container that resembles a garbage can. It's large enough for a sump pump to rest at the bottom.
The drain tile pipe runs beneath the footer to this sump. The collected water is then mechanically pumped from the sump.
Do Sump Pumps Fail?
Yes, sump pumps stop working and the basement or crawlspace floods. They typically fail in big storms when there are extended power outages.
Sump pumps also fail because the float mechanism gets jammed or the pump burns up.
Dry Wells Don't Stay Dry
Some people say to extend the drain tile pipe to an underground dry well. A dry well is a large subterranean pit filled with gravel.
The drain tile pipe runs to this pit and the water fills this pit.
These pits work well only in places that have very open gravel soils. Not many places have this soil. In most places, the soil is dense clay and the dry well fills with water and the water then backs up against your foundation.
Should Drain Tile Be Next To the Footing?
Drain tile pipes work best when placed alongside a foundation footing, instead of on top of the footing.
By placing the pipe alongside the footing, you lower the water table below your basement floor another 6-8 inches.
When Should Drain Tile Be Installed?
In new construction, install the drain tile immediately after the footing forms are removed. Cover the pipe with gravel to a level flush with the top of the footer.
If you choose to wait until the foundation is poured, there will be less room to work in, the side walls of the excavation could cave in, or extra concrete from the foundation pour could fall into the hole and have to be removed. Believe me, it's faster and easier to install the drain tile pipe and the first layer of gravel without the foundation walls in the way.
Install Piping After Waterproofing
After the foundation walls have been waterproofed you begin step two. Backfill over the pipe with at least a three-foot-thick layer of gravel.
If you can afford it, backfill with gravel to within 18" of the finish grade. You must think long term. Remember, it will be virtually impossible to dig up and add gravel in the future when your basement is leaking. The extra money spent now is well worth it.
Once the gravel is in place, cover it with a 16-inch thick layer of straw or a single layer of 15# roofing felt paper. This barrier will prevent the silt from the backfill dirt from clogging the gravel and drain tile.
Extra Protection
To really ensure your basement or crawlspace stays dry, install a Linear French Drain around your home once it's built. I created a fantastic step-by-step Streaming Video showing you how to do this.

Do your own DIY install of a Linear French Drain with Tim Carter's time-tested methods and materials! CLICK IMAGE TO ORDER NOW!
CLICK HERE to get FREE & FAST BIDS from local foundation drainage experts.
Column B14

45 Responses to Foundation Drain Tile Installation