Foundation Drain Tile
DEAR TIM: I am building a new home in the mountains and would like to know the correct way to install a foundation drain tile. How much gravel goes under the perforated pipe?
Do I need the drain to slope? Does anything need to be installed over the gravel? Are there any other tips or secrets you can share?
Craig R., Spruce Pine, NC
DEAR CRAIG: Congratulations on your new home, and furthermore, for identifying one of the most important parts of the house. Controlling water alongside a foundation is vitally important. If the email I receive each week is a barometer of what is happening around the nation, many builders seem to fall down when it comes to foundation drain tile and what it takes to keep basements dry as a bone.
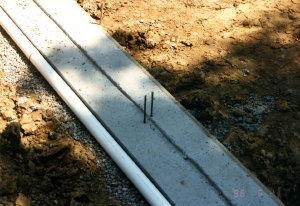
This is the drain tile at my own home. Note how the drain tile pipe is alongside the footer and the holes in the pipe are facing down. The pipe is also placed on a layer of clean gravel. PHOTO CREDIT: Tim Carter
Drainage issues around homes is important where you are building a slab home in the wet South or the dry Southwest. Drainage becomes critically important if you build in other areas of the nation where a crawlspace or full basement can be installed. In slab homes, you do not want water to pond around the outside of the house or under the slab. The holes created in the ground for crawlspaces and basements are really nothing more than covered swimming pools waiting for water from the ground to fill them.
Drain tile around the outside of a foundation acts as a piping system to collect and redirect the subsurface water that moves down into and through soil. On undeveloped land, this water is constantly on the move and eventually enters deep groundwater reservoirs or it exits the ground into springs, creeks, brooks and rivers. Houses and any other structure have a tendency to get in the way of this constant underground water movement.
Drain tile that is placed around a foundation needs to be a minimum of four-inches in diameter and the drain tile pipe must be perforated. I prefer pipe that has rows of holes rather than tiny slits. The large holes allows for easy water entry and small grains of sand or rock will not clog the openings. The rows of holes should point down, not up. This prevents the rounded gravel from clogging the holes as the pipe is being covered. What's more, if the holes point up, the water has to build up around the pipe before it can start to enter the holes.
It is my preference to place the drain tile pipe alongside the spread concrete footer that is below the actual foundation wall. Spread a two or three-inch thick layer of clean gravel on the soil, and then put the pipe next to the concrete footer. The pipe can be installed level around the footer and operate perfectly. Keep in mind that the water seeping into the level pipe will flow towards its outlet no matter how far away it is. The pipe does not need a slope for this movement to happen.

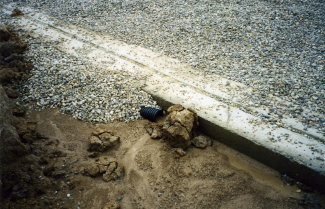
Here is a drain tile that runs inside a footer. I took this photo at a house someone else was building. Look how the pipe is already half-clogged with mud and the foundation has yet to be poured. It rained very hard just after the footing was poured and the builder did not slope the ground away from the excavated hole. PHOTO CREDIT: Tim Carter
The drain tile should exit the ground if the building lot has enough slope to allow this to happen. Many lots that are on hillsides are perfect for this. My own lot did not have enough natural fall, so I had to terminate my drain tile pipe in an interior sump pit. The water that is collected by the drain pipe enters the sump and a pump ejects it to the outside of the home. This water should be piped far away from the house to the lowest part of the lot. Allowing it to dump out alongside the foundation simply allows it to seep down once again to the drain tile only to be pumped over and over again.
The drain tile pipe should be covered with two or even three-feet of round, washed gavel. The more gravel you place over the pipe the better. The gravel must then be covered with a thick one-foot layer of straw, a layer of 30-pound felt paper or a geo-textile fabric. These coverings keep the gravel clean for many years. If you do not protect the gravel, the very small fluffed pieces of soil in the backfill dirt will be carried by rain water into the gravel and the draintile pipe. If the open spaces between individual pieces of gravel becomes clogged with this dirt, the foundation drain tile system will fail and water leaks into the basement or crawlspace become almost certain.
This large chunk of dirt must be removed before the drain tile can be installed. It is very important to get the drain tile installed before mud and dirt falls into the hole alongside the footer. PHOTO CREDIT: Tim Carter
To fully waterproof a foundation or crawlspace, you need more than foundation drain tile and gravel. The outside surfaces of the foundation must be covered with a true waterproofing membrane. There are rubberized asphalts, synthetic rubbers and other types of materials that work very well. Do not think that a thin layer of sprayed-on hot asphalt is waterproofing. That is almost always damp-proofing which simply stops the movement of water vapor into the foundation.
It is also a great idea to install washed gravel under the interior basement slab. Drain tile can also be placed inside the footer. Pipes can be placed under the footer in several locations that connect the outer drain tile to the inner drain tile. This system allows any water pressure that builds beneath the basement slab to be relieved by the drain tile outside the foundation. This water under the slab needs a clear pathway to the exterior drainage point or the interior sump pit.
Column 600

16 Responses to Foundation Drain Tile