How To Connect Cabinets
How to Connect Cabinets
- Correct tools are a must
- Ratchet or screw clamps, not squeeze
- Pilot hole and countersink bit needed
- Wall cabinets first
- CLICK HERE to Get Tim's FREE & FUNNY Newsletter!
DEAR TIM: I’m on a very tight budget and remodeling my kitchen by myself. I’m having great difficulty connecting my cabinets together. After numerous attempts, there are gaps in between the face frames and the front faces of the cabinets don’t line up.
What am I doing wrong? How can I get professional results? Also, what’s the best order to install cabinets, both wall and base cabinets? Amy M. Waterville, OH
DEAR AMY: Your question brought back strong flashback memories of my early days in the remodeling and building business.
CLICK HERE to get FREE & FAST BIDS from local finish carpenters who install cabinets.
My First Attempt
I clearly remember the first job I had installing kitchen cabinets. I was pulling my hair out having the exact same issues as you’re experiencing. Once I saw the face of the cabinet frames go out of alignment, I knew I had to do something different.
Then there was the time I split the cabinet frame because I failed to drill a pilot hole deep enough.
Oh, and then there was the time I snapped off a screw halfway because the pilot hole was too narrow and the dense oak wood frame won the battle of friction.
Only through trial and error did I finally develop a system that produced professional results every time.
No Clamp Syndrome
My guess is you’re having issues because you’re trying to hold the cabinets together with your hands as you drill the screw pilot holes through the edges of the face frames. No matter how hard you squeeze all seems well until you then drive the screw. As you tighten the screw, the cabinet face frames move out of alignment. Am I close?
Shavings - You Gotta Hate Them
To add insult to injury, my guess is you’re getting small shavings of wood from the drilling operation in between the cabinets. That makes it impossible to have a tight seam between the cabinet frames.
The only way to prevent shavings is to have the face frames be as tight as possible with no gap as you drill the pilot hole through the one frame and then into the adjacent cabinet frame.
The clamps never are removed until the screws are tight.
Ratchet Or Screw Clamps
The solution I’ve used for years are ratcheting squeeze clamps that have hard rubber pads that won’t harm the cabinets. These clamps, when installed properly, temporarily hold the cabinets together stronger than the grip of Ironman™! The best clamp I've ever used is the one you see in the photo below.
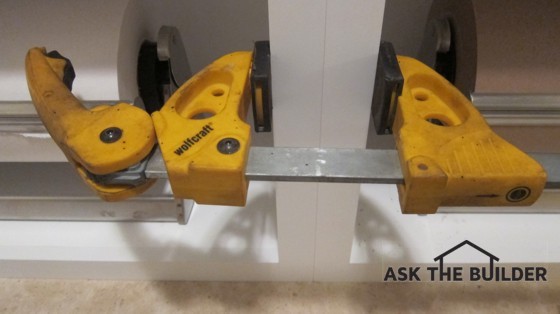
Using professional ratcheting squeeze clamps are a must if you want to expertly connect cabinets. © Copyright 2017 Tim Carter
It's got a unique cam on the rotating handle. You open the handle so it's in the same orientation as the long bar.
The next step is to adjust the jaws so they're pretty tight on the two things you want to clamp. You should have the two face frames as tight as possible at this point. You then rotate the handle and as you approach about 60 degrees, the clamp really begins to squeeze tightly.
If you can't locate a cam ratchet clamp, then go with the screw type but be sure you use a block of oak wood to protect the one face frame. You can crush the wood fibers if you don't spread out the pressure from the metal foot.

This is a screw-type clamp. These work really well too, but you need to protect the sides of the cabinet face frames from wood crush. Yes, you can screw them so tight you can crush the wood! CLICK THE IMAGE NOW TO BUY THIS SET OF FOUR. You may need more than four!
IMPORTANT TIP: Don't think that a simple squeeze clamp is going to work. Most of these clamps don't have enough squeeze power and leverage to do the job. The screw clamp or a ratchet clamp with a cam is the only way to go. I'm finding it increasingly difficult to find the cam-type ratchet clamps.
Shim Base Cabinets
It’s imperative you have the cabinets shimmed to the proper height before you start the connection process. The cabinet face frames need to be perfectly aligned and touching with no gaps before you apply clamping pressure. Expecting the clamps to make up for an out-of-level floor or a wavy wall is asking too much.
Two Or More
I use two clamps to squeeze the cabinet frames together. I then drill the screw pilot holes. I put a minimum of two screws in each one about 1.5 inches from the top and bottom of the face frame opening. Cabinets 24 inches or taller always get three screws connecting the face frames.
CLICK HERE to get FREE & FAST BIDS from local finish carpenters who install cabinets.
The Screws
I've had great success using 2.5-inch drywall screws to hold the cabinet face frames together. The bugle-shaped head of the drywall screw works perfectly with the countersink bit you read about in a moment. This provides lots of contact area for the head of the screw which is important.

This is a fine thread drywall screw. They work great. Be sure you drill a pilot hole that's 1/32 of an inch smaller than the diameter of this screw. CLICK THE IMAGE NOW TO ORDER THESE PERFECT SCREWS.
Countersink
Once the pilot holes are drilled, I create the countersink cavity for the screw head. Using my drill/driver or an impact driver I then install the screws. CLICK HERE to see the great impact driver I use to install cabinets.
After all that, I remove the clamps. If you do everything right, the cabinets are locked into position and the seam between the two cabinets should look superb.

Here's a marvelous set of countersink bits. You match the diameter of the bit to the head of the screw. CLICK THE IMAGE NOW TO ORDER THESE.
Wall Cabinets First
I’ve found it’s far easier installing wall cabinets first. You don’t have to reach over the base cabinets risking damage to them. Interestingly enough you’ll have other carpenters or builders tell you just the opposite. They prefer to put in the base cabinets first.
Hold Back
When I install wall cabinets that need to be screwed together, I don’t drive the screws holding them to the wall completely in. I want the cabinets to have a small amount of play in them so I can pull them together with the squeeze clamps.
Couple Cabinets
If you have plenty of muscle power or a few helpers you can also do what I’ve done for years. Screw the wall cabinets together on the ground - as many as you can safely lift - and then install the solid mass of cabinetry as one unit. This same trick can be done with base cabinets.
Screws Into Studs
You’ll have to have lots of help to do this and it really pays to do the math ahead of time as to drilling the holes in the back of the cabinets so the screws go into the center of wall studs or pre-installed solid blocking that’s hidden behind the drywall or plaster.
Be sure to use screws long enough to penetrate at least 1 and 1/2 inches into the wall studs. The weight of the cabinet and the items in the cabinets can be hundreds of pounds. Special screws like the ones just below are made for hanging wall cabinets.

These are the screws you use to mount the cabinets to the wall. Do NOT use these to screw cabinets together. CLICK THE IMAGE NOW TO ORDER THESE GREAT SCREWS.
Remove Doors
I also recommend removing cabinet doors, especially wall cabinets, when you’re trying to connect them. It’s mandatory if you need to screw together cabinets where the hinges connect to the face frames. The cabinet doors need to be out of the way for the squeeze clamps to grasp the cabinet face frames.
Removing the cabinet doors minimizes the chance of damage to them as you work. In the case of wall cabinets, it also decreases the weight of them as you lift them into place.
Practice Countersink
If you’ve never used a countersink bit to create the cavity for the screws, I beg you to practice. You want to discover the correct depth of the countersink hole so the screw head is flush with the inside edge of the face frame. It’s a precision task. If you drill to deep, the diameter of the countersink hole will be too large. Drill too shallow and the screw head will be proud of the cabinet frame.
CLICK HERE to get FREE & FAST BIDS from local finish carpenters who install cabinets.
Column 1024
4 Responses to How To Connect Cabinets